
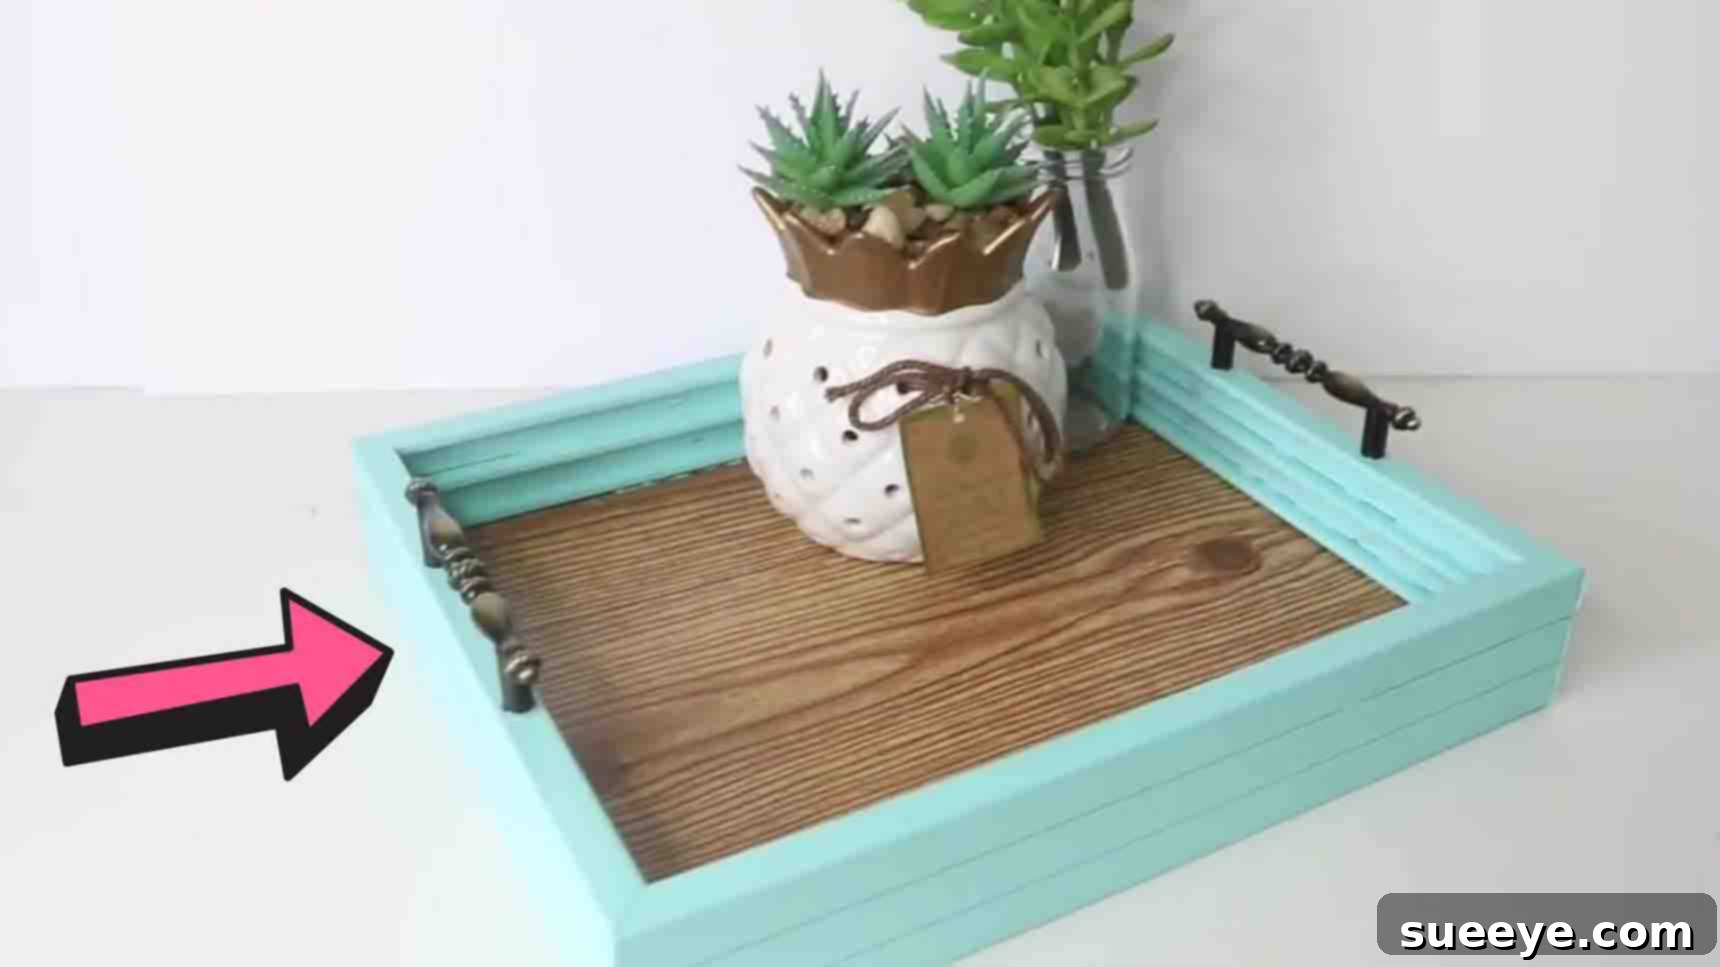
Are you dreaming of elegant home decor that won’t break the bank? It’s time to transform your space with a touch of DIY magic! We’ve got an irresistible project for you: an adorable and sophisticated DIY faux wood vanity tray inspired by the brilliant Jay Munee DIY on YouTube. Who says luxurious-looking pieces need to come with a hefty price tag? This incredible craft proves that stunning style is entirely achievable on a budget, using simple supplies primarily from your local Dollar Tree.
DIY Faux Wood Vanity Tray: Elevate Your Home Decor on a Dollar Tree Budget
Imagine a beautifully organized vanity, a charming coffee table accent, or a stylish entryway catch-all – all created by your own hands for just a few dollars. This project is not only super easy to make but also allows for incredible customization, ensuring your finished tray perfectly complements your existing decor. Forget overpriced boutique items; embrace the satisfaction of crafting a unique, high-end look without the high-end cost. Get ready to gather your materials and unleash your inner decorator as we guide you through creating this elegant faux wood tray step-by-step.
Why Choose This Dollar Tree DIY Vanity Tray Project?
In a world where home decor trends often come with steep price tags, the allure of DIY projects, especially those using Dollar Tree supplies, is stronger than ever. This faux wood vanity tray stands out for several compelling reasons:
- Unbeatable Affordability: The primary appeal lies in its cost-effectiveness. By utilizing items found at Dollar Tree, you can achieve a sophisticated piece for a fraction of the cost of similar retail items.
- Elegant Aesthetic: Despite the budget-friendly materials, the finished product exudes an elegant, high-end look. The faux wood peel and stick, combined with a sleek painted finish, mimics much more expensive trays.
- Beginner-Friendly: This project requires minimal crafting experience. The steps are straightforward, making it perfect for DIY novices and seasoned crafters alike.
- Customizable: From the choice of spray paint color to the pattern of the faux wood and the style of the handles, every element can be personalized to match your home’s aesthetic.
- Versatile Functionality: While designed as a vanity tray, its utility extends far beyond. It can serve as an organizer for jewelry, makeup, perfumes, remote controls, or even as a decorative centerpiece on a coffee table or dining room server.
- Sense of Accomplishment: There’s a unique satisfaction that comes from creating something beautiful and functional with your own hands. This project delivers that rewarding experience.
Materials You’ll Need: Crafting Elegance on a Budget
The beauty of this project lies in its simplicity and the accessibility of its materials. Most, if not all, items can be sourced from your local Dollar Tree, keeping your expenses delightfully low. Here’s a detailed list of what you’ll need, along with tips for selection:
- Three 8×10 Picture Frames: These form the core structure of your tray. Opt for frames that are simple in design, as you’ll be spray painting them. Ensure they are identical in size for a perfectly aligned finished product. Dollar Tree typically carries a good selection of basic black or white frames.
- E6000 Adhesive: This industrial-strength adhesive is crucial for securely bonding the glass pieces and the frame components. Its strong hold and quick-drying properties make it ideal for this project. Make sure to work in a well-ventilated area when using E6000.
- Spray Paint (Color of Your Choice): This is where you infuse your personal style. Choose a color that complements your home decor. Matte black, gold, silver, or a vibrant pop of color can all create stunning effects. Look for all-purpose spray paints that adhere well to plastic and metal, as your frames might have varying components.
- Peel and Stick Faux Wood Contact Paper: This ingenious material gives your tray its luxurious “wood” finish without the actual cost or effort of real wood. Dollar Tree often carries various patterns, including light wood, dark wood, and even distressed wood designs. Select a pattern that appeals to you and will provide enough coverage for your glass pieces.
- Cutter or Craft Knife: Essential for precise cutting of the faux wood contact paper. A sharp blade ensures clean edges and a professional finish. Safety first: always use a cutting mat underneath and exercise caution.
- Two Decorative Handles: These provide both functionality and a significant style upgrade. You can find a variety of handle styles at Dollar Tree, hardware stores, or craft shops. Consider small drawer pulls or cabinet handles. Look for handles that come with small screws for attachment or that can be securely glued if preferred.
Additional Recommended Tools & Supplies:
- Protective Gloves: When working with E6000 and spray paint.
- Newspaper or Drop Cloth: To protect your work surface during painting and gluing.
- Ruler or Measuring Tape: For accurate measurements of the contact paper.
- Pencil: For marking cutting lines on the contact paper.
- Microfiber Cloth or Paper Towels: For wiping away excess adhesive.
- Masking Tape (optional): To hold pieces in place while adhesive dries.
- Screwdriver (if using screw-in handles): To attach the handles securely.
Gathering all your materials beforehand will ensure a smooth and enjoyable crafting experience. Let’s get started on bringing this elegant tray to life!
Directions: Crafting Your Faux Wood Vanity Tray Step-by-Step
Step 1: Preparing and Assembling the Tray’s Foundation
The first step focuses on meticulously preparing your frames and assembling the core structure of your vanity tray. Precision and patience are key here, especially when working with adhesives and glass.
Begin by carefully taking apart all three of your 8×10 picture frames. Gently remove the backing, matting (if any), and most importantly, the glass panes. Set the glass pieces aside carefully, as these will form the surface of your tray. You will only be working with the glass and the empty frames themselves for this step.
Next, take the three glass pieces. Apply a thin, even bead of E6000 adhesive along one long edge of the first glass piece. Carefully align the second glass piece directly on top of the adhesive, ensuring the edges are perfectly flush. Gently press them together to create a secure bond. Repeat this process with the third glass piece, attaching it to the newly joined edge of the second piece. You should now have three glass panes securely glued side-by-side, forming a larger, rectangular glass surface. Wipe away any immediate excess E6000 with a damp cloth or paper towel, and then set the joined glass aside in a safe, flat place to begin drying. While E6000 offers an initial tack, a stronger bond forms over time, so ensure it’s undisturbed.
Now, turn your attention to the empty frames. You’ll notice small metal prongs or tabs on the back of each frame, designed to hold the backing and glass in place. For two of your frames, carefully remove these metal prongs entirely. You can use pliers or a flathead screwdriver for this. However, for the third frame, leave these metal prongs intact. This particular frame will serve as the base of your tray, and the prongs will be utilized later to secure the faux wood-covered glass.
Grab the frame where you left the prongs on. Flip it right side up so the front of the frame is facing you. This frame will be the very bottom layer of your tray. Now, apply a generous, continuous bead of E6000 adhesive along the entire top surface of this frame, focusing on the wider parts where the other frames will sit. Be liberal but avoid applying so much that it oozes excessively when pressed.
Carefully take one of the prong-removed frames and place it directly on top of the first frame, ensuring perfect alignment along all edges. Press down gently but firmly. Repeat this process with the third frame (also with prongs removed), stacking it directly on top of the second. All three frames should now be stacked and perfectly aligned, facing right side up. This creates a sturdy, multi-layered base for your tray.
Immediately after stacking, take a moment to meticulously wipe away any excess E6000 that may have squeezed out from between the frame layers. A clean, damp cloth or paper towel works best for this. Once clean, set the entire stacked frame structure aside in a safe, well-ventilated area, allowing it to dry undisturbed for a full 24 hours. This crucial drying period ensures a strong, lasting bond between the frame components.
Step 2: Adding the Faux Wood Finish, Paint, and Final Assembly
After the essential 24-hour drying period for your stacked frame base, it’s time for the exciting transformation. This step involves painting, applying the faux wood, and bringing all the components together for a stunning finish.
First, take your fully dried, stacked frame base outside or to a very well-ventilated area. Lay down newspaper or a drop cloth to protect your surroundings. Give your chosen spray paint can a good shake according to the manufacturer’s instructions. Holding the can about 8-12 inches away from the frame, apply a light, even coat of spray paint. Use sweeping motions to avoid drips and ensure consistent coverage. Don’t try to achieve full opacity in one go; multiple light coats are always better for a smooth, professional finish. Allow each coat to dry to the touch (usually 10-15 minutes, check your specific paint’s instructions) before applying the next. Continue this process until your frame is uniformly coated and you’re satisfied with the color depth. Once painted, allow the frame to cure fully, which might take several hours, again depending on your specific paint.
While your frame is drying, turn your attention back to your joined glass pieces. This is where the magic of the faux wood peel and stick contact paper comes in. Unroll your contact paper and carefully measure the exact dimensions of your combined glass surface. Using a ruler and a sharp cutter or craft knife, cut the faux wood contact paper to size. Precision here is key for a seamless look. Lay the glass piece flat on a clean, stable surface.
Carefully peel back a small section of the backing paper from one end of the faux wood sheet. Align this exposed adhesive edge with one end of your glass. Slowly and carefully, begin to press the contact paper onto the glass, gradually peeling back the backing paper as you go. Use a credit card, a smoothing tool, or your hand to smooth out any air bubbles as you apply, working from the center outwards to the edges. This technique helps ensure a smooth, bubble-free finish, giving it that authentic wood look. Once fully applied, trim any minuscule excess contact paper around the edges with your craft knife for a perfectly clean fit.
Once your painted frame is completely dry and cured, take it and flip it upside down. The metal prongs on the bottom frame should now be pointing upward. Carefully place the glass piece, with the faux wood side facing down, into the frame opening. The faux wood design should now be visible through the glass from what will be the top side of your tray. Ensure the glass sits snugly within the frame. If the fit is slightly loose, you can apply a thin line of E6000 along the inner edges of the frame before placing the glass, ensuring a firm, rattle-free fit.
With the glass in place, bend the metal prongs inward to secure the faux wood-covered glass firmly against the frame. This is why keeping those prongs on the bottom frame was essential! These prongs will hold your beautiful faux wood surface securely in place.
To finish your elegant tray, attach the two decorative handles on each side. Measure to ensure they are evenly spaced and centered. Depending on your handles, you might screw them in (if they come with screws and the frame material allows) or use E6000 for a strong adhesive bond. If gluing, apply a generous amount of E6000 to the base of each handle and firmly press them onto the sides of the tray. Allow ample drying time for the E6000, ideally another 24 hours, before putting any significant weight on the handles or moving the tray frequently.
And there you have it! A stunning, high-end looking faux wood vanity tray crafted with your own hands and on a budget. Now, place it in your desired spot and admire your beautiful, functional creation!
Customizing Your DIY Faux Wood Vanity Tray
The beauty of DIY projects lies in the freedom to personalize them to your heart’s content. While the core instructions provide a fantastic foundation, here are some ideas to make your faux wood vanity tray uniquely yours:
- Color Palette: Experiment with different spray paint colors. A classic gold or silver frame offers timeless elegance, while a vibrant teal or coral can add a pop of color to a neutral room. Consider a distressed look by lightly sanding areas after painting.
- Faux Wood Variety: Dollar Tree often carries different styles of peel and stick contact paper. Look for white washed wood, darker oak, or even marble patterns if you want to switch up the texture.
- Handle Styles: Handles are miniature jewelry for your tray. Explore different styles beyond what Dollar Tree offers. Vintage-inspired pulls from an antique store, sleek modern bars from a hardware store, or even unique knobs can dramatically change the tray’s character.
- Embellishments: Consider adding small decorative elements to the frame. Self-adhesive rhinestones, stenciled patterns, or delicate appliques can elevate the design.
- Lining the Bottom: To protect surfaces and add a luxurious feel, cut a piece of felt or cork sheet to fit the bottom of your tray and secure it with adhesive.
- Seasonal Themes: Create multiple trays for different seasons! A lighter wood and pastel frame for spring, a rich dark wood and metallic frame for fall, or a glittering silver frame for the holidays.
Caring for Your Handmade Vanity Tray
To ensure your beautiful DIY faux wood vanity tray remains a cherished piece in your home for years to come, proper care is essential. Thankfully, maintenance is straightforward:
- Gentle Cleaning: For routine dusting, simply use a soft, dry microfiber cloth. For smudges or spills, slightly dampen the cloth with water and a tiny drop of mild soap. Avoid harsh chemical cleaners, abrasive scrubbers, or excessive moisture, as these can damage the faux wood surface or the paint finish.
- Avoid Overloading: While the tray is sturdy, it’s designed for light decorative items, cosmetics, or small serving purposes. Avoid placing excessively heavy items on it to prevent stress on the adhesive bonds.
- Protect from Extreme Heat: Do not place hot items directly on the faux wood surface, as high temperatures could warp the contact paper or affect its adhesive.
- Handle with Care: When moving the tray, always lift it from the base rather than solely by the handles, especially if the handles are glued on.
Beyond the Vanity: Versatile Uses for Your DIY Tray
While designed as a “vanity tray,” this versatile piece of decor can find a home in almost any room, serving a multitude of purposes:
- Bedroom Organizer: The classic use! Keep perfumes, lotions, jewelry, and makeup neatly arranged on your dresser or nightstand.
- Coffee Table Centerpiece: Style your living room by using the tray to group candles, coasters, books, or small decorative figurines.
- Entryway Catch-All: Place it near your front door to hold keys, mail, sunglasses, and other essentials, keeping your entryway tidy.
- Bathroom Elegance: Organize hand towels, decorative soaps, or small plant pots on your bathroom counter.
- Kitchen Accent: Use it to hold salt and pepper shakers, oil and vinegar bottles, or a small fruit display.
- Office Desk Organizer: Keep pens, paper clips, sticky notes, and other office supplies neatly contained.
- Serving Tray (for dry items): While not food-safe for direct contact, it can be used to carry bottled beverages or wrapped snacks.
The possibilities are endless, limited only by your imagination!
Conclusion: Your Journey to Stylish, Affordable Home Decor Starts Here
In a world saturated with expensive home decor, this Dollar Tree DIY faux wood vanity tray offers a refreshing and empowering alternative. It’s a testament to the fact that style, elegance, and organization don’t have to come with a hefty price tag. With just a few affordable materials and a little bit of time, you can craft a functional and beautiful piece that rivals high-end boutique finds.
This project is more than just making a tray; it’s about embracing creativity, finding joy in crafting, and discovering the immense satisfaction of elevating your living space with your own hands. Whether you’re a seasoned DIY enthusiast or just starting your crafting journey, this project is accessible, rewarding, and offers endless possibilities for personalization. So, roll up your sleeves, gather your Dollar Tree treasures, and get ready to create a stunning piece that will not only organize your essentials but also spark joy every time you see it.
Don’t forget to watch the original video tutorial by Jay Munee DIY for visual guidance, and share your incredible creations with us! Happy crafting!