
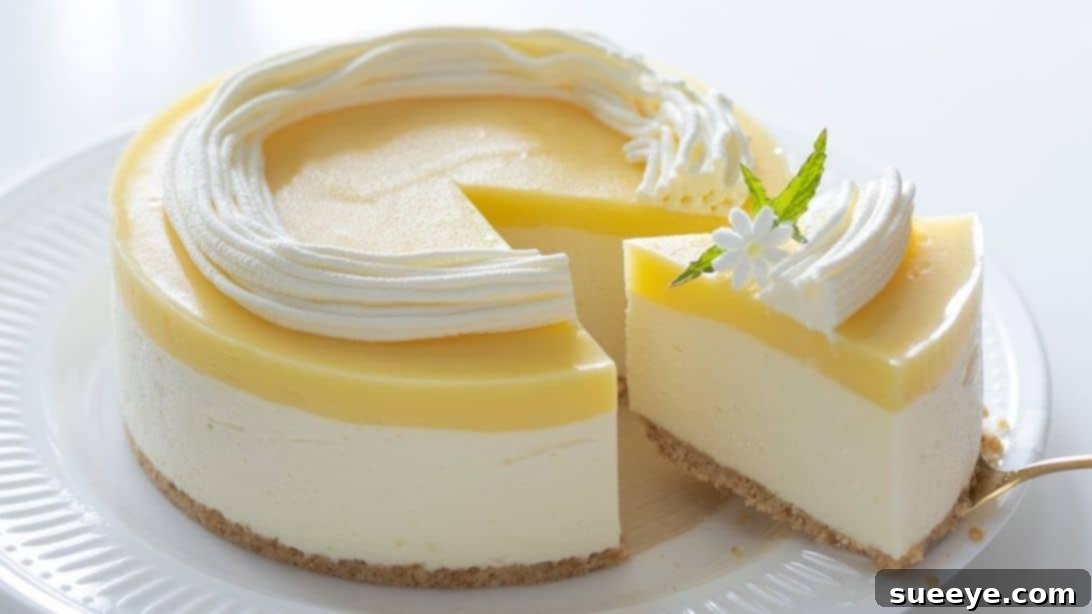
There’s nothing quite like the invigorating zest of lemon to brighten your day, especially when it’s perfectly balanced in a creamy, delightful dessert. Just recently, I had the pleasure of rediscovering this joy during a visit to my favorite cafe. While my usual order is a classic blueberry cheesecake, a new offering caught my eye: a stunning lemon cheesecake. As a devoted fan of all things lemon, I simply had to try it. The experience was absolutely sublime – a harmonious blend of tart and sweet, with an incredibly smooth texture that lingered in my memory for days. Imagine my sheer delight when I stumbled upon a tutorial by one of my absolute favorite YouTubers, HidaMari Cooking, featuring a no-bake lemon cheesecake recipe! Intrigued, I followed her detailed steps, and the result was astonishingly close to the cafe’s masterpiece. This recipe isn’t just a dessert; it’s a refreshing escape, surprisingly simple to create, and destined to become a staple in your culinary repertoire. If you’re searching for an effortless yet impressive dessert that truly shines, look no further than this luscious no-bake lemon cheesecake.
Effortless & Creamy No-Bake Lemon Cheesecake: Your Ultimate Tangy Delight
Forget the oven and say hello to simplicity with this incredible no-bake lemon cheesecake. Perfect for any occasion, especially when you crave something light, refreshing, and bursting with vibrant citrus flavor. This recipe combines a crisp, buttery cookie crust, a smooth and tangy rare cheesecake filling, a glistening, vibrant lemon curd layer, and a delicate mascarpone cream topping for a truly unforgettable dessert experience. It’s the ideal treat for summer gatherings, dinner parties, or simply a delightful indulgence any day of the week.
Why Choose a No-Bake Cheesecake? The Benefits of Oven-Free Perfection
No-bake cheesecakes offer a multitude of advantages that make them a fantastic choice for home bakers of all skill levels, from beginners to seasoned dessert enthusiasts. Firstly, the most obvious benefit is the complete absence of baking, which eliminates the common anxieties associated with baked cheesecakes, such as dreaded cracks, overbaking, or the fuss of a water bath. This makes the entire process significantly more forgiving and accessible to everyone.
Secondly, no-bake versions often boast a distinctively lighter, silkier, and incredibly creamy texture compared to their baked counterparts. This creates a melt-in-your-mouth sensation that is profoundly refreshing, making them particularly appealing during warmer months when the thought of turning on a hot oven is less than desirable. The delicate consistency allows the vibrant flavors, especially citrus notes like lemon, to truly shine without being dulled or altered by heat.
Furthermore, the preparation often involves fewer complex steps and relies primarily on refrigeration to set the layers beautifully. This means you can achieve a professional-looking and tasting dessert with minimal fuss and specialized equipment, allowing you to spend more time enjoying your culinary creation and less time stressing in the kitchen. For a stunning dessert that looks and tastes elaborate but is surprisingly simple to execute, a no-bake cheesecake is the perfect solution. It truly epitomizes effortless elegance in the world of desserts.
Ingredients You’ll Need for Your Tangy Masterpiece
Gathering your ingredients is the foundational step towards creating this culinary masterpiece. For optimal results, ensure all dairy products are at room temperature (unless otherwise specified) before you begin, as this helps achieve a perfectly smooth, lump-free mixture that incorporates beautifully.
For the Irresistible Cookie Crumb Base:
- 2.5 oz. (70g) Digestive biscuits, graham crackers, or your favorite plain cookies – These finely crushed cookies create a perfectly crumbly, buttery, and sturdy foundation for your cheesecake, providing a delightful textural contrast to the creamy filling.
- 1¼ tablespoon (20g) Unsalted butter, melted – The rich, melted butter acts as the binding agent, holding the cookie crumbs together to form a compact and delicious crust that won’t fall apart when sliced.
For the Velvety Rare Cheesecake Filling:
- 1 cup (200g) Full-fat cream cheese, softened at room temperature – This is the heart of your cheesecake, providing its characteristic richness, tang, and creamy body. Using full-fat ensures a luxuriously smooth texture.
- ¼ cup (50g) Mascarpone cheese, softened at room temperature – Adds an extra layer of decadent creaminess and a subtle, delicate sweetness that elevates the cheesecake’s flavor profile.
- ¼ cup (50g) Granulated sugar – Precisely sweetens the cheese mixture, striking a perfect balance with the tartness of the lemon.
- 2 tablespoons (30ml) Hot water – Essential for smoothly dissolving the bloomed gelatin, ensuring it incorporates seamlessly into the filling without any grainy texture.
- 0.17 oz. (5g) Gelatin sheet (approximately 2.5 sheets, or 1½ teaspoons unflavored gelatin powder bloomed in 2 tablespoons cold water) – This crucial setting agent gives the cheesecake its firm yet delicate, wobbly texture without the need for baking.
- ¾ cup (150ml) Heavy cream (at least 35% fat), well chilled – Whipped to soft peaks, it’s folded into the cheese mixture to create lightness, airiness, and that signature melt-in-your-mouth quality.
- 2½ teaspoons (10g) Granulated sugar – Added to the heavy cream as it’s whipped, enhancing its flavor and stability.
- 1 teaspoon (5ml) Fresh lemon juice – A vital addition for that bright, unmistakable, and refreshing lemon flavor that permeates the entire cheesecake base.
For the Zesty Lemon Curd Layer:
- 1 Large egg – Provides essential structure, richness, and emulsification to the curd, contributing to its smooth consistency.
- ¼ cup (50g) Granulated sugar – Sweetens the curd, expertly balancing the intense tartness of the fresh lemon juice.
- 3¼ tablespoons (50ml) Fresh lemon juice – The star ingredient of the curd, delivering an intense, vibrant citrus flavor and tartness.
- 3½ tablespoons (50g) Unsalted butter, cut into small cubes – Incorporated at the end, it adds a luxurious sheen, smooth texture, and richness, making the curd incredibly decadent.
- 0.07 oz. (2g) Gelatin sheet (approximately 1 sheet, or ½ teaspoon unflavored gelatin powder bloomed in 1 tablespoon cold water) – Ensures the lemon curd sets beautifully into a distinct, stable layer on top of the cheesecake.
- ¾ tablespoon (10ml) Hot water – Used to dissolve the bloomed gelatin for the lemon curd mixture.
For the Delicate Cheese Cream Topping:
- ¼ cup (50g) Mascarpone cheese, well chilled – Forms the creamy, stable base for the topping, offering a rich yet mild flavor.
- ½ cup (50ml) Heavy cream (at least 35% fat), well chilled – Whipped to create a light, airy, and pipeable cream that adorns the top of your cheesecake.
- 3 teaspoons (9g) Granulated sugar – Sweetens the topping to perfection, complementing the lemon flavors below.
Step-by-Step Guide to Your Lemon Cheesecake Masterpiece
Follow these detailed instructions carefully and with precision to achieve a flawless and exquisitely delicious no-bake lemon cheesecake. Patience during the chilling phases is paramount for a perfectly set dessert!
Step 1: Crafting the Cookie Crust and Preparing the Rare Cheesecake Base
Begin by preparing your sturdy and delicious cookie crust. Place your chosen cookies (digestive biscuits, graham crackers, or similar) inside a sturdy, sealable plastic bag. Using a rolling pin, the bottom of a heavy glass, or even a food processor, crush them thoroughly until they resemble fine, uniform crumbs. It’s important to ensure there are no large chunks remaining, as this will result in an uneven and potentially crumbly base. Once finely crushed, pour the measured melted unsalted butter into the bag with the crumbs. Seal the bag securely and mix diligently, massaging and squeezing until every single crumb is evenly coated with butter. This ensures a cohesive and well-structured crust.
Next, prepare your cake mold. Line the bottom of a 7-inch (18cm) round springform cake pan with a piece of parchment paper. This simple step will greatly assist in the effortless unmolding of your beautiful cheesecake later. Transfer the buttered cookie crumbs into the prepared mold. Using the back of a spoon, the bottom of a flat-bottomed glass, or your fingertips, spread the crumbs evenly across the base and press them down very firmly into a compact, level layer. The firmer you press, the less likely your crust is to crumble when sliced. Once pressed, place the mold in the refrigerator to chill and firm up while you prepare the rare cheesecake filling.
Now, let’s create the star of the show: the rare cheesecake filling. Take your gelatin sheets and place them in a bowl filled with ice-cold water. Allow them to soften, or “bloom,” for approximately 5-10 minutes. This crucial step is essential for the gelatin to dissolve properly later and achieve the desired setting power. In a large mixing bowl, combine the softened full-fat cream cheese and mascarpone cheese. Using a spatula or a hand mixer on low speed, gently break down the cheeses and fold them together until they are well combined, perfectly smooth, and free of any lumps. Gradually add the first measure of granulated sugar (¼ cup / 50g), mixing until it’s fully incorporated and the mixture appears light and fluffy. Set this creamy mixture aside.
Carefully retrieve the bloomed gelatin sheets from the ice water, gently squeezing out any excess water with your hands. Transfer these softened gelatin sheets to a small heatproof bowl containing the hot water (2 tablespoons / 30ml). Stir continuously until the gelatin has completely melted and the solution is translucent, with no visible granules. It is absolutely crucial that the gelatin is fully dissolved at this stage to avoid any unpleasant specks in your finished cheesecake. Slowly pour this dissolved gelatin mixture into your cream cheese and mascarpone mixture, folding and mixing well with a spatula to ensure it is evenly distributed throughout the entire batter. This step activates the setting process for your cheesecake.
For the airy texture of the rare cheesecake, prepare your heavy cream. Place a clean, large mixing bowl on top of another bowl filled with ice water – this technique helps keep the cream consistently cold, which is vital for it to whip up beautifully and maintain its volume. Pour in the well-chilled heavy cream and sprinkle in the second measure of granulated sugar (2½ teaspoons / 10g). Using a hand mixer, beat on medium-high speed until soft peaks form. Be very careful not to overbeat, as this can result in a grainy or curdled texture. Gently fold the whipped cream into the cheesecake mixture using a light hand and a spatula. Use sweeping motions to preserve the airiness and lightness you’ve just created. Finally, add the fresh lemon juice, straining it if necessary to remove any seeds or pulp, and stir until just combined. The mixture should be smooth, creamy, and pourable.
Retrieve your chilled cake mold with its firm cookie crust from the refrigerator. Carefully pour the cheesecake batter evenly over the crust. Gently spread the batter across the mold using your spatula or by lightly tilting the mold to ensure a uniform layer. Cover the mold tightly with plastic wrap to prevent any odors from the refrigerator from affecting its delicate flavor and to keep the surface smooth. Place it back in the refrigerator to cool and set for a minimum of 2 hours. This initial chill is absolutely vital for the cheesecake base to firm up properly, allowing subsequent layers to be added with ease.
Step 2: Preparing the Vibrant Lemon Curd Layer
While your rare cheesecake base is chilling and firming up, you can prepare the exquisite and vibrant lemon curd. Begin by blooming the second set of gelatin sheets (0.07 oz. / 2g) in a bowl of ice water, following the same procedure as before. Set them aside to soften.
In a separate heatproof bowl, crack and lightly beat the large egg. Add the granulated sugar (¼ cup / 50g) and continue to beat until the sugar is well combined and the mixture is pale yellow and slightly frothy. Pour this egg mixture through a fine-mesh sieve into a clean saucepan – this critical step removes any chalazae (the stringy bits of egg white) or small pieces of cooked egg that may have formed, ensuring a perfectly smooth and silky curd. Next, strain the fresh lemon juice into the same saucepan, followed by the cubed unsalted butter. Place the saucepan on a stove over medium-low heat. It is imperative to stir the ingredients continuously with a whisk or a heat-proof spatula. This constant stirring is crucial to prevent the egg from scrambling and to ensure the butter melts evenly and emulsifies into the mixture. Continue stirring patiently until the butter has completely melted and the mixture has noticeably thickened. The curd should be thick enough to coat the back of a spoon (a consistency referred to as “nappé”). Do not allow the curd to boil, as this will curdle the eggs and ruin the texture. Remove the saucepan from the heat immediately once the desired consistency is reached.
Retrieve the bloomed gelatin sheets from the ice water, thoroughly squeezing out any excess liquid. Transfer them to the small bowl with hot water (¾ tablespoon / 10ml) and stir until they are fully dissolved and translucent. Pour this dissolved gelatin mixture into the still-warm lemon curd, mixing thoroughly and quickly until it’s completely incorporated. This will give your curd its perfect, stable set.
Take your partially set cheesecake mold from the refrigerator. Carefully pour the warm lemon curd evenly over the chilled cheesecake base. Gently tilt the mold back and forth or use a spatula to ensure the curd spreads uniformly across the entire surface, creating a beautiful, even layer. Return the mold to the refrigerator and chill for at least 1 hour. This allows the lemon curd to set firmly, creating a distinct, tangy, and visually appealing layer.
Step 3: Whipping Up the Cheese Cream Topping and Final Assembly
For the luxurious and decorative topping, ensure your mascarpone cheese and heavy cream are both well chilled. Place a clean, large mixing bowl over another bowl filled with ice water – this continuous chilling will help the cream and mascarpone whip up and stabilize more effectively. Add the cold mascarpone cheese, chilled heavy cream, and the final measure of granulated sugar (3 teaspoons / 9g) into the top bowl. Using a hand mixer, beat the ingredients together on medium-high speed until the mixture becomes smooth, thick, and holds soft peaks. It’s crucial to be cautious not to overbeat, as mascarpone can curdle easily, leading to a grainy texture. The ideal texture should be creamy, stable, and perfectly pipeable.
Gently fold the whipped cheese cream a little bit with a spatula to ensure a uniform and silky consistency. Carefully transfer the cream into a piping bag fitted with your preferred decorative nozzle – a star tip or a round tip works wonderfully for this. Retrieve the fully chilled cheesecake from the refrigerator. Starting from the outer edge, begin piping decorative dollops, elegant rosettes, or a simple, swirling pattern onto the top of the cake. Continue piping until the entire surface is beautifully adorned with your creamy creation. Once decorated, cover the cheesecake loosely with plastic wrap to protect the delicate topping and return it to the refrigerator for a final, crucial chill of at least 5 hours, or ideally, overnight. This extended chilling period is absolutely essential for all the layers to fully set, for the flavors to meld perfectly, and to ensure a stable, easily sliceable cake.
Once the cheesecake has been thoroughly set and beautifully chilled, it’s time for the grand reveal and serving! To unmold, gently run a thin, warm knife or a small offset spatula around the inner edge of the springform pan before releasing the clasp. Carefully lift the cheesecake from the base and slide it onto your desired serving plate. Slowly and carefully remove the parchment paper from the bottom. Now for the artistic touch: garnish and design your masterpiece with fresh mint leaves, thin, delicate slices of lemon, vibrant edible flowers, or a sprinkle of finely grated lemon zest – whatever suits your aesthetic preference and complements the bright flavors. For clean, elegant, and professional-looking slices, warm a sharp knife under hot water, wipe it completely dry, and then make each cut. Repeat this precise process of warming and wiping the knife between every single slice to achieve pristine results. Serve immediately and savor every delicious, tangy, and wonderfully creamy bite of your homemade perfection.
Expert Tips for a Perfectly Smooth and Stable Cheesecake
- Room Temperature Ingredients are Key: Always ensure your cream cheese and mascarpone are softened to room temperature before you begin mixing. This is critical for achieving a lump-free, perfectly smooth, and easily blendable filling. Cold dairy is notoriously difficult to incorporate smoothly.
- Bloom Gelatin Correctly: For both the cheesecake filling and the lemon curd, always use ice-cold water for blooming gelatin sheets. This prevents them from dissolving prematurely and ensures proper hydration and activation. After blooming, make sure to squeeze out any excess water thoroughly before dissolving the gelatin in hot water.
- Don’t Overbeat Dairy: When whipping heavy cream (for the filling or topping) or the mascarpone topping, stop as soon as soft peaks form. Overbeating can quickly lead to a grainy texture, especially with delicate mascarpone, and can make your cream less stable.
- Gentle Folding Technique: When incorporating whipped cream into the cheese mixture, use a gentle folding technique with a spatula. This crucial step preserves the airiness and lightness of the cheesecake, contributing to its signature melt-in-your-mouth texture.
- Chill Time is Crucial: Patience is a virtue with no-bake cheesecakes! Do not rush the chilling process between layers or the final extended set. Each chilling period is absolutely essential for the cheesecake to firm up properly, making it easier to layer, unmold, and ensuring a stable, beautifully sliceable dessert. Rushing will result in a soft or collapsed cake.
- Achieve Clean Slices: For professional-looking, elegant slices, use a sharp, thin-bladed knife. Dip the knife in hot water, wipe it completely clean and dry, and then make each cut. Repeat this process for every single slice to prevent dragging crumbs or cream and achieve pristine edges.
- Fresh Lemon Juice: While bottled lemon juice can be used in a pinch, fresh lemon juice will always yield the brightest, most vibrant, and authentic lemon flavor for both the cheesecake and the curd.
Storage and Make-Ahead Options for Convenience
This no-bake lemon cheesecake is not only delicious but also an excellent make-ahead dessert, making it perfect for entertaining or enjoying over several days. Once fully set and chilled, cover the cheesecake loosely with plastic wrap or place it in an airtight container to protect its delicate texture and flavor. It will keep beautifully in the refrigerator for up to 3-4 days. In fact, many find that the flavors tend to deepen and meld even more beautifully after a day or two, making it an ideal dessert to prepare in advance of an event.
For longer storage, individual slices can be wrapped tightly in plastic wrap, then an additional layer of aluminum foil, and frozen for up to 1 month. To enjoy, simply thaw frozen slices overnight in the refrigerator before serving. This allows you to savor this delightful treat whenever a craving strikes.
Delicious Variations to Try and Personalize Your Cheesecake
While this classic lemon cheesecake is perfect as is, feel free to unleash your creativity and experiment with these delightful variations to personalize your dessert:
- Different Crusts: Explore alternative crust options! Swap out the digestive biscuits for shortbread cookies (for a richer, buttery crust), ginger snaps (for a spicy, warming kick that pairs wonderfully with lemon), or even a gluten-free cookie option for dietary needs.
- Berry Bliss: Elevate your cheesecake with fresh fruit! Garnish lavishly with fresh raspberries, blueberries, or thinly sliced strawberries for an added burst of color, complementary sweetness, and vibrant flavor. You can even gently swirl a spoonful of berry puree into the lemon curd layer for a beautiful marbled effect.
- Tropical Coconut Zest: Introduce a tropical twist by adding a tablespoon of finely shredded coconut to your cookie crust mixture. For an extra touch, sprinkle toasted coconut flakes on top of the finished cheesecake just before serving.
- Lime Lover’s Delight: For those who adore lime, simply replace all the lemon juice with fresh lime juice and incorporate finely grated lime zest for a vibrant, tangy key lime pie-inspired cheesecake. The process remains the same, but the flavor profile shifts beautifully.
- White Chocolate Swirl: For an added touch of decadence, melt a small amount of high-quality white chocolate and gently swirl it into the rare cheesecake batter before chilling, or drizzle it artistically over the set lemon curd layer.
Indulge in Homemade Perfection: Your New Favorite No-Bake Delight
This no-bake lemon cheesecake recipe, lovingly adapted and inspired by the culinary artistry of HidaMari Cooking, offers a simple yet profoundly rewarding path to an extraordinary dessert. Its bright, tangy lemon flavor, combined with an irresistibly creamy, smooth texture and a crisp, buttery cookie base, creates a symphony of tastes and sensations that is sure to impress and delight. Whether you’re a seasoned baker looking for a refreshing change or just starting your dessert journey, this recipe provides a foolproof way to impress your guests, celebrate a special occasion, or simply treat yourself to a moment of pure bliss. So, gather your ingredients, follow these detailed steps with confidence, and prepare to fall in love with your new favorite no-bake delight. Happy no-baking and enjoy every exquisite spoonful!
*These amazing images are all credited to HidaMari Cooking via YouTube. Check her other content and follow for more inspiring recipes and culinary tutorials!