
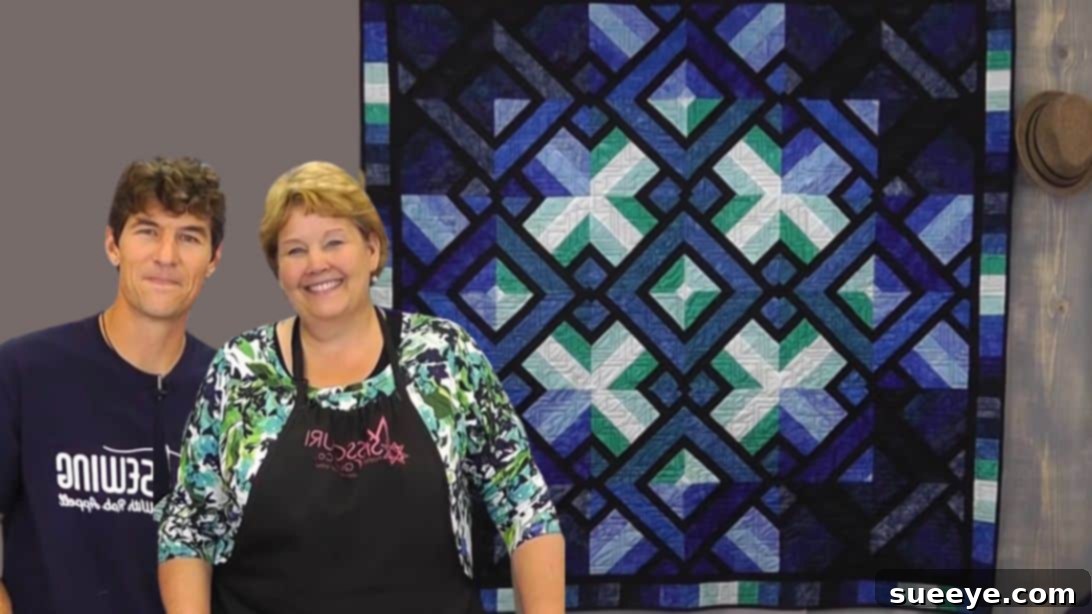
Embark on a quilting adventure that promises awe-inspiring results with surprisingly little effort. The “Three Dudes Quilt” is a design masterpiece that consistently captivates onlookers, making them believe it required countless hours of meticulous work. Yet, beneath its intricate appearance lies a remarkably simple sewing process, making it an absolute dream project for both seasoned quilters and enthusiastic beginners alike. When I first encountered this mesmerizing pattern, I was instantly charmed by its vibrant colors and dynamic layout. My initial thought was that such a complex-looking design would surely challenge even experienced quilters. Imagine my delightful surprise upon discovering just how straightforward the steps truly are, transforming what seemed like an advanced project into an accessible and rewarding craft.
This tutorial is your gateway to mastering an optical illusion quilt that will undoubtedly become a conversation piece. Perfect for those who crave a significant visual impact without the accompanying time commitment, the Three Dudes Quilt utilizes clever fabric placement to create its stunning depth and movement. It’s a testament to the fact that brilliant quilting doesn’t always equate to difficult techniques. Prepare to fool everyone with your newfound quilting prowess!
RELATED: Easy Flower Patchwork Block for Beginners: Your First Step into Patchwork Delights
Unveiling the Secret: The “Three Dudes Quilt” Phenomenon
If you’re on the hunt for your next captivating quilting endeavor, look no further than the ingenious “Three Dudes Quilt” design, masterfully presented by the creative minds at Man Sewing. In this exceptional tutorial, you’ll be guided by the collaborative expertise of Man Sewing and our beloved quilting icon, Jenny Doan from the Missouri Star Quilt Company. Their combined knowledge ensures a clear, encouraging, and highly effective learning experience.
The true genius behind this quilt’s spectacular visual appeal lies in a simple yet profound trick: the meticulous pre-selection and strategic placement of your fabric strips. To perfectly replicate the captivating depth and illusion evident in the finished quilt photographs, the key is to judiciously use lighter-colored fabrics for the central blocks and contrasting darker hues for the corner blocks. This thoughtful color arrangement isn’t just about aesthetics; it’s the very mechanism that creates the striking dimensional effect, making the pattern appear to recede and emerge, giving it that characteristic “three dudes” dynamic.
This method allows even those new to quilting to achieve professional-looking results. By understanding this core principle of color contrast and placement, you’re not just following a pattern; you’re learning a foundational design technique that can be applied to countless future quilting projects. Embrace the magic of color theory and watch your quilt blocks come alive, transforming simple fabric strips into a work of art that belies its straightforward construction.
For even more beginner-friendly and utterly delightful quilt projects to expand your skills, explore these fantastic resources:
- Beginner-Friendly Box Spring Quilt Tutorial: Comfort and Style Made Easy
- Honey Do Quilt Tutorial for Beginners: A Sweet and Simple Project
- Circle Quilt Block Tutorial for Beginners: Adding Curves to Your Quilting Journey
Essential Materials for Your Three Dudes Quilt
One of the beauties of the “Three Dudes Quilt” is its reliance on readily available and often pre-cut fabrics, significantly streamlining the preparation process. This project is perfectly suited for using a jelly roll, a popular quilting staple that provides a coordinated collection of 2 1/2-inch wide fabric strips, saving you valuable cutting time and ensuring a cohesive look. Alternatively, if you have a stash of assorted fabrics or prefer to curate your own color palette, you can simply cut your own 2 1/2-inch strips from yardage or even repurpose larger scraps. The magic truly happens when you combine these wider strips with narrower accents.
Here’s a detailed breakdown of what you’ll need to gather:
- 1 Jelly Roll Strips or Equivalent 2 1/2″ Strips: A standard jelly roll typically contains 40 strips, each 2 1/2 inches wide by 42 inches long. This will be the bulk of your quilt. If not using a jelly roll, aim for a variety of coordinated fabrics that you can cut into 2 1/2-inch strips. Remember the earlier tip about distinguishing light and dark colors for the illusion effect.
- 1 Roll of 1″ Strips (or cut your own): These narrower strips serve as crucial accent pieces, defining the larger blocks and enhancing the optical illusion. You’ll need enough to complement your 2 1/2-inch strips. Again, pre-cut rolls are convenient, but cutting your own 1-inch strips is perfectly acceptable. Consider a contrasting color for these thin strips to make them pop.
Beyond the Fabric: Essential Quilting Tools
While the fabric forms the heart of your quilt, having the right tools makes the entire process smoother, more accurate, and much more enjoyable. For any quilting project, especially one aiming for precise visual effects like the Three Dudes Quilt, these items are indispensable:
- Rotary Cutter: A sharp rotary cutter with a self-healing mat is invaluable for quickly and accurately cutting fabric strips and squares.
- Quilting Ruler: A clear acrylic quilting ruler (at least 6″ x 24″ is versatile) will be essential for precise measurements and straight cuts.
- Sewing Machine: A reliable sewing machine capable of a consistent 1/4-inch seam allowance is crucial.
- Matching Thread: High-quality polyester or cotton thread that blends with or complements your fabrics.
- Fabric Scissors: For snipping threads and any small cuts.
- Iron and Ironing Board: Absolutely vital for pressing seams flat at each stage, ensuring accuracy and a crisp finish.
- Pins or Fabric Clips: To hold fabric pieces together before sewing, preventing shifting.
- Seam Ripper: Every quilter needs one! It’s there for those inevitable moments when a stitch needs to be undone.
Gathering these materials and tools before you begin will ensure a seamless and satisfying quilting experience, allowing you to focus purely on the creative process of bringing your Three Dudes Quilt to life.
How to Make the Three Dudes Quilt: A Step-by-Step Guide
This section will walk you through each stage of constructing your impressive “Three Dudes Quilt.” Precision in cutting and sewing is key to achieving the optical illusion, so take your time and enjoy each step.
Step 1: Preparing Your Fabric Strips
Begin by carefully organizing your jelly roll strips. Most jelly rolls include multiple strips of the same color or tone. For this quilt, you will need to identify and select at least two strips of a similar light color for your main central blocks and separate them from the rest. The remaining strips, especially those with darker or more vibrant hues, can be set aside for later use as borders or for creating additional blocks, allowing for greater variety and a personalized touch. The distinction between light and dark fabrics at this initial stage is critical for the visual effect of the finished quilt, so choose thoughtfully.
Step 2: Assembling the Initial Strip Unit
Now, let’s create the foundational strip unit that will form the basis of your blocks. From your collection, select five pieces of 2 1/2″ strips and four pieces of 1″ strips. Arrange these strips in an alternating pattern, ensuring a visually balanced sequence. A typical arrangement might be 2.5″, 1″, 2.5″, 1″, 2.5″, 1″, 2.5″, 1″, 2.5″. Lay them out on your cutting mat or ironing board to visualize the order before sewing. Once satisfied with the arrangement, carefully sew all nine strips together lengthwise using a consistent 1/4″ seam allowance. Accuracy here is paramount, as an inconsistent seam allowance can distort your blocks. After sewing, take your strip unit to the ironing board and press all seams flat in one direction. Pressing is crucial for reducing bulk, ensuring your block lays flat, and making subsequent cuts and joins more precise. This completed strip unit is the core component from which your unique blocks will emerge.
Step 3: Creating Square Units from Your Strips
With your strip unit pressed flat, the next step is to transform it into perfect squares. Carefully measure the width of your freshly sewn strip unit. This measurement will determine the side length of your squares. For example, if your strip unit measures 9.5 inches wide, you will cut 9.5-inch squares from it. Using your rotary cutter and quilting ruler, begin cutting square units from the strip set. Ensure your cuts are perfectly perpendicular to the seams of the strip unit to maintain the integrity of the design. The precision of these squares is vital for the overall symmetry and illusion of the “Three Dudes Quilt,” as any inaccuracies can throw off the final pattern. Cut as many squares as possible from your assembled strip unit; these will become your primary quilt blocks.
Step 4: The Hourglass Block Transformation
This is where the magic truly unfolds, as you’ll turn two squares into four dynamic half-square triangles (HSTs) that form an hourglass block. Take two of your newly cut squares. Place them right sides together, ensuring all edges align perfectly. Now, here’s the crucial “rotation” element for the optical illusion: orient one square so that the strip lines run horizontally, and the other square so the strip lines run vertically, or simply rotate one square 90 degrees relative to the other. The goal is to create contrasting diagonal lines once cut. Using your sewing machine, sew a precise 1/4″ seam all the way around the outside edge of the joined squares. This creates a fabric ‘sandwich’ with seams on all four sides.
Once sewn, take your fabric sandwich and place it on your cutting mat. Using your quilting ruler and rotary cutter, make two diagonal cuts from corner to corner, creating an “X” shape across the square. You will now have four smaller triangle units. Carefully cut them apart. Each of these four units, once pressed, will open up to reveal a perfect hourglass block (or a block that can be trimmed into an hourglass block). Take each unit to your ironing board and carefully press the seams open or to one side. Pressing them open often helps reduce bulk at the center point. This technique will yield four identical (or nearly identical) blocks from two initial squares. Repeat this entire process for all your remaining pairs of squares until you have a collection of these captivating hourglass-style blocks.
Step 5: Arranging Your Quilt Blocks for the Illusion
Now comes the exciting part: arranging your newly formed hourglass blocks to reveal the stunning “Three Dudes” illusion. Lay out all your blocks on a design wall, the floor, or a large table. The key to this pattern is the strategic rotation of each block. Start by placing one block, then arrange the next block adjacent to it, rotating it precisely 90 degrees to create the desired flow and interaction between the strips. Continue this process, building your quilt top row by row and column by column, carefully observing how the dark and light strips interact to form the “dudes” or the illusion of depth. This step is like solving a puzzle; experiment with rotations until the distinctive pattern emerges clearly. Take your time during this arrangement phase, as it’s critical for the final visual impact of your quilt. The image below provides a visual guide for the correct arrangement.
Step 6: Assembling Your Quilt Top – Sewing Blocks into Rows
Once you are completely satisfied with your block arrangement, it’s time to stitch them together. Begin by sewing the blocks within each row. Take the first two blocks of a row, place them right sides together, aligning the edges and matching the seams as precisely as possible. Using your consistent 1/4″ seam allowance, sew them together. Continue adding blocks to this row until all blocks for that row are joined. Repeat this process for every row in your quilt top. After sewing each row, press the seams. For adjacent rows, it’s often helpful to press the seams of one row in one direction (e.g., to the left) and the seams of the next row in the opposite direction (e.g., to the right). This technique, known as “nesting seams,” helps the seams butt up against each other when you join the rows, reducing bulk and leading to perfectly aligned intersections.
Step 7: Joining the Rows to Form the Quilt Top
With all your rows individually sewn and pressed, the next step is to join them to create the complete quilt top. Place the first two rows right sides together. Carefully align the seams where the blocks meet, using pins to secure them in place at these critical intersections. Pins placed generously between intersections can also help keep the long edges aligned. Sew these two rows together with a 1/4″ seam allowance. Continue adding each subsequent row in the same manner, aligning seams and pinning before sewing. After each row is attached, press the new seam either open or to one side, maintaining consistency across your quilt top. This diligent attention to detail will ensure a flat, smooth quilt top that proudly displays the intricate Three Dudes pattern.
Step 8: Adding a Border (Optional but Recommended)
Adding a border not only frames your beautiful quilt top but can also help stabilize it and add to its overall size. You can use some of the remaining jelly roll strips that you set aside earlier, or choose new coordinating fabrics. To add a border, first measure the length of your quilt top through the center. Cut two border strips to this exact length and sew them to the opposite sides of your quilt top (e.g., left and right). Press the seams towards the border. Next, measure the width of your quilt top (including the newly added side borders). Cut two more border strips to this measurement and sew them to the remaining two sides (e.g., top and bottom). Press these seams towards the border. This method helps prevent wavy borders and ensures your quilt remains square. You can add multiple borders for a more elaborate frame if desired.
Step 9: Quilting and Finishing Your Masterpiece
Once your quilt top is complete and borders are attached, it’s time for the final stages. You’ll need batting (the fluffy middle layer) and backing fabric (the fabric for the back of the quilt). Create your quilt sandwich by layering the backing fabric (right side down), the batting, and then your quilt top (right side up). Baste these layers together using pins, basting spray, or thread basting to prevent shifting during quilting. Now, it’s time to quilt! You can choose straight-line quilting, free-motion quilting, or send it to a professional long-arm quilter. The quilting stitches hold all three layers together. After quilting, trim any excess batting and backing fabric, squaring up your quilt. The very last step is to add the binding, which is a fabric strip sewn around the edges of the quilt to give it a neat, durable finish. This final touch will complete your stunning Three Dudes Quilt, ready to be admired and cherished.
Tips for Quilting Success with the Three Dudes Pattern
To ensure your Three Dudes Quilt turns out as spectacular as you envision, keep these essential quilting tips in mind:
- Precision is Paramount: The optical illusion of this quilt heavily relies on accurate cutting and a consistent 1/4″ seam allowance. Take your time with each cut and sew slowly to maintain precision. Invest in a good rotary cutter, mat, and ruler.
- Press, Don’t Iron: When joining fabric pieces, always “press” your seams rather than “ironing” them. Pressing involves lifting and placing the iron, preventing fabric distortion. Press seams flat or to one side as indicated, usually towards the darker fabric to prevent shadowing.
- Color Contrast is Key: Revisit the initial advice on selecting light colors for the center and dark colors for the corners. This contrast is fundamental to creating the “three dudes” effect. Don’t be afraid to experiment with your jelly roll; hold fabrics up to see how they interact.
- Chain Piecing for Efficiency: When sewing multiple identical units (like the strip units or the perimeter seams in Step 4), consider chain piecing. This involves feeding one unit after another through your sewing machine without cutting the thread in between, saving time and thread.
- Stay Organized: With multiple blocks and strips, keeping everything organized is crucial. Use a design wall or simply lay out your blocks on the floor to visualize your layout before sewing. Label your rows if needed.
- Enjoy the Process: Quilting is a journey, not just a destination. Embrace any challenges as learning opportunities and celebrate each completed step. The joy of creating something beautiful by hand is incredibly rewarding.
Why You’ll Adore Your Handmade Three Dudes Quilt
Completing your “Three Dudes Quilt” isn’t just about finishing a project; it’s about creating a tangible piece of art that embodies creativity, patience, and skill. You’ll be amazed at how such a seemingly complex design came together with relatively simple techniques. This quilt is perfect for adding a vibrant touch to any room, draping over a couch, or adorning a bed. It also makes an incredibly thoughtful and cherished handmade gift for friends, family, or loved ones, offering a unique blend of visual intrigue and cozy comfort.
Beyond its aesthetic appeal, embarking on this quilting journey provides immense satisfaction. The process of selecting fabrics, meticulously cutting, precisely sewing, and finally seeing the striking pattern emerge is deeply rewarding. It’s a wonderful way to relax, focus your mind, and engage in a creative outlet that results in a beautiful, functional heirloom. So, gather your materials, follow these steps, and prepare to be utterly delighted by your very own “Three Dudes Quilt.” Share your creations with the quilting community and inspire others with your amazing work!
Watch the Full Three Dudes Quilt Video Tutorial
For a complete visual walkthrough of every step, including expert tips and demonstrations from Man Sewing and Jenny Doan, be sure to watch the full video tutorial. Seeing the techniques in action can greatly enhance your understanding and confidence as you create your own “Three Dudes Quilt.”