
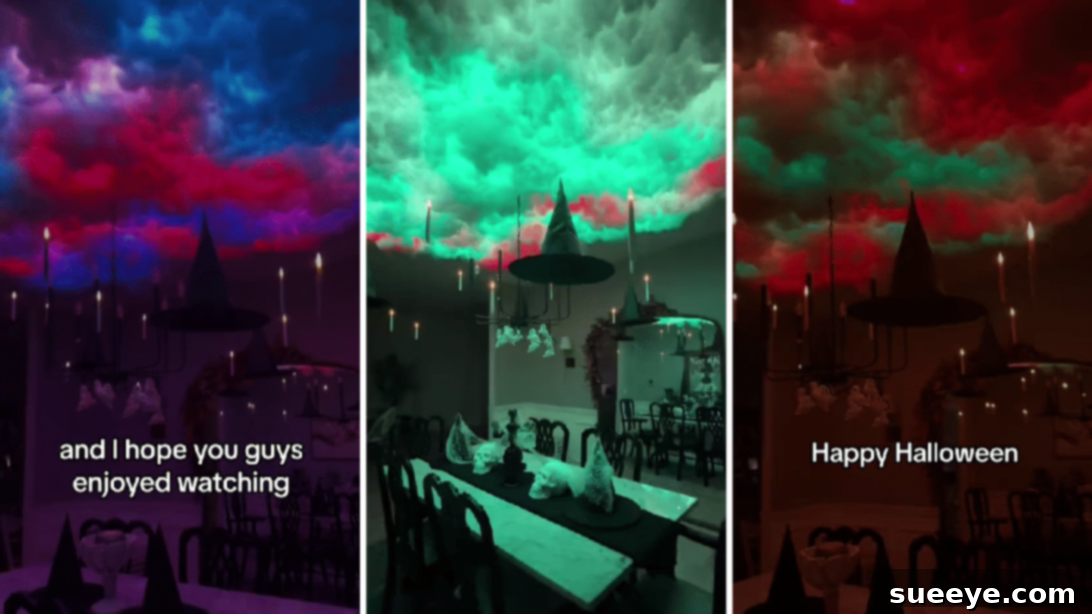
As Halloween approaches, the desire to transform our homes into captivating, spooky spectacles grows. This year, transcend traditional decorations and embark on a DIY project that promises to leave your entire neighborhood in awe: the Spooky Cloud Ceiling, a viral sensation championed by creators like melsysillustrations on TikTok. Imagine a mystical canopy of ethereal clouds, illuminated by dynamic LED lights, with an enchanting array of floating witch hats and candles suspended beneath. This isn’t just a decoration; it’s an immersive experience that perfectly captures the magic and mystery of the spooky season.
RELATED: Easy DIY Fake Fire & Witch Cauldron For Halloween
The allure of the spooky cloud ceiling lies in its ability to create a truly mesmerizing atmosphere with a relatively simple DIY approach. What might seem like an elaborate undertaking quickly reveals itself as an accessible and incredibly rewarding project. The visual impact upon completion is nothing short of breathtaking, transforming any room into a haunted, ethereal wonderland. Whether you’re aiming for a classic haunted house vibe, a mystical Harry Potter-inspired Great Hall, or simply a unique and unforgettable Halloween display, this DIY idea is your ticket to an extraordinary celebration. Gather your supplies, unleash your creativity, and prepare to craft a centerpiece that will be the talk of the town.
@melsysillustrations Spooky cloud ceiling tutorial! #cloudceiling #halloweendecor #spookyseason #harrypotterceiling #floatingcandles #floatingwitchhats #amazonhalloween #diyhalloweendecor
♬ Harry Potter’s Parody – 加藤(食物繊維)
Why a DIY Spooky Cloud Ceiling is Your Ultimate Halloween Project
In a world of mass-produced decorations, a DIY spooky cloud ceiling stands out as a unique and personal statement. This project offers an unparalleled opportunity to infuse your space with character and charm, creating an atmosphere that store-bought items simply cannot replicate. The “wow” factor is immense; guests will be captivated by the illusion of floating clouds, flickering candles, and hovering witch hats, making your Halloween gathering truly unforgettable.
Beyond its aesthetic appeal, this DIY project is surprisingly cost-effective. Many of the core materials can be found at dollar stores or craft shops, allowing you to achieve a high-end look without breaking the bank. It’s also an incredibly engaging activity, perfect for a family project or a fun crafting session with friends. The collaborative effort not only speeds up the process but also adds to the joy and memories of the spooky season.
The versatility of the spooky cloud ceiling is another significant advantage. While perfect for Halloween, the basic cloud structure can be adapted for various themes. Remove the spooky elements, and you have a whimsical cloud ceiling for a child’s room or a fantastical backdrop for a themed party. This adaptability ensures your effort isn’t just for one night but can bring joy and wonder on multiple occasions.
Essential Materials for Your Spooky Cloud Ceiling Project
Before diving into the creation process, gathering the right materials is crucial. Most of these items are readily available at craft stores, discount retailers, or online. Here’s what you’ll need to conjure your very own ethereal Halloween sky:
- Poster Board: This forms the essential base for your cloud structure, providing a stable surface to attach lights and fiberfill. Opt for sturdy, large sheets that can be cut to size, often found in black or white. The color isn’t critical as it will be covered.
- Velcro Strips: These are ideal for securely attaching the poster board to your ceiling without causing damage, especially if you’re renting. Choose strong, adhesive-backed strips for reliable hold. Command Strips can also serve as an excellent alternative for damage-free installation.
- LED Strip Lights: The magic of your cloud ceiling largely depends on its lighting. Look for LED strips with multiple color options and, ideally, a “lightning effect” or dynamic modes to enhance the spooky ambiance. Battery-operated options offer flexibility, while plug-in versions provide sustained brilliance. Ensure they are safe for indoor use and consider remote-controlled versions for ease of use.
- Floating Witch Hats: These iconic accessories add a whimsical yet eerie touch. Many come with loops or elastic for easy hanging. You can find them at Halloween specialty stores or online.
- Floating Candles: Battery-operated LED candles are perfect for creating the illusion of levitating flames without any fire hazard. Look for ones that come with clear fishing lines or can be easily modified for hanging.
- Poly-fil Fiberfill: This is the fluffy material that creates your clouds. You’ll need a substantial amount to achieve a full, voluminous look. Purchase several bags to ensure adequate coverage.
- Spray Adhesive: A strong, fast-drying spray adhesive is vital for attaching the fiberfill to the poster board and ceiling. Ensure you work in a well-ventilated area when using this product.
- Scissors: For cutting poster board, velcro, and any excess fiberfill.
- Gloves: Protect your hands from the spray adhesive and keep them clean while working with the fiberfill.
- Clear Fishing Line or Thread: While not explicitly listed, this is indispensable for hanging your floating witch hats and candles, making them appear to levitate.
- Step Stool or Ladder: Safety first! You’ll be working overhead, so a stable step stool or ladder is essential for reaching the ceiling comfortably and safely.
How to Make the Viral TikTok Spooky Cloud Ceiling: A Step-by-Step Guide
Creating this captivating Halloween display is a rewarding process that transforms your space. Follow these detailed steps to bring your spooky cloud ceiling to life:
Step 1: Preparing Your Poster Board Base
Begin by carefully measuring the area of your ceiling where you intend to install the cloud effect. If you have a chandelier or existing light fixture, you’ll want to cut a hole in the center of your poster board to accommodate it. This ensures a seamless integration of your fixture into the cloud design. Use your scissors to cut the poster board into manageable sections that can be easily handled and attached to the ceiling. Next, take your strong adhesive Velcro strips (or Command Strips for a less permanent solution). Cut these strips into smaller, evenly sized pieces and apply them strategically to the back of each poster board section. Ensure adequate spacing for a secure hold, focusing on the edges and center of each piece. This base will support the weight of your lights and fiberfill, so security is key.
Step 2: Installing the Base, Lights, and Hanging Elements
With your poster board sections prepared, it’s time to attach them to the ceiling. Press each section firmly into place, ensuring the Velcro adheres properly. Once the base is secure, it’s time for the lighting. Unroll your LED strip lights and begin attaching them to the poster board. You can create various patterns—wavy lines, spirals, or geometric shapes—depending on the desired effect. Aim for an even distribution of light across the entire area. Next, start hanging your floating witch hats and candles. Use clear fishing line or thread, attaching one end to the hat or candle and the other to the poster board or directly to the ceiling (if using removable hooks). Vary the lengths of the lines to create different heights, adding depth and dimension to your “floating” elements. Test the LED lights to ensure they function correctly and create the desired spooky ambiance before proceeding.
Step 3: Creating Your Ethereal Cloud Layers
Now for the most satisfying part: creating the clouds! Don a pair of gloves to protect your hands from the spray adhesive. Working in small sections, take a handful of poly-fil fiberfill and gently pull it apart to fluff it up, giving it an airy, cloud-like texture. With proper ventilation, spray a light, even layer of adhesive onto the poster board where you want to attach the fiberfill. Immediately press the fluffed fiberfill onto the sprayed area, gently molding it into cloud shapes. Don’t be afraid to overlap and layer the fiberfill to create volume and a more realistic, organic cloud appearance. Remember, irregularity adds to the natural look of clouds.
Step 4: The Grand Reveal and Finishing Touches
Continue the process of fluffing, spraying, and attaching fiberfill until you have covered the entire poster board base and achieved your desired cloud density. Step back periodically to assess your progress and make any adjustments to the cloud shapes. You want to ensure an even, full coverage that effectively conceals the poster board and LED strips, making the lights appear to glow from within the clouds. Once satisfied with your cloud formation, conduct a final check on all hanging hats and candles to ensure they are securely in place. Then, it’s time for the grand reveal: dim the room lights, switch on your LED strips, and watch as your room transforms into a magical, spooky wonderland. Experiment with different light settings to achieve various moods, from an eerie, slow flicker to a dramatic lightning effect. Enjoy the fruits of your labor and the enchanting atmosphere you’ve created!
Tips for a Flawless and Safe Spooky Cloud Ceiling
To ensure your DIY spooky cloud ceiling is both stunning and safe, consider these expert tips:
- Safety First: Always use a sturdy ladder or step stool when working overhead. Ensure proper ventilation when using spray adhesive to avoid inhaling fumes. While poly-fil fiberfill is generally safe, keep it away from open flames. Use only battery-operated LED lights and candles for fire safety.
- Plan Your Layout: Before applying anything, visualize or even sketch out where your poster board sections will go and how you want your LED lights to weave through the clouds. This helps prevent rework and ensures a cohesive design.
- Layer for Depth: Don’t just apply fiberfill in a single, flat layer. Gently pull apart the poly-fil to make it airy, then build up layers to create dimension and a more realistic, voluminous cloud effect.
- Even Lighting Distribution: When placing your LED strips, try to distribute them evenly within the area you plan to cover with clouds. This will ensure your entire cloud ceiling glows beautifully and uniformly.
- Vary Hanging Heights: For your floating witch hats and candles, experiment with different lengths of fishing line. Hanging them at various heights creates a dynamic, whimsical visual effect that enhances the illusion of floating.
- Test Lights Early: Before covering everything with fiberfill, switch on your LED lights to ensure they are working correctly and the chosen settings (colors, effects) are to your liking.
- Ventilation is Key: When applying spray adhesive, work in a well-ventilated room or open windows to allow fumes to dissipate quickly.
- Clean Removal: If using Velcro or Command Strips, removal should be relatively clean. For fiberfill, you might encounter some tiny remnants, but careful peeling should minimize residue.
Beyond Halloween: Creative Variations for Your Cloud Ceiling
While the spooky cloud ceiling is a Halloween showstopper, the basic concept offers incredible versatility for other occasions and permanent decor:
- Whimsical Nursery or Kids’ Room: Replace the spooky elements with soft, pastel LED lights and perhaps some hanging stars or paper moons for a dreamy, calming atmosphere in a child’s bedroom.
- Fantasy-Themed Parties: Adapt the cloud ceiling for birthday parties, baby showers, or any event with a fantasy, sky, or dream theme. Use different colored lights to match your party’s palette.
- Cosplay Backdrops: Create an immersive backdrop for photo shoots or themed events, perfect for cosplayers looking for a dramatic setting.
- Gaming Room Ambiance: Incorporate dynamic RGB LED lights for an immersive gaming environment that reacts to sound or game actions, adding a futuristic touch.
- Magical Reading Nook: Soft, warm LED lights within a cloud ceiling can create an incredibly cozy and enchanting reading space, perfect for escaping into a good book.
The core technique remains the same, but by swapping out the accessories and changing the LED light colors, you can transform the ambiance to suit any theme or mood. This makes your investment in time and materials extend far beyond a single holiday.
*These amazing images are all credited to melsysillustrations via TikTok. Check her other content and follow for more inspiring DIY ideas!
Viral TikTok DIY Spooky Cloud Ceiling: Your Halloween Masterpiece Awaits
The viral TikTok Spooky Cloud Ceiling is more than just a decoration; it’s an opportunity to unleash your creativity and craft an unforgettable experience for Halloween. The sheer delight and wonder this project brings, especially when the lights dim and the ethereal glow takes over, are incredibly rewarding. With readily available materials and a straightforward process, anyone can achieve this stunning effect, transforming a mundane ceiling into a canvas of spooky artistry.
So, why settle for ordinary Halloween decor when you can create something truly extraordinary? Embrace the spirit of DIY, follow this comprehensive guide, and prepare to enchant your family and friends with a masterpiece straight out of a whimsical nightmare. Your magnificent spooky cloud ceiling will not only impress but will also serve as a testament to your imaginative spirit, making this Halloween the most magical one yet.