
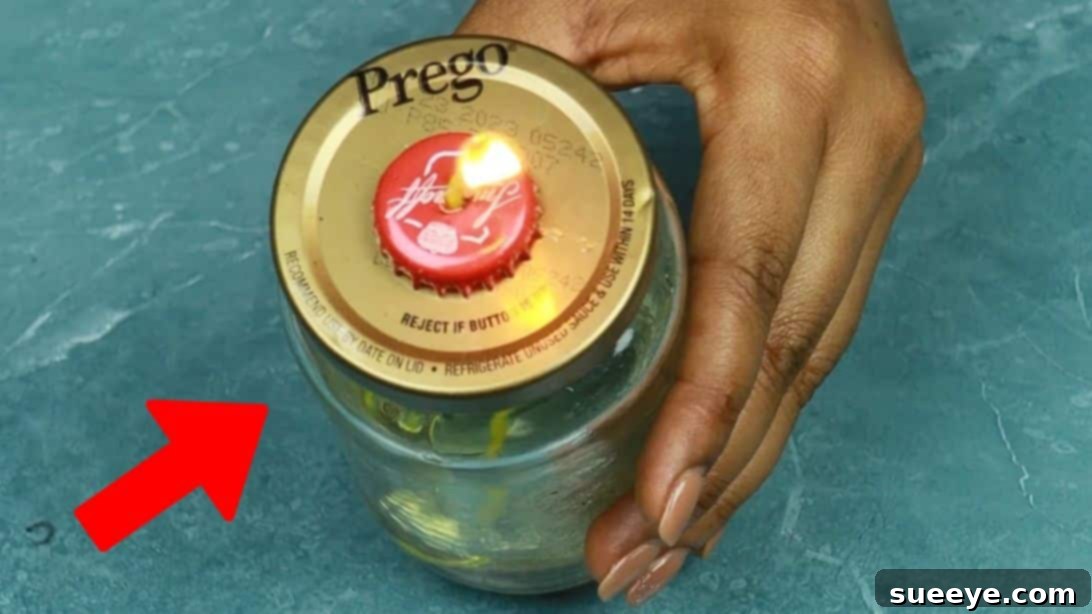
DIY Emergency Candle: A Lifesaving Hack for Power Outages and Outdoor Adventures
The unpredictability of nature and the increasing frequency of extreme weather events make preparedness not just a suggestion, but a crucial necessity. As winter approaches, or indeed any season, unexpected challenges can arise. A recent experience of a close friend vividly brought this point home for me. They endured the harshest snowstorm in recent memory, which plunged their home into darkness for several unsettling hours due to a widespread power outage. What made their ordeal particularly challenging was their lack of readiness; essential items like candles were nowhere to be found, leaving them in a cold, dark, and uncomfortable situation.
Hearing their story was a stark reminder of the vital importance of being prepared for such emergencies. It underscored that while we often hope for the best, it’s always wise to plan for the worst. This incident sparked my search for reliable emergency lighting solutions, leading me to a fascinating discovery. I stumbled upon Jennifer’s tips video, which showcased a DIY emergency candle hack that promised to “never go out.” Intrigued and a little skeptical, I decided to put this ingenious candle hack to the test, eager to see if it truly lived up to its claim and could offer a practical solution for future unforeseen circumstances.
Why Every Home Needs a DIY Emergency Candle
After giving it a try, I can confidently confirm: this emergency candle hack absolutely works, and it’s surprisingly simple to create. Before this experiment, I had no idea that such an effective and straightforward solution existed using common household items. This DIY emergency candle offers a dependable source of light and a modest amount of heat, making it invaluable during power outages when conventional electricity fails. Beyond its utility in unexpected emergencies, this clever trick is also perfect for outdoor enthusiasts. Imagine the convenience and charm of using a homemade, long-lasting candle during camping trips, providing ambient light without the need for bulky lanterns or short-lived store-bought candles.
While the video’s title playfully suggests it “never goes out,” the reality is that like any candle, its fuel source will eventually deplete. However, the brilliance of this hack lies in its incredible reusability and refillable design. When the oil runs low, all you need to do is replenish it, and your emergency candle will perform as good as new. This makes it an incredibly sustainable and cost-effective lighting solution for prolonged emergencies or frequent use. Embracing this survival tip is a proactive step towards peace of mind, ensuring you’re well-equipped and ready, no matter what challenges the weather or other unforeseen events may bring. It’s not just about having a light; it’s about having control and comfort when everything else seems uncertain.
The Science Behind the “Never-Goes-Out” Candle Hack
The principle behind this emergency candle is elegantly simple, drawing on basic physics and chemistry to create a sustained flame using everyday materials. Unlike traditional wax candles that slowly burn down their solid fuel, this DIY version operates as an oil lamp. The yarn acts as a wick, drawing liquid fuel (kitchen oil) upwards through capillary action. When ignited, the heat from the flame vaporizes the oil at the wick’s tip, and these oil vapors are what actually burn, producing the light and heat. As long as there’s a continuous supply of oil and a properly functioning wick, the flame can be maintained indefinitely, assuming regular refilling.
This design makes it inherently more efficient and longer-lasting than many conventional candles. A small amount of oil can burn for many hours, and the ability to simply add more oil means you’re not constantly replacing entire candles. It’s a testament to resourceful thinking, transforming common kitchen ingredients and repurposed items into a vital emergency tool. Understanding this basic mechanism not only demystifies the “never goes out” claim – clarifying that it’s about sustained fuel supply rather than magic – but also empowers you to troubleshoot any issues and truly appreciate the ingenuity of this simple survival hack.
Essential Supplies for Your Homemade Emergency Candle
One of the most appealing aspects of this emergency candle hack is that it utilizes materials you likely already have around your home, making it an incredibly accessible and cost-effective solution. Gather these items to begin crafting your reliable light source:
- Old Glass Jar with Lid: A key component, providing a safe, heat-resistant container for the oil. Mason jars, old jam jars, or pickle jars work perfectly. Ensure the jar is clean and dry. The lid is crucial for securing the wick assembly.
- Nail: Used to create a precise hole in both the jar lid and the metal bottle cap. A medium-sized nail, sturdy enough to be hammered without bending, is ideal.
- Yarn (or Cotton Twine/String): This will serve as your candle’s wick. Natural fibers like cotton yarn or twine are best as they absorb oil effectively. Avoid synthetic materials, which may melt or burn poorly.
- Hammer or Any Hard Object: Essential for carefully piercing holes with the nail. A small hammer is perfect, but a sturdy rock or another heavy, blunt object can also work in a pinch, provided you exercise caution.
- Metal Bottle Cap: This ingenious component acts as a base and stabilizer for your wick, keeping it elevated and centered within the oil. Any standard soda or beer bottle cap will do.
- Scissors: For cutting the yarn to the appropriate length.
- Kitchen Oil: The fuel source for your candle. Common options include vegetable oil, olive oil, canola oil, or even mineral oil. Choose an oil you have readily available. The type of oil can influence burn time and smoke, but most cooking oils will function effectively.
Step-by-Step Guide: Crafting Your Emergency Candle At Home
Creating your own emergency candle is a straightforward process, but paying attention to each step will ensure its effectiveness and safety. Follow these instructions carefully:
Step 1: Prepare the Jar Lid
Carefully take the lid from your glass jar. Using your nail and hammer (or hard object), make a single, clean hole directly in the center of the lid. The hole should be just large enough for your chosen yarn to pass through snugly. Avoid making it too wide, as a tighter fit helps stabilize the wick and prevents excessive oil evaporation. Safety first: place the lid on a sturdy, non-slip surface, and wear appropriate hand protection if available.
Step 2: Create a Hole in the Bottle Cap
Next, take your metal bottle cap. Using the same nail and hammer, make another hole precisely in the center of the bottle cap. This hole should also be just big enough to comfortably accommodate the yarn. This cap will act as a floating wick holder, ensuring the wick stays upright and at the optimal height above the oil surface for efficient burning.
Step 3: Measure and Cut the Yarn Wick
Unroll a length of your yarn. Measure it so that it is a bit longer than the height of your glass jar. This extra length ensures that the wick will reach the bottom of the jar to draw up all the oil, and also allows for a small portion to extend above the lid, which will be the part you light. Use your scissors to make a clean cut.
Step 4: Assemble the Wick System
Carefully thread one end of the cut yarn through the hole in the jar lid. Pull it through until a substantial portion is on the ‘inside’ of the lid (the side that will face into the jar). Then, take the metal bottle cap and thread the same end of the yarn through the hole in its center. The bottle cap should now rest securely against the underside of the lid, with the yarn passing through both.
Step 5: Fill the Jar and Position the Wick
Now, pour your chosen kitchen oil into the glass jar. Fill it approximately 1/4 of the way full. This amount provides a good initial burn time without making the candle excessively heavy or unstable. Next, take the assembled lid with the threaded yarn and caps. Hold onto the end of the yarn that extends from the bottom of the bottle cap. Carefully lower the lid onto the jar. Ensure the yarn extending from the bottle cap reaches the bottom of the jar and that the small portion of yarn for lighting protrudes nicely through the top of the lid. To secure the wick in place, tie a small knot on the very end of the yarn that is now inside the jar. This knot will help anchor the wick and prevent it from pulling through the cap as the oil level drops.
Step 6: Prime the Wick
This step is crucial for the candle’s initial performance and longevity. Gently hold the knot you made at the bottom of the wick and subtly rotate or wiggle the entire wick assembly. The goal is to fully moisten the yarn with oil through capillary action. It is extremely important that the yarn, especially the part above the lid, becomes completely saturated with oil. If the wick is not adequately primed, the candle will struggle to light, may produce a very small flame, or will burn out quickly. Give it a few minutes to allow the oil to fully climb the wick.
Step 7: Light and Maintain Your Emergency Candle
Once the wick is thoroughly moistened, carefully light the exposed tip of the yarn with a lighter or a match. You should see a steady flame emerge. Allow it to burn for a few moments to ensure it’s established. After the initial oil supply is used up, the flame will naturally diminish. At this point, simply refill the jar with more kitchen oil. The wick will continue to draw up the new fuel, and your candle will work like new, ready to provide sustained light whenever you need it. Remember to always supervise a burning candle and keep it away from flammable materials.
Tips for Maximizing Your Emergency Candle’s Performance and Safety
While making this DIY emergency candle is simple, a few extra tips can enhance its effectiveness and ensure your safety:
- Choose the Right Oil: While most kitchen oils work, olive oil tends to burn cleaner and with less soot than some vegetable oils. Experiment with what you have to find the best performance. Avoid highly flammable liquids like gasoline or kerosene, which are extremely dangerous.
- Wick Maintenance: If the flame becomes too large or starts producing excessive smoke, gently trim the carbonized tip of the wick with scissors. A smaller, well-maintained wick provides a cleaner burn.
- Ventilation: Always use your emergency candle in a well-ventilated area, especially indoors. Although it burns cleaner than many petroleum-based lamps, any open flame consumes oxygen and can produce some carbon monoxide.
- Placement is Key: Place your candle on a stable, heat-resistant surface, away from anything flammable like curtains, papers, or bedding. Keep it out of reach of children and pets.
- Never Leave Unattended: As with any open flame, never leave your emergency candle burning unsupervised. Extinguish it before leaving the room or going to sleep.
- Storage: Store your assembled candle (without oil for long-term storage, or with a full reservoir if you anticipate immediate use) in a cool, dry place. Have extra oil readily available for refills.
- Fire Safety: Keep a fire extinguisher or a bucket of sand/water nearby when using any open flame, just in case.
Embrace Preparedness: Make Your Emergency Candle Today!
The experience of a power outage or the desire for reliable light during outdoor adventures doesn’t have to be a source of stress. This DIY emergency candle offers a simple, cost-effective, and remarkably efficient solution to ensure you’re never left in the dark. Its ingenious design, utilizing everyday materials like a glass jar, yarn, and kitchen oil, transforms household items into a vital survival tool. The ability to easily refill and reuse it means you have a sustainable light source that can last as long as you have oil on hand, truly embodying the spirit of preparedness.
Beyond its practical benefits, crafting this emergency candle provides a sense of self-sufficiency and empowerment. It’s a reminder that with a little ingenuity, we can often find effective solutions using what we already possess. Whether for unexpected blackouts, cozy camping nights, or simply as an essential addition to your home emergency kit, this “never-goes-out” (or rather, endlessly refillable) candle is an invaluable asset. Take a few minutes to assemble one today; you’ll gain not just a light source, but also the peace of mind that comes with being truly prepared for whatever comes your way.