
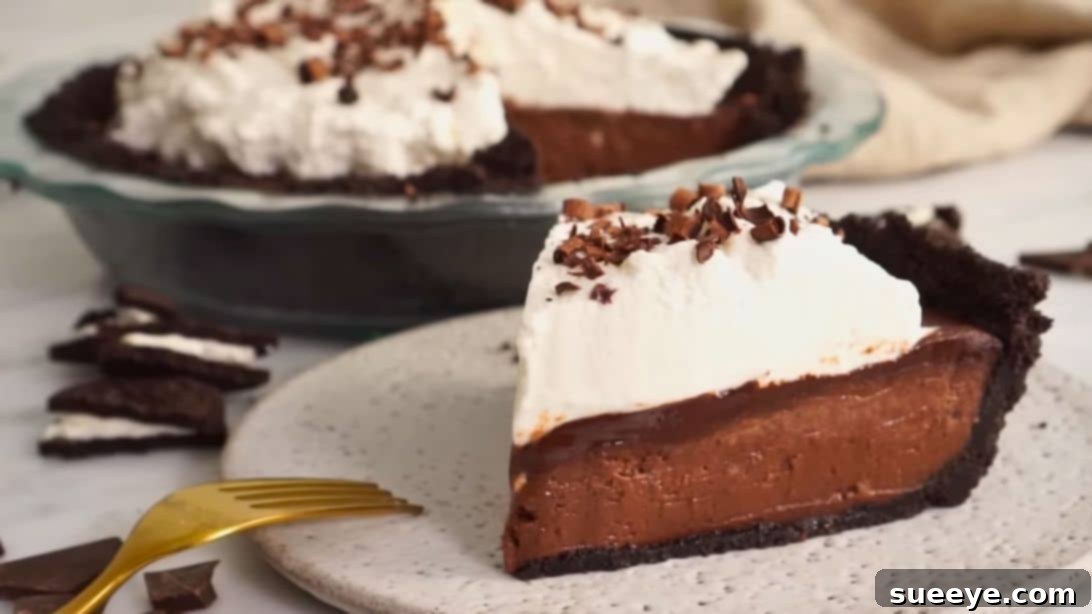
The Ultimate No-Bake Chocolate Mud Pie: A Decadent Delight for Every Occasion
Prepare to embark on a journey of pure chocolate bliss with this sensational No-Bake Chocolate Mud Pie recipe, inspired by the culinary genius of Preppy Kitchen. This isn’t just a dessert; it’s an experience, a symphony of textures and flavors that will captivate your taste buds from the very first bite. Imagine a rich, crumbly Oreo crust providing the perfect foundation for an unbelievably smooth, intensely chocolatey filling, all crowned with a cloud of light, airy whipped cream. It’s a dessert that screams indulgence, yet remains remarkably simple to prepare, making it an ideal choice for both novice bakers and seasoned dessert connoisseurs.
Forget the oven and complicated techniques; this mud pie comes together with minimal effort, allowing you more time to savor the delightful results. Its no-bake nature makes it a fantastic option for warmer months when turning on the oven feels like a chore, or for busy schedules when you need a show-stopping dessert without the fuss. Whether you’re hosting a dinner party, planning a family gathering, or simply craving a moment of pure, unadulterated chocolate happiness, this recipe is your golden ticket. We guarantee one slice won’t be enough to satisfy your craving for this absolutely heavenly creation.
Why You’ll Fall in Love with This No-Bake Chocolate Mud Pie
There are countless reasons why this particular chocolate mud pie stands out from the crowd. It’s more than just a sweet treat; it’s a culinary masterpiece that delivers on every front:
- Effortless Elegance: As the name suggests, this pie requires no baking, simplifying the process significantly. It’s perfect for those who shy away from complex baking techniques but still want to impress with a gourmet-quality dessert.
- Rich, Decadent Flavor: The combination of bittersweet chocolate and a hint of espresso creates a deep, complex chocolate flavor that is both intense and incredibly satisfying without being overly sweet.
- Perfect Texture Harmony: From the crunchy, buttery Oreo crust to the silken chocolate filling and the ethereal whipped cream, each layer offers a unique texture that contributes to an overall delightful mouthfeel.
- Crowd-Pleaser Guaranteed: Chocolate is universally loved, and this pie takes chocolate appreciation to a new level. It’s a guaranteed hit at any gathering, leaving guests asking for the recipe.
- Make-Ahead Friendly: This pie benefits from chilling, making it an excellent dessert to prepare a day or two in advance. This frees up your time on the day of your event, reducing stress and allowing you to focus on other preparations.
- Versatile & Customizable: While perfect as is, this recipe also offers room for personalization. Add a sprinkle of sea salt, a drizzle of caramel, or a few fresh berries to make it uniquely yours.
This recipe transforms simple ingredients into an extraordinary dessert, proving that sometimes, the best things in life (and in the kitchen) are the simplest.
Essential Ingredients for Your Mud Pie Masterpiece
Crafting this incredible no-bake chocolate mud pie begins with selecting quality ingredients. Each component plays a vital role in creating the perfect balance of flavor and texture. Here’s a detailed look at what you’ll need:
For the Irresistible Oreo Crust:
- 25 Oreo Cookies (about 1 standard family-size package): The star of our crust! Oreos provide a fantastic chocolatey base with a hint of creaminess. For best results, use classic Oreos.
- 4 tablespoons (½ stick) Unsalted Butter, melted: Butter binds the crushed cookies together, forming a sturdy, delicious crust that holds its shape beautifully.
For the Silky Smooth Chocolate Filling:
- 1 cup Heavy Cream: Contributes to the rich, luxurious texture and mouthfeel of the filling.
- 2 cups Whole Milk (divided): Provides the liquid base for the custard and helps achieve the perfect consistency.
- ¼ cup Cornstarch: The key thickening agent that gives the filling its desirable pudding-like consistency without the need for eggs alone.
- ⅔ cup Granulated Sugar: Sweetens the filling to perfection, balancing the bitterness of the chocolate.
- ¼ teaspoon Salt: A crucial ingredient that enhances all the other flavors, particularly the chocolate, making it taste richer and more profound.
- 5 Large Egg Yolks: Adds richness, color, and helps thicken the custard, providing a velvety smooth texture. They also contribute to the pie’s stability.
- 6 ounces Bittersweet Chocolate, finely chopped: The heart of our pie! Bittersweet chocolate provides a deep, intense chocolate flavor that is truly decadent. Finely chopping ensures quick and even melting.
- 1 teaspoon Vanilla Extract: A classic flavor enhancer that complements chocolate beautifully, adding warmth and depth.
- ½ teaspoon Powdered Espresso (or instant coffee granules): This secret ingredient doesn’t make the pie taste like coffee, but rather intensifies and deepens the chocolate flavor, making it more complex and irresistible.
For the Glossy Chocolate Ganache Topping:
- ½ cup Bittersweet Chocolate, finely chopped: For a beautiful, thin layer of glossy chocolate that adds another dimension of flavor and visual appeal.
- ¼ cup Heavy Cream: Combines with the chocolate to create a smooth, pourable ganache.
For the Dreamy Whipped Cream Crown:
- 2 cups Cold Heavy Whipping Cream: The foundation for our light and airy topping. Ensure it’s very cold for optimal whipping.
- ¼ cup Granulated Sugar (or powdered sugar): Sweetens the whipped cream to complement the rich pie.
- 1 teaspoon Vanilla Extract: Adds a lovely aromatic note to the whipped cream.
Gathering these ingredients before you start will make the entire process smoother and more enjoyable. Let’s get cooking!
Step-by-Step Guide: Crafting Your No-Bake Chocolate Mud Pie
Follow these detailed instructions carefully to ensure a perfect, show-stopping chocolate mud pie. Each step is designed to guide you through the process with ease, from the crunchy crust to the luscious topping.
Step 1: The Foundation – Preparing the Oreo Crust
Begin by making the simple yet incredibly satisfying Oreo crust. This forms the perfect base for your rich chocolate filling.
- Take your 25 Oreo cookies and place them into the bowl of a food processor.
- Pulse the food processor until the Oreos are finely pulverized into uniform crumbs. There should be no large chunks remaining. If you don’t have a food processor, you can place the Oreos in a large zip-top bag and crush them with a rolling pin or the bottom of a heavy pan until very fine.
- Once crushed, add the 4 tablespoons of melted unsalted butter to the Oreo crumbs in the food processor.
- Pulse again or blend until the butter is thoroughly incorporated with the crumbs. The mixture should resemble wet sand and hold together when pressed.
- Transfer the buttery Oreo mixture into a 9-inch pie dish.
- Using the bottom of a flat glass or your fingers, firmly press the mixture into an even, thin layer across the bottom and up the sides of the pie dish. Ensure the edges are neat and compact.
- Place the prepared crust into the freezer for at least 15-20 minutes, or until you are ready to fill it. This chilling step helps the crust set and prevents it from crumbling when sliced.
Step 2: Starting the Silken Chocolate Filling – The Custard Base
Now, we’ll begin to build the rich chocolate custard that forms the heart of this mud pie.
- In a medium-sized, heavy-bottomed pot, combine 1½ cups of the whole milk, the entire cup of heavy cream, the ⅔ cup of granulated sugar, and the ¼ teaspoon of salt.
- Whisk these ingredients together until well combined.
- Place the pot over medium heat. Continue to stir the mixture frequently, ensuring the sugar dissolves and the milk doesn’t scorch at the bottom.
- Heat until the mixture just begins to simmer around the edges, showing small bubbles. Do not let it come to a rolling boil.
- Once simmering, immediately remove the pot from the heat. Set it aside temporarily.
Step 3: Preparing the Egg Mixture for Tempering
This step is crucial for preventing scrambled eggs in your custard! We’ll prepare the yolks and then combine them with cornstarch.
- In a large, separate heatproof bowl, vigorously whisk the 5 egg yolks until they are smooth and slightly pale. Set this bowl aside.
- In a different, smaller bowl, whisk together the remaining ½ cup of whole milk and the ¼ cup of cornstarch until no lumps remain and the mixture is smooth.
- Pour the cornstarch-milk slurry into the bowl with the whisked egg yolks. Whisk thoroughly until everything is fully combined and smooth. This cornstarch mixture will help stabilize the yolks and thicken the custard.
- Now, we need to temper the egg mixture. Slowly, in a thin stream, pour about half of the hot milk-cream mixture from the pot into the egg yolk mixture, whisking continuously and vigorously. This slowly raises the temperature of the yolks without cooking them.
- Once tempered, pour the entire egg yolk mixture back into the pot with the remaining hot milk-cream mixture.
Step 4: Cooking the Custard to Perfection
This is where the magic happens and your filling begins to thicken into a rich custard.
- Return the pot with the combined custard mixture to medium heat.
- Continuously whisk the mixture, paying special attention to the bottom and corners of the pot, to prevent sticking and ensure even cooking.
- Continue whisking until the mixture comes to a full boil, showing large, active bubbles.
- Once boiling, reduce the heat to medium-low and continue whisking constantly for another 2 to 3 minutes. This allows the cornstarch to fully activate and thicken the custard properly. The mixture should become noticeably thick, coating the back of a spoon.
- After 2-3 minutes, remove the pot from the heat immediately.
Step 5: Infusing with Chocolate and Chilling the Filling
The moment of truth – adding the chocolate and preparing for the final chill.
- Immediately add the 6 ounces of finely chopped bittersweet chocolate, the 1 teaspoon of vanilla extract, and the ½ teaspoon of powdered espresso (or instant coffee) to the hot custard in the pot.
- Stir vigorously with a whisk or spatula until all the chocolate is completely melted and the mixture is perfectly smooth and glossy. The heat from the custard will melt the chocolate quickly.
- Retrieve your chilled Oreo crust from the freezer.
- Carefully pour the warm chocolate filling into the prepared crust.
- Use a spatula to gently spread and smoothen the top surface of the filling, ensuring it’s even.
- Place the pie into the refrigerator to chill while you prepare the ganache. The filling needs to set, and starting the chilling process now will give it a head start.
Step 6: The Glossy Ganache Layer and Final Chill
A thin, luxurious layer of ganache adds an extra touch of chocolate elegance and helps seal in moisture.
- In a medium microwave-safe bowl, combine the ½ cup of finely chopped bittersweet chocolate and the ¼ cup of heavy cream.
- Heat this mixture in the microwave for a 20-second burst at 50% power.
- Remove from the microwave and stir gently. If the chocolate isn’t fully melted, return it for another 10-15 second burst at 50% power, stirring between each interval, until the ganache is smooth and glossy. Be careful not to overheat, as this can cause the chocolate to seize.
- Retrieve your pie from the refrigerator. The chocolate filling should have started to set slightly.
- Carefully pour the warm ganache over the top of the chocolate filling.
- Gently tilt the pie dish or use a small offset spatula to spread the ganache evenly over the entire surface of the pie.
- Return the pie to the refrigerator and chill for a minimum of 3 hours, or ideally, overnight. This crucial chilling time allows all the layers to set completely, ensuring clean slices and optimal flavor development.
Step 7: The Whipped Cream Crown and Serving
Just before serving, prepare the light and airy whipped cream to complete your masterpiece.
- Ensure your heavy whipping cream, mixing bowl, and whisk attachment (for a stand mixer) are all very cold. You can chill the bowl and whisk in the freezer for 10-15 minutes prior.
- In the cold mixing bowl, combine the 2 cups of cold heavy whipping cream, the ¼ cup of granulated sugar, and the 1 teaspoon of vanilla extract.
- Using a stand mixer with the whisk attachment (or an electric hand mixer), begin whipping on medium speed, gradually increasing to high.
- Continue whipping until the cream forms thick, soft peaks. Be careful not to over-whip, as it can quickly turn into butter. The cream should be airy and hold its shape.
- Once the pie has thoroughly chilled and set, take it out of the refrigerator.
- Spoon or pipe the freshly made whipped cream generously over the top of the pie. You can spread it evenly or create decorative swirls.
- For an extra touch of elegance and chocolatey goodness, sprinkle some chocolate shavings, cocoa powder, or mini chocolate chips on top of the whipped cream just before serving.
- Slice and serve immediately!
Tips for a Perfect No-Bake Chocolate Mud Pie Every Time
Even though this recipe is straightforward, a few expert tips can elevate your mud pie from delicious to absolutely unforgettable:
- Chill Everything: A cold crust and a well-chilled filling are key to a firm, clean-slicing pie. Don’t skimp on the refrigeration time; overnight is always best.
- Finely Chop Your Chocolate: For the filling and ganache, finely chopped chocolate melts more evenly and quickly, ensuring a smooth, lump-free consistency.
- Temper Eggs Slowly: When adding hot milk to egg yolks, do it gradually while whisking constantly. This prevents the yolks from scrambling and ensures a silky custard.
- Constant Stirring: When cooking the custard, continuous stirring prevents sticking, scorching, and lumps, resulting in a perfectly smooth filling.
- Don’t Overheat Ganache: Chocolate can seize if overheated. Microwave in short bursts and stir well in between to achieve a smooth ganache.
- Cold Cream for Whipping: Make sure your heavy cream, bowl, and whisk are very cold for the best whipped cream results. This helps the cream incorporate air more effectively and hold its shape longer.
- Salt Enhances Chocolate: The small amount of salt in the filling isn’t just for seasoning; it significantly enhances the natural sweetness and depth of the chocolate.
- Use Quality Chocolate: Since chocolate is the star here, choose a good quality bittersweet chocolate (around 60-70% cocoa solids) for the best flavor.
Creative Variations and Customizations
While the classic no-bake chocolate mud pie is phenomenal on its own, feel free to get creative and personalize it with these delightful variations:
- Different Crusts:
- Graham Cracker Crust: Substitute crushed graham crackers for Oreos for a classic, slightly less intense chocolate base.
- Nutty Crust: Combine crushed Oreos with finely ground almonds or pecans for an added layer of flavor and texture.
- Pretzel Crust: For a salty-sweet contrast, use crushed pretzels mixed with butter for a unique twist.
- Flavor Boosters for the Filling:
- Mint Chocolate: Add a few drops of peppermint extract along with the vanilla for a refreshing twist.
- Caramel Swirl: Swirl in some homemade or store-bought caramel sauce into the chocolate filling before chilling, or drizzle it over the ganache.
- Orange Zest: A touch of finely grated orange zest can brighten the chocolate flavor beautifully.
- Spicy Kick: A pinch of cayenne pepper in the filling can add a subtle, intriguing warmth to the chocolate.
- Topping Innovations:
- Nutty Crunch: Sprinkle chopped toasted nuts (pecans, walnuts, almonds) over the whipped cream.
- Berry Burst: Garnish with fresh raspberries, strawberries, or blueberries for a vibrant contrast and a touch of tartness.
- Coconut Flakes: Toasted coconut flakes add a tropical flair and lovely texture.
- Extra Chocolate: Beyond shavings, try mini chocolate chips, chocolate curls, or a drizzle of melted chocolate over the whipped cream.
- Sea Salt Flakes: A delicate sprinkle of flaky sea salt on top of the ganache or whipped cream perfectly balances the sweetness.
- Individual Servings: Instead of a large pie, create individual mud pies in ramekins or small dessert glasses for elegant single portions.
Storage and Make-Ahead Instructions
One of the many benefits of this no-bake pie is its excellent make-ahead potential and easy storage:
- Refrigeration: Store any leftover pie, covered loosely with plastic wrap or aluminum foil, in the refrigerator for up to 3-4 days. The crust might soften slightly over time, but the flavors will remain fantastic.
- Freezing: For longer storage, this mud pie freezes beautifully. Once fully chilled and set, you can freeze the entire pie (without the whipped cream topping, which is best added fresh) for up to 1 month. Wrap it tightly in several layers of plastic wrap, then a layer of aluminum foil, to prevent freezer burn.
- Serving Frozen: To serve from frozen, transfer the pie to the refrigerator 4-6 hours before you plan to eat it, allowing it to thaw. Add fresh whipped cream just before serving.
- Make Ahead: The entire pie can be made a day or two in advance and stored in the refrigerator. This allows the flavors to meld beautifully and ensures it’s perfectly set for slicing. Add the whipped cream topping just before serving for the freshest taste and texture.
Frequently Asked Questions (FAQs)
Here are answers to some common questions you might have about making this irresistible no-bake chocolate mud pie:
- Q: Can I use different types of chocolate for the filling or ganache?
- A: Yes, you can! While bittersweet chocolate is recommended for its depth, you can experiment with semi-sweet chocolate for a sweeter pie. Milk chocolate can also be used, but you might want to reduce the sugar in the filling slightly, as milk chocolate is sweeter. Ensure it’s good quality baking chocolate for best melting and flavor.
- Q: My crust seems too crumbly or too soft. What went wrong?
- A: If your crust is too crumbly, you might need a little more melted butter to bind the crumbs. If it’s too soft, it might not have been pressed firmly enough or chilled for a sufficient amount of time. Ensure you press it down very compactly and give it ample time in the freezer or fridge to set.
- Q: How do I prevent lumps in my chocolate filling?
- A: Lumps usually occur if the cornstarch isn’t fully dissolved in the milk, if the eggs aren’t tempered properly, or if the custard isn’t stirred constantly while cooking. Whisk the cornstarch and milk until completely smooth, temper the eggs slowly and continuously, and stir constantly over medium heat to avoid lumps.
- Q: Can I skip the espresso powder?
- A: Yes, you can skip the espresso powder if you prefer. However, it’s highly recommended as it doesn’t add a coffee flavor but rather enhances and deepens the chocolate’s natural notes, making the pie taste even more rich and complex.
- Q: My whipped cream isn’t thickening. What should I do?
- A: The most common reason for whipped cream not thickening is that the cream, bowl, or whisk aren’t cold enough. Ensure all components are very cold. Also, make sure you are using heavy whipping cream or heavy cream, not half-and-half or light cream, as these have lower fat content and won’t whip properly.
- Q: How long does this pie need to chill?
- A: For best results, the pie should chill for a minimum of 3 hours, but ideally overnight (8+ hours). This allows the chocolate filling and ganache to set completely, making for clean slices and a perfectly firm texture.
Indulge in Pure Chocolate Bliss
There you have it – the definitive guide to creating a truly unforgettable No-Bake Chocolate Mud Pie. This recipe is a testament to the fact that simplicity can lead to extraordinary results. With its irresistible Oreo crust, luxuriously smooth chocolate filling, and a crowning cloud of homemade whipped cream, it’s a dessert that not only looks impressive but tastes absolutely divine.
Perfect for any celebration, a cozy night in, or simply to satisfy that undeniable chocolate craving, this mud pie is more than just a recipe; it’s an invitation to experience pure joy. So go ahead, gather your ingredients, follow these steps, and prepare to delight your senses and those of your loved ones. This no-bake masterpiece is sure to become a cherished addition to your dessert repertoire, proving that sometimes, the best desserts don’t even need an oven!
Enjoy every decadent bite!