
Master Understitching: The Essential Sewing Technique for Flawless Garment Finishes
Every passionate sewer understands the satisfaction of creating a beautifully finished garment. However, achieving that truly professional look often hinges on mastering specific techniques that elevate a good project to a great one. One such invaluable skill, often overlooked by beginners but cherished by seasoned crafters, is understitching. This ingenious method can transform bulky, puckered necklines and unruly facings into crisp, smooth edges that lie perfectly flat, imparting a high-end finish to all your sewing projects.
I recently stumbled upon an incredibly insightful video tutorial on understitching by Evelyn Wood on YouTube, and it genuinely revolutionized my approach to a challenging aspect of garment construction. For years, creating necklines, especially those incorporating a yoke, presented a recurring frustration. The finished product would often pucker, and getting the interior seam to settle correctly felt like an impossible task. Evelyn Wood’s clear, concise explanation of understitching provided the perfect solution. With this clever method, you simply stitch along the yoke lining, catching the edges of your join seam into that understitch. The outcome is remarkably professional, and Evelyn’s detailed guidance makes the technique incredibly accessible. This video is an absolute must-watch for anyone who enjoys making clothing, as it promises to enhance all your future projects immensely.
What is Understitching? A Core Concept in Garment Construction
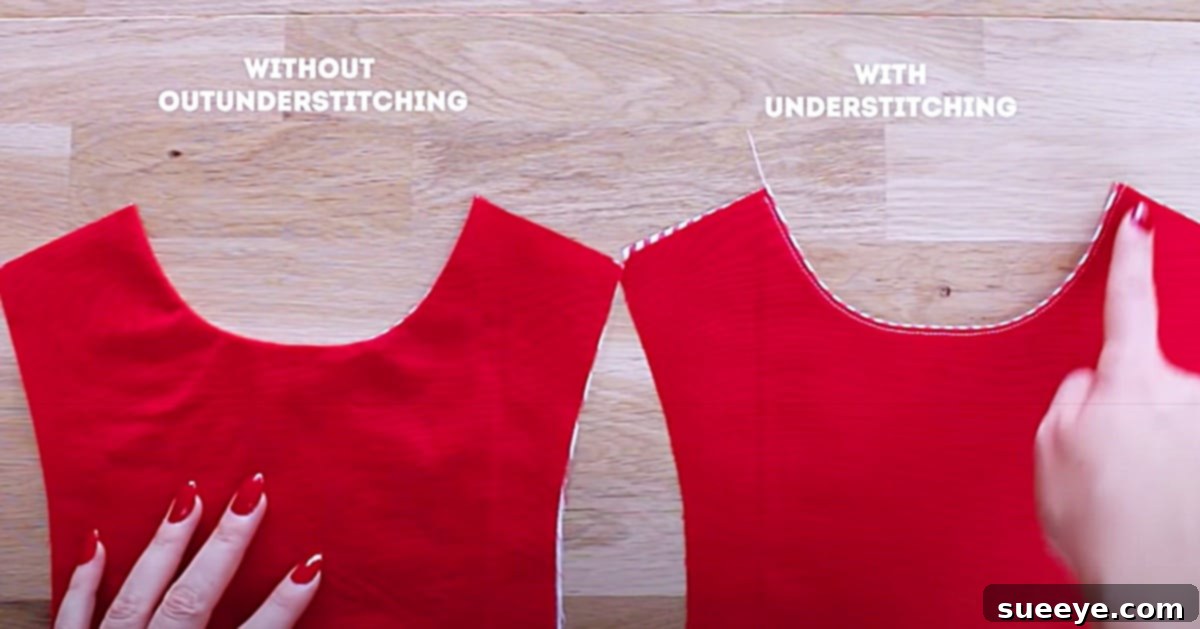
At its heart, understitching is a sewing technique designed to secure a facing or lining to the seam allowance, preventing it from rolling to the outside of the garment. Imagine sewing a neckline: you typically attach a facing (a piece of fabric cut to mirror the neckline shape) to the main garment. After stitching this seam, you often press the seam allowance towards the facing. Understitching takes this a step further by stitching through the facing and the pressed seam allowance, very close to the original seam line, but *not* through the main garment fabric. This subtle, hidden stitch acts as an anchor, pulling the facing slightly inward and ensuring that the garment’s outer edge remains clean, crisp, and free from any visible lining or facing.
Why Understitching is Essential: Benefits for Every Sewer
The importance of understitching extends far beyond mere aesthetics. It’s a foundational technique that addresses common sewing dilemmas and significantly improves the quality and longevity of your handmade garments. Here are the key benefits:
- Prevents Facings from Rolling Out: This is the primary and most celebrated advantage. Understitching acts as an invisible barrier, ensuring that your facings or linings stay securely tucked inside the garment, even after wear and washing.
- Creates a Clean, Crisp Edge: By keeping facings from showing, understitching contributes to a sharp, professional-looking garment edge that is indicative of high-quality construction.
- Reduces Bulk: Especially beneficial in curved areas like necklines and armholes, understitching helps to distribute and flatten the seam allowance, resulting in a smoother, less bulky finish.
- Improves Garment Drape and Fit: When facings lie flat and smooth, the garment itself hangs better, enhancing its overall drape and fit. It eliminates the stiffness or puffiness that can occur with unsecured facings.
- Adds Durability to Seams: The extra line of stitching reinforces the seam, making it more robust and less prone to stretching or tearing over time.
- Professional Finish: It’s a hallmark of ready-to-wear clothing and a technique that immediately elevates the perceived quality of your handmade items.
When and Where to Apply Understitching
While often associated with necklines, understitching is a versatile technique applicable to numerous areas of garment construction. Knowing when to use it can significantly enhance your projects:
- Necklines: The most common application. Essential for all types of necklines – round, V-neck, scoop, boat, or sweetheart – especially when a facing or lining is used.
- Armholes: Similar to necklines, understitching keeps armhole facings neatly hidden, creating a comfortable and clean finish for sleeveless garments.
- Waistbands: For lined or faced waistbands, understitching can prevent the inner waistband from flipping up or peeking out.
- Pocket Bags: Especially for in-seam pockets or welt pockets where you want the pocket bag to stay securely inside the garment.
- Hem Facings: For curved or shaped hems that use a facing, understitching can ensure a smooth, stable hemline.
- Anywhere a Facing or Lining is Used: Generally, if you have a facing or lining that needs to stay tucked away, understitching is your go-to technique.
Materials For Understitching:
- A garment project with a facing or lining (e.g., a dress, top, or skirt with a neckline, armhole, or waistband).
- Matching thread.
- Sharp fabric scissors or a rotary cutter.
- A sewing machine.
- An iron and ironing board.
- Optional: Pinking shears (for bulk reduction in curves) and a point turner/crease tool.
Directions: A Step-by-Step Guide to Flawless Understitching
Mastering understitching is surprisingly straightforward once you understand the core principles. This guide, perfectly complemented by the visual instructions in the helpful video tutorial on understitching by Evelyn Wood on YouTube, will help you achieve mastery.
- Prepare Your Garment and Join Facing/Lining: Begin by carefully pressing your garment pieces. Sew the facing or lining to the main garment along the edge that needs understitching (e.g., the neckline, armhole, or waistband). Make sure your seam allowance is consistent. As per the instructions in Evelyn Wood’s fabulous video, ensuring a clean initial seam is crucial.
- Trim and Clip Seam Allowances: This is a vital step, especially for curved seams. For concave curves (like necklines), clip small notches into the seam allowance without cutting through the stitching line. For convex curves (like outer edges of collars), trim the seam allowance and make small V-shaped snips. This reduces bulk and allows the curve to lie smoothly.
- Press the Seam Allowance Towards the Facing/Lining: Carefully press the entire seam allowance towards the facing or lining. This sets the seam and prepares it for the next step. A good press here is critical for a crisp finish.
- Stitch the Understitch: On your sewing machine, sew a line of stitches through the facing/lining and the seam allowance, very close (about 1/8 inch or 3mm) to the original seam line. Ensure you are *not* stitching through the main garment fabric. This is the understitch.
- Final Press: Once the understitching is complete, press the facing/lining away from the main garment, allowing the understitched edge to roll slightly to the inside. Give it a final, thorough press to flatten everything and set the stitches.
The finished product truly looks so much more professional; the difference is like night and day. Gone are the days of struggling with unruly facings or bulky seams that detract from the overall beauty of your handmade clothes. Understitching ensures a sleek, tailored appearance every time.
Tips for Successful Understitching and Common Mistakes to Avoid
To ensure your understitching is always immaculate, keep these tips in mind and learn from common pitfalls:
Tips for Success:
- Use a Shorter Stitch Length: A stitch length between 2.0 and 2.5 mm often works best for understitching. This provides a more secure seam and a neater finish.
- Match Thread Color: Although understitching is hidden, using thread that matches your facing fabric is still good practice, just in case a stitch ever peeks through.
- Pressing is Key: Don’t underestimate the power of your iron. Pressing after joining the facing, after trimming/clipping, and finally after understitching is crucial for a crisp, flat result.
- Don’t Stretch the Fabric: When sewing curves, be careful not to stretch the fabric. This can lead to distortion and an uneven finish. Sew slowly and carefully.
- Practice on Scraps: If you’re new to the technique, practice on some scrap fabric pieces with similar weight and drape to your project fabric.
- Consider Fabric Type: For very thick or slippery fabrics, you might need to adjust your stitch length or use a walking foot.
Common Mistakes to Avoid:
- Not Pressing Adequately: A wrinkled seam allowance will never understitch smoothly.
- Stitching Too Far from the Seam Line: If your understitch is too far from the original seam, it won’t effectively pull the facing inward and may be visible. Aim for 1/8 inch (3mm).
- Not Clipping or Trimming Curves Properly: Failure to clip concave curves or trim/notch convex curves will result in a puckered, bulky edge.
- Stretching the Fabric While Sewing: This can distort the garment’s shape, especially in bias-cut areas.
- Forgetting to Direct the Seam Allowance Towards the Facing: The entire seam allowance must be pressed and held towards the facing or lining for the understitch to work correctly.
Elevate Your Sewing with This Indispensable Technique
This method of understitching has become an absolutely invaluable tool in my sewing repertoire. I almost cannot believe that I didn’t incorporate it into my projects before and instead struggled with uneven, bulky yokes and puckered necklines. This tip is a real keeper, and I am incredibly happy that I learned it! The difference it makes in the finished quality of garments is truly remarkable, transforming handmade items into pieces that rival professional craftsmanship.
Whether you’re crafting a simple blouse, an elegant dress, or a tailored jacket, integrating understitching into your process will undoubtedly elevate your work. It’s a small step that yields monumental results, providing a clean, durable, and sophisticated finish that speaks volumes about your attention to detail and skill. Take the time to master this fundamental technique, perhaps starting with Evelyn Wood’s excellent tutorial, and watch as your sewing projects achieve a new level of excellence and professionalism.