
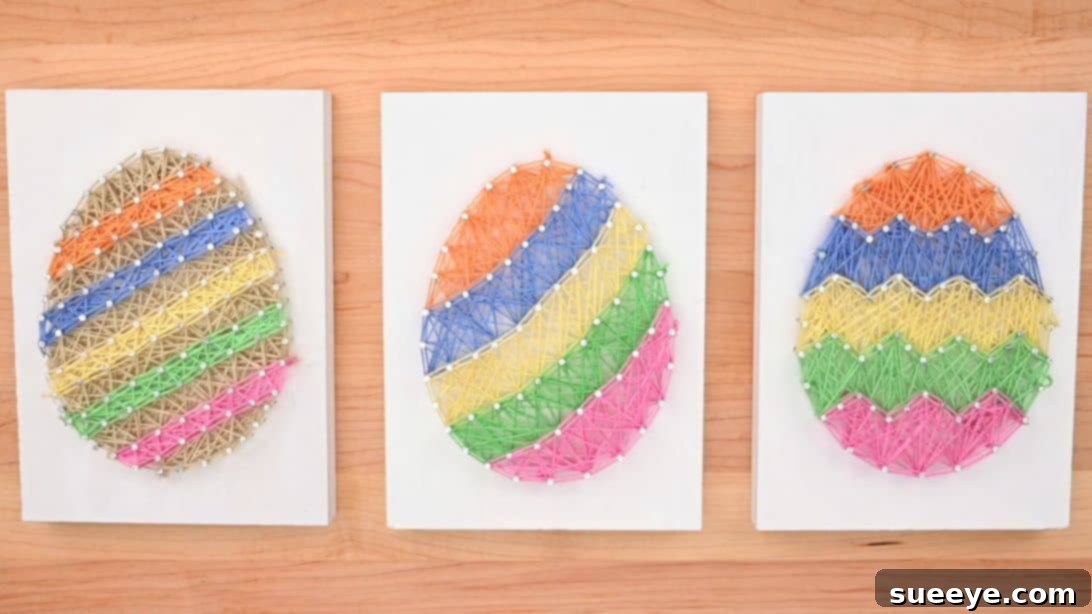
Mastering Easter Egg String Art: A Beginner-Friendly DIY Guide to Stunning Holiday Decor
Welcome to the enchanting world of string art! If you’re looking for a captivating and rewarding DIY craft that adds a personal touch to your home decor, you’ve come to the right place. String art has recently captured my heart, transforming simple materials into intricate and beautiful wall art. The satisfaction of watching a design come to life, thread by thread, is truly unparalleled. As the festive spirit of Easter approaches, there’s no better time to embark on a themed project. Imagine vibrant, colorful Easter eggs meticulously crafted from string, adorning your walls and spreading holiday cheer!
This comprehensive guide will walk you through creating a charming Easter egg string art piece, inspired by the brilliant ideas from One Little Project on YouTube. This specific design is not only visually appealing but also surprisingly accessible for beginners, offering a fantastic entry point into the craft. Whether you’re a seasoned crafter or just starting your DIY journey, this project promises a delightful experience and a beautiful outcome that you’ll be proud to display. Let’s gather our supplies and get ready to weave some magic and create lasting Easter memories!
RELATED: How to Make String Art for Beginners: Essential Tips and Techniques
Why Embrace String Art? The Benefits of This Captivating Craft
String art isn’t just about creating pretty pictures; it’s a therapeutic and rewarding hobby with numerous benefits that extend beyond the finished product. It offers a wonderful creative outlet, allowing you to express your artistic flair through a harmonious blend of colors and geometric patterns. The repetitive and focused nature of wrapping string can be incredibly calming and meditative, making it a perfect activity to unwind and de-stress after a long day. Furthermore, string art projects are highly customizable, enabling you to tailor designs to your personal taste, match existing home decor themes, or create unique seasonal accents. They also make fantastic handmade gifts, adding a personal touch that store-bought items simply can’t replicate. For beginners, it’s a low-cost entry into the world of crafting, requiring only a few basic materials, yet yielding impressively sophisticated results. This Easter egg project, in particular, is a testament to how simple techniques can produce stunning, festive decorations that add warmth and personality to any space.
Essential Materials for Your Easter Egg String Art Masterpiece
Before diving into the creative process, let’s ensure you have all the necessary tools and materials at hand. Having everything prepared not only streamlines the crafting experience but also prevents interruptions, allowing you to fully immerse yourself in the art. This list focuses on quality and efficiency to help you achieve the best results for your vibrant Easter egg string art.
- ¾-inch thick wooden board: The thickness of your wooden board is crucial for both stability and securely holding the nails. A ¾-inch thick board provides ample depth, preventing nails from bending or pulling out easily, thus ensuring the longevity and structural integrity of your artwork. You can choose various types of wood, such as pine, plywood, or MDF, depending on your preference for grain, weight, and finish.
- Nails: Small, thin nails (e.g., ¾-inch or 1-inch brad nails) with a defined head work best for string art. Ensure they have a consistent size and length for a uniform appearance, which is key to a polished final product.
- Embroidery floss, assorted colors: This is where the magic of color comes to life! Embroidery floss offers a wide array of vibrant colors, a subtle sheen, and durability. Choose colors that evoke the Easter spirit – think soft pastels, bright spring hues like lemon yellow, sky blue, or lush green. You can even incorporate metallic threads for an added touch of sparkle.
- Scissors: A sharp pair of scissors is absolutely essential for making clean, precise cuts of your embroidery floss, preventing fraying and ensuring neat transitions between colors.
- Tape: Painter’s tape or masking tape is ideal for securely attaching your pattern to the wooden board. These types of tape are designed to adhere firmly but remove cleanly without damaging the wood’s surface or your pattern.
- Hammer: A small, lightweight hammer is recommended for precise nailing. Its manageable size allows for better control, reducing the risk of hitting your fingers or bending nails.
- Paint or stain (optional): To enhance the aesthetic foundation of your wooden board. A painted or stained background can make your string art colors pop and unify the design. Consider pastel paints for a soft, traditional Easter look or a rich wood stain for a rustic and natural feel.
- Paintbrush (optional): Only needed if you opt to paint or stain your wooden board. A flat brush works well for even coverage, ensuring a smooth and consistent base for your string art.
- Printable pattern: This pattern acts as your blueprint, simplifying the precise placement of nails. A clear, well-designed pattern ensures your Easter egg shape is perfectly symmetrical. You can click here to access the printable pattern directly from One Little Project.
- Sandpaper (fine-grit, optional): For smoothing out the surface of your wooden board before painting, staining, or even if leaving it natural. A smooth surface creates a more professional finish.
- Pencil and Ruler (optional): Useful for marking guide lines, checking nail spacing, or scaling your pattern if you decide to customize its size.
- Safety Glasses (recommended): Always a good idea when hammering, to protect your eyes from any potential wood chips or nail fragments.
Crafting Your Beautiful Easter Egg String Art: A Step-by-Step Tutorial
Now that you have all your materials meticulously gathered, let’s embark on the exciting journey of creating your Easter egg string art. Remember, patience and precision are invaluable, but don’t be afraid to enjoy the process and let your creativity flow. Follow these detailed steps to bring your vision to life, transforming a simple wooden board into a stunning piece of holiday decor.
Step 1: Preparing Your Wooden Canvas for String Art
The foundation of your string art project is crucial, as a well-prepared board sets the stage for a flawless outcome. Begin by thoroughly preparing your wooden board. If the surface feels rough or uneven, gently sand it down with fine-grit sandpaper until it achieves a smooth, uniform texture. This often-overlooked step significantly improves the final look and feel of your artwork, particularly if you plan to apply paint or stain. After sanding, meticulously wipe away any sawdust or debris to ensure a clean surface. Now, if you desire a painted or stained background, this is the perfect time to apply it. Choose a color that will beautifully complement your chosen embroidery floss palette. For an Easter theme, soft pastels like a delicate sky blue, a fresh mint green, or a cheerful pale yellow can create a charming backdrop, while a rich natural wood stain can offer a more rustic and earthy appeal. Apply the paint or stain evenly with a paintbrush, following the grain of the wood for a smooth finish. It is imperative to allow the board to dry completely, which may take several hours or even overnight, depending on the product used and the ambient humidity. Rushing this step could lead to smudges, an uneven finish, or even paint adhering to your string later on. If you prefer the natural look of the wood, you can skip the painting/staining entirely and proceed directly to the next step after ensuring your board is clean and perfectly smooth.
Step 2: Precision Pattern Placement and Secure Nail Attachment
With your wooden board meticulously prepared, it’s time for the intricate work of pattern transfer and nail placement – a critical phase that defines the shape and structure of your Easter egg. Carefully print out the Easter egg pattern from One Little Project, ensuring it’s scaled appropriately to fit your wooden board and desired finished size. Cut out the pattern, leaving a generous margin of paper around the edges. This allowance makes it considerably easier to handle and securely tape the pattern in place. Precisely center the printed pattern on your wooden board, taking care to align it for optimal visual balance. Use painter’s tape or masking tape to firmly secure the pattern, ensuring it lies perfectly flat against the wood with no creases, bubbles, or shifting. This stability is absolutely vital for accurate nail placement. Now, donning your safety glasses, begin attaching the nails with your hammer. Follow the dots or marked points on your printed pattern, carefully hammering a nail into each designated spot. The paramount key here is consistency: aim to drive each nail to a similar depth and height. This uniformity in nail height is crucial for the string to wrap evenly and create a clean, professional, and visually appealing look. Take your time, focus on precision, and maintain a steady hand throughout this process. Safety first: always be exceptionally mindful of your fingers while hammering!
Step 3: Revealing the Outline and Initiating Your String Design
Once all the nails are securely and uniformly in place, the exciting reveal of your Easter egg outline is next! Carefully and slowly rip off the paper pattern from the board. Work with gentle, deliberate movements around each nail to avoid dislodging them or bending them out of alignment. You should now have a perfect, clean outline of your Easter egg shape, beautifully formed by an array of evenly spaced nails. Now, it’s time to introduce your first color of embroidery floss – this will form the foundational base of your intricate design. Select a color that will define the core of your egg. Take one end of the floss and tie a secure double knot around one of the nails located at the outer edge of your egg shape. Trim any excess tail from the knot closely to the nail. This first nail serves as your crucial anchor point. Begin to wrap the string. As clearly demonstrated in the original tutorial, start by twisting and wrapping the floss around nails, strategically moving diagonally across the egg shape. The technique often involves skipping one or two nails in a consistent pattern to create an initial, open-weave structure that forms the basic internal framework and initial depth of the egg. This initial layer gives the egg its basic form and a foundational texture, creating a beautiful canvas for subsequent layers of color and intricate detail. Don’t pull the string excessively tightly, but ensure it is taut enough to stay firmly in place and maintain its shape without sagging.
Step 4: Building Layers and Defining Borders with String Art
After completing your initial diagonal weaving with the first chosen color, it’s time to add more depth, complexity, and distinct structure to your Easter egg design. Now, bring the strand of floss back and wrap it around the nails in the opposite direction from your previous passes. This crisscross pattern dynamically helps to fill in the interior of the egg, creating a fuller, richer, and more intricate texture. Think of it as meticulously weaving a delicate web, where each thoughtful pass adds to the density and overall visual appeal of your artwork. Once you’re completely satisfied with the interior filling and coverage of your first color, it’s time to create a distinct and elegant border that will define the egg’s perimeter. Using the same color of floss (or, for a more nuanced effect, you could switch to a slightly darker or lighter shade for added emphasis and dimension), carefully encircle each nail on the outer perimeter of your egg design. This crucial step defines the edges of your Easter egg, giving it a crisp, clean, and professionally finished look. Again, for added solidity, depth, and visual interest, reverse the direction of your border wrapping, creating a second, reinforcing layer around the perimeter. This intelligent layering technique, applied both internally and externally, significantly adds dimension and makes your string art truly stand out. Secure your string with a firm double knot on a nail once this section is completely finished, trimming any excess floss neatly.
Step 5: Adding Vibrancy and Personalizing Your Easter Egg Art
With the first set of colors and patterns securely in place, you’re now ready to infuse your Easter egg with more vibrant hues and personal artistic flair. Tie off the current strand of yarn securely with a strong double knot around one of the nails, ensuring it won’t unravel over time. Carefully cut off any excess floss, making sure the knot is snug and discreetly tucked against the nail head. Now, joyfully select your next color! Using the same systematic steps outlined previously – tying an initial knot, weaving diagonally across the egg, reversing direction to create fullness, and then meticulously forming a clean border – continue to add more sets of colors. This iterative process allows you to gradually build up the richness, complexity, and visual interest of your Easter egg design. You are free to experiment widely with different color combinations: perhaps transitioning from light to dark (an ombre effect), using complementary colors to create striking and harmonious contrasts, or even designing a rainbow pattern that embodies the joyful spirit of spring. As you gain confidence and ‘get the hang of it,’ feel free to fearlessly explore other intricate patterns within the larger egg shape. Instead of just diagonal wraps, you might try creating concentric circles, straight radiating lines, or even small geometric shapes within the larger egg outline. This is truly where your creativity shines brightest, making each Easter egg unique and a genuine reflection of your artistic vision and personal style. Once all your desired colors and patterns are complete, ensure every single strand is securely knotted and neatly trimmed for a perfectly finished masterpiece.
Tips for String Art Success and Stunning Results
To ensure your Easter egg string art project is not only enjoyable and creatively fulfilling but also yields a professional-looking and durable result, consider integrating these expert tips into your crafting process:
- Nail Consistency is Key: Strive for absolute uniformity in both nail height and spacing. Inconsistencies can make your string lines appear uneven, sag in places, and ultimately detract from the overall aesthetic appeal of your artwork. Consider using a ruler, a small level, or even a pre-drilled guide template if precision is paramount for your design.
- Maintain Even String Tension: Throughout the entire stringing process, it is vital to keep your embroidery floss consistently taut. If the string is too loose, it might sag, shift, or create an untidy appearance; if it’s too tight, it could potentially pull nails out of the board or even snap the floss. Aim for a firm, gentle tension that holds the string securely without stressing the nails or material.
- Experiment with Colors: Don’t be afraid to boldly play with various color combinations! Analogous colors (those next to each other on the color wheel) create harmonious and soothing designs, while complementary colors (those opposite on the wheel) provide vibrant, eye-catching contrasts. Consider ombre effects, where colors subtly blend from light to dark, or even full rainbow patterns for your Easter eggs to symbolize spring’s vibrancy.
- Secure Your Knots Diligently: Every time you start a new strand of floss or finish a section of color, ensure your knots are tied tightly and securely. Double knots are generally the most reliable. For an extra layer of security, you can dab a tiny, almost invisible amount of clear-drying craft glue onto each knot, but be careful not to make the glue visible on the finished piece.
- Work in Manageable Sections: Especially for larger or more complex designs, it can be incredibly helpful to work on one section or one color at a time, fully completing it before moving on to the next. This methodical approach helps to maintain focus, ensures neatness, and prevents tangles or errors.
- Patience is a Virtue: String art, while rewarding, does require a degree of patience, particularly when meticulously hammering numerous nails or untangling a stray piece of floss. Don’t rush the process; instead, embrace and enjoy the meditative and calming aspect of the craft.
- Safety First: Always prioritize your safety. Wear safety glasses when hammering nails to protect your eyes from any potential flying debris or errant nail fragments. Keep your workspace clear and ensure small children and pets are safely away from sharp tools and small parts.
- Good Lighting: Work in a well-lit area. This will help you see the nail holes clearly, ensure accurate string placement, and allow you to appreciate the subtle color variations as you work.
Creative Variations and Display Ideas for Your Easter Egg String Art
Once you’ve mastered the basic Easter egg design and experienced the joy of string art, the possibilities for customization, expansion, and creative expression are truly endless! Here are some inspiring ideas to spark your imagination and help you make your string art uniquely yours:
- Shape Variations Beyond Eggs: While the egg shape is a quintessential classic for Easter, why not venture into other festive symbols? Consider creating charming bunnies, adorable chicks, delicate spring flowers, or even the elegant word “EASTER” in script. Mix and match shapes for a dynamic display.
- Size and Scale Exploration: Experiment with different dimensions. Create a series of mini Easter egg string art pieces that can be strung together to form a charming garland, perfect for a mantelpiece or doorway. Alternatively, go bold with a large statement piece for your wall, making it a striking focal point in any room.
- Embellishments and Enhancements: Add small, whimsical decorative elements after the stringing is complete to give your eggs extra personality. Consider attaching tiny bows made of ribbon, small decorative beads, delicate faux flowers, or even applying glitter glue along the edges or within certain string patterns to give your eggs an extra sparkle and captivating dimension.
- Diverse Background Textures: Instead of just a painted or stained background, experiment with other textures for your board. You could use fabric-covered boards (e.g., burlap for a rustic look), decoupage with patterned paper, or even distress the wood for a charming shabby-chic aesthetic before adding your string art.
- Lighting Integration for Magical Ambiance: For an extra magical touch, carefully weave small, battery-operated LED fairy lights through the finished string art. This creates a beautiful, soft glow that is especially enchanting in the evening, adding warmth and a festive atmosphere to your space.
- Innovative Displaying Your Art: Your finished Easter egg string art can be displayed in a myriad of creative ways. Hang it on a wall individually as a standalone piece or integrate it as part of a larger gallery wall arrangement. Lean it artfully on a mantelpiece, a bookshelf, or a console table. For a unique holiday touch, incorporate smaller pieces into an Easter basket display or use them as distinctive centerpieces for your holiday table. Consider adding a sawtooth hanger to the back of the wooden board for easy and secure wall mounting.
- Personalized Patterns: Beyond the provided pattern, try creating your own! Draw your favorite Easter motifs, or even a personalized initial, onto cardstock and use it as your guide.
Conclusion: Your Handmade Easter Masterpiece Awaits!
There you have it – a comprehensive, step-by-step guide to creating your very own stunning Easter egg string art! This project is a beautiful testament to the elegance and simplicity of DIY crafts, proving that with just a few basic materials, a dash of creativity, and a touch of patience, you can transform ordinary components into extraordinary works of art. From meticulously selecting your perfect wooden board and carefully hammering each nail to skillfully weaving vibrant threads into a captivating Easter egg design, every single step in this process is a wonderful opportunity for creative expression and mindful crafting. The immense satisfaction of displaying a handmade piece, especially one imbued with the joyful spirit of Easter and crafted by your own hands, is truly unmatched and brings a unique warmth to your home.
Whether this is your very first foray into the delightful world of string art or simply another cherished addition to your growing crafting repertoire, we sincerely hope you found this tutorial clear, inspiring, and easy to follow. Don’t hesitate to experiment boldly with different colors, explore diverse patterns, and even try other Easter-themed shapes to truly make this project your own unique creation. We encourage you to share your beautiful string art creations, inspire others with your craft, and most importantly, deeply enjoy the entire process of bringing beauty and personal touch into your home. Happy crafting, and a very Happy Easter to you!
*All image credit belongs to One Little Project via YouTube. Follow and subscribe to their channel for more inspiring DIY projects and creative tutorials!