
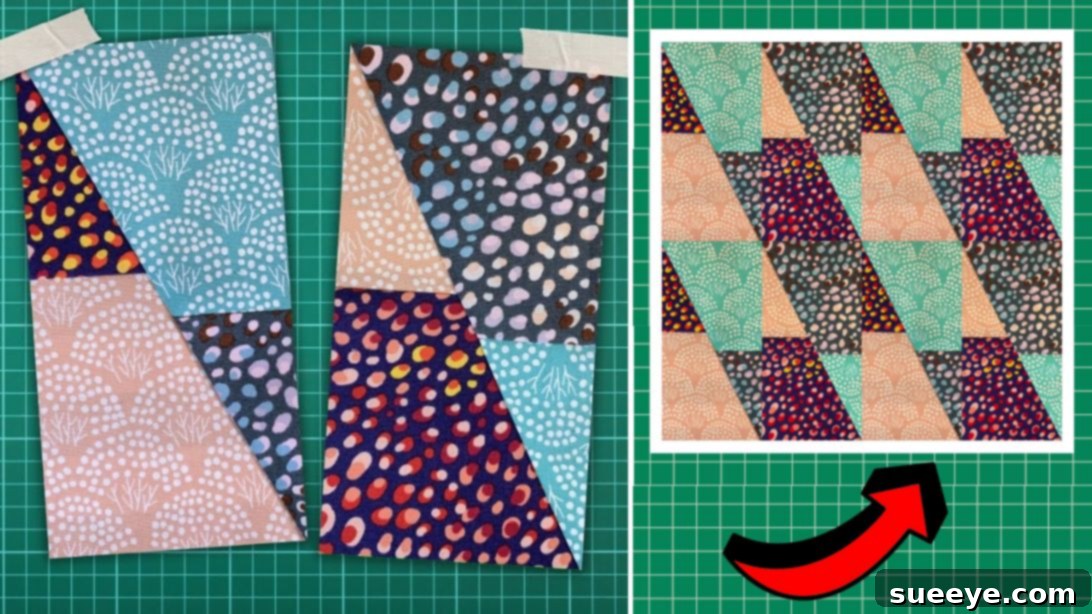
Welcome to the captivating world of quilting, where simple shapes combine to create stunning masterpieces! While you might be familiar with the ever-popular Half-Square Triangle (HST), allow us to introduce you to its equally charming and versatile cousin: the Half-Rectangle Triangle (HRT). HRTs open up a whole new realm of design possibilities, allowing for dynamic movement and unique visual textures in your projects. And the best part? The techniques involved are remarkably straightforward, making this an achievable and rewarding endeavor even for novice quilters. Get ready to add a fantastic new skill to your quilting repertoire!
RELATED: Unlock More Quilt Block Secrets with Easy Half-Square Triangles
To guide you through this exciting journey, we’re thrilled to feature an excellent video tutorial by the talented Teresa DownUnder on YouTube. Her clear instructions will walk you through each step, ensuring a smooth and enjoyable learning experience. Once you’ve mastered the basic HRT block, you’ll be amazed at the array of projects you can create – from elegant table runners that elevate your dining space to intricate, full-sized quilts that become cherished heirlooms. Whatever creative path you choose, one thing is for certain: you will absolutely adore the results of this engaging and beginner-friendly project idea.
Understanding Half-Rectangle Triangles: A Foundation for Creativity
Before we dive into the creation process, let’s take a moment to appreciate what makes Half-Rectangle Triangles so special. Unlike HSTs, which form a square from two triangles, HRTs combine two triangles to create a rectangle. This subtle difference dramatically impacts the visual flow of your quilt. HRTs introduce a sense of motion, allowing you to design zigzags, chevrons, arrows, and other directional patterns that would be challenging to achieve with traditional HSTs. They are perfect for adding modern flair and an architectural feel to your textile art. Moreover, the ease of construction means you can achieve these sophisticated designs without advanced techniques.
Essential Preparations for HRT Success
Precision is a quilter’s best friend, especially when working with geometric shapes like HRTs. A little preparation goes a long way in ensuring your blocks come out perfectly square and your seams align beautifully. Here are some key considerations before you begin:
- Fabric Selection: Choose high-quality quilting cotton. It’s stable, easy to press, and holds its shape well. Contrasting fabrics are crucial for making your HRT design pop. Consider one light and one dark fabric, or two fabrics with distinct patterns, to highlight the triangular shapes.
- Pre-Washing: While not always necessary for small projects, pre-washing your fabric can prevent future shrinkage and color bleeding, especially if you’re mixing different fabric types or colors.
- Pressing: Always press your fabric thoroughly before cutting. Wrinkles and creases can lead to inaccurate cuts and ultimately, wonky blocks. A crisp, flat fabric surface is essential.
- Accurate Cutting: This is perhaps the most vital step. Even a slight deviation in your initial cuts can compound through the entire project. Take your time, use sharp tools, and double-check your measurements.
- Seam Allowance: A consistent 1/4-inch seam allowance is non-negotiable in quilting. Invest in a 1/4-inch presser foot for your sewing machine, or mark a guide on your machine’s throat plate to ensure uniformity.
Materials for Your Half-Rectangle Triangle Project:
Gathering your supplies is the first tangible step toward creating your stunning HRT blocks. Having everything laid out and ready will make the process much smoother and more enjoyable.
- Assorted Print Fabric: As discussed, choose at least two contrasting fabrics. Quality quilting cotton is recommended for its stability and ease of handling. Consider how the colors and patterns will interact to create your desired effect.
- Ruler: A clear acrylic quilting ruler with precise measurements is indispensable for accurate cutting. A longer ruler (e.g., 6×24 inches) is excellent for initial fabric strips, while a smaller square ruler can be handy for squaring up blocks.
- Scissors or Rotary Cutter and a Cutting Mat: A rotary cutter provides unparalleled precision and speed, especially for cutting long strips and multiple layers of fabric. Always use it with a self-healing cutting mat to protect your work surface and prolong blade life. Sharp fabric scissors are also useful for smaller cuts and trimming threads.
- Fabric Pins: Fine, sharp pins are essential for securing fabric layers together before sewing. Ensure they are strong enough to hold fabric securely but fine enough not to distort the fabric.
- Needle and Thread: Choose a good quality, all-purpose polyester or cotton thread that complements your fabric colors. A new, sharp needle in your sewing machine (appropriate for quilting cotton) will prevent skipped stitches and fabric snags.
- Iron, for pressing: An iron is arguably as important as your sewing machine in quilting. You’ll use it constantly to set seams, press fabrics flat, and ensure your blocks lie perfectly. A spray starch can also be a quilter’s best friend for achieving crisp, stable fabric.
- Sewing Machine: Any standard sewing machine in good working order will suffice. Ensure it’s clean, oiled, and fitted with the correct needle and foot for quilting.
How to Make a Half-Rectangle Triangle: Step-by-Step Guide
Now that your materials are ready and you’re mentally prepared, let’s dive into the practical steps of creating your beautiful Half-Rectangle Triangles. Remember, patience and precision are your allies here.
Step 1: Preparing Your Fabric Strips for Sewing
Begin by cutting two strips of contrasting fabrics, each measuring 5 inches wide by 21 inches long. The longer length (21 inches) is typically the width of fabric (WOF) after the selvages are trimmed, providing ample material for multiple HRT units. Carefully place these two contrasting fabric strips together, ensuring their right sides are facing each other. Align all edges precisely. To prevent any shifting during sewing, use fabric pins to secure them in place along the longer edges. A good rule of thumb is to place pins every 2-3 inches. Repeat this process with two other contrasting fabrics if you wish to create a variety of HRT blocks. Stitch these pinned pairs together along both long edges using a consistent ¼ inch seam allowance. Once stitched, take your fabric to the ironing board and press the seams. For HRTs, it’s often beneficial to press the seam allowance towards the darker fabric. This technique helps to “hide” the seam and prevent shadowing on the lighter fabric, resulting in a cleaner finish.
Step 2: Segmenting and Creating Diagonal Cuts
With your sewn fabric pairs now pressed flat, it’s time to cut them into individual segments that will form your HRT units. Using your rotary cutter and ruler, cut these sewn strips into 5-inch wide pieces. From each fabric combination, you will end up with approximately four individual pieces, depending on how accurately you cut and the initial length of your strips. Next, select two contrasting pieces – ideally, one from each of your initial fabric pairings – and place them together with their right sides facing up. The key here is to have different fabric combinations adjacent to each other for the next step. Now, using your ruler and rotary cutter, carefully cut these stacked pieces diagonally in half. This diagonal cut is what transforms your rectangles into triangles. To maximize the dynamic effect of HRTs, you’ll then mix and match these freshly cut diagonal pieces, rearranging them to form new rectangular units where the contrasting fabrics create the distinct HRT look. This is where the magic truly begins to take shape, as you visualize the final design.
Step 3: Assembling and Finishing Your Half-Rectangle Triangles
Now you have several diagonal pieces ready for assembly. Take two pieces that you wish to join and lay them with their right sides facing each other. It’s crucial that the edges match perfectly, especially where the diagonal cuts meet. Refer to the video tutorial by Teresa DownUnder for a visual demonstration of correct alignment – often, one piece will be oriented differently to achieve the desired rectangular block. Pin the edges securely to prevent any slippage. Stitch these pieces together along the aligned edge with your consistent ¼ inch seam allowance. After stitching, return to your ironing board to press the seams nicely and flat. For precision, pressing the seams open can sometimes help reduce bulk, or you can continue pressing towards the darker fabric. Next, you’ll likely notice small “nubs” or dog ears sticking out at the corners where the seams meet. Carefully cut these off to create a clean edge. Finally, and this is a critical step for a professional finish, trim your HRT blocks to their desired, consistent size using your ruler and rotary cutter. This “squaring up” ensures all your blocks are uniform, which is vital for seamless piecing when you assemble your quilt top. Once trimmed, your Half-Rectangle Triangles are ready to be put together, and you can finish your quilt or project however you desire, knowing you’ve built a strong, accurate foundation.
Tips for HRT Mastery and Quilt Success
Creating beautiful quilts is a journey of continuous learning and refinement. Here are some additional tips to help you master Half-Rectangle Triangles and enhance your overall quilting experience:
- Starch Your Fabric: Applying spray starch to your fabric before cutting and sewing can make a huge difference. It stiffens the fabric slightly, making it more stable and easier to cut accurately and preventing stretching while sewing.
- Chain Piecing: If you’re making many HRT blocks, consider chain piecing. Sew one seam, then without cutting the thread, feed the next unit under the needle and sew its seam. Continue until all units are sewn, then clip them apart. This saves time and thread.
- Test Block: Before committing to an entire project, sew one or two HRT units as a test. This allows you to check your seam allowance, cutting accuracy, and pressing technique. Adjust as needed before proceeding with all your fabric.
- Nesting Seams: When joining two HRT blocks, try to “nest” the seams where they meet. This means pressing the seams of adjacent blocks in opposite directions. When you bring them together, the seams will lock into each other, creating a perfect match and reducing bulk.
- Use a Walking Foot: If your sewing machine has a walking foot, this can be incredibly helpful for quilting. It helps feed multiple layers of fabric evenly, preventing shifting and puckering, which is especially useful when joining blocks.
- Square Up Relentlessly: We cannot overstate the importance of squaring up. Even if your initial cuts are perfect, sewing can introduce slight distortions. Trimming each HRT block to a precise, consistent size ensures your final quilt top will lie flat and your points will match.
Creative Project Ideas with Half-Rectangle Triangles
The beauty of HRTs lies in their incredible versatility. Once you’re confident in making these blocks, a world of design possibilities opens up:
- Modern Quilts: HRTs are perfect for contemporary quilt designs, offering dynamic movement and sharp angles. Experiment with different orientations to create chevron, zigzag, or radiating star patterns.
- Table Runners & Placemats: A series of HRT blocks can be sewn together to create a striking table runner or a set of personalized placemats, adding a touch of handmade elegance to your home decor.
- Pillows & Cushions: Incorporate HRT panels into throw pillows to add texture and visual interest to your sofa or bed. They can be a fantastic way to experiment with color palettes.
- Tote Bags & Pouches: Use HRT blocks to create unique panels for tote bags, cosmetic pouches, or project bags. This adds a personalized, quilted touch to everyday accessories.
- Wall Hangings: Design small wall art pieces using HRT blocks. Their directional nature makes them ideal for creating visually impactful decorative elements for any room.
- Quilt Borders: HRTs can be used as a distinctive border design around a central quilt panel or medallion, adding a secondary design element that frames your main pattern beautifully.
*All these amazing images are thanks to Teresa DownUnder via YouTube. Do visit her channel to see more inspiring videos and tutorials like this!
Unlock Your Creativity with Beginner-Friendly Half-Rectangle Triangles
You’ve now explored the fascinating world of Half-Rectangle Triangles, from understanding their unique appeal to mastering the step-by-step construction and discovering endless project possibilities. This beginner-friendly tutorial proves that creating complex-looking quilt blocks doesn’t have to be complicated. With a little practice, a keen eye for detail, and the foundational knowledge shared here, you’ll be creating dynamic and stunning HRT designs in no time.
The journey of quilting is as rewarding as the finished product. Each stitch tells a story, and each block you create adds to your growing skill set. So, don’t hesitate to pull out your fabrics, fire up your sewing machine, and give Half-Rectangle Triangles a try today. Watch Teresa DownUnder’s video, follow along with these detailed instructions, and let your creativity soar. We can’t wait to see the incredible quilts and projects you’ll bring to life using these versatile and beautiful blocks. Happy quilting!