
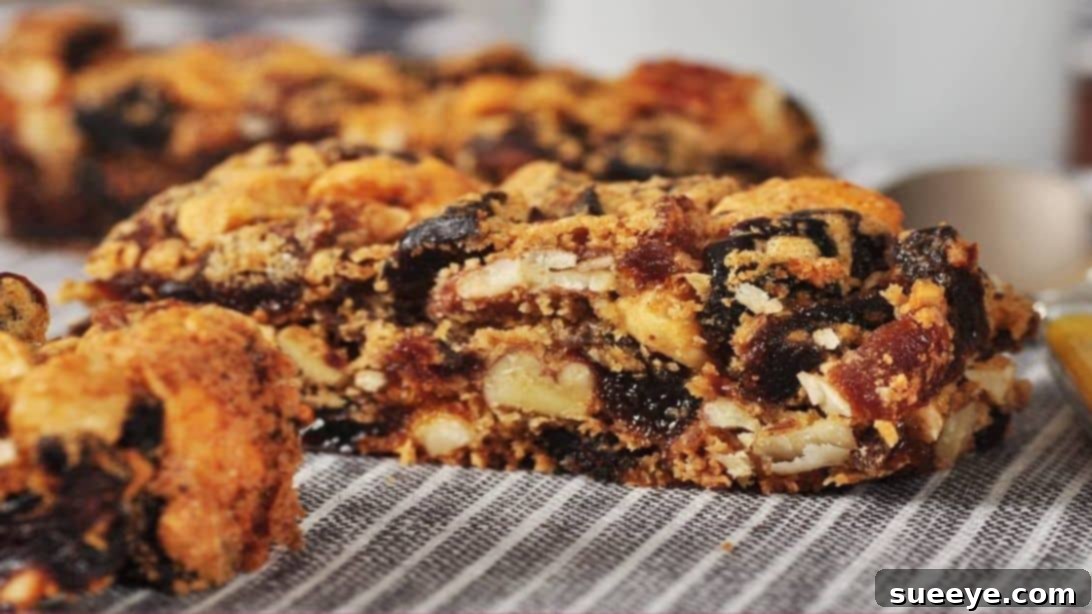
In our fast-paced lives, finding a convenient yet healthy snack can often feel like an uphill battle. We constantly seek options that are delicious, provide sustained energy, and fit seamlessly into our busy schedules. Look no further than these incredible homemade fruit and nut bars, inspired by the culinary wisdom of Joy of Baking. These aren’t just any snack bars; they are a delightful fusion of crunchy nuts and chewy dried fruits, meticulously crafted to offer a burst of flavor and a significant energy boost whenever hunger strikes.
Imagine starting your day with a wholesome, satisfying bar that you’ve made yourself, knowing exactly what goes into it. These grab-and-go treats are perfect for those hectic mornings when time is of the essence, serving as my personal go-to breakfast during a demanding week. Beyond breakfast, they excel as a midday pick-me-up, a post-workout refuel, or a guilt-free dessert. Their versatility and nutritional profile make them a staple for anyone committed to a healthy lifestyle.
While store-bought options abound, nothing quite compares to the freshness, flavor, and peace of mind that comes with baking your own fruit and nut bars at home. You gain complete control over the ingredients, allowing you to tailor them precisely to your taste preferences and dietary needs. Want less sugar? Easy. Craving specific nuts or fruits? No problem. This recipe empowers you to create a truly personalized snack that is both incredibly healthy and irresistibly delicious, far surpassing the often over-processed and additive-laden alternatives found on supermarket shelves.
For those eager to explore more homemade snack options, don’t miss these fantastic recipes: No Sugar Apricot Bars Recipe and for a quick chocolate fix, try the 5-Ingredient Chocolate Oatmeal Energy Bars Recipe. But first, let’s dive into mastering the art of the perfect fruit and nut bar.
The Wholesome Power of Homemade Fruit and Nut Bars
Homemade fruit and nut bars are more than just a tasty treat; they are a powerhouse of nutrition designed to fuel your body effectively. Unlike many commercial snacks laden with artificial ingredients, excessive sugars, and unhealthy fats, these bars rely on the natural goodness of whole foods. They are rich in dietary fiber from both fruits and nuts, which aids in digestion, promotes a feeling of fullness, and helps stabilize blood sugar levels, preventing those dreaded energy crashes.
Nuts provide a fantastic source of healthy monounsaturated and polyunsaturated fats, essential for heart health, brain function, and overall well-being. They also contribute plant-based protein, crucial for muscle repair and sustained energy. Dried fruits offer natural sugars for a quick energy boost, along with essential vitamins, minerals, and antioxidants. When combined, these ingredients create a synergistic effect, providing a balanced profile of carbohydrates, fats, and proteins that make these bars an ideal choice for active individuals, students, professionals, or anyone seeking a wholesome dietary addition.
Making your own bars allows you to bypass common concerns associated with store-bought versions, such as hidden sugars, preservatives, and artificial flavors. You choose organic ingredients, adapt to allergies, and ensure every bite contributes positively to your health journey. This control not only enhances their nutritional value but also elevates the sensory experience, as you savor the fresh, vibrant flavors of real food.
Mastering Your Ingredients: A Guide to Perfect Fruit and Nut Bars
The secret to truly exceptional fruit and nut bars lies in the quality and balance of your ingredients. While the recipe provides a solid foundation, understanding each component allows for endless customization and ensures a perfect outcome every time. Here’s a detailed look at what you’ll need:
Essential Ingredients:
- 1 1/2 cups of chopped nuts: This is your primary source of crunch and healthy fats. A mix is often best for flavor and texture variety.
- 1/2 cup of dried cherries, cranberries, raisins: These small, tangy fruits add bursts of flavor and chewiness.
- 1 cup of dried apricots, mango, and/or papaya (bite-size pieces): Larger, softer dried fruits contribute significant chew and natural sweetness.
- 1/3 cup of mini chocolate chips: An optional but highly recommended addition for a touch of indulgence.
- 1/3 cup of all-purpose flour: Acts as a binder, helping to hold the bars together.
- 1/8 teaspoon of baking soda: A leavening agent that contributes to a tender texture.
- 1/4 teaspoon of salt: Enhances all the flavors, balancing the sweetness.
- 1/3 cup of firmly packed light brown sugar: Provides moisture and a rich, caramel-like sweetness.
- 1 large egg (room temperature): Crucial for binding the ingredients and adding richness. Room temperature eggs emulsify better.
- 1/2 teaspoon of pure vanilla extract: Elevates the overall flavor profile.
Ingredient Deep Dive & Customization Tips:
Nuts: The Crunch Factor
For your 1 1/2 cups of chopped nuts, consider a delightful mix. Almonds, walnuts, pecans, and cashews are excellent choices, each bringing its own unique flavor and texture. For an extra layer of flavor, lightly toast your nuts in a dry pan or oven before chopping. This simple step intensifies their natural oils and nuttiness. Ensure they are coarsely chopped, not finely ground, to maintain that satisfying crunch. You can also add seeds like pumpkin seeds, sunflower seeds, or even a sprinkle of chia or flax seeds for added omega-3s and fiber.
Dried Fruits: Sweetness and Chewiness
The combination of smaller, tart fruits like dried cherries, cranberries, and raisins with larger, sweeter ones like apricots, mango, and papaya creates a dynamic texture and flavor profile. Always opt for dried fruits that are pliable and fresh, ideally without added sugars or sulfites. If your dried fruits are particularly sticky or hard, a quick soak in warm water for a few minutes, followed by patting dry, can help. Ensure larger fruits are cut into uniform bite-sized pieces for even distribution and easier eating. Dates, figs, and even candied ginger can be wonderful additions for unique flavor twists.
Sweeteners: The Heart of the Flavor
Light brown sugar provides not just sweetness but also moisture and a subtle molasses flavor that complements the fruits and nuts beautifully. For those looking to reduce refined sugars, consider natural alternatives. You could experiment with honey or maple syrup, though these are liquid and might require slight adjustments to the flour amount to maintain consistency. Date paste or finely chopped dates can also serve as a natural binder and sweetener, especially if you’re aiming for a no-added-sugar version (though the current recipe is designed around brown sugar’s binding properties).
Binders and Leavening: Structure and Texture
All-purpose flour acts as a foundational binder, ensuring your bars hold their shape. If you’re looking for a gluten-free option, a 1:1 gluten-free baking flour blend should work effectively. Baking soda contributes to a slightly softer texture and aids in browning, while salt is crucial for balancing the sweetness and enhancing all the other flavors, preventing the bars from tasting flat.
Eggs and Extracts: The Finishing Touches
Using a large egg at room temperature is important because it emulsifies more effectively with other ingredients, creating a smoother, more uniform batter. It’s the primary binding agent that gives these bars their structural integrity. Pure vanilla extract adds a layer of warmth and complexity. Don’t underestimate its power; it truly brings all the flavors together. For adventurous bakers, a hint of almond extract, orange zest, or a pinch of cinnamon or nutmeg could also be interesting additions.
Chocolate Chips: A Touch of Indulgence
Mini chocolate chips melt subtly into the bars, providing delightful pockets of chocolatey goodness without overpowering the fruit and nut flavors. You can use dark, milk, or white chocolate chips depending on your preference. For a healthier alternative, consider cacao nibs for a bitter, intense chocolate flavor and added antioxidants.
Step-by-Step Guide to Crafting Your Perfect Fruit and Nut Bars
Making these fruit and nut bars is a straightforward process, but paying attention to each step will ensure your bars turn out perfectly chewy, crunchy, and delicious.
Step 1: Prepare Your Oven and Baking Pan
Before you begin mixing, properly prepare your baking environment. Start by preheating your oven to 325°F (160°C). Ensuring the oven reaches the correct temperature beforehand is crucial for even baking. Position the oven rack in the center. This placement allows for optimal heat circulation, ensuring your bars bake uniformly from top to bottom. Next, prepare an 8-inch square baking pan. Line it with aluminum foil, extending the foil across the bottom and up two opposing sides. This creates “handles” that will make it incredibly easy to lift the entire slab of baked bars out of the pan once cooled, preventing sticking and making cleanup a breeze. For extra non-stick insurance, you can lightly grease the foil or use parchment paper instead.
Step 2: Combine the Dry & Main Ingredients
In a large mixing bowl, combine your chopped nuts, dried fruits (both the smaller berries and the larger bite-sized pieces), and mini chocolate chips. Stir these ingredients thoroughly to ensure they are well distributed. This initial mix is important so that every bite of your bar contains a delightful medley of textures and flavors. Next, add the all-purpose flour, baking soda, salt, and firmly packed light brown sugar to the bowl. Mix everything together meticulously. It’s vital that the flour mixture coats all the nuts and fruits. This helps prevent the fruits from clumping together and ensures they are evenly suspended throughout the batter, rather than sinking to the bottom during baking.
Step 3: Prepare and Integrate the Wet Ingredients
In a separate, smaller bowl, crack the large egg and add the pure vanilla extract. Using a whisk or an electric hand mixer, beat this mixture until it becomes thick, pale in color, and slightly frothy. This process incorporates air into the egg, which contributes to a lighter texture in the finished bars and helps create a stable emulsion. Once beaten, pour the egg and vanilla mixture into your large bowl containing the fruit and nut mixture. Using a spatula or wooden spoon, mix until all the dry ingredients are just coated with the wet batter. Be careful not to overmix; simply ensure everything is thoroughly moistened and combined. The mixture will be thick and sticky.
Step 4: Spread and Compact the Mixture
Carefully transfer the entire fruit and nut mixture into your prepared 8-inch square baking pan. Once it’s all in, spread the mixture evenly across the bottom of the pan. This step is crucial for achieving uniform bars that bake consistently. Using the back of a spoon, a spatula, or even a piece of parchment paper to protect your hands, firmly press the mixture down to compact the batter. Pressing it down tightly helps bind all the ingredients together, preventing the bars from crumbling once baked and cooled. Ensure the surface is as flat and even as possible.
Step 5: Bake, Cool, and Cut
Place the baking pan into your preheated oven and bake for approximately 35 to 40 minutes. The exact baking time may vary slightly depending on your oven. You’ll know the bars are done when they turn a beautiful golden brown color around the edges and begin to pull away slightly from the sides of the pan. The center should feel firm to the touch. Once baked to perfection, remove the pan from the oven and immediately place it on a wire rack to cool completely. This is a critical step; resist the urge to cut them warm! Allowing them to cool fully ensures they set properly, making them easier to cut cleanly without crumbling. Once completely cool, use the foil overhangs to gently lift the entire slab of bars out of the pan. Transfer to a cutting board and use a sharp knife to cut them into your desired squares or rectangular bars. Enjoy your homemade, perfectly chewy, and crunchy fruit and nut bars!
Beyond the Basics: Customization, Storage, and Serving Suggestions
Once you’ve mastered the basic recipe, the world of customization opens up, allowing you to tailor your fruit and nut bars to any preference or occasion. Their robust nature also makes them ideal for various storage methods, ensuring you always have a healthy snack on hand.
Unleash Your Creativity: Customization Ideas
- Nut & Seed Swaps: Experiment with different nut varieties like pistachios, pecans, or macadamias. For an extra nutritional boost and varied texture, incorporate seeds such as pumpkin seeds, sunflower seeds, chia seeds, or flax seeds.
- Dried Fruit Adventures: Don’t limit yourself to the suggested fruits. Try dried blueberries, figs, or even small pieces of crystallized ginger for a zesty kick. Ensure all fruits are soft and pliable; if not, a quick soak and pat dry can help.
- Spice It Up: A pinch of cinnamon, nutmeg, cardamom, or even a touch of pumpkin pie spice can add wonderful depth and warmth to your bars.
- Extract Variations: Beyond vanilla, consider almond extract for a marzipan-like flavor, or a hint of orange or lemon extract to brighten the fruit notes.
- Oatmeal Boost: For added fiber and chewiness, you can substitute a small portion of the flour (e.g., 1/4 cup) with old-fashioned rolled oats. This will give them an even heartier texture.
- Protein Power: If you’re making these for a post-workout snack, consider mixing in a scoop of unflavored or vanilla protein powder with the dry ingredients. You might need to add a touch more liquid (like milk or water) if the mixture becomes too dry.
- Chocolate Alternatives: Aside from mini chocolate chips, you could use white chocolate chips, butterscotch chips, or even a drizzle of melted chocolate over the cooled bars for a decorative and delicious finish. Cacao nibs offer a less sweet, more intense chocolate experience.
Smart Storage Solutions for Freshness
Proper storage is key to maintaining the delicious taste and texture of your homemade fruit and nut bars. These bars are quite forgiving and store well, making them perfect for meal prepping.
- Room Temperature: Store the cooled bars in an airtight container at room temperature for up to 10 days. Layer them between pieces of parchment paper to prevent sticking, especially if they contain chocolate.
- Refrigeration: For a firmer texture and extended shelf life, you can store the bars in an airtight container in the refrigerator for up to 2-3 weeks. This is particularly useful in warmer climates or if your kitchen runs warm.
- Freezing: These bars freeze beautifully! Once completely cooled, wrap individual bars tightly in plastic wrap, then place them in a freezer-safe bag or container. They can be stored in the freezer for up to 3 months. To enjoy, simply thaw them at room temperature for an hour or two, or microwave briefly for a quick warm treat. Freezing is excellent for batch baking and always having a healthy snack on hand.
Serving Suggestions
These versatile bars can be enjoyed in numerous ways:
- Breakfast: A quick and satisfying start to your day, especially when paired with coffee or yogurt.
- Mid-morning/Afternoon Snack: Beat the hunger pangs and stay energized between meals.
- Pre or Post-Workout Fuel: The combination of natural sugars, healthy fats, and protein makes them an excellent choice for sustained energy before a workout or for recovery afterward.
- Healthy Dessert: A wholesome alternative to traditional sweets, satisfying your sweet tooth without the guilt.
- Lunchbox Addition: A perfect, nutritious treat for school or work lunchboxes.
With these tips, your homemade fruit and nut bars will not only be a consistent hit but also a testament to your culinary creativity and commitment to healthy living. Enjoy the journey of making and savoring these delightful treats!
Fruit and Nut Bars Recipe