
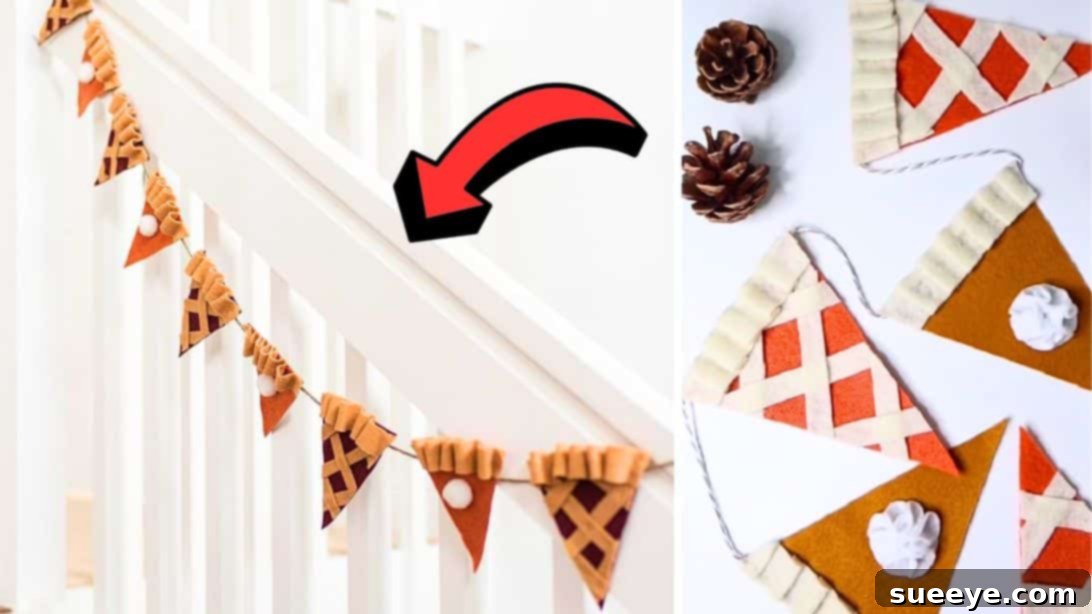
Craft Your Perfect Autumn: The Ultimate DIY Felt Fall Pie Garland Tutorial
As the leaves begin to change and a crispness fills the air, our thoughts naturally turn to the comforting warmth of autumn and the joy of seasonal decorating. If you’re looking to infuse your home with a unique blend of cozy charm and festive cheer for Fall or Thanksgiving, look no further! This delightful DIY Fall Pie Garland is the perfect project to bring that quintessential autumn feeling right into your living space. Forget mass-produced decorations; this homemade garland offers a personalized touch that’s both enchanting and wonderfully easy to create.
Inspired by the delectable pies that define the season, this wall-hanging decoration is a tribute to comfort and homemade goodness. Whether you’re a seasoned crafter or just starting, you’ll find this project incredibly straightforward and rewarding. We’re taking a cue from the fantastic creative minds, specifically drawing inspiration from a lovely garland decor idea shared by annelourayne on TikTok. This simple yet elegant craft is designed to be super easy to make, delivering a neat and impressive result without any fuss. Get ready to transform ordinary felt into a mouth-watering display of autumn joy!
For visual guidance and inspiration, you can check out the original video by @annelourayne on TikTok:
Before I do more Christmas DIYs 😅 #thanksgivingdiy #falldecor
♬ Fall Sounds – Greg
Why Choose a DIY Felt Pie Garland for Your Autumn Decor?
There’s something uniquely satisfying about adorning your home with decorations you’ve made yourself. A DIY felt pie garland isn’t just a craft project; it’s an opportunity to inject personality and warmth into your seasonal display. Unlike store-bought items, your handmade garland will possess a charm that speaks volumes about your care and creativity. It’s also an incredibly budget-friendly way to decorate, utilizing readily available materials that won’t break the bank. This project is perfect for crafters of all skill levels, offering a simple yet elegant outcome. Imagine the cozy atmosphere it will create, reminiscent of home-baked pies and festive gatherings, making your Fall and Thanksgiving celebrations even more special.
Gather Your Essential Crafting Supplies for the Perfect Pie Garland
Before diving into the fun of crafting, ensure you have all your materials ready. The beauty of this project lies in its simplicity and the accessibility of its components. Here’s a detailed look at what you’ll need to create your charming felt pie garland:
- Craft Felt: This is the star of our show! You’ll need felt in several key autumn hues to mimic the appearance of delicious pies.
- Beige: Essential for the pie crusts, providing that warm, baked look. Consider slightly varying shades of beige or light brown for added depth.
- Orange: Perfect for pumpkin pies! This vibrant color will stand out beautifully in your garland.
- Brown: Ideal for chocolate, pecan, or even apple pie fillings, adding a rich, earthy tone.
- White: Crucial for creating fluffy whipped cream dollops that will make your pies irresistible.
- Tip: Look for acrylic craft felt, which is inexpensive and easy to cut. You might also explore wool felt blends for a more luxurious feel, though they are pricier.
- Pen or Pencil: For accurately marking your felt before cutting. A fine-tipped fabric marker could also be used for lighter felt colors.
- Ruler: Absolutely vital for achieving straight lines and consistent strip widths, especially for your lattice crusts. Precision here will elevate the finished look of your garland.
- Sharp Scissors: A good pair of fabric scissors will make cutting felt much easier and cleaner, preventing frayed edges. If you don’t have fabric-specific scissors, ensure yours are sharp and dedicated to craft use.
- Hot Glue Gun and Glue Sticks: Your primary adhesive for this project. Hot glue provides a strong, fast bond, which is perfect for securing felt pieces quickly. Have plenty of glue sticks on hand, as you’ll be doing a fair amount of gluing. Always exercise caution when using a hot glue gun to prevent burns.
- String or Rope: This will be the backbone of your garland, holding all your delicious pie slices together.
- Jute twine or rustic rope: Offers a natural, farmhouse-style aesthetic that complements fall decor beautifully.
- Satin ribbon: For a slightly more refined and elegant look.
- Yarn: A softer, cozier alternative.
- Ensure you have enough length for your desired garland size, plus extra for hanging loops on each end.
Step-by-Step Guide: Crafting Your Festive Pie Garland
Let’s transform these simple materials into a stunning decorative piece that will be the talk of your autumn celebrations. Follow these detailed directions to bring your felt pie garland to life.
Step 1: Laying the Foundation – Pie Shapes and Crust Strips
Begin by preparing the core elements of your pies. On your orange and brown felt sheets, carefully draw a series of triangle pie shapes. The base of the triangle will represent the wide crust edge of your pie slice, and the point will be the tip. For a consistent look, aim for triangles that are approximately 4-6 inches wide at the base and 5-7 inches long. You can create a paper template first to ensure all your pie slices are uniform. Once drawn, meticulously cut out these felt triangles. Take your time with the cutting; clean edges make a significant difference in the final appearance. Next, move to the beige felt. Using your ruler and pen, mark and cut strips that are consistently half an inch wide. These strips will form the delightful lattice crusts and the main crust borders. The length of these strips will depend on the width of your pie slices, so it’s a good idea to cut them a bit longer than needed and trim later. Finally, from your white felt, cut several 1-inch round pieces. These small circles are crucial for crafting the realistic whipped cream dollops.
Step 2: The Art of the Whipped Cream Dollop
Now, let’s create those tempting whipped cream accents. Take one of your 1-inch white felt rounds. Dab a tiny spot of hot glue precisely at the center of the white round piece. Carefully fold the felt circle in half, pressing gently to secure the fold with the glue. Now, take this folded half-circle and fold it again in half, creating a quarter-circle shape. Apply a small amount of hot glue along the newly formed edges where they meet, pressing them together firmly. This technique creates a plump, rounded, and realistic “dollop” effect. Repeat this process, but for some dollops, make them slightly smaller by starting with a smaller initial circle or folding a bit tighter. The goal is to create varying sizes to mimic the natural look of whipped cream. Once you have a few dollops ready, begin assembling them. Adhere a smaller, folded piece inside a larger, similarly folded piece to add volume and texture. Continue hot gluing these individual dollops to each other, building up a cluster that resembles a generous swirl of whipped cream. Once you are satisfied with your whipped cream cluster, carefully hot glue it right at the center of a brown triangle pie felt piece. This will be your “pecan” or “chocolate” pie with a decadent topping.
Step 3: Creating the Lattice Top and Initial Assembly
Next, let’s focus on creating the classic lattice crust for your orange “pumpkin” pies. Take your pre-cut beige felt strips. Begin by laying a few strips diagonally across the orange triangle pie felt, securing the ends with small dabs of hot glue on the underside. Then, weave additional beige strips perpendicular to the first set, creating that iconic criss-cross lattice pattern. Ensure the strips are evenly spaced for a neat and professional appearance. Once the lattice pattern is complete and secured with glue, carefully trim off any excess felt strips extending beyond the edges of the orange pie triangle. This step ensures a clean and finished look for your pie slices. Now, it’s time to prepare the pies for stringing. On the wide edge (the crust edge) of each pie felt piece – both the whipped cream pies and the lattice pies – hot glue a piece of string horizontally across the back. This string should be slightly shorter than the width of the pie, allowing it to be completely hidden once the pie is attached to the main garland string. This initial string acts as a reinforcement and a cleaner attachment point for the final assembly.
Step 4: Assembling Your Delicious Garland
With all your individual pie slices ready, it’s time to bring them together into a beautiful garland. Take your main string or rope – this will be the central hanging component. Starting from one end, take your first pie slice. Apply a line of hot glue along the string you previously attached to the back of the pie (from Step 3). Carefully align this glued string onto your main garland string, pressing firmly to attach. Ensure the pie is oriented correctly so it hangs facing forward. Once secured, cut a small, narrow strip of beige felt, about a quarter-inch wide. Place this strip over the main garland string, directly on top of where the pie is attached, and glue it down securely. This strip acts as an aesthetic “crust” border over the main string, providing a neat finish and further reinforcing the pie’s attachment. Trim off any excess of this beige strip. Now, leave a deliberate space of approximately 2 to 3 inches along the main garland string before adhering your next pie slice. This spacing allows each pie to be clearly visible and prevents the garland from looking too crowded. Continue attaching the pies, alternating between the whipped cream-topped pies and the lattice-crusted pies for a varied and visually appealing pattern. Keep adding the pies in this alternating fashion until you’ve reached your desired garland length and all your delectable pie slices have found their place. Ensure each pie is firmly secured and evenly spaced. Finally, tie loops at both ends of your main string for easy hanging.
Personalizing Your Pie Garland: Beyond the Basics
While the classic pumpkin and pecan pies are delightful, don’t hesitate to personalize your garland further! Consider adding “apple pie” slices with green felt, “cherry pie” with red felt, or “blueberry pie” with purple felt. You could even use brown felt with tiny yellow dots for a “lemon meringue” look. For extra embellishments, tiny felt leaves, miniature faux berries, or even a dusting of glitter glue (applied sparingly to mimic sugar) can add another layer of charm. Experiment with varying the length of your garland to fit different spaces, or create multiple shorter garlands for different rooms. You could even incorporate small real cinnamon sticks or dried orange slices between the felt pies on the string for a fragrant touch that enhances the autumn ambiance. This project is a canvas for your creativity!
Displaying Your Autumn Masterpiece
Once your DIY Fall Pie Garland is complete, the final step is to proudly display your creation! This versatile decoration can adorn a myriad of spaces in your home. Drape it across your fireplace mantel, letting it become the cozy focal point of your living room. Hang it above a doorway or window to welcome guests with its festive cheer. It also looks fantastic strung across a buffet table during your Thanksgiving feast, adding a whimsical touch to your holiday spread. For an extra festive look, intertwine it with string lights or artificial autumn leaves. Your handmade garland is sure to spark joy and compliments, embodying the true spirit of fall and Thanksgiving.
Embrace the Joy of Fall Crafting
Crafting this DIY felt pie garland is more than just making a decoration; it’s an act of embracing the season, fostering creativity, and adding a personal touch to your home. It’s an easy, budget-friendly project that delivers immense satisfaction and a charming result. So, gather your materials, follow these simple steps, and create a beautiful autumn decoration that will be cherished for years to come. We encourage you to share your unique creations and inspire others to bring their own fall visions to life. Happy crafting, and may your home be filled with the warmth and sweetness of the season!
All image credit belongs to annelourayne via TikTok and squeeze.andthankyou on Instagram. Follow and subscribe to her channel for more inspiring DIY content!