
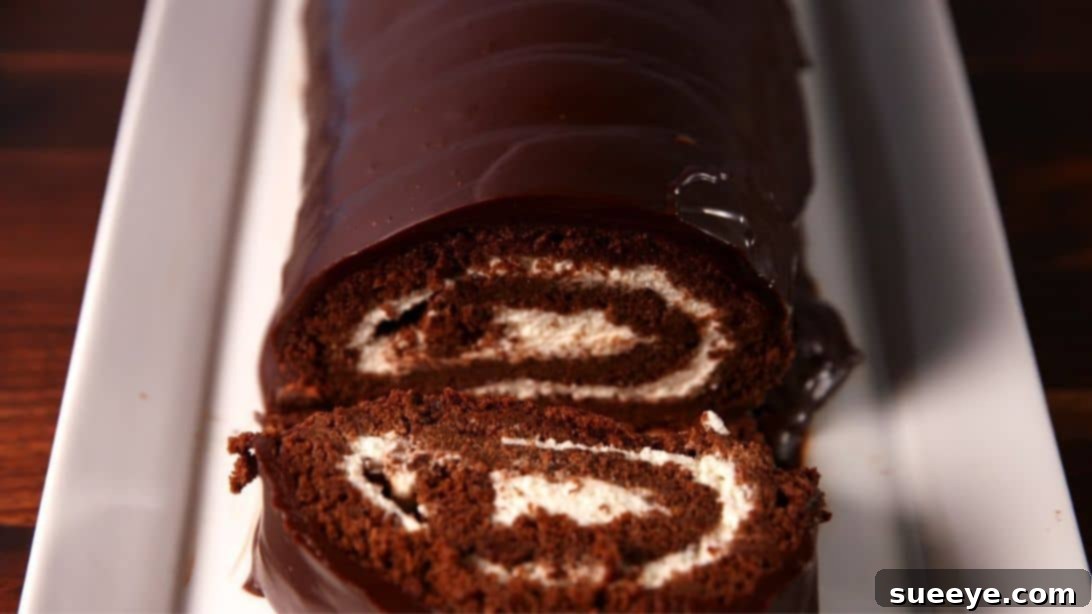
Do you ever crave those nostalgic, delectable snack cakes like Ho Hos, Yodels, or classic Swiss Rolls? Imagine elevating that experience with a homemade version that’s even richer, more decadent, and utterly satisfying. Look no further than this incredible Giant Yodel Ho Ho Cake recipe, inspired by the culinary wizards at Delish. This isn’t just any chocolate cake roll; it’s a masterpiece of moist chocolate sponge, luscious cream filling, and a silky chocolate ganache coating that promises to become your new favorite dessert. Prepare to be amazed – you’ll want to bake this again and again!
Why You Need to Make This Giant Yodel Ho Ho Cake
Forget the artificial flavors and preservatives often found in store-bought treats. This homemade Giant Yodel Ho Ho Cake offers an authentic, superior taste that will delight your senses. Crafted with care, each component—from the tender chocolate cake to the airy cream filling and the glossy chocolate ganache—contributes to an unforgettable dessert experience. It’s surprisingly easy to prepare, even for those new to baking cake rolls, and the result is a show-stopping dessert that’s perfect for any occasion, from family gatherings to special celebrations. Its impressive appearance belies its straightforward creation, making you look like a pastry pro without the fuss.
RELATED: If you love chocolate rolls, you might also enjoy our Easy Chocolate Swiss Roll Cake recipe for another delightful variation.
This recipe breaks down into three main, manageable parts: creating the perfect chocolate cake base, whipping up a light and fluffy cream filling, and preparing a smooth, rich chocolate ganache. Each step is designed to be simple and enjoyable, leading you to a dessert that tastes anything but artificial. If you’re a true fan of chocolate and cream combinations, this homemade Yodel Ho Ho Cake is an absolute must-try. Get ready to indulge in its profoundly rich, exquisitely creamy, and intensely chocolatey flavors that will leave you craving just one more slice.
For more sensational chocolate dessert ideas, explore these popular recipes: Easy Chocolate-Covered Mini Cakes Recipe, Easy Southern Chocolate Delight Recipe, and No-Bake Chocolate Balls Recipe. Each offers a unique way to satisfy your chocolate cravings!
Essential Ingredients for Your Easy Yodel Ho Ho Cake
Creating this magnificent cake starts with selecting quality ingredients. Using fresh, high-quality components ensures the best flavor and texture for your homemade treat. Here’s what you’ll need for each delicious layer:
For the Rich Chocolate Cake Base:
- 1 cup of semisweet chocolate chips: These will give your cake its deep, satisfying chocolate flavor. Choose a good quality brand for the best results.
- 3 tablespoons of coffee: Brewed coffee enhances the chocolate flavor without making the cake taste like coffee. It’s a secret ingredient for rich chocolate desserts!
- 6 large eggs (room temperature): Room temperature eggs incorporate more air, resulting in a lighter, more voluminous cake. This is crucial for a roll cake.
- 2/3 cup of granulated sugar: Provides sweetness and helps create a tender crumb.
- 1 teaspoon of vanilla extract: A staple in baking, vanilla complements and deepens the chocolate notes.
- 1/4 teaspoon of kosher salt: Balances the sweetness and brings out the other flavors.
- 1 tablespoon of unsweetened cocoa powder: Adds an extra layer of chocolate intensity and a beautiful dark color to the cake.
For the Fluffy Cream Filling:
- 1 1/2 cups of heavy or whipping cream: Ensure it’s very cold for optimal whipping. Heavy cream whips up thicker and holds its shape better than light cream.
- 1/4 cup of powdered sugar: Sweetens the cream and helps stabilize it for a smooth, airy texture.
- 1/3 teaspoon of vanilla extract: Adds a lovely aromatic touch to the creamy filling.
For the Velvety Chocolate Ganache Coating:
- 2 cups of chocolate chips: Again, opt for good quality semisweet chocolate chips for a smooth, luscious ganache that coats beautifully.
- 1 cup of heavy cream: The key to a rich and pourable ganache. Just like for the filling, quality matters.
How to Make the Giant Yodel/Ho Ho Cake: A Step-by-Step Guide
Follow these detailed steps to create your magnificent homemade Giant Yodel Ho Ho Cake. Precision and patience are your best tools in the kitchen for this delightful recipe!
Step 1: Prepare Your Baking Environment
Begin by preheating your oven to 350°F (175°C). It’s crucial for the oven to be at the correct temperature before the cake goes in. Position an oven rack in the bottom half of your oven. Next, take a 10″ x 15″ rimmed baking sheet. Generously spread butter across the bottom and up the sides of the pan. This helps the parchment paper adhere smoothly. Line the buttered pan with parchment paper, ensuring that the short sides of the paper extend slightly beyond the edges of the pan. This overhang will act as a “sling” to help you lift the baked cake later, making the rolling process much easier.
Step 2: Gently Melt the Chocolate Mixture
In a medium-sized microwave-safe bowl, combine your semisweet chocolate chips and the brewed coffee. Microwave the mixture in 30-second intervals, stirring thoroughly after each interval, until the chocolate is just melted and smooth. Be careful not to overheat the chocolate, as this can cause it to seize. Once melted, set the bowl aside to cool slightly while you prepare the egg mixture. It should be warm but not hot when added to the eggs.
Step 3: Create the Ribbony Egg Yolk Mixture
In a large mixing bowl, add the room temperature egg yolks. Using an electric mixer on medium-high speed, beat the yolks until they become pale in color and develop a creamy consistency. This process incorporates air and begins to build the cake’s structure. Gradually add the granulated sugar to the egg yolks while continuing to beat. Continue mixing until the mixture becomes thick and “ribbony,” meaning when you lift the beaters, a ribbon of batter falls back into the bowl and slowly disappears into the surface. At this point, gently fold in the slightly cooled melted chocolate mixture until just combined. Overmixing here can toughen the cake.
Step 4: Prepare and Fold in the Egg Whites for Lightness
In a separate, impeccably clean bowl, add the egg whites and the kosher salt. It’s essential that the bowl and beaters are grease-free to ensure the egg whites whip properly. Beat with an electric mixer on high speed until stiff peaks form. Stiff peaks mean that when you lift the beaters, the egg whites stand straight up without collapsing. This aeration is key to a light and airy chocolate cake. Gently fold about one-quarter of the whipped egg whites into the chocolate batter mixture to lighten it. Then, carefully fold in the remaining whipped egg whites in two additions, using a light hand, until just combined. The goal is to retain as much air as possible.
Step 5: Bake Your Chocolate Sponge Cake to Perfection
Pour the carefully prepared batter into your buttered and parchment-lined baking pan, using an offset spatula to gently spread and smoothen the top evenly. Place the pan into your preheated oven and bake for approximately 15 minutes, or until the cake springs back when lightly touched and feels dry to the touch. To confirm doneness, insert a toothpick into the center; it should come out clean. Avoid overbaking, as this can lead to a dry cake that cracks when rolled. A slightly underbaked cake is more flexible.
Step 6: Prepare the Cake for Rolling
Once baked, immediately transfer the hot pan to a wire cooling rack. This quick cooling prevents the bottom of the cake from getting soggy. Place two layers of damp (not soaking wet) paper towels directly on top of the cake for about 10 minutes. The steam from the damp towels keeps the cake moist and pliable. After 10 minutes, carefully remove the paper towels. Using a thin, sharp knife, gently loosen the edges of the cake from the pan. Lightly sift a thin layer of unsweetened cocoa powder over the entire surface of the cake. This helps prevent sticking. Overlap two layers of wax paper lengthwise over the cake. Then, place another baking sheet or a flat cutting board over the wax paper and carefully invert the cake onto it. Gently peel off the parchment paper lining from the bottom of the cake.
Step 7: The Initial Roll for Flexibility
While the cake is still warm and pliable, use the wax paper to help you. Starting from one of the short ends, carefully and snugly roll the cake into a tight spiral. The wax paper will roll up with the cake, acting as a barrier. This initial roll, done while the cake is warm, “trains” the cake to hold its rolled shape and significantly reduces the risk of cracking later. Let the rolled cake cool completely at room temperature, still wrapped in the wax paper, on the cooling rack. This step is crucial for stability.
Step 8: Prepare the Luscious Whipping Cream Filling
Once your chocolate cake roll has cooled completely, it’s time to prepare the delicious cream filling. In a large, chilled mixing bowl (you can chill the bowl and beaters in the freezer for 10-15 minutes for best results), combine the very cold heavy cream, powdered sugar, and vanilla extract. Using an electric mixer, beat on high speed until stiff peaks form. This means the cream should be thick enough to hold its shape when the beaters are lifted. Be careful not to overbeat, as it can turn into butter.
Step 9: Fill, Reroll, and Chill
Carefully unroll the cooled chocolate cake. Gently peel away the wax paper. Spread the freshly whipped cream filling evenly over the entire surface of the cake, leaving a small border around the edges. Now, carefully reroll the cake, again starting from the short end, but this time without the wax paper inside. Take your time to make it as neat and tight as possible. Once rolled, gently transfer the cake to a serving plate, placing it seam-side down to prevent unraveling. Refrigerate the cake while you prepare the chocolate ganache. This chilling step helps the cake and filling set.
Step 10: Create the Silky Chocolate Ganache and Final Chill
For the luscious ganache, place your chocolate chips in a medium heatproof bowl and set aside. In a small saucepan, heat the heavy cream over medium heat until it just begins to lightly bubble around the edges. Do not bring it to a rolling boil. Immediately remove the saucepan from the heat and pour the hot cream over the chocolate chips in the bowl. Let the mixture sit undisturbed for 5 minutes. This allows the hot cream to melt the chocolate evenly. After 5 minutes, begin whisking from the center outwards until the ganache is completely smooth, glossy, and uniform. The heat from the cream will melt the chocolate into a beautiful, pourable consistency. Carefully pour the warm ganache evenly over the chilled cake roll, allowing it to drip down the sides for a professional finish. Use an offset spatula to spread if necessary. Once fully coated, return the cake to the refrigerator for about 15-20 minutes, or until the ganache is set and firm to the touch. This final chill ensures everything holds together perfectly.
Pro Tips for a Perfect Giant Yodel Ho Ho Cake
- Room Temperature Eggs are Key: For the best volume and texture in your cake, always ensure your eggs are at room temperature. This helps them incorporate more air, leading to a lighter, more pliable sponge.
- Don’t Overmix the Batter: Once you’ve added the dry ingredients or folded in the egg whites, mix only until just combined. Overmixing develops gluten, which can make your cake tough and prone to cracking.
- Gentle Folding: When incorporating the whipped egg whites, use a gentle folding technique (a spatula moving down through the center, across the bottom, and up the side of the bowl) to maintain as much air as possible.
- Do Not Overbake: An overbaked cake will be dry and brittle, making it nearly impossible to roll without cracking. Keep a close eye on it; it’s better to slightly underbake than overbake for a roll cake.
- Roll While Warm: The initial roll right out of the oven is critical. The warmth of the cake makes it flexible and helps it “remember” the rolled shape, preventing major cracks once it’s completely cooled.
- Chill Your Cream and Bowl: For the best whipped cream, ensure your heavy cream, mixing bowl, and even the beaters are thoroughly chilled before whipping. Cold temperatures help the cream achieve stiff peaks more quickly and hold its shape longer.
- Patience with Ganache: Allow the hot cream to sit over the chocolate chips for the full 5 minutes before whisking. This ensures the chocolate is fully melted by residual heat, resulting in a perfectly smooth and lump-free ganache.
- Quality Ingredients Matter: Especially for chocolate, using good quality chips will significantly impact the flavor of both the cake and the ganache.
Variations and Serving Suggestions
While the classic Giant Yodel Ho Ho Cake is divine on its own, feel free to get creative with variations:
- Mint Chocolate Delight: Add a touch of peppermint extract to the cream filling for a refreshing twist.
- Orange Zest Infusion: Incorporate finely grated orange zest into both the cake batter and the ganache for a bright, citrusy note that pairs wonderfully with chocolate.
- Coffee Kick: Enhance the coffee flavor by brushing the cooled cake with a light coffee syrup before adding the filling.
- Nutty Crunch: Sprinkle finely chopped toasted nuts (like pecans or hazelnuts) over the cream filling before re-rolling for added texture and flavor.
- Berry Beautiful: Garnish with fresh raspberries or strawberries just before serving for a pop of color and tartness that cuts through the richness.
- Cream Cheese Filling: For a richer, tangier filling, try incorporating cream cheese into your whipped cream (ensure it’s softened and beaten smooth first).
Serve your magnificent Giant Yodel Ho Ho Cake chilled, sliced into generous portions. It’s an ideal dessert for birthdays, holidays, or any occasion that calls for a truly special treat. Pair it with a glass of cold milk, a cup of coffee, or a scoop of vanilla bean ice cream for an extra indulgent experience.
Storage Tips for Your Homemade Yodel Ho Ho Cake
To keep your Giant Yodel Ho Ho Cake fresh and delicious:
- Refrigeration is Key: Because of the fresh cream filling and ganache, this cake must be stored in the refrigerator.
- Airtight Container: Place leftover cake in an airtight container to prevent it from drying out or absorbing odors from other foods in the fridge.
- Shelf Life: Stored properly, the cake will remain fresh for up to 3-4 days in the refrigerator.
- Freezing: You can also freeze slices of the cake! Wrap individual slices tightly in plastic wrap, then place them in an airtight freezer-safe container or freezer bag. It can be frozen for up to 1 month. Thaw in the refrigerator overnight or at room temperature for a couple of hours before serving.
Indulge in the Ultimate Chocolate Cake Roll Experience
Creating this Giant Yodel Ho Ho Cake is more than just baking; it’s an act of culinary delight, transforming simple ingredients into a truly spectacular dessert. From the initial whisk of the eggs to the final pour of the glossy ganache, each step brings you closer to a sweet reward that tastes infinitely better than any store-bought equivalent. The moist chocolate cake, the fluffy vanilla cream, and the decadent chocolate coating come together in perfect harmony, making every bite a moment of pure bliss. So, gather your ingredients, follow these detailed instructions, and prepare to impress yourself and everyone you share this masterpiece with. This isn’t just a cake; it’s a celebration of homemade goodness and a testament to the joy of baking. Enjoy your journey to creating the ultimate chocolate cake roll!