
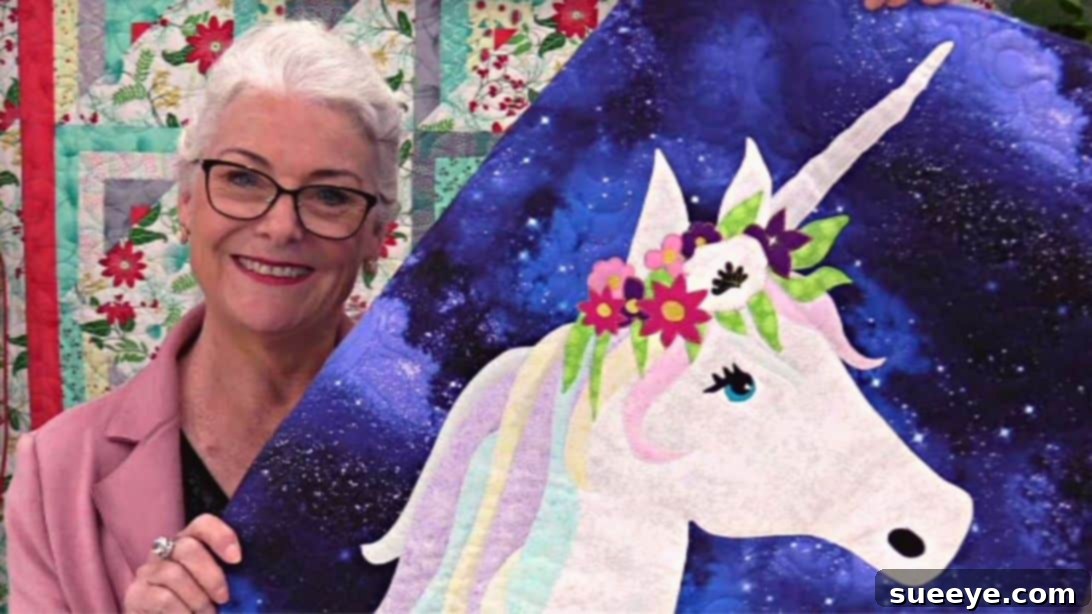
Create a Magical Unicorn Applique Quilt: An Easy Step-by-Step Tutorial for All Skill Levels
Embark on a delightful creative journey with this enchanting unicorn applique quilt, inspired by the brilliant insights from SewVeryEasy. Whether you are taking your first stitches into the world of quilting or are a seasoned crafter seeking a whimsical new challenge, this project promises not only a rewarding experience but also a truly magical finished piece. Known for its charming design and surprising simplicity, this unicorn quilt can be completed quicker than you might imagine, potentially in a single day of focused crafting. Its versatile pattern also means the captivating unicorn motif can be adapted to various other textile projects, from decorative wall hangings to cozy throws, adding a touch of fantasy wherever it goes.
Quilting, at its heart, is an art form that blends practicality with artistic expression. It’s about taking disparate pieces of fabric and transforming them into a cohesive, warm, and beautiful item. This particular unicorn applique quilt stands out for its playful character, making it an ideal gift for children, a whimsical addition to a nursery, or simply a joyful creation for yourself. The applique technique, where fabric shapes are attached to a larger background fabric, allows for incredible detail and vibrant storytelling through textiles. By following this comprehensive guide, you’ll learn not only how to construct this specific quilt but also gain valuable skills in fabric preparation, precise cutting, careful fusing, and decorative stitching that will serve you well in all your future sewing adventures.
Essential Materials for Your Unicorn Quilt Project
Gathering all your supplies before you begin is a crucial step in ensuring a smooth and enjoyable crafting process. Here’s a detailed list of what you’ll need to bring your unicorn quilt to life, along with some helpful tips for selection:
- Background Fabric: This will be the canvas for your unicorn. Opt for a high-quality quilting cotton that is stable and easy to work with. Consider light, solid colors like white, cream, pale blue, or a subtle pastel print to make your colorful unicorn truly pop. The amount needed will depend on the desired size of your quilt, so always check your pattern requirements.
- Batting Fabric: The heart of your quilt, batting provides warmth, loft, and a lovely texture for quilting stitches. Cotton batting is a popular choice for its natural feel and breathability, while polyester offers more loft and can be lighter. Blends often provide the best of both worlds. Choose a batting appropriate for the size of your quilt, ensuring it’s slightly larger than your background fabric to allow for trimming.
- A Collection of Colorful Fabrics: This is where the magic truly happens! Select a variety of vibrant scraps, fat quarters, or yardage for your unicorn’s body, mane, tail, horn, and eye. Think about a spectrum of colors for the mane and tail to give it a whimsical, rainbow effect. Consider different patterns and textures within your chosen color palette to add depth and interest to your applique design. Small floral prints, polka dots, or geometric patterns can be delightful for the unicorn’s features.
- Parchment Paper or Fusing Mat: Absolutely essential for working with fusible web. Parchment paper (the kind used for baking) or a dedicated fusing mat creates a non-stick surface that protects your iron and ironing board from fusible adhesive. You’ll use this to build your applique pieces without them sticking to unwanted surfaces.
- Sharp Fabric Scissors or Rotary Cutter and Mat: Precision is key in quilting. Invest in good quality fabric scissors that are kept solely for fabric, or a rotary cutter with a self-healing mat for quick, accurate cuts. A ruler designed for quilting will also be invaluable for squaring up fabrics.
- Needle and Thread: For sewing, you’ll need all-purpose sewing thread in colors that coordinate with your fabrics, especially for the applique stitching. Cotton or polyester threads are suitable. Ensure you have sharp sewing machine needles (e.g., universal or quilting needles) in the correct size for your fabric weight.
- Fabric Pins and Clips: These tools are invaluable for holding fabric layers together securely before sewing. Quilting pins are longer and finer, while wonder clips are great for thicker sections or when you want to avoid pinholes.
- Sewing Machine: A reliable sewing machine with basic straight stitch and zigzag stitch capabilities is all you need. If your machine offers a blanket stitch or satin stitch, these can be fantastic for decorative applique edges. Make sure your machine is clean, oiled, and has a fresh needle before you start.
- Unicorn Applique Pattern: This project requires a specific pattern for the unicorn’s shape. The provided link leads to the “Unicornia” pattern by Madi Hastings, which is perfectly suited for this magical design. Downloading and printing this pattern accurately is your first concrete step towards creating your beautiful quilt. Ensure you print at 100% scale to maintain the correct dimensions.
Step-by-Step Guide to Crafting Your Unicorn Applique Quilt
With your materials ready and your workspace organized, let’s dive into the creative process. This detailed guide will walk you through each stage, ensuring a successful and enjoyable quilting experience.
Step 1: Preparing Your Applique Pieces with Precision and Care
The foundation of any beautiful applique project lies in meticulous preparation. This initial stage focuses on transforming your chosen fabrics into the distinct shapes of your unicorn, ready for assembly.
Begin by carefully reviewing your unicorn applique pattern. This will help you visualize which specific fabric colors and prints will bring each part of your unicorn to life – from the majestic body to the vibrant mane, intricate horn, and sparkling eye. Take your time to make these aesthetic decisions, as they will define the character of your finished quilt.
Once you’ve assigned colors, select the first segment of your pattern and the corresponding fabric. Lay your chosen fabric right-side up on your ironing surface. Now, take a piece of fusible web (following the manufacturer’s instructions, typically the paper-backed adhesive). Place the fusible web onto the *wrong side* of your fabric. Using a warm iron, press the fusible web firmly onto the fabric, ensuring it adheres smoothly and completely without any bubbles or wrinkles. The heat will bond the adhesive to the fabric. Repeat this process for all the remaining pattern pieces and their respective fabrics until every fabric segment has fusible web attached to its wrong side.
Next, carefully place each pattern piece (the paper template) onto the paper backing of its corresponding fused fabric. Trace the pattern piece accurately onto the paper backing. Once traced, use your sharp fabric scissors or a rotary cutter to meticulously cut out each fabric shape, following your traced lines with utmost precision. Accuracy here is paramount for a clean applique finish. After cutting, gently peel away the paper backing from each fused fabric piece, revealing the adhesive on the fabric’s wrong side. Set these prepared applique pieces aside, organized by section (e.g., all body pieces together, all mane pieces together).
Now, lay your fusing mat or a sheet of parchment paper over your pattern guide. This protective layer ensures that as you assemble your unicorn, the fusible adhesive doesn’t accidentally transfer to your ironing surface or iron. Refer to your pattern guide underneath the mat/paper. One by one, take your prepared applique pieces, remove any remaining paper backing if not already done, and carefully position them on the fusing mat or parchment paper, precisely aligning them with the guide beneath. This is where your unicorn starts to take shape! As you place each piece, give it a quick, light press with a warm iron to temporarily fuse it in place and prevent shifting. This allows you to build entire sections of the unicorn (like the head or a segment of the mane) before permanently attaching them to the background fabric. Once an entire section is complete and lightly fused together on the mat, carefully peel the entire assembled section off the mat/parchment paper. Handle it gently to avoid distorting the shapes. Set this completed section aside and proceed to build any remaining complex sections of your unicorn.
Step 2: Assembling and Quilting Your Unicorn Masterpiece
With all your unicorn’s delightful components ready, it’s time for the exciting stage of assembly and bringing your quilt to completion. This step involves carefully positioning your applique, securing it with stitching, and then finishing the quilt itself.
After building all the individual sections of your unicorn (leaving smaller, delicate pieces like the horn and eyes for a slightly later, more precise attachment), it’s time to transfer them to your chosen background fabric. Lay your background fabric smoothly and flat on your ironing board. Carefully arrange the fused unicorn pieces onto the background fabric, following your pattern guide for perfect placement. Take your time to ensure the unicorn is centered and positioned exactly where you want it. Once satisfied with the arrangement, use your warm iron to firmly press each applique piece onto the background fabric. Apply even pressure and hold the iron in place for the recommended time (check your fusible web instructions) to create a strong, permanent bond. This initial fusing will hold your applique in place securely before you add any stitching.
Now, prepare your quilt sandwich. This involves layering your backing fabric (right side down), then your batting, and finally your background fabric with the fused unicorn applique (right side up). Secure these layers together using basting pins, safety pins, or temporary spray adhesive. Proper basting prevents shifting during the quilting process. To make the entire piece more manageable, especially if it’s a larger quilt, gently roll all sides of the background fabric and batting inward towards the center, creating a more compact and easier-to-handle roll. This is particularly helpful when working with a standard sewing machine, as it reduces the bulk you need to maneuver under the needle.
Bring your basted quilt sandwich to your sewing machine. It’s time to permanently attach the unicorn applique with decorative stitching. There are several popular applique stitching techniques you can use:
- Satin Stitch: A dense, narrow zigzag stitch that completely covers the raw edge of the applique, giving it a smooth, finished look.
- Blanket Stitch: A decorative stitch that creates a hand-stitched appearance around the edge, with stitches extending out from the applique.
- Straight Stitch: A simple straight stitch just inside or on the edge of the applique for a clean, subtle finish.
Choose the stitch that best suits your desired aesthetic. Use coordinating thread colors or contrasting ones for a more defined outline. Start carefully sewing around the edges of all the main unicorn pieces, securing them to the background fabric. Be mindful of your speed and use a slow, controlled pace, especially around curves. Now is also the time to attach the smaller, more intricate details such as the unicorn horn and the eye. Precisely position these tiny pieces, give them a quick press to adhere, and then carefully sew around their edges. Once all the applique stitching is complete, give the entire quilt top another good press to smooth everything out.
With the applique securely stitched, it’s time for the final stages of quilting and binding. First, carefully trim the edges of your background fabric, squaring up the entire quilt sandwich so all layers are even and perfectly aligned. Next, you will quilt the layers together. Quilting involves stitching through all three layers (quilt top, batting, and backing) to secure them, prevent shifting of the batting, and add texture. You can choose from various quilting methods:
- Straight-line quilting: Simple lines stitched across the quilt, often following the applique or a grid pattern.
- Free-motion quilting: Allows for intricate, continuous designs, such as stippling or loops, where you “draw” with your sewing machine.
- Outline quilting: Stitching just outside the applique shapes to make them stand out.
Select a quilting design that complements your unicorn and adds to the overall charm. After the quilting is complete, the final step is to bind your quilt. Binding provides a clean, durable finish to the raw edges of your quilt. This typically involves cutting strips of fabric, joining them to create a continuous binding strip, attaching it to the front edge of the quilt, turning it over, and then hand-stitching or machine-stitching it to the back. Take your time with the binding for neat corners and a professional look. Once your binding is complete, your magical unicorn applique quilt is officially done!
Congratulations on completing your enchanting unicorn applique quilt! This project is a wonderful testament to creativity, patience, and the joy of handmade crafts. The satisfaction of seeing your fabric pieces transform into a magical creature is truly unparalleled. Remember, every stitch tells a story, and your unique touch makes this quilt truly special. Don’t hesitate to share your finished creation with friends and family, inspiring others to embark on their own quilting adventures.
*All image credit belongs to SewVeryEasy via YouTube. Follow and subscribe to her channel for more inspiring and easy-to-follow quilting tutorials!
Unicorn Applique Quilt Tutorial: FAQs and Further Tips
To help you further perfect your unicorn applique quilt and ensure a smooth crafting experience, here are some frequently asked questions and additional tips:
Tips for Fabric Selection and Preparation:
- Pre-washing Fabrics: While some quilters prefer not to pre-wash to avoid shrinkage, pre-washing and drying your fabrics can prevent future color bleeding and significant shrinkage after the quilt is finished. If you do pre-wash, press them thoroughly to remove all wrinkles before cutting.
- Choosing Contrasting Colors: For your unicorn’s mane and tail, consider choosing fabrics with high contrast to make each strand stand out. Varying light, medium, and dark tones will add depth and visual interest.
- Fusible Web Quality: Not all fusible webs are created equal. Invest in a good quality, lightweight fusible web that offers strong adhesion without adding too much stiffness to your applique pieces.
Applique and Stitching Advice:
- Practice Makes Perfect: If you’re new to applique stitching, practice on some scrap fabric first. Experiment with different stitch types (satin, blanket, straight) and stitch lengths to find what you like best and what works well with your machine.
- Needle Position: When doing applique, if your machine allows, adjust your needle position slightly for better control, especially around tight curves and points.
- Stabilizer for Applique: For very intricate appliques or stretchy fabrics, a temporary tear-away or wash-away stabilizer placed under the background fabric can help prevent puckering during stitching.
- Small Details: When attaching tiny pieces like the unicorn’s eye, a dab of fabric glue stick can temporarily hold them in place before you stitch, making it easier to maneuver.
Quilting and Finishing Touches:
- Basting is Key: Don’t rush the basting process. A well-basted quilt prevents fabric layers from shifting, which can lead to puckers and uneven quilting.
- Quilting Foot: Consider using a walking foot on your sewing machine for quilting. It helps feed all three layers of the quilt sandwich evenly, reducing fabric shifting. For free-motion quilting, you’ll need a darning foot or free-motion quilting foot.
- Binding Corners: When attaching your binding, learning to create perfectly mitered corners will elevate the professional look of your quilt. There are many excellent tutorials available for this technique.
- Labels: Don’t forget to add a personalized label to the back of your quilt! Include the date, your name, and any special message. This turns your quilt into a cherished heirloom.
By following these detailed instructions and incorporating these helpful tips, you are well-equipped to create a stunning and unique unicorn applique quilt. This project is a testament to the joy of making, and the skills you gain will undoubtedly open doors to many more exciting creative endeavors. Enjoy the process, and revel in the beauty of your finished, handmade masterpiece!