
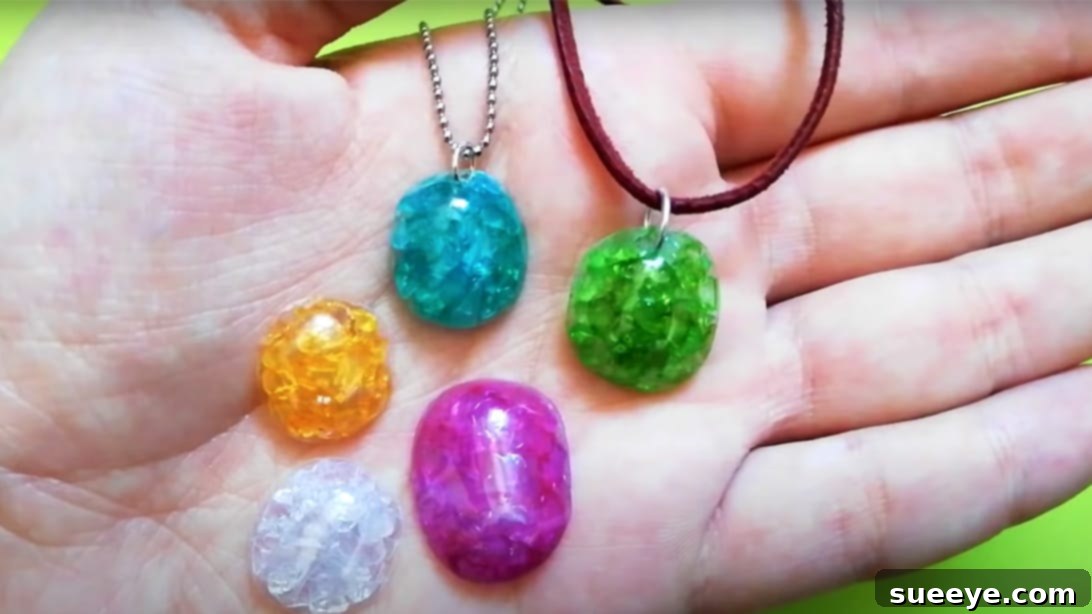
Create Dazzling Eco-Friendly Gemstones from Recycled Plastic Bottles
In an age where environmental consciousness is more vital than ever, embracing creative ways to reduce our carbon footprint has become a rewarding endeavor. What if you could transform discarded plastic bottles into something truly beautiful and unique? This exciting DIY project offers a fantastic opportunity to do just that! We’re talking about upcycling those everyday plastic bottles into dazzling, statement-making gemstones. Not only is this a wonderfully sustainable craft, but it’s also incredibly fun, easy, and allows you to create fashionable accessories that are genuinely one-of-a-kind.
Inspired by the ingenious techniques shared by Randamona, this guide will walk you through every step of turning humble plastic into sparkling treasures. Imagine adorning yourself with jewelry that not only looks stunning but also tells a story of sustainability and innovation. This project is perfect for crafters of all skill levels, offering a chance to contribute to a healthier planet while indulging your creative side. Get ready to save the planet, one gorgeous gemstone at a time!
Essential Materials for Your DIY Plastic Gemstones
Before diving into the creative process, gathering your materials is key. Most of these items are likely already in your home or easily accessible, making this an incredibly budget-friendly craft. Choosing the right materials ensures a smooth crafting experience and a beautiful finished product.
Core Supplies:
- Plastic Bottle: Opt for clear, colorless bottles if you plan to color your gems later, as this provides a neutral base. However, colorful bottles can also be used to create pre-tinted gemstones, adding an interesting variation to your collection. Ensure the bottle is clean and dry.
- Sharp Scissors: A good pair of sharp scissors is crucial for precise cutting, especially when shaping the gemstone bases and trimming the hot glue sticks. Safety should always be a priority when using sharp tools.
- Hot Glue Sticks: These will form the ‘crystals’ within your gemstone. Clear or translucent hot glue sticks work best for achieving that crystalline sparkle. You’ll need several, depending on the size and quantity of gemstones you plan to create.
- Craft Glue: A strong, quick-drying craft glue or super glue is essential for adhering the hot glue crystal pieces to the plastic base. Look for glues that dry clear to maintain the aesthetic appeal of your gemstones.
- Toothpicks: These indispensable tools will be used for applying small amounts of glue, meticulously arranging tiny crystal pieces, and stirring coloring mixtures. They offer precision and keep your fingers clean.
For Coloring Your Gemstones (Optional, but highly recommended for personalization):
- Felt-Tip Pens or Fine Liner (Non-Permanent): These are fantastic for adding vibrant hues to your gemstones. Non-permanent pens are preferred for certain coloring techniques as their ink can mix effectively with glue to create tinted solutions. Experiment with various colors to create a spectrum of gems.
- Non-Stick Surface: A plastic sheet, aluminum foil, a glass plate, or even a ceramic tile will serve as your palette for mixing colors and glue without them adhering permanently. This allows for easy cleanup and prevents waste.
For Turning Your Gemstone into a Pendant (Optional):
- Map Tack or Small Drill Bit: A sharp map tack is ideal for carefully poking a small hole into your finished gemstone, preparing it for accessorizing. Alternatively, a very fine drill bit can be used for a cleaner, more precise hole, especially if you have access to a mini-drill.
- Pendant Bail: This is the small loop or connector piece that allows your gemstone to hang elegantly from a necklace chain or cord. Choose a style and material that complements your gemstone.
- Jump Ring: A small metal ring used to connect the pendant bail to your gemstone, ensuring flexibility and movement. Having a few different sizes on hand can be useful.
Having all these materials ready before you begin will ensure a smooth and enjoyable crafting experience, allowing your creativity to flow without interruption.
Step-by-Step Instructions: Crafting Your Plastic Bottle Gemstones
Let’s transform those ordinary plastic bottles into extraordinary works of art! Follow these detailed steps to create stunning, eco-friendly gemstones.
Step 1: Preparing Your Gemstone Base from the Plastic Bottle
Begin by taking a clean, dry plastic bottle and positioning it upside down. Observe the unique, often multi-faceted curved corners at the very bottom of the bottle. These natural contours are perfect for forming the base of your gemstones. Carefully use your sharp scissors to cut out these small, gemstone-like curved sections. The key here is to cut symmetrically from the top (the curved part that will be the front) and ensure the back remains as flat as possible. This flat back will be essential for stability and for attaching the gemstone to other items later. Aim for a variety of shapes and sizes by utilizing different bottles or different sections of the same bottle. Congratulations, you’ve just created your raw gemstone bases!
Step 2: Creating Your Hot Glue Crystal Fragments
Now, it’s time to generate the crystalline pieces that will give your gemstones their unique sparkle and texture. Take your hot glue sticks and, with your sharp scissors, begin to snip off small pieces. Be warned: these tiny bits tend to fly! To manage this, you might consider cutting inside a shallow box or a container to contain the pieces and prevent them from scattering all over your workspace. Don’t worry about perfect uniformity at this stage; variation is actually desirable. The goal is to create a collection of different sizes and shapes of hot glue fragments, which will add depth and naturalistic appeal to your finished gemstone.
Step 3: Refining Your Crystal Fragment Collection
Once you have a good pile of hot glue pieces, you’ll want to refine their sizes. Cut some of the larger pieces into even smaller fragments. Then, take some of those smaller ones and snip them again to create minuscule speckles. This step is crucial for achieving a nuanced and realistic gemstone texture. Having a diverse collection of different-sized pieces – from larger chunks to tiny shards – will allow you to fill the plastic base effectively and create a captivating, varied surface. This meticulous attention to detail will elevate the final appearance of your handmade gems.
Step 4: Assembling the Gemstone – The Initial Layer
With your plastic base ready and your hot glue crystals sorted, it’s time for assembly. Apply a thin, even layer of your chosen craft glue over the inside surface of the plastic base. Make sure not to use too much, as it could seep out or take too long to dry. While the glue is still wet, carefully begin adding your larger hot glue crystal pieces. Use a toothpick to gently push and arrange them into place, ensuring they are evenly distributed and pressed down firmly into the glue. The toothpick offers excellent control, allowing you to position each piece precisely. It’s important to build this initial layer thoughtfully, as it forms the foundation of your gemstone’s appearance. Once you are satisfied with the placement of the larger pieces, set your gemstone aside to dry completely. Patience at this stage prevents pieces from shifting later on.
Step 5: Filling Gaps and Refining the Surface
Once the first layer of glue and crystals has fully dried and set, it’s time to add more detail and volume. Apply additional glue to the edges and any remaining gaps on the plastic base. Now, begin adding the medium and tiny crystal pieces. Again, use a toothpick to adjust their placements, ensuring every part of the inside surface is covered. The goal is to create a full, rich texture that mimics natural crystal formations. As you work, strive to keep the backside of the plastic base as flat as possible, which will be important if you plan to attach the gemstone to a piece of jewelry or another surface. Continue this meticulous process until the entire interior is covered, creating a beautifully faceted and textured surface. Allow this final layer of glue to dry thoroughly.
Step 6: Your Gemstone is Complete!
Once all the glue has completely dried, you’ll be left with a stunning, textured gemstone. The hot glue pieces, firmly adhered to the plastic base, will catch the light beautifully, creating a brilliant, faceted effect. Take a moment to admire your creation – you’ve just transformed waste into a treasure!
Adding Vibrant Hues: Coloring Your Recycled Gemstones
While clear plastic bottle gemstones have their own understated elegance, adding color can truly make them pop and allow for incredible personalization. There are several exciting ways to infuse your creations with vibrant hues.
Option 1: Utilizing Naturally Colored Bottles
The simplest method for colorful gems is to start with a plastic bottle that already has a tint. Many soda bottles, water bottles, or detergent containers come in shades of green, blue, brown, or even pink. By cutting your gemstone bases from these already colored bottles, you will automatically have a colored gem without any additional steps. This method is quick and results in a more subtle, translucent color effect, perfect for a natural, sea-glass like appearance.
Option 2: Direct Coloring of Crystal Bits
For more control over the color and intensity, you can color the individual hot glue crystal bits directly. Before applying them to your plastic base, simply use a felt-tip pen or a permanent fine liner in your chosen shade to color the hot glue pieces. Lay them out on a non-stick surface (like plastic, aluminum foil, or glass) and carefully color each piece. This technique allows for precise color application and can create a mosaic of different shades within a single gemstone. Permanent markers are great here as the color won’t bleed when glue is applied.
Option 3: The Ink-and-Glue Mixture Technique (for dynamic color)
This method offers a unique, marbled, or translucent coloring effect, making each gemstone truly one-of-a-kind. It’s particularly effective with non-permanent felt-tip pens because their ink can be reactivated and mixed. Here’s how:
- Prepare Your Palette: On your non-stick surface (plastic, aluminum foil, or glass), “paint” with your felt-tip pen. Create several patches of intense color, ensuring you get a good amount of ink onto the surface.
- Mix with Glue: Quickly pour a small amount of clear craft glue directly onto the ink patches. Use a toothpick to stir the ink and glue together. You’ll notice the ink dissolving into the glue, creating a beautifully colored, translucent mixture. You can experiment with different ratios of ink to glue to achieve varying color intensities.
- Coat the Crystals: Now, throw your clear hot glue crystal pieces into this colored glue mixture. Use your toothpick to stir and ensure every piece is thoroughly coated, allowing them to soak up the vibrant color.
- Dry and Set: Spread all the coated crystal pieces out on your non-stick surface, ensuring they are not touching each other too much. This allows them to dry evenly. As they dry, the color will set into the glue, creating beautifully tinted crystals ready to be used in your gemstone assembly. This technique creates a wonderful depth of color and can result in fascinating gradients and variations within your finished gem.
Don’t be disheartened if the final color isn’t exactly what you envisioned initially. Part of the charm of this DIY project lies in these delightful variations and unexpected results. Each color anomaly adds to the unique character and story of your handmade gemstone.
Transforming Your Gems into Fashionable Accessories
Once your beautifully crafted and colored plastic bottle gemstones are complete and fully dry, the real fun begins: turning them into wearable art or decorative accents! These versatile pieces can be incorporated into a variety of projects, adding a touch of sustainable sparkle.
Creating a Pendant:
The most popular way to showcase your gemstone is by transforming it into a pendant. Here’s how:
- Making the Hole: Carefully use a map tack or a very fine drill bit to poke a tiny, neat hole near the top edge of your gemstone. Ensure the hole is large enough for a jump ring to pass through but small enough not to compromise the gemstone’s integrity. If using a map tack, twist it gently to create a clean opening. For a cleaner finish, a mini-drill with a fine bit is ideal.
- Attaching the Jump Ring: Using a pair of jewelry pliers, gently open a jump ring. Thread the open jump ring through the hole you just created in your gemstone.
- Connecting to a Pendant Bail: Attach a pendant bail to the jump ring. The bail will provide a sturdy loop for threading your necklace chain or cord. Close the jump ring securely with your pliers, ensuring there are no gaps from which the bail could escape.
- Final Touch: Thread your favorite chain, leather cord, or ribbon through the pendant bail, and voila! You now have a unique, eco-friendly necklace that’s sure to be a conversation starter.
Other Creative Uses:
- Earrings: With a smaller gemstone, you can easily attach an earring hook using a jump ring to create a pair of stunning, lightweight earrings.
- Brooches/Pins: Glue a pin back onto the flat reverse side of a larger gemstone to create a chic brooch for jackets, scarves, or bags.
- Decorative Embellishments: Your gemstones aren’t limited to jewelry! Use them to adorn picture frames, personalize greeting cards, enhance scrapbooking projects, or add a unique touch to home decor items like vases or candle holders.
- Hair Accessories: Glue smaller gems onto hairpins or barrettes for a whimsical touch.
The possibilities are truly endless! Let your imagination run wild and discover all the wonderful ways to “flex out” your incredible, upcycled plastic bottle gemstones. Each piece you create is a testament to your creativity and commitment to sustainable living.
Embrace Sustainable Crafting with Your DIY Plastic Bottle Gemstones
You’ve journeyed through the process of transforming discarded plastic bottles into magnificent, sparkling gemstones. This isn’t just a craft project; it’s a statement. By choosing to upcycle, you are actively participating in reducing waste, minimizing your environmental impact, and breathing new life into materials that would otherwise contribute to landfills. Each handmade gemstone you create is a tiny testament to sustainable living and the boundless potential of human creativity.
The beauty of this project lies not only in the stunning final product but also in the joyful process of making it. From the initial cut of the plastic bottle to the careful placement of each hot glue crystal, and the vibrant splash of color, every step is an opportunity for personal expression and mindful engagement. The slight imperfections and variations in each gem only add to its unique charm, celebrating the authentic touch of handmade artistry.
We encourage you to experiment with different bottle shapes, colors, and coloring techniques. Create a collection of gems in various sizes and hues to complement different outfits or occasions. Share your creations with friends and family, inspiring them to join the movement of eco-friendly crafting. This project proves that sustainability doesn’t mean sacrificing beauty or style; in fact, it enhances it.
So, gather your materials, unleash your inner artisan, and start crafting your very own collection of DIY plastic bottle gemstones today. You’re not just making jewelry; you’re making a difference, one sparkling, recycled gem at a time. Thank you for choosing to craft responsibly and creatively!