
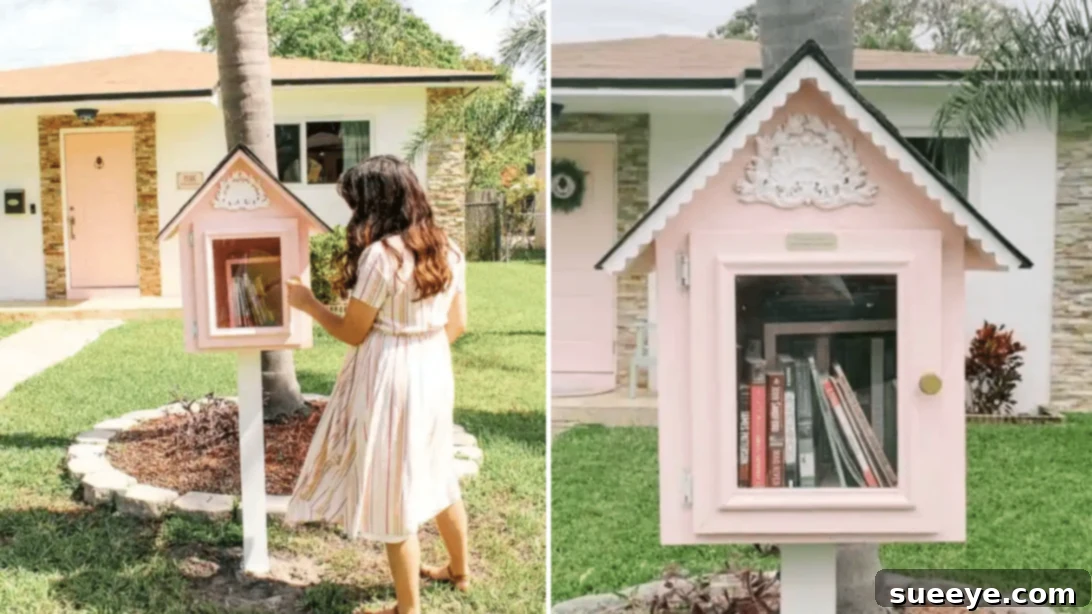
Imagine a charming, miniature beacon in your front yard, brimming with stories waiting to be discovered. This isn’t just a decoration; it’s a Free Little Library, a heartwarming concept that transforms neighborhoods by fostering literacy, community connection, and the joy of shared knowledge. For years, I’ve admired the simple yet profound impact these tiny book havens have, offering neighbors a delightful way to borrow a book, share their favorites, and spark conversations. The essence of a Free Little Library is its open invitation: take a book, leave a book, and enrich the lives of those around you.
More than just a bookshelf, these libraries serve as a gateway to imagination and learning, creating a positive ripple effect throughout your community. Beyond their noble purpose, they also make for incredibly endearing outdoor decor, adding a touch of personalized charm to your home. If you’ve been dreaming of bringing this wonderful initiative to your street, now is the perfect time. With this comprehensive guide, inspired by the creative insights of At Home with Ashley on YouTube, you can learn how to build your very own Free Little Library. Prepare to embark on a fulfilling DIY journey that will leave a lasting legacy of literacy and connection in your neighborhood!
RELATED: Explore more creative DIY projects like building a DIY Bookshelf Chair
Why Embark on This DIY Free Little Library Project?
Building your own Free Little Library is more than just a woodworking project; it’s an investment in your community and a testament to your creativity. Here’s why this DIY endeavor is so rewarding:
- Foster Community Spirit: A Free Little Library becomes a natural gathering point, encouraging neighbors to interact, share recommendations, and build stronger bonds. It’s a tangible symbol of generosity and shared interests.
- Promote Literacy and Learning: By providing easy, free access to books, you help cultivate a love for reading across all ages. It’s especially beneficial for children, sparking their curiosity and expanding their world through stories.
- Sustainable Book Sharing: In an age of consumption, a Free Little Library champions reuse and sustainability. Books get a new lease on life, circulating through the community instead of gathering dust or being discarded.
- Personalized Outdoor Decor: This project allows you to create a unique piece of outdoor art that reflects your style. From paint colors to decorative elements, every detail can be customized to complement your home’s aesthetic, making it a true centerpiece.
- The Satisfaction of Creation: There’s immense pride in building something beautiful and functional with your own hands, especially when it serves such a noble purpose. This project is a fantastic way to hone your woodworking skills and enjoy the process of bringing an idea to life.
Planning Your Free Little Library: Design & Durability
Before you even pick up a saw, thoughtful planning will ensure your Free Little Library is not only beautiful but also durable and functional. Consider these key aspects:
Choosing Your Design and Size
The beauty of a DIY project is the freedom to customize. While our guide provides a fantastic blueprint, think about:
- Style: Do you envision a classic house-shaped library, a modern minimalist box, or something whimsical? The exterior can reflect your home’s architecture or stand out as a unique focal point.
- Capacity: How many books do you anticipate it holding? This will influence the overall dimensions. A single shelf is common, but a multi-tiered design can accommodate more.
- Visibility: Ensure the plexiglass window is large enough for passersby to easily see the book selection, enticing them to stop and browse.
Selecting Weather-Resistant Materials
Since your library will brave the elements year-round, material selection is paramount:
- Wood: Plywood, especially exterior-grade, is a cost-effective and sturdy choice. However, consider cedar or treated lumber for even greater longevity, though these might increase the cost.
- Paint and Sealants: Only use high-quality exterior latex paint. Follow this with a marine-grade sealant or poly-acrylic clear top coat to protect against UV rays, rain, and humidity.
- Hardware: Opt for brass or stainless steel hinges, pulls, and screws to prevent rust and ensure smooth operation over time.
- Plexiglass: More shatter-resistant and lighter than glass, plexiglass is ideal for the front window, offering clear visibility while being safer.
Optimal Placement and Installation
Where you place your library is almost as important as how you build it:
- Visibility and Accessibility: Position it prominently near the sidewalk or pathway, but ensure it’s easily accessible without obstruction.
- Protection from Elements: While sealed, try to place it where it gets some natural shade or protection from the harshest direct sun and driving rain, if possible.
- Secure Foundation: Installing your library on a sturdy cedar post anchored with concrete ensures it remains stable and secure against wind and potential theft.
Materials for Your Custom Free Little Library:
Gathering the right materials is the first concrete step in bringing your vision to life. This list ensures you have everything needed for a durable, weather-resistant, and aesthetically pleasing Free Little Library:
- 1 Plywood Sheet: @ ¾” x 4′ x 8′ – This provides the primary structure. Ensure it’s exterior-grade for weather resistance.
- Outdoor Exterior Latex Paint: Choose a color that complements your home or adds a vibrant splash of personality. This paint is crucial for protecting the wood from moisture and UV damage.
- Roofing Nails: For securing any additional roofing materials or ensuring the top panels are firmly in place.
- Brass Hardware Pull: A sturdy and attractive pull for the door, adding a touch of elegance and functionality. Brass resists corrosion, making it perfect for outdoor use.
- Decorative Onlay: Optional, but perfect for adding architectural detail or a unique design flourish to the library’s exterior.
- Hinges: Two robust, exterior-grade hinges (preferably brass or stainless steel) to allow the door to open and close smoothly.
- Poly Acrylic Clear Top Coat: A vital protective layer that seals the painted surface, offering enhanced defense against moisture, fading, and general wear.
- Cabinet Door Magnet: Ensures the door remains securely closed, preventing books from getting wet or blown away in windy conditions.
- Wood Filler: Essential for filling any screw holes, gaps, or imperfections in the wood, creating a smooth surface for painting.
- Caulk (Exterior Grade): Used to seal all seams and joints, providing a waterproof barrier against rain and humidity.
- Construction Adhesive: For reinforcing structural joints, adding extra strength and durability to the assembly.
- Concrete (Quick-Setting): For anchoring the cedar post firmly into the ground, ensuring the library’s stability.
- Wood for Door: Additional smaller pieces of plywood or lumber specifically cut to form the door frame.
- Cap Trim Door: For finishing the edges of the door and window openings, giving it a neat, professional look.
- Plexiglass: A clear, durable, and shatter-resistant alternative to glass for the front window, allowing books to be visible while protecting them from the elements.
- Studs (optional): For internal framing or strengthening specific sections, depending on your design.
- Cedar Posts: A sturdy, naturally rot-resistant post to serve as the main support for your library.
- Screws (Exterior Grade): Various lengths, suitable for wood, to securely fasten all components. Stainless steel or galvanized screws are recommended.
- Brass Plaque: An optional but lovely addition for engraving your library’s name, dedication, or its official Free Little Library charter number.
- Detailed Plans: (Click here to access the plans from At Home with Ashley for precise measurements and cuts.)
How to Build Your DIY Free Little Library: Step-by-Step Guide
Follow these detailed steps to construct a robust and inviting Free Little Library that will stand the test of time and weather.
Step 1: Precision Cutting and Core Assembly
The foundation of a great library is precise construction. Start by carefully cutting your plywood sheet according to the dimensions specified in the plans. Accuracy here is key for a well-fitting structure. Once all pieces are cut:
- Construct the Base: Begin by assembling the bottom panel and its reinforcing side pieces. Use a strong exterior construction adhesive and weather-resistant screws to create a solid, level base. Ensure all corners are square.
- Build the Walls: Attach the side walls, back wall, and any internal dividers to the base. Again, use both adhesive and screws, pre-drilling pilot holes to prevent wood splitting. Double-check that all walls are plumb and square. This forms the main housing for your books.
- Install the Plexiglass Window: Carefully measure and cut the plexiglass to fit your designated window opening. Secure it from the inside using small screws or a strong adhesive designed for plexiglass. Ensure the edges are well-sealed with clear exterior caulk to prevent any water intrusion. This window is vital for showcasing the books within.
- Add Internal Shelving: Once the main structure is up, install any internal shelves. The plan typically includes one main shelf, but you can adjust its height or add more based on your preferred book sizes. Secure shelves firmly with screws for stability.
Step 2: Roof Construction, Door Fabrication, and Weatherproofing
This stage focuses on making your library weather-tight and aesthetically pleasing, protecting your precious book collection.
- Construct the Roof: Assemble the roof panels, ensuring they have a slight pitch for water run-off. This often involves two plywood pieces joined at an angle. If your design includes an overhang, incorporate it now for added weather protection. Secure these panels firmly to the top of the library structure. You can also add roofing nails and perhaps a layer of roofing felt if you desire extra durability, especially in very wet climates.
- Fabricate the Door: Create the door frame from your chosen wood pieces, ensuring it fits perfectly within the front opening. Securely attach the plexiglass into the door frame. Test the fit frequently to ensure it opens and closes smoothly without binding. This precision is vital for a functional door.
- Caulk All Seams: This is a critical step for weatherproofing. Apply a generous bead of exterior-grade caulk to every single seam, joint, and connection point on the library’s exterior, including around the plexiglass and where the roof meets the walls. Smooth it out for a clean, watertight seal.
- Sand for a Flawless Finish: Once the caulk has dried, sand every surface of the library as smoothly as possible. Start with a medium-grit sandpaper and finish with a finer grit to prepare the wood for painting. A smooth surface ensures better paint adhesion and a professional look. Wipe away all sanding dust.
- Paint and Seal: Apply multiple coats of your chosen exterior latex paint, allowing ample drying time between each coat. Ensure thorough coverage, especially on edges and corners. Once the paint is completely dry, apply several coats of poly-acrylic clear top coat. This final sealant layer provides superior protection against UV rays, moisture, and general wear, significantly extending the life of your library.
Step 3: Hardware Installation and Final Placement
With the structure built and weatherproofed, it’s time for the finishing touches and secure installation.
- Install Door Hardware: Attach the two exterior-grade hinges to one side of the door, ensuring they are evenly spaced and flush. Then, carefully align the door within its opening and screw the hinges to the front of the library body. Test the door’s swing. Next, attach your chosen brass hardware pull to the door for easy opening. Finally, install the cabinet door magnet on the inside of the door and its corresponding strike plate on the library frame. This simple mechanism will keep the door securely closed, protecting the books from wind and rain.
- Add Decorative Elements: If you’re using a decorative onlay, attach it to the desired spot on the library’s exterior using exterior-grade adhesive or small finishing nails. If you have a brass plaque, now is the time to carefully screw it into place, personalizing your library.
- Prepare for Installation: Select the final spot for your Free Little Library. Dig a post hole deep enough to ensure stability, typically 2-3 feet deep, depending on your post length and local frost line. Place your cedar post into the hole.
- Secure the Library: Attach your finished library securely to the top of the cedar post using long, weather-resistant screws or bolts. Ensure it is perfectly level before proceeding.
- Anchor with Concrete: Mix quick-setting concrete according to package directions and pour it into the post hole around the cedar post. Use a level one final time to make sure the library is straight before the concrete sets. Allow the concrete to cure completely (usually 24-48 hours) before placing books inside. This robust foundation will ensure your library stands firm for years to come.
- Fill with Books: Once installed and fully cured, it’s time for the most exciting part! Stock your Free Little Library with a diverse selection of books to kickstart the sharing. Consider adding a small welcome note explaining the concept.
Maintaining and Curating Your Community Library
Building your Free Little Library is just the beginning. To ensure it remains a beloved community asset, a little ongoing care goes a long way:
- Regular Checks: Periodically inspect your library for any signs of wear, especially after harsh weather. Check for loose screws, peeling paint, or compromised caulk.
- Cleaning: Wipe down the exterior and clean the plexiglass regularly to keep it looking fresh and inviting.
- Touch-Ups: Reapply paint or sealant as needed, typically every few years, to maintain its weather resistance and appearance.
- Book Rotation: Occasionally rotate the books, remove any damaged items, and add new selections to keep the library exciting and engaging for your neighbors.
- Community Engagement: Encourage neighbors to contribute books and suggest titles. A vibrant, well-loved library is a shared responsibility.
Making It Uniquely Yours: Personalization Tips
While the core structure is set, there are countless ways to infuse your personality into your Free Little Library:
- Themed Decor: Paint murals, add stencils, or incorporate small figurines that reflect a specific theme (e.g., a fairy garden library, a classic literature theme).
- Lighting: Install a small solar-powered LED light inside or outside the library so it can be enjoyed even after dusk.
- Guest Book: Include a small waterproof notebook and pen for visitors to leave comments, recommendations, or simply sign their name.
- Benches or Seating: If space allows, place a small bench nearby, inviting people to sit and browse their newfound literary treasures.
Your Free Little Library will not only be a functional hub for books but also a charming testament to your dedication to community enrichment. Enjoy the process of creating this wonderful neighborhood landmark!
*All image credit belongs to At Home with Ashley via YouTube. Follow and subscribe to her channel for more inspiring DIY projects and home ideas!