
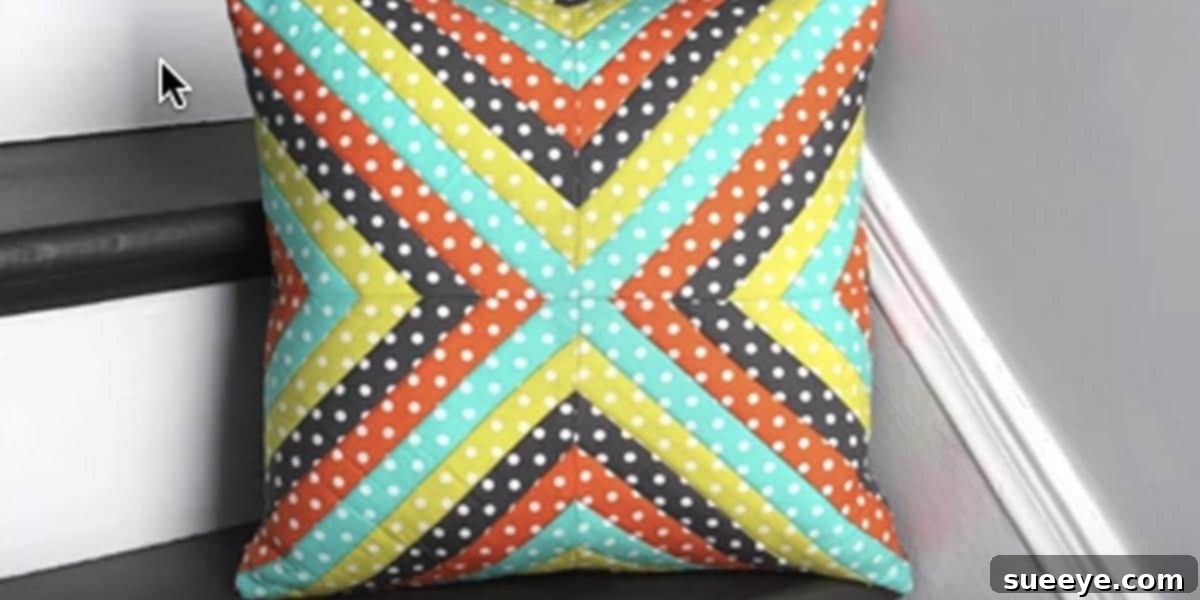
Master Quilting with an Easy DIY Quilted Pillow: A Beginner-Friendly Tutorial
Are you fascinated by the art of quilting but feel intimidated by its perceived complexity? Many aspiring crafters share this sentiment, often postponing their quilting dreams due to the sheer scale of traditional quilt projects. However, the journey into quilting doesn’t have to begin with an overwhelming queen-sized quilt. Instead, start small, build your confidence, and unleash your creativity with a charming and manageable project: a quilted pillow. This step-by-step guide is specifically designed to introduce you to fundamental quilting techniques, transforming what might seem daunting into an enjoyable and rewarding experience. Think of this pillow as your gateway to a vast world of fabric artistry – a quick, satisfying win that will prepare you for bigger quilting adventures!
Once you complete your first quilted pillow, you’ll not only be immensely proud of your accomplishment but also discover a passion for creating personalized, handmade items. These beautiful quilted pillows make thoughtful gifts for friends and family, adding a touch of cozy elegance to any home. Everyone appreciates a handmade treasure, and a custom-quilted pillow is a gift that speaks volumes about your care and effort. Let’s dive in and transform some beautiful fabrics into a stunning piece of home decor!
Essential Materials for Your Quilted Pillow Project
Before we begin, gather the following materials. Having everything ready will ensure a smooth and enjoyable crafting process:
- Several Quilting Fabrics: Opt for high-quality 100% cotton quilting fabrics in coordinating colors or patterns. These fabrics are easier to work with, less prone to fraying, and will give your finished pillow a professional look and feel.
- Pencil or Fabric Marker: Essential for precise marking on your paper templates and fabric.
- Rotary Cutter or Sharp Scissors: A rotary cutter with a self-healing mat is highly recommended for straight, accurate cuts, especially when working with multiple fabric layers. If using scissors, ensure they are sharp and dedicated to fabric.
- Fusible Fleece or Batting: This adds structure, softness, and makes your quilting stitches pop. Fusible fleece has an adhesive side that can be ironed onto your fabric, simplifying the quilting process.
- Printer Paper: Standard printer paper serves as a fantastic foundation for paper piecing, helping to stabilize fabric and achieve precise results.
- Zipper (Optional) and Seam Ripper: A zipper allows for a removable and washable pillow cover. A seam ripper is a quilter’s best friend – mistakes happen, and it’s there to help you fix them gracefully!
- Ruler: A clear acrylic quilting ruler with precise measurements is invaluable for accurate cutting and marking.
- Pins: Essential for holding fabric layers together, especially when matching seams.
- Thread: High-quality polyester or cotton thread that matches or complements your fabric colors.
- Pillow Form: The inner cushion that gives your pillow its shape. Make sure to choose a size that corresponds to your finished cover.
- Iron and Ironing Board: Crucial for pressing seams, setting fusible fleece, and ensuring crisp, professional results throughout the entire project.
- Sewing Machine: A reliable sewing machine is necessary for stitching your fabric pieces together.
Step 1: Preparing Your Fabric for the Pillow Cover
Accurate cutting is the cornerstone of a successful quilting project. Precision here will pay off in beautifully aligned seams later on.
First, measure your chosen pillow form. For this tutorial, we’ll assume a 16″ x 16″ pillow form. To achieve a plump, professional-looking pillow, it’s customary to make the cover slightly smaller than the form. This ensures a snug fit, preventing saggy corners and giving your pillow a full, inviting appearance. Therefore, for your 16″ x 16″ pillow form, you will cut the back fabric panel to 17″ x 17″, adding a 1/2″ seam allowance on all sides. This means your finished pillow cover will effectively be 16″ x 16″, but the snug fit will make the pillow look a wonderful 15-15.5″ square.
Next, prepare your fusible fleece (or batting). Cut two pieces of fusible fleece, each measuring 15″ x 15″. Notice that these pieces are cut *without* the seam allowance, designed to fit perfectly within the finished dimensions of your pillow front and back panels. This prevents bulk in your seams and ensures a smooth finish.
Finally, select your quilting fabrics for the front design. From each of your chosen colors, cut several 1-1/2″ wide strips. The length of these strips will depend on the size of your paper templates (which we’ll prepare in the next step), but it’s always better to cut them longer than needed and trim later. Having a variety of strip colors will allow for a dynamic and engaging quilted pattern.
Step 2: Crafting the Quilted Pillow Front Using Paper Piecing
This step involves a fantastic technique called “paper piecing” or “foundation paper piecing.” It’s an excellent method for beginners because the paper acts as a stable guide, ensuring perfect points and precise angles, even with complex designs. This method will create four individual squares that will then be joined to form the quilt top.
Begin by cutting four squares of printer paper. The dimensions for these paper squares need to be calculated based on your desired finished block size. For a 16″ x 16″ pillow top divided into four blocks, each block will be approximately 8″ x 8″. To account for seam allowances in the paper piecing method, cut your paper squares to 8 1/8″ x 8 1/8″. This provides a little extra wiggle room for trimming later.
On each paper square, draw a diagonal line from one corner to the opposite corner. This will be your central guide. Then, draw two more lines, each 3/4″ away from the central diagonal line, one on each side. These parallel lines effectively create a 1-1/2″ wide channel, perfectly matching the width of your fabric strips. This channel is where your first fabric strip will be placed.
Now, let’s start piecing! Take your first 1-1/2″ fabric strip (this will be your central diagonal strip) and place it on the *unmarked* side of the paper, aligning it perfectly within the 1-1/2″ channel you drew. Pin the fabric to the paper. Choose your next fabric strip. Place this strip on top of the first strip, right sides together, aligning one edge along the drawn line. Using your sewing machine, sew through both fabric strips and the paper with a precise 1/4″ seam allowance. For paper piecing, a shorter stitch length (around 1.4-1.8) is recommended. This smaller stitch perforates the paper more, making it much easier to remove once the piecing is complete.
After sewing, carefully unfold the top fabric strip and press the seam flat with an iron. This pressing is crucial for crisp, accurate blocks. Continue adding strips in this manner, working outwards from the center diagonal. Place each new strip right sides together with the previous one, sew, unfold, and press. Repeat this process until the entire paper square is covered with fabric. The paper acts as a stable foundation, preventing fabric distortion and ensuring your strips are perfectly straight.
Once the paper is completely covered, carefully trim any excess fabric from the edges of the square, using the paper as your guide. Then, gently tear away the printer paper from the back of your newly pieced fabric block. The shorter stitch length will make this process much easier. You should now have one perfectly pieced fabric square!
Repeat this entire paper piecing process three more times to create a total of four identical squares. While creating identical squares offers a cohesive look, don’t hesitate to experiment with varying the colors or even the widths of your strips for a more random and eclectic aesthetic. For a strong, diamond-like pattern (especially if you plan to expand this technique to a full quilt), consider using the same color for the middle diagonal strip across all four blocks. This creates a powerful visual flow.
Step 3: Assembling Your Quilted Pillow Top Squares
With your four beautifully pieced squares ready, it’s time to arrange and sew them together to form the complete front of your pillow cover. This is where your design vision comes to life!
Lay out your four squares on a flat surface. Experiment with different orientations: you can have all the diagonal lines running in the same direction for a striped effect, rotate them to create a striking diamond pattern, or flip them to form an “X” shape in the center, which is a popular and dynamic choice. Take your time to decide on the arrangement that most appeals to you.
Once you’ve settled on your desired layout, take two adjacent squares (e.g., the top-left and top-right squares). Place them right sides together, carefully aligning their edges. If your strips are of consistent width, it’s particularly important to match up the seams where the strips meet. Use pins liberally to hold these seams precisely in place. This attention to detail will ensure your final design looks seamless and professional.
Using your sewing machine, stitch these two squares together with a 1/4″ seam allowance. Remember to change your stitch length back to a standard setting (around 2.5) for general construction. After sewing, gently press the seam open. Pressing seams open helps to reduce bulk, creating a flatter and smoother finish, which is especially important in quilting.
Repeat this process for the remaining two squares. Now you should have two rows of two pieced squares each. Finally, place these two rows right sides together, aligning the center seams carefully, and pin in place. Stitch them together with a 1/4″ seam allowance, and once again, press the seam open. You now have a completed and beautifully pieced quilted pillow top!
Step 4: Quilting the Fabric and Adding Fusible Fleece
Now that your patchwork top is complete, it’s time to add the “quilt” part to your quilted pillow! This step involves attaching the fusible fleece and adding decorative stitching that holds all the layers together, giving your pillow texture and dimension.
Take one of your 15″ x 15″ pieces of fusible fleece. Turn your assembled pillow top to the wrong side. Center the fusible fleece on the back of the pieced fabric, ensuring it covers the entire area without extending into the seam allowances. Using your iron, follow the manufacturer’s instructions to fuse the fleece securely to the fabric. This creates a stable backing for your quilt top, adds softness, and prepares it for quilting.
Do the same for the back fabric panel of your pillow. Take your second 15″ x 15″ piece of fusible fleece and fuse it to the wrong side of your 17″ x 17″ back panel. While quilting the back panel is optional, it adds a lovely touch of consistency and makes the entire pillow feel more substantial. If you choose to quilt the back, simple straight lines or a crosshatch pattern work beautifully and are easy for beginners.
Now, for the actual quilting stitches! There are numerous ways to quilt, each offering a different aesthetic. A popular and effective method, especially for beginners, is “stitching in the ditch.” This involves sewing directly along the seam lines you’ve already created in your pieced top. Stitching in the ditch hides your quilting stitches in the “ditch” of the seam, making them less visible and allowing the pieced design to stand out. It also securely holds the fabric layers together.
Alternatively, you can opt for straight-line quilting. For the pillow back, you might sew straight lines 1/2″ apart across the fabric, either horizontally, vertically, or diagonally. If you’re feeling more adventurous, you could try free-motion quilting, which allows for more intricate patterns, but this requires practice and a specialized free-motion foot for your sewing machine. For your first project, sticking to “in the ditch” or simple straight lines is highly recommended. Whichever method you choose, ensure your stitches are even and consistent for a polished look.
Step 5: Installing the Zipper for a Professional Finish
Adding a zipper to your pillow cover is a fantastic way to make it removable and washable, greatly extending its lifespan and practicality. While hand-stitching the pillow closed is an option, the zipper provides a much cleaner and more professional finish. Let’s install a standard zipper.
Take your quilted back panel (the 17″ x 17″ piece with fusible fleece attached). Decide which edge you want the zipper to be on – typically, it’s one of the longer edges. Fold the fabric in half along this edge, right sides together, and press a crease. Stitch along this edge with a 1/2″ seam allowance, but here’s the trick: use a very long stitch length (your machine’s basting stitch setting, often around 4.0-5.0) for the middle section where the zipper will be. Leave the first and last inch of this seam sewn with a regular stitch length. Press this entire seam open.
Now, lay your zipper face down centered over the open seam, ensuring the zipper teeth are directly over the seam line. Pin the zipper securely in place. Change your sewing machine’s foot to a zipper foot – this specialized foot allows you to sew very close to the zipper teeth. Adjust your stitch length back to normal (2.5). Starting at one end, sew along one side of the zipper, approximately 1/8″ to 1/4″ away from the zipper teeth, through the zipper tape and the fabric. Pivot at the end, sew across the bottom (if your zipper is shorter than the seam), pivot again, and sew up the other side. Make sure to backstitch at the beginning and end for security.
Once stitched, the final step for zipper installation is to reveal it. Carefully use your seam ripper to tear out the long basting stitches you made in the middle of the seam. As you rip, the zipper will be exposed. Remember to open the zipper halfway *before* you sew the rest of the pillow cover together. Forgetting this step can lead to a lot of frustration when you try to turn the pillow right side out!
Step 6: Assembling and Finishing Your Quilted Pillow Cover
You’re almost there! With the quilted front and zipper-backed back panel ready, it’s time to bring them together to complete your stunning quilted pillow cover.
Place your finished quilted front panel and your back panel right sides together. This means the beautiful quilted side of the front piece and the right side of the back fabric (the side that will be visible) should be facing each other. Align all the raw edges carefully. Pin generously around all four sides of the pillow cover. Pay particular attention to pinning the corners and the edges where the zipper is located, ensuring everything stays aligned during sewing.
Using your sewing machine, stitch around all four sides of the pinned pillow cover with a 1/2″ seam allowance. Begin and end with a backstitch for added security. When you reach the corners, stop 1/2″ from the edge, lift your presser foot, pivot your fabric 90 degrees, and then continue stitching down the next side. This creates nice, crisp corners.
Once you’ve sewn all the way around, it’s time to turn your pillow cover right side out. Before doing so, clip the corners diagonally, close to the seam line but without cutting through your stitches. This reduces bulk in the corners and helps them lay flat when turned. Now, reach inside the pillow cover (remember, your zipper should be open!) and gently push out all four corners. Use a blunt tool like a chopstick or a point turner to carefully poke out the corners from the inside, ensuring they are as sharp and defined as possible. Be careful not to push too hard, which could break through your stitches.
Finally, insert your pillow form into the newly finished quilted pillow cover. Zip it closed, fluff it up, and step back to admire your beautiful, handmade creation! You’ve successfully navigated the basics of quilting, from fabric preparation and intricate piecing to professional finishing techniques. This pillow is not just a decorative item; it’s a testament to your newfound skill and patience.
Your Quilting Journey Begins Here!
Congratulations! You’ve successfully completed your first quilted pillow. This project, while seemingly small, has introduced you to a wealth of essential quilting and sewing techniques, including precision cutting, paper piecing, seam matching, pressing, quilting, and zipper installation. You’ve conquered the initial intimidation and transformed raw fabric into a beautiful, functional piece of art. This is more than just a pillow; it’s a stepping stone to a fulfilling hobby.
Now that you’ve gained confidence and practical experience, you’re well-equipped to tackle larger and more ambitious quilting projects. Imagine creating a matching set of pillows, a stunning table runner, or even your very first full-sized quilt! The possibilities are endless. Don’t forget to share your creation with friends and family – these handmade treasures make truly unique and cherished gifts that carry a piece of your heart. Happy quilting!