
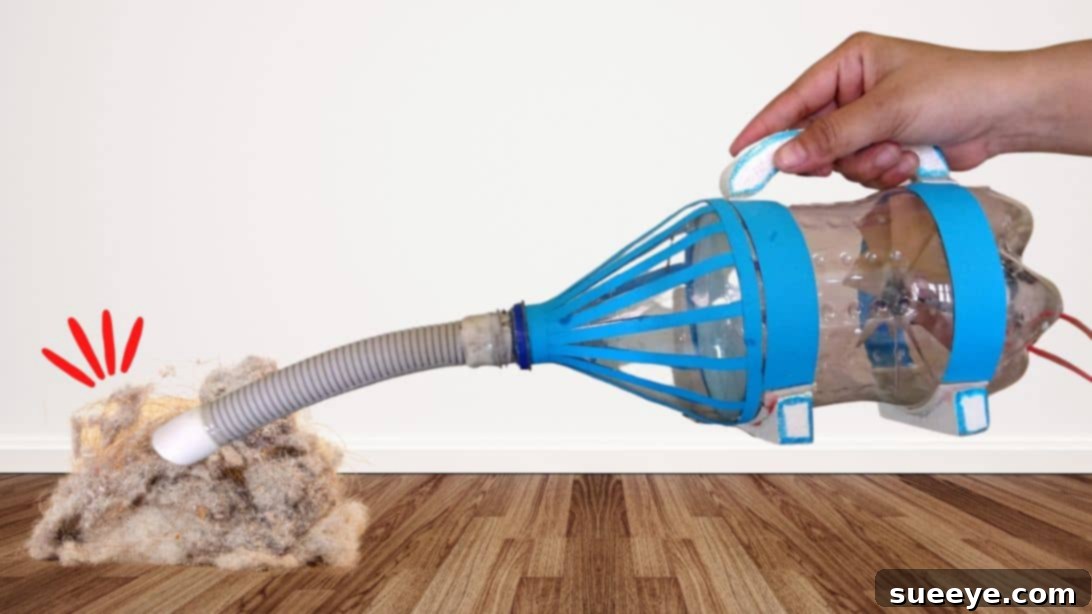
DIY Bottle Vacuum Cleaner: Crafting a Functional Cleaning Tool from Recycled Materials
Are you a fan of innovative DIY projects and keen on transforming everyday waste into something functional? If so, you’re in for a treat! This guide will walk you through the exciting process of building your very own functional vacuum cleaner, ingeniously crafted from simple waste materials. This brilliant concept, brought to life by the creative mind of Navin Khambhala, known as #crazyNK on YouTube, offers an incredible opportunity to get hands-on, explore basic engineering principles, and understand how such a machine operates. Beyond the thrill of creation, this project champions sustainability, giving new life to items destined for the landfill. Join us as we delve into the steps to construct a practical and eco-friendly vacuum cleaner using a common plastic bottle.
Why Build Your Own DIY Vacuum Cleaner?
The allure of a DIY project goes far beyond simply saving money. Building a vacuum cleaner from recycled materials offers a multitude of benefits that extend to personal growth, environmental consciousness, and practical utility. It’s a testament to ingenuity and resourcefulness.
- Promotes Sustainability and Eco-Friendliness: By repurposing items like plastic bottles and empty spray cans, you actively reduce the amount of waste sent to landfills. This project serves as a practical demonstration of recycling and upcycling, contributing to a more circular economy and fostering environmental responsibility.
- Offers Significant Educational Value: This hands-on project is a fantastic learning experience for all ages. It introduces fundamental concepts of aerodynamics (how the fan creates suction), basic electrical circuits (for powering the motor), and mechanical design. It encourages problem-solving, critical thinking, and a deeper understanding of how everyday appliances function.
- Highly Cost-Effective Solution: The vast majority of materials required for this vacuum cleaner are items you might already have lying around your home, or they can be sourced very inexpensively. This makes it an incredibly budget-friendly alternative to purchasing a commercial vacuum cleaner, especially for lighter cleaning tasks.
- Delivers Immense Hands-On Satisfaction: There is a unique sense of accomplishment in creating something useful and functional with your own hands. Seeing your homemade device effectively clean up small spills, crumbs, or dust provides a rewarding experience that boosts confidence, creativity, and a sense of achievement.
- Provides a Unique Tool for Small Spaces: This compact, DIY vacuum cleaner is surprisingly effective and highly practical for cleaning up messes in tight corners, car interiors, computer keyboards, desk areas, or other confined spaces where a larger, more cumbersome vacuum might be impractical or unable to reach.
- Inspires Further Innovation and Creativity: Completing this project often sparks further ideas for repurposing materials, designing other helpful gadgets, or tackling more complex DIY challenges. It can ignite a lasting passion for invention, engineering, and the broader DIY culture.
Materials You’ll Need
Gathering the right components is the essential first step towards a successful build. Many of these items are likely already present in your home, eagerly waiting to be repurposed into this ingenious cleaning device. Here’s a detailed list of materials:
- Plastic Bottle: A standard polyethylene terephthalate (PET) plastic bottle, such as a 1.5L or 2L soda bottle, will form the primary body and the dust collection chamber of your vacuum cleaner. Choose one with a relatively sturdy plastic.
- Mini Motor: A small DC motor is the heart of your vacuum, providing the crucial suction power. These can often be salvaged from old toys (e.g., remote control cars, fans), electric toothbrushes, or purchased affordably online. Ensure it’s rated for a suitable voltage (e.g., 3-9V) and capable of spinning a small fan blade efficiently.
- Old Spray Can: An empty aerosol spray can (e.g., hairspray, paint, air freshener, or cooking spray) is needed to craft the fan blades. Crucially, ensure it’s absolutely empty and completely depressurized before attempting any cuts. Safety first!
- Modeling Clay or Epoxy Putty: This versatile material will be used to secure the motor firmly in place, helping to create an airtight seal around its mounting points and filling any small gaps that could compromise suction.
- Epoxy (or Strong Adhesive): A two-part epoxy resin or a strong, quick-drying adhesive (like super glue or construction adhesive) is essential for permanently bonding various parts, creating durable joints, and ensuring airtight seals for optimal performance.
- Thick Double-Adhesive Tape: This type of tape, preferably foam-backed, will be instrumental for sealing the plastic bottle sections together and other parts where a strong, flexible, and air-tight bond is needed. This minimizes air leaks and maximizes suction.
- Electrical Wire: A length of insulated electrical wire (e.g., 22-26 gauge) is required for connecting the motor to its power source (such as batteries or a low-voltage DC adapter).
- Cloth Filter: A piece of fine mesh cloth, non-woven fabric, or felt (an old t-shirt, sock, or a piece of dryer sheet can work) will serve as a crucial filter. It prevents dust and debris from entering and damaging the motor, while also effectively trapping particles within the collection chamber.
- Styrofoam: This lightweight and easily workable material will be repurposed to create ergonomic handles and a stable stand for your vacuum cleaner. This enhances usability and allows for convenient storage.
- Flexible Tube: A flexible tube or hose segment (e.g., from an old vacuum cleaner attachment, medical tubing, or a piece of garden hose) will serve as the nozzle, allowing you to direct the suction precisely where it’s needed.
Tools for the Job
Precision, safety, and efficiency are paramount when undertaking this project. Ensure you have the following tools readily available to facilitate a smooth and successful build:
- Cutter or Utility Knife: Essential for making initial cuts on the plastic bottle, foam, and other materials. Always use with extreme caution, on a stable cutting mat or protected surface, and cut away from your body.
- Pair of Scissors: Sharp, robust scissors are vital for cleaning rough edges, precisely cutting the cloth filter, and carefully shaping the delicate fan blades from the metal sheet.
- Small Saw: A junior hacksaw, a small craft saw, or even a robust box cutter can be useful for more precise or demanding cuts, especially when dealing with the spray can metal or shaping the Styrofoam components.
- Ruler: Indispensable for accurate measurements and marking straight lines, particularly when preparing the fan blade template and cutting the bottle sections evenly.
- Marker: A permanent marker is needed for clearly marking cut lines, drill points, and other guidelines on all your materials, ensuring accuracy.
- Hammer: Used in conjunction with a nail to create pilot holes, especially in the metal sheet for the fan, before larger cuts or drilling.
- Nail: A sturdy nail is perfect for piercing small, precise holes, such as the central hole for the motor shaft in the fan blade and initial holes for wires.
- Drill (optional but highly recommended): A small hand drill or a rotary tool (like a Dremel) with appropriate drill bits can make cleaner, more precise, and safer holes for wires and mounting points than relying solely on a heated nail or knife.
Step-by-Step Assembly Guide
Follow these detailed instructions carefully to construct your functional bottle vacuum cleaner. Take your time with each step, paying close attention to details, to ensure optimal durability and effective suction performance.
Step 1: Preparing the Plastic Bottle Body
Begin by thoroughly cleaning your plastic bottle and completely removing its label. Using your cutter or utility knife, carefully make a circumferential cut just above the bottle’s midpoint. This will effectively divide the bottle into two main sections. Next, take the upper half of the bottle and make another precise cut, this time just below the conical neck section where the cap screws on. You will now be left with three parts: the very top section (including the neck and cap), the bottom section, and a discarded middle cylindrical part. For this project, you will only be using the top and bottom sections. Use a sharp pair of scissors to carefully trim and smooth any rough or uneven edges from your cuts on both the top and bottom sections, ensuring a clean finish and safe handling.
Step 2: Crafting the Impeller Fan
This step is absolutely crucial for generating the vacuum’s suction. First and foremost, ensure the old spray can is completely empty and thoroughly depressurized – safety is paramount here. If in doubt, puncture a small hole in the top to release any residual pressure. Carefully cut off the top and bottom ends of the spray can, then cut the resulting cylinder open lengthwise to flatten it into a rectangular metal sheet. This sheet will be your raw material for the fan blades. Place the upper rim of the bottom section of your plastic bottle onto this flattened metal sheet and meticulously trace its circular opening with a marker. Cut out this metal circle using sharp, sturdy scissors. With a marker and ruler, precisely divide this metal circle into quarters, then further into eighths, creating eight evenly spaced radial lines extending from the center. Gently hammer a small nail into the exact center to create a pilot hole for the motor shaft. Now, from this central hole, draw a small inner circle, approximately 1 to 1.5 cm in diameter. Carefully cut along each of the eight radial lines, making sure to stop precisely at this small inner circle. This prevents the blades from detaching. Finally, with great care, gently twist each of the eight metal blades slightly, giving them a subtle but distinct curve. This specific angle is critical as it will create the necessary airflow and thrust for effective suction when the fan rotates at high speed.
Step 3: Integrating the Motor and Securing the Cap
Now, it’s time to prepare the core motor assembly. Take your meticulously crafted metal fan and apply a small, firm amount of modeling clay or epoxy putty to the very center, on both the front and back sides. Carefully insert the shaft of your mini motor through the central hole of the fan, ensuring it is securely attached, perfectly centered, and rotates freely without wobble. Next, take the cap from your plastic bottle. Using a drill with an appropriate bit or a carefully heated nail, create a central hole in the bottle cap, large enough for the motor’s electrical wires to pass through comfortably without friction. Additionally, consider drilling a few smaller ventilation or drainage holes around the “feet” or base rim of the plastic bottle’s bottom section. These subtle additions aid in proper airflow and prevent potential motor overheating. Apply a strong, durable adhesive, such as epoxy, to the underside of the motor’s casing, and then firmly attach the bottle cap to the motor. This cap will eventually screw onto the bottle, holding the motor and fan securely in their operational position.
Step 4: Assembling the Fan into the Bottle and Sealing the Base
With the motor and fan securely assembled, it’s time to integrate them into the vacuum cleaner’s main body. Carefully place the entire motor-fan assembly inside the bottom section of the plastic bottle, ensuring the motor is facing downwards (towards the base) and the fan blades are completely unobstructed and centered within the bottle. Gently thread the motor’s electrical wires through one of the small ventilation holes you previously drilled in the base of the bottle. To create an absolutely airtight seal between the motor housing (which is now firmly attached to the bottle cap) and the main body of the bottle, apply two generous layers of thick, double-adhesive tape around the upper rim of the bottom bottle section. This robust seal is paramount for achieving and maintaining effective suction, preventing any air from leaking out.
Step 5: Incorporating the Filter and Final Bottle Assembly
The filter is a critical component for trapping dust and debris, preventing it from reaching and potentially damaging the motor. Begin by creating a sturdy circular frame using a piece of stiff wire, bending it into a loop with a small, practical hook. This hook will aid in both inserting and removing the filter for future cleaning or replacement. Cut a piece of your chosen cloth filter material (such as felt, fine mesh, or a segment of an old t-shirt) to fit precisely over this wire circle and glue it securely in place, effectively forming a filter bag or screen. Carefully insert this completed filter assembly into the bottom section of the bottle, positioning it just above the fan assembly. Ensure the hook allows it to be correctly positioned without making contact with the spinning fan blades. Once the filter is properly situated, attach the upper part of the bottle (the neck section with the motor and cap already screwed on) to the bottom section, pressing firmly to ensure the double-adhesive tape creates a tight and impenetrable seal. Twist the cap tightly to fully secure the motor and fan assembly within the bottle, completing the main body of your vacuum cleaner.
Step 6: Adding Ergonomic Handles, a Stable Stand, and the Suction Nozzle
Now for the final touches that enhance usability and functionality. Utilize Styrofoam to craft ergonomic handles that fit comfortably in your hand, and a stable stand that allows your device to rest upright when not in use. This thoughtful addition offers both comfort during operation and convenience for storage. Secure these custom-made Styrofoam parts to the body of the bottle using a strong adhesive like epoxy or robust construction glue, ensuring they are firmly attached. Take your chosen flexible tube and insert one end firmly into the mouth of the bottle (where the drinking spout would typically be). Apply glue around the insertion point to create an airtight connection, which is crucial for maximizing effective suction. For added reinforcement and to provide an even more secure fit for the tube, you can cut the threaded collar (the top ring) from an extra plastic bottle and glue it to the inside of the neck of your vacuum cleaner’s bottle. This creates a stronger, more rigid opening for the tube to slot into. Finally, unleash your creativity! Feel free to decorate your vacuum cleaner with paint, stickers, or other embellishments to make it truly personalized and unique. Once all adhesives have dried completely, connect the motor wires to a suitable low-voltage power source (e.g., a battery pack of 3-9V, or a regulated DC power adapter). Congratulations, you now have a fully functional, custom-built DIY bottle vacuum cleaner!
Safety First! Important Considerations for Your DIY Project
While building this vacuum cleaner is an incredibly fun and rewarding experience, safety should always remain your paramount concern. Please keep the following crucial guidelines in mind throughout the entire construction process and during use:
- Handling Sharp Tools: Always exercise extreme caution when working with utility knives, cutters, and scissors. Utilize a cutting mat or a stable, protected work surface, and make sure to always cut away from your body. Adult supervision is highly recommended and essential for younger builders.
- Empty and Depressurized Spray Cans: Re-emphasizing this critical point: ensure any spray cans used are completely empty and thoroughly depressurized before attempting to cut them. Residual pressure or fumes can pose significant dangers. It is advisable to wear protective gloves and safety eyewear when cutting metal sheets.
- Working with Electrical Components: When integrating the mini motor and connecting wires, always ensure your chosen power source is low-voltage (e.g., typically between 3-9V DC). Absolutely avoid connecting directly to mains household electricity unless you are a qualified and experienced electrician. Double-check all wire connections carefully to prevent any short circuits or electrical hazards.
- Using Adhesives and Mindful of Fumes: Utilize epoxy and other strong adhesives in a well-ventilated area to minimize inhalation of fumes. Always read and strictly follow the product instructions, and wear protective gloves if recommended by the manufacturer.
- Ensuring Adequate Ventilation for the Motor: While this DIY vacuum is designed for light use, it’s important to ensure there is adequate airflow and ventilation around the motor to prevent it from overheating, especially during prolonged operation.
- Intended Use and Limitations: This DIY vacuum cleaner is specifically designed for light cleaning of dry dust, small crumbs, and minor debris. It is explicitly not intended for picking up liquids, heavy-duty industrial cleaning, or vacuuming hazardous materials. Using it for unintended purposes could damage the device or pose a safety risk.
Troubleshooting and Customization Ideas
Even the most careful builders might encounter small hiccups. Here are some common troubleshooting tips and ideas to customize your new cleaning tool:
Troubleshooting Tips:
- Weak Suction: This is by far the most common issue. Thoroughly check for any air leaks throughout the entire assembly! Re-seal any gaps or loose joints with more tape, clay, or epoxy. Ensure the motor is spinning freely without obstruction and that the fan blades are angled correctly. Also, verify that the cloth filter isn’t overly clogged or too dense, which could restrict airflow.
- Motor Not Spinning: First, verify that your power source (batteries or adapter) is connected correctly and has sufficient charge. Next, carefully check all wire connections to the motor for continuity and ensure there are no loose contacts.
- Noisy Operation: Excessive noise usually indicates that the fan blades might be scraping against the inner walls of the plastic bottle or the filter. Adjust their position carefully if necessary to ensure they spin freely without contact.
Customization Ideas:
Feel empowered to get creative and personalize your vacuum cleaner to suit your specific needs and aesthetic preferences:
- Interchangeable Nozzle Attachments: Design and create various nozzle shapes using smaller bottle necks, cardboard, or even 3D-printed parts to reach different types of crevices, corners, or flat surfaces more effectively.
- Alternative Power Sources: Experiment with different battery packs (e.g., rechargeable AA, 9V, or small LiPo batteries) or a regulated DC power adapter to find the optimal power for your motor and desired suction.
- Advanced Filter Options: Try different types of cloth materials or even a small, porous sponge for filtration, depending on the specific type of dust or debris you intend to clean. Consider multi-layer filtration for finer particles.
- Aesthetic Enhancements: Personalize your vacuum cleaner by painting it in your favorite colors, adding decorative stickers, incorporating small LED lights for a futuristic look, or integrating other decorative elements to make it truly unique and reflective of your style.
Conclusion: Empowering Creativity and Sustainability
You’ve now successfully transformed what would typically be considered everyday waste materials into a functional, practical, and environmentally friendly cleaning tool! This rewarding project, inspired by the innovative spirit of Navin Khambhala, is much more than just about building a vacuum cleaner; it stands as a testament to the immense power of repurposing, human ingenuity, and the invaluable experience of hands-on learning. By taking on such a creative challenge, you not only make a tangible contribution to reducing waste and promoting sustainable practices but also gain valuable insights into the fundamental mechanics and engineering principles that govern common household devices.
We sincerely hope this detailed, step-by-step guide empowers you to tackle even more ambitious DIY projects in the future, encourages you to adopt sustainable habits in your daily life, and ignites a lasting passion for innovation and creation. Share your completed bottle vacuum cleaner with your friends, family, and online communities; inspire them to embark on their own inventive journeys, demonstrating how simple materials can be transformed into something truly useful!