
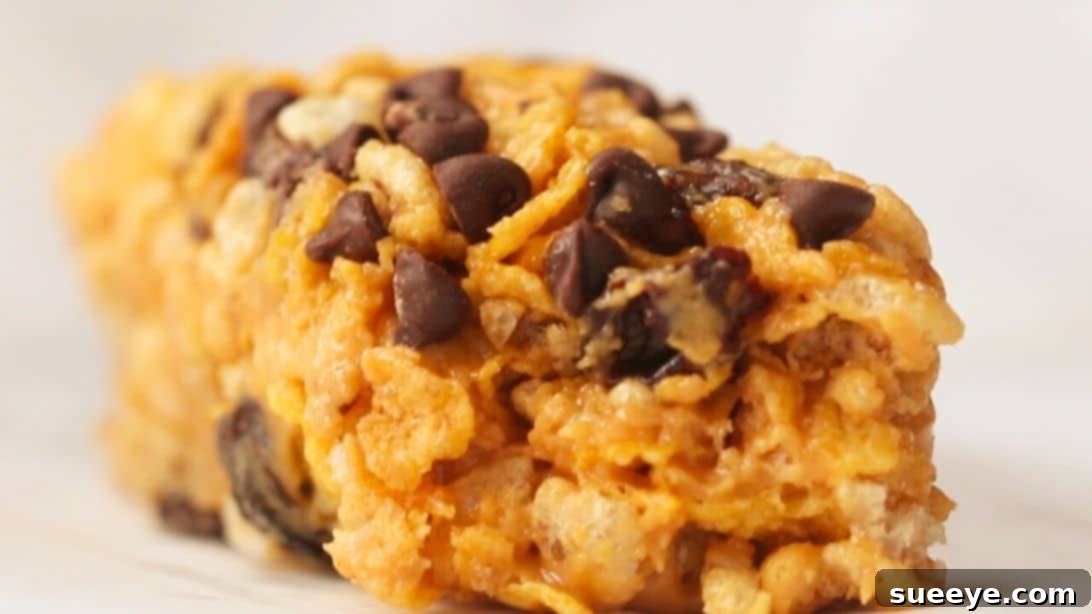
Are you searching for the ultimate grab-and-go snack that’s both delicious and incredibly simple to make? Look no further! Homemade cereal bars are a game-changer for busy mornings, afternoon slumps, or whenever you need a quick burst of energy. Forget those store-bought versions laden with preservatives and hidden sugars; making your own means you control every single ingredient, ensuring a wholesome and satisfying treat.
This fantastic on-the-go cereal bar recipe, inspired by culinary innovators like Tasty, delivers a perfect symphony of textures and flavors. Imagine a delightful blend of chewy, crunchy, and sweet, all in one bite. The best part? This recipe is entirely no-bake, meaning you won’t need to turn on your oven or stovetop. It’s a truly effortless approach to creating irresistible snack bars right in your kitchen.
RELATED: Soft and Chewy Homemade Granola Bars
Why Make Your Own No-Bake Cereal Bars?
There’s a growing trend towards homemade snacks, and for good reason. While the supermarket aisles are packed with various cereal bar options, making your own offers unparalleled benefits:
- Control Over Ingredients: Commercial bars often contain high-fructose corn syrup, artificial flavors, and preservatives. When you make them at home, you choose fresh, high-quality ingredients, allowing you to tailor them to your dietary needs and preferences.
- Healthier Choices: Reduce sugar content, opt for whole-grain cereals, and load up on nutritious add-ins like nuts, seeds, and dried fruits for a truly wholesome snack.
- Cost-Effective: Buying ingredients in bulk for homemade bars is often more economical than purchasing individual pre-packaged bars.
- Endless Customization: This is where the fun truly begins! Our base recipe is incredibly versatile, serving as a blank canvas for your culinary creativity. Whether you’re avoiding certain allergens or simply experimenting with new flavor combinations, the possibilities are limitless.
- Quick & Easy: With no baking required, these bars come together in minutes, making them ideal for even the busiest schedules.
- Kid-Friendly: Get your children involved in the preparation! It’s a fun activity that encourages healthy eating habits and lets them personalize their snacks.
The Simple Magic of 6 Core Ingredients
Believe it or not, crafting these delightful homemade cereal bars requires just a handful of staple ingredients. The beauty lies in their simplicity and how they come together to create such a satisfying result. You’ll need:
- Peanut Butter: This is the hero ingredient, acting as the primary binder that holds everything together. Its rich flavor also adds a wonderful depth to the bars. For those with nut allergies or specific preferences, almond butter, cashew butter, or even sunflower seed butter (like SunButter) can be excellent alternatives. Just ensure they have a similar creamy consistency.
- Honey: Serving as both a natural sweetener and an additional binder, honey contributes to the bars’ delightful chewiness. If you prefer, maple syrup or agave nectar can be substituted, though you might need to adjust the quantity slightly to achieve the desired stickiness.
- Cornflakes: These provide a fantastic light and crispy texture, contrasting beautifully with the chewy elements. Ensure your cornflakes are fresh for maximum crunch!
- Puffed Rice Cereal: Another textural superstar, puffed rice adds an airy crispness. Combining it with cornflakes creates a dynamic duo of crunch. You can also experiment with other puffed cereals like puffed wheat or even a mix of various whole-grain cereals.
- Raisins: These classic dried fruits offer natural sweetness and a lovely chewy bite. They’re packed with energy and complement the other flavors wonderfully.
- Mini Chocolate Chips (Optional): While optional, a sprinkle of mini chocolate chips adds an irresistible touch of indulgence. Dark chocolate chips can offer a richer, less sweet flavor, while milk chocolate provides a classic treat.
This humble list forms the foundation for countless delicious variations. Don’t be afraid to make it your own!
Essential Equipment for No-Bake Cereal Bars
You won’t need any fancy kitchen gadgets for this recipe. Just a few basic items will suffice:
- Microwave-Safe Bowl: For melting the peanut butter and honey. A medium-sized bowl will be perfect.
- Large Mixing Bowl: To combine all the dry ingredients with the melted binder.
- Sturdy Spatula or Wooden Spoon: For mixing and pressing the mixture firmly into the pan.
- 8×8 Inch Baking Pan: This size yields perfect bars. A 9×9 inch pan can also work, but your bars will be slightly thinner.
- Parchment Paper: Crucial for easy removal of the chilled bars and preventing sticking. Don’t skip this step!
- Sharp Knife: For cleanly cutting the chilled slab into individual bars.
How to Make Easy Homemade Cereal Bars: A Step-by-Step Guide
Creating these delightful snacks is incredibly straightforward. Follow these simple steps for perfect no-bake cereal bars every time:
Step 1: Melt the Binders
In a microwave-safe bowl, combine 1 cup of creamy peanut butter and 1/4 cup of honey. Place the bowl in the microwave and heat it in short, 30-second intervals. After each interval, stir the mixture well. Continue this process until the peanut butter and honey are fully melted and smoothly combined into a pourable liquid. Be careful not to overheat, as this can cause the peanut butter to separate or burn. The goal is a warm, cohesive syrup.
Step 2: Combine the Dry and Wet Ingredients
Once your peanut butter and honey mixture is smooth, add 3 cups of cornflakes, 2 cups of puffed rice cereal, and 1/2 cup of raisins to the bowl. If you’re including them, now is also the time to add 1/4 cup of mini chocolate chips or any other dry mix-ins. Using your sturdy spatula or spoon, mix everything thoroughly. Ensure that all the dry cereal and add-ins are evenly coated with the sticky peanut butter-honey mixture. This step is crucial for ensuring the bars hold together well. Be gentle but firm to avoid crushing the cereals too much.
Step 3: Press and Chill
Prepare an 8×8 inch baking pan by lining it completely with parchment paper, allowing an overhang on the sides. This overhang will serve as handles, making it incredibly easy to lift the entire slab out once chilled. Transfer the mixed cereal bar mixture into the prepared pan. Using the back of your spatula or a piece of parchment paper, press the mixture down very firmly and evenly across the entire surface of the pan. The firmer you press, the better your bars will hold their shape. Once compacted, place the pan in the refrigerator. Chill for at least 1 to 2 hours, or until the mixture is completely firm and set. This chilling process is essential for the bars to solidify and be easily cut.
Step 4: Cut and Store
Once the cereal mixture is thoroughly firm, use the parchment paper overhang to carefully lift the entire slab out of the baking pan and place it on a cutting board. Using a sharp knife, cut the slab into your desired bar sizes. For cleaner cuts, you can slightly warm your knife under hot water and wipe it dry between cuts. To keep them fresh and convenient, wrap each individual bar tightly with parchment paper, wax paper, or plastic wrap. Store the wrapped bars in an airtight container or a large ziplock bag. These homemade cereal bars can be stored in the refrigerator for up to 2 weeks or frozen for up to 3 months. When ready to enjoy from the freezer, simply let them thaw at room temperature for a few minutes.
Customization Ideas: Unleash Your Creativity!
The beauty of this easy homemade cereal bar recipe lies in its adaptability. Here are endless ways to customize your bars and make them truly unique:
- Dried Fruits: Not a fan of raisins? Swap them for dried cranberries, chopped apricots, dates, cherries, or even tropical mango pieces.
- Nuts and Seeds: For an extra layer of crunch and a boost of healthy fats and protein, incorporate a handful of chopped almonds, walnuts, pecans, pumpkin seeds, sunflower seeds, chia seeds, or flax seeds. If adding nuts, you might need a tiny bit more honey or peanut butter to ensure everything binds securely.
- Chocolate Varieties: Beyond mini chocolate chips, try white chocolate chips, butterscotch chips, or even a drizzle of melted dark chocolate over the top once the bars are set.
- Spices: A pinch of cinnamon, nutmeg, or a dash of pumpkin pie spice can add wonderful warmth and flavor, especially if you’re using fall-inspired add-ins like dried apples.
- Coconut: Toasted shredded coconut can add a lovely texture and tropical flavor.
- Protein Boost: Stir in a scoop of your favorite protein powder (unflavored or vanilla works best) for a post-workout snack. You may need to slightly increase the liquid binder to compensate for the dry powder.
- Different Cereals: While cornflakes and puffed rice are excellent, don’t hesitate to experiment with other sturdy cereals like Cheerios, crushed graham crackers, or even gluten-free oat flakes.
Tips for Perfect Homemade Cereal Bars Every Time
- Measure Accurately: Especially with the binders (peanut butter and honey), precise measurements ensure the right consistency for your bars.
- Don’t Overcook the Binders: Microwave just until melted and smooth. Overheating can make them too thick or oily.
- Press FIRMLY: This is arguably the most crucial step. The harder you press the mixture into the pan, the less crumbly your bars will be. Use the heel of your hand or a flat bottomed glass if a spatula isn’t enough.
- Chill Thoroughly: Patience is key here. Don’t rush the chilling process, or your bars might fall apart when cut.
- Use Parchment Paper: Seriously, this is a lifesaver for easy removal and cleanup.
- Warm Knife for Cutting: For super clean, professional-looking cuts, dip your knife in hot water and wipe it dry before slicing through the chilled slab. Repeat for each cut if needed.
- Store Properly: Airtight storage prevents the bars from drying out or becoming stale.
The Nutritional Edge of Homemade Cereal Bars
When made with wholesome ingredients, these homemade cereal bars can offer significant nutritional advantages over their commercial counterparts. They can be a good source of:
- Energy: The combination of carbohydrates from cereals and natural sugars from honey and dried fruit provides a quick energy boost.
- Healthy Fats: Peanut butter and optional nuts/seeds contribute monounsaturated and polyunsaturated fats, which are important for heart health and satiety.
- Fiber: Whole-grain cereals and dried fruits are excellent sources of dietary fiber, crucial for digestive health.
- Protein: Peanut butter and added nuts/seeds boost the protein content, helping you feel fuller for longer.
By customizing your ingredients, you can control the sugar content, add extra protein, or boost fiber, making these bars a truly tailored healthy snack.
Your Go-To On-The-Go Cereal Bars Recipe
Whether you’re packing school lunches, heading out for a hike, or simply need a guilt-free treat, these homemade cereal bars are your perfect solution. They’re incredibly easy, endlessly customizable, and utterly delicious. Ditch the preservatives and embrace the joy of creating wholesome, satisfying snacks from scratch. Give this recipe a try today and discover your new favorite on-the-go fuel!
Remember, the best recipes are the ones you make your own. Experiment with flavors, add your favorite ingredients, and share your unique creations. Happy snacking!