
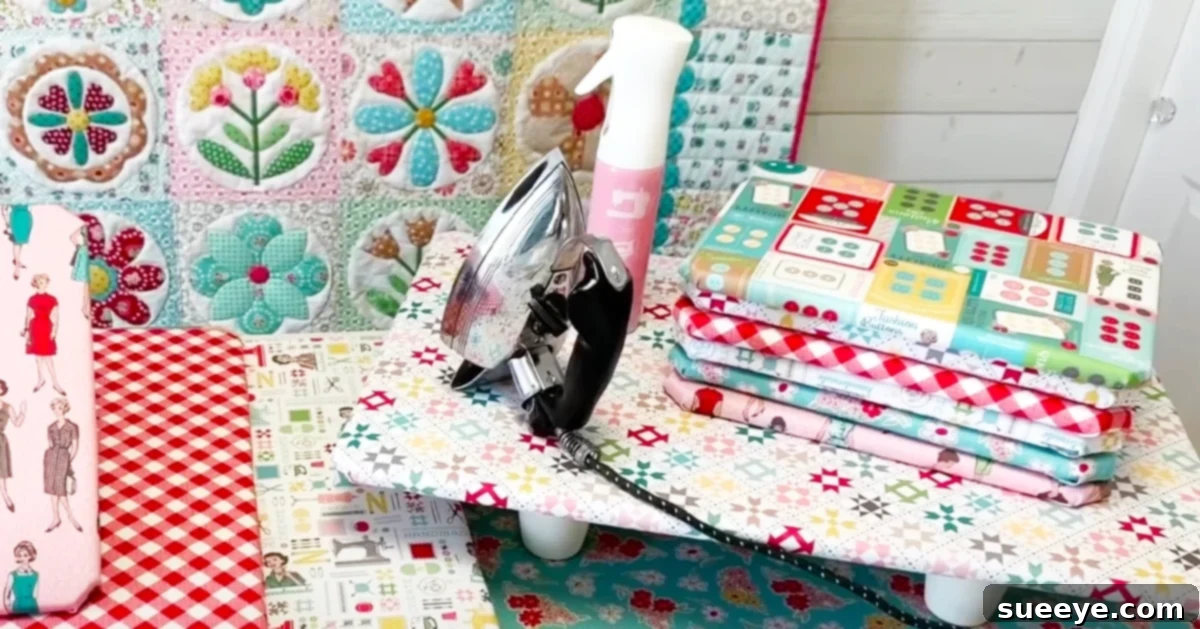
Craft Your Own Custom Portable Ironing Board: The Ultimate Space-Saving Solution
Are you tired of lugging out that cumbersome, full-sized ironing board every time you need to press a small item, touch up a collar, or prepare fabric for a quick sewing project? Traditional ironing boards can be unwieldy, occupy valuable floor space, and often feel like overkill for minor tasks. Imagine a world where quick touch-ups are genuinely quick, and your crafting space remains clutter-free. This is where the magic of a DIY portable ironing board comes in, offering unparalleled convenience and efficiency right where you need it.
Inspired by the ingenious tutorial from craft expert Lori Holt on YouTube, creating your own portable ironing surface is not only incredibly simple but also deeply satisfying. Lori’s approach showcases how versatile these boards can be, demonstrating various sizes and even clever additions like wooden legs to elevate the surface. These DIY boards are a game-changer for anyone who values practicality, space efficiency, and a touch of personalized style in their home or craft studio. Forget wrestling with a giant board for a tiny crease – let’s dive into making your perfect compact ironing companion!
Why DIY Your Own Portable Ironing Board? Unleash Convenience and Creativity
The decision to craft your own portable ironing board goes beyond mere practicality; it’s an embrace of efficiency, customization, and cost-effectiveness. Here’s why making your own is a brilliant idea:
Unmatched Convenience and Portability
The primary appeal of a portable ironing board lies in its sheer convenience. It eliminates the need for a dedicated ironing station, allowing you to press garments or fabric scraps wherever you have a flat surface. Whether it’s on your kitchen counter, a sewing table, or even packed for a craft retreat, its compact size ensures you can quickly set up and put it away. This makes it ideal for quilters working on small blocks, sewers pressing seams as they go, or anyone who simply needs to smooth out a shirt collar before heading out the door without the hassle of a full setup.
Ultimate Space-Saving Solution
In today’s homes, especially apartments or multi-functional rooms, space is a premium commodity. A full-sized ironing board can be a significant storage challenge. A DIY portable version, however, can be easily tucked away in a closet, slid under a bed, or stored vertically against a wall. Its slim profile and custom dimensions mean it fits perfectly into the nooks and crannies where bulkier items simply can’t. This not only frees up valuable floor space but also contributes to a cleaner, more organized living or crafting environment.
Personalized Style and Customization
One of the most exciting aspects of a DIY project is the freedom to personalize. Unlike generic store-bought boards, you get to choose every element of your portable ironing surface. Select a vibrant fabric pattern that complements your existing decor, matches your sewing room aesthetic, or simply brings you joy. You can opt for whimsical prints, sophisticated geometrics, or classic florals. This personal touch transforms a utilitarian item into a beautiful, functional accessory that reflects your unique taste and makes everyday tasks a little more enjoyable.
Budget-Friendly Crafting
Creating your own portable ironing board is significantly more economical than purchasing a specialized compact board from a store. The materials required are readily available and relatively inexpensive. By leveraging basic crafting supplies, you can assemble a high-quality, durable ironing surface for a fraction of the retail cost. This budget-friendly approach allows you to invest your savings in other crafting endeavors or simply enjoy the satisfaction of a smart, economical choice.
A Creative and Rewarding Project
Engaging in a DIY project provides a wonderful opportunity for creative expression. From selecting the perfect fabric to meticulously stapling the layers, each step is a chance to exercise your crafting skills. The satisfaction of using an item you’ve made with your own hands is immense. It’s not just an ironing board; it’s a testament to your resourcefulness and a functional piece of art born from your creativity.
Essential Materials for Your DIY Portable Ironing Board
Gathering your materials is the first exciting step in bringing your custom ironing board to life. The beauty of this project lies in its simplicity and the accessibility of its components:
- Plywood (1/2 inch thickness recommended): This forms the sturdy base of your ironing board. A 1/2-inch thickness provides excellent durability without being overly heavy. You can choose birch, MDF, or a similar smooth, flat wood. The size is entirely up to you – common dimensions for portable boards range from 12×18 inches for small tasks to 18×24 inches or even larger for quilting projects.
- Decorative Fabric: This will be the visible top layer, offering your board its unique aesthetic. Choose a 100% cotton fabric, as it is heat-tolerant and easy to work with. Select a pattern or solid color that inspires you! You’ll need enough to cover your plywood board with an additional 2-3 inches of overhang on all sides.
- Silver Ironing Board Fabric (Heat Reflective): This specialized fabric is crucial for effective ironing. Its metallic coating reflects heat, helping to press garments more efficiently and evenly. It also provides a scorch-resistant layer, protecting your decorative fabric. Purchase this from fabric stores or online retailers that specialize in sewing supplies.
- Batting Fabric (Cotton or Heat-Resistant): Batting provides the essential padding and insulation for your ironing surface. A cotton batting or a specific heat-resistant batting will protect your table surface from heat and give a soft, forgiving surface for pressing. Aim for a medium loft batting for optimal results. You’ll need the same dimensions as your other fabrics.
- Staples (3/8 inch) and Staple Gun: A heavy-duty staple gun is indispensable for securely attaching the fabric layers to the plywood. Ensure you have staples that are 3/8 inch long, which are ideal for firmly gripping into 1/2-inch plywood without poking through the other side.
- Wood Legs (Optional): For added elevation and a touch of charm, small wooden legs can be attached to the underside of your board. These can be pre-made furniture feet, small wooden blocks, or even custom-cut pieces. This feature, inspired by Lori Holt’s designs, makes the board even more comfortable to use by lifting it slightly off your workspace.
- Additional Tools (Not in original list but helpful): Measuring tape, scissors, utility knife or jigsaw (for cutting plywood if not pre-cut), sandpaper (for smoothing plywood edges), marker.
Step-by-Step Guide: Crafting Your DIY Portable Ironing Board
Creating your portable ironing board is a straightforward process that yields incredibly satisfying results. Follow these simple steps, and you’ll have a custom ironing surface in no time:
Step 1: Prepare Your Plywood Base
First, obtain your plywood base cut to your desired dimensions. A common starting point is 12×18 inches or 18×24 inches, but feel free to customize for your specific needs – perhaps a long, narrow board for pressing quilting strips, or a smaller one for delicate items. Crucially, before proceeding, make sure to gently round off all four corners of the plywood. You can achieve this with sandpaper, a utility knife, or even a jigsaw for a more precise curve. Removing these sharp points is vital: it not only makes the subsequent fabric folding much easier and smoother but also prevents the sharp corners from potentially poking through and damaging your beautiful fabric layers over time. A smooth edge also ensures a more professional and comfortable finish.
Step 2: Layering Your Fabrics with Precision
Once your plywood is prepped, it’s time to assemble the layers. Find a clean, flat work surface large enough to spread out your materials. Begin by laying your chosen decorative fabric face down, ensuring the “right side” (the side you want to see) is facing the table. Smooth out any wrinkles. On top of the decorative fabric, center your silver ironing board fabric, shiny side up. Finally, place your batting layer directly on top of the silver fabric. Make sure all layers are aligned and completely flat. Then, carefully center your prepared plywood board on top of the batting. Using scissors, trim all three fabric layers, leaving an overhang of approximately 2-3 inches beyond the edges of the plywood on all four sides. This excess fabric is essential for securely wrapping and stapling the layers to the underside of the board.
Step 3: Securely Stapling the Fabric Layers
Now comes the stapling, which requires a bit of tension and technique for a professional finish. Begin by focusing on the long sides of your board first. Carefully pull the layered fabric up and over the edge of the plywood, ensuring it is taut but not so tight that it distorts the fabric or makes it impossible to staple. Fold the raw edge of the fabric under itself to create a clean, finished edge before stapling it securely to the underside of the plywood. Place staples every 1/2 to 1 inch along the entire length of both long sides. Repeat this process for the two shorter sides, again pulling the fabric taut. Once the straight edges are secured, move to the rounded corners. For the corners, carefully fold the fabric as if you’re wrapping a gift, creating neat pleats or gathers that lie flat against the plywood. Pull firmly to maintain tension and staple these folds down securely. The goal is to achieve a smooth, wrinkle-free top surface and a neatly finished underside. Ensure all staples are fully embedded in the plywood.
Step 4: Adding Optional Wooden Legs for Elevation
If you’ve opted for the stylish and functional addition of wooden legs, this is the final step. Small wooden blocks or pre-made furniture feet can be attached to the four corners of the underside of your board. Ensure they are positioned far enough from the edges so that the board remains stable. You can attach them using small wood screws, carefully ensuring the screws are not too long and won’t penetrate through the top surface of the plywood. If you prefer a foldable design, small hinges could also be used to attach collapsible legs, making your board even more versatile for storage and travel. These legs not only add a touch of charming aesthetics but also provide better airflow and prevent heat transfer directly to your work surface, enhancing the overall functionality and user experience of your DIY portable ironing board.
Customization Ideas & Expert Tips
Making your own portable ironing board opens up a world of possibilities for personalization and enhanced functionality:
- Size it Right: Don’t be confined to standard sizes. Create a tiny board (e.g., 6×10 inches) perfect for doll clothes or tight spaces. Or, go for a long, narrow one (e.g., 8×30 inches) specifically for pressing quilt sashing or garment sleeves. Think about your most frequent ironing tasks and tailor the size accordingly.
- Fabric Flair: This is where your personality truly shines! Choose fun, quirky prints for a craft room, elegant patterns for a more formal space, or seasonal fabrics to match holiday decor. You can even use remnants from a favorite quilt project to tie your crafting items together.
- Built-in Storage: Consider stapling a fabric pocket or two to the underside of your board before attaching the legs. These pockets can hold small notions like a seam ripper, tailor’s chalk, or even a mini spray bottle for starch, keeping essentials close at hand.
- Heat-Resistant Underlay: While silver ironing board fabric offers great heat reflection, for extra protection, especially if you plan to use very high heat settings, you could add an additional layer of heat-resistant interfacing or insul-bright between the batting and the silver fabric.
- Alternative Bases: While plywood is excellent, for a lighter board, you could explore alternatives like dense foam core boards (though these might not withstand heavy stapling or extreme heat as well). Always ensure your chosen base is sturdy and heat-tolerant.
The Enduring Benefits of Your New Portable Ironing Board
The decision to make your own portable ironing board is one you’ll appreciate daily. This simple project delivers a multitude of lasting benefits:
- Unmatched Convenience: No more dragging out a bulky board. Your custom board is always ready for quick touch-ups, making ironing a less daunting chore and more of an efficient task.
- Ultimate Space Saver: Perfect for small living spaces, dorm rooms, or dedicated craft areas where every square inch counts. It stores away effortlessly, keeping your home tidy and organized.
- Express Your Style: This isn’t just a functional tool; it’s an extension of your personal aesthetic. Choose fabrics that bring joy and make your workspace uniquely yours.
- Perfect for Crafters and Sewers: Essential for pressing seams, squaring up quilt blocks, or preparing fabric pieces right at your sewing machine. It streamlines your workflow and enhances the quality of your handmade projects.
- Eco-Friendly and Sustainable: By crafting a durable, long-lasting item, you contribute to less waste compared to frequently replacing flimsy, mass-produced alternatives.
- An Ideal Gift: A handmade portable ironing board makes a thoughtful and practical gift for fellow crafters, students, or anyone who appreciates ingenious home solutions.
This portable ironing board truly is easy to make, requires no expensive tools or complex steps, and offers incredible utility. It’s perfect for anyone seeking a more efficient, personalized, and space-saving solution for their ironing needs. Whether it’s for your mom’s intricate small projects, your quilting endeavors, or just quick daily maintenance, a custom-sized, DIY portable ironing board is a brilliant addition to any home. Get ready to transform your ironing experience and enjoy the satisfaction of a functional creation!