
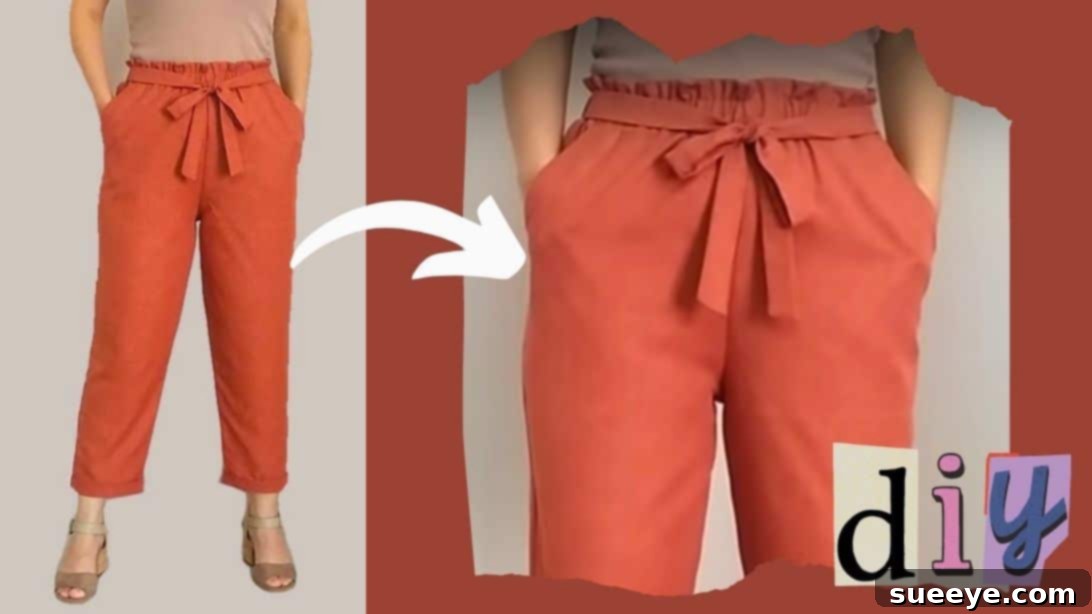
DIY Paper Bag Trousers: Your Ultimate Sewing Guide for Stylish Comfort
Are you yearning to refresh your wardrobe without breaking the bank? Do you dream of owning a pair of chic, comfortable trousers that perfectly fit your style and body? If so, you’re in the right place! We’ve all faced the dilemma of wanting new clothes but not wanting to overspend. The good news is, creating an impressive fashion statement doesn’t have to be expensive or out of reach. With this comprehensive DIY tutorial, you’ll embark on an exciting journey to craft your very own pair of fashionable paper bag trousers.
This project is not only cost-effective but also incredibly rewarding. You can choose a new fabric that speaks to your personal aesthetic or, even better, repurpose old fabrics, contributing to a more sustainable fashion practice. The paper bag waist design, known for its gathered, high-waisted look cinched with a tie-belt, is incredibly comfortable and universally flattering. It adds an instant touch of effortless elegance to any outfit, making it a staple piece for any wardrobe.
Forget the notion that sewing is only for seasoned pros. This step-by-step guide is meticulously designed for beginners, ensuring a smooth and enjoyable learning experience. We’ll walk you through every stage, from selecting your materials to the final finishing touches. So, gather your supplies and let nothing stop you from creating your first, or perhaps next, amazing pair of paper bag trousers. Special thanks to Tuğba İşler from YouTube for the inspiring original tutorial that sparked this detailed guide.
Why Paper Bag Trousers Are a Must-Have
Before we dive into the creation process, let’s explore why paper bag trousers have become a beloved fashion trend and why they’re the perfect choice for your next sewing project:
- Unmatched Comfort: The loose fit and elasticated or gathered high waist ensure maximum comfort, allowing for ease of movement throughout your day.
- Flattering Silhouette: The cinched waist accentuates your natural waistline, creating an hourglass shape that complements various body types. The wider leg often helps balance proportions.
- Versatile Style: These trousers can be effortlessly dressed up or down. Pair them with a simple t-shirt and sneakers for a casual look, or dress them up with a sophisticated blouse and heels for a more formal occasion.
- Customizable: When you sew your own, you have complete control over the fabric, print, length, and fit, ensuring a truly personalized garment that reflects your unique style.
- Sustainable Choice: By making your own clothes, especially from repurposed fabrics, you contribute to reducing textile waste and promoting ethical fashion consumption.
Essential Materials for Your Sewing Project
To begin your journey into crafting these stylish trousers, you’ll need a few key materials. Choosing the right fabric is crucial for achieving the desired drape and comfort of paper bag trousers. For the best results, we recommend lightweight to medium-weight fabrics with a good drape.
- Fabric: Approximately 120-150cm (47-59 inches) of linen fabric or a similar suitable alternative. Linen is excellent for its breathability and elegant drape, making it ideal for summer trousers.
- Alternatives: Consider cotton twill, chambray, rayon challis, Tencel, or even lightweight denim for different looks and seasons. For beginners, a stable woven cotton is easier to handle than very slippery fabrics.
- Fabric Quantity Tip: Always check the pattern layout if available, or purchase slightly more than recommended, especially if you’re working with a directional print or need to account for shrinkage after pre-washing.
- Sewing Machine: A basic sewing machine with a straight stitch and zigzag stitch function.
- Matching Thread: High-quality polyester thread that matches your fabric color.
- Fabric Scissors: Sharp, dedicated fabric scissors are essential for clean, precise cuts. Avoid using them on paper or other materials to maintain their sharpness.
- Tailor’s Chalk or Fabric Marker: For marking patterns onto your fabric. Disappearing ink pens or heat-erasable pens are also excellent choices.
- Measuring Tape: For accurate body and fabric measurements.
- Pins or Fabric Clips: To hold fabric pieces together before sewing.
- Elastic (Garter): Approximately 1-1.5 inches wide, enough to comfortably fit around your natural waist.
- Safety Pin: To help thread the elastic through the waistband casing.
- Iron and Ironing Board: Crucial for pressing seams as you go, which gives your finished garment a professional look.
- Seam Ripper: For carefully undoing any stitches that need correction – every sewer’s best friend!
- Optional: A serger or overlocker for finishing raw edges beautifully, or simply use your sewing machine’s zigzag stitch.
Pre-Sewing Preparations: Setting Yourself Up for Success
Before you even think about cutting your fabric, a few preparatory steps will ensure a smoother sewing process and a better finished product:
- Pre-wash Your Fabric: Always wash and dry your fabric according to its care instructions before cutting. This prevents potential shrinkage after your garment is made and removes any manufacturing chemicals.
- Iron Your Fabric: Press your pre-washed fabric thoroughly to remove all wrinkles. Working with smooth, flat fabric is much easier and leads to more accurate cuts and seams.
- Read Through Instructions: Familiarize yourself with all the steps in this tutorial before you begin. Understanding the full process will help you anticipate each stage and avoid mistakes.
- Gather All Tools: Make sure all your materials and tools are readily accessible in your sewing space.
- Test Stitch: Use a scrap piece of your fabric to test your sewing machine’s tension and stitch length. This ensures your stitches are perfect before you start on your main project.
Step-by-Step Guide to Sewing Your Paper Bag Trousers
Now, let’s get down to the exciting part – sewing! Remember to take your time, be precise with your measurements, and press your seams as you go for a truly professional finish.
Step 1: Preparing and Marking the Fabric Pattern
This crucial first step involves accurately folding your fabric and marking the initial pattern for your trouser legs. Precision here ensures a well-fitting garment.
- Fold the Fabric: Lay your pre-washed and ironed fabric flat. Fold the fabric in half lengthwise (selvedge to selvedge), then fold it in half again crosswise. This will create four layers of fabric. Ensure all edges are neatly aligned and smooth out any wrinkles.
- Measure and Mark Initial Dimensions:
- From the folded edge, measure 86cm (approximately 34 inches) horizontally and mark this point. This will define the approximate width of your trouser leg.
- From the top raw edge, measure 38cm (approximately 15 inches) vertically downwards and mark. This establishes the rise of your trousers.
- Define the Crotch Curve (Right Side): Still working on one of the top layers of your folded fabric (which we’ll refer to as the “right side” for clarity in this step):
- From the top-right corner of your folded fabric (where the top raw edge meets the right folded edge), measure 31cm (approximately 12 inches) horizontally inwards and mark.
- From this new mark, measure 27cm (approximately 11 inches) upward along the folded edge and mark.
- Now, carefully draw a smooth curve connecting the mark at 31cm horizontally to the mark at 27cm vertically. This curve forms the crucial crotch seam of your trousers.
- Adjusting the Outer Edge: From the top-right corner of your fabric, measure 36cm (approximately 14 inches) horizontally along the top edge and mark. This mark will help define the outer seam of your trousers, creating a slight taper or flare as desired.
Tip for beginners: Use a French curve ruler if you have one to draw smooth, professional-looking curves for the crotch area.
Step 2: Shaping the Trouser Leg and Cutting
Now that your initial markings are in place, we’ll further define the shape of your trousers and prepare for cutting.
- Define the Inner Leg Seam (Left Side): Move to the opposite side of your folded fabric (the “left side” in reference to our initial markings).
- From the bottom-left corner of your folded fabric (where the bottom raw edge meets the left folded edge), measure 5cm (approximately 2 inches) upward and mark.
- From this new mark, measure another 20cm (approximately 8 inches) further upward and mark again. These two marks will guide the shaping of your inner leg seam.
- Connect the Marks: Carefully connect the marks you’ve made on the left side (inner leg) towards the right side (outer leg) to form the complete shape of one trouser leg. Visualize the outline of your future trousers on the fabric. You should now have a clear pattern drawn on the top layer of your four-layered fabric.
- Cut the Pattern: Using your sharp fabric scissors, carefully cut along all the lines you have drawn. Make sure to cut through all four layers of fabric simultaneously to ensure consistency.
- Once cut, unfold the fabric. You should now have two identical, mirror-image pieces of fabric, each representing one leg of your paper bag trousers.
Step 3: Constructing Pockets, Seams, and Waistband Casing
This step brings your trouser pieces together and prepares the crucial paper bag waistband.
- Sewing the Main Trouser Seams:
- Place your two trouser pieces right sides together. Pin along the front and back crotch seams.
- Sew these crotch seams with a 1.5cm (5/8 inch) seam allowance. Press the seams open or to one side and finish the raw edges with a zigzag stitch or serger to prevent fraying.
- Next, align the inner leg seams of both trouser pieces, right sides together. Pin and sew these seams with a 1.5cm (5/8 inch) seam allowance. Press seams and finish raw edges.
- Finally, sew the outer leg seams, leaving the top portion open for pocket insertion if you’re adding them, or sew all the way up if not.
- Creating Front Pockets (Optional but Recommended):
- For practical front pockets, you’ll need to create a separate pattern. A simple curved or angled pocket bag can be drawn directly onto paper. Typically, this involves cutting four pocket pieces (two for each side).
- Attach two pocket pieces (one lining, one main fabric) to the curved opening on the front of your trouser side seams, right sides together, and sew. Clip curves, turn right side out, and press.
- Then, attach the remaining two pocket pieces to the back of the pocket opening, completing the pocket bag. Stitch around the pocket bag to secure it, then baste the top and side edges of the pocket to the trouser waistband and side seam, respectively, to hold them in place.
- Preparing the Waistband Fabric: Cut a fabric strip with a measurement of approximately 12cm (5 inches) in width and 102cm (40 inches) in length. This dimension is a general guideline; for a custom fit, measure your own waist circumference and add 10-15cm for overlap and seam allowance.
- Constructing the Waistband Casing:
- Fold the waistband fabric strip lengthwise, right sides together, and sew the short ends to form a loop. Press the seam open.
- Now, fold the long strip in half lengthwise, wrong sides together, pressing neatly. This creates a neat casing for your elastic.
- Attach this waistband strip to the top edge of your trousers, right sides together, matching seams and distributing the fabric evenly if your trousers are wider than the waistband. Pin securely all around.
- Sew the waistband to the trousers with a 1.5cm (5/8 inch) seam allowance, leaving a 5-7cm (2-3 inch) opening along the back seam of the waistband. This opening is where you’ll insert the elastic.
- Press the seam allowance upwards into the waistband casing.
- Inserting the Elastic (Garter):
- Cut your elastic to a length that feels comfortable around your natural waist (not stretched).
- Attach a safety pin to one end of the elastic. Thread the elastic through the opening you left in the waistband casing. Carefully guide the safety pin through the entire casing until it emerges from the other side.
- Ensure the elastic doesn’t twist inside the casing.
- Once both ends of the elastic are out, overlap them by about 2.5cm (1 inch) and securely sew them together, forming a sturdy loop.
- Gently pull the elastic back into the casing, distributing the gathers evenly around the waistband.
- Finally, close the opening in the waistband casing with a neat topstitch or invisible hand stitch.
Step 4: Crafting the Belt and Finishing the Hem
The belt adds the signature “paper bag” look, and the hem provides a polished finish to your new trousers.
- Making the Tie Belt:
- For the tie belt, cut two pieces of fabric, each measuring approximately 7.4cm (3 inches) in width and 63cm (25 inches) in length. You may adjust the length based on how long you want your belt ties to be.
- Place the two fabric pieces right sides together and sew along the two long edges and one short end, leaving one short end open for turning. Use a 1cm (3/8 inch) seam allowance.
- Clip the corners, then carefully flip the belt inside out through the open end. A loop turner or a safety pin can be very helpful here.
- Press the belt flat, turning under the raw edges of the open end and topstitching it closed or hand-stitching for a cleaner finish.
- Attach one end of the finished belt to each side of the waistband, positioning it so the belt can be tied at the front. You can either sew it directly to the inside or outside of the waistband, or create small belt loops if preferred for a more integrated look.
- Finishing the Bottom Hem with a Faced Cuff:
- For the bottom hem, we’ll create a faced cuff to give it a neat and substantial finish. Cut another piece of fabric with a measurement of approximately 37cm (15 inches) in length and 12cm (5 inches) in width. This piece will be for one trouser leg, so you’ll need two of these in total.
- Sew the short ends of this cuff piece together, right sides facing, to form a loop. Press the seam open.
- Align the raw edge of the cuff loop with the bottom raw edge of one trouser leg, right sides together. Pin all around, matching seams.
- Sew with a 1.5cm (5/8 inch) seam allowance.
- Press the seam allowance up into the cuff. Fold the cuff up once so that the raw edge is hidden inside and the cuff creates a clean finish on the outside of the trouser leg. Press firmly.
- Secure the cuff in place with a subtle stitch in the ditch along the seam or by hand-stitching the top edge of the cuff to the inside of the trouser leg.
- Repeat this process for the other trouser leg.
Expert Tips for a Flawless Finish
Even with detailed instructions, a few general sewing tips can significantly improve your results:
- Press as You Go: This cannot be stressed enough! Pressing seams after each step makes subsequent steps easier and results in a much cleaner, more professional-looking garment.
- Use Plenty of Pins: Don’t be shy with pins. They help keep your fabric layers aligned, especially on curves or when attaching gathers.
- Finish Raw Edges: To prevent your trousers from fraying and to increase their longevity, finish all raw seams with a zigzag stitch on your regular machine or an overlocker/serger.
- Take Your Time: Sewing is not a race. Rushing often leads to mistakes that take more time to fix. Enjoy the process!
- Measure Twice, Cut Once: This old adage holds true in sewing. Double-check all your measurements before making any cuts.
- Good Lighting: Work in a well-lit area to minimize eye strain and see your stitches clearly.
Styling Your New Paper Bag Trousers
Now that you’ve put in the hard work, it’s time for the fun part: styling your beautiful new trousers! The versatility of paper bag trousers means endless outfit possibilities:
- Casual Chic: Pair them with a simple tucked-in t-shirt, a fitted tank top, or a graphic tee. Complete the look with comfortable sneakers or stylish sandals.
- Effortless Elegance: For a more polished ensemble, tuck in a silk blouse, a crisp button-down shirt, or a fine knit sweater. Add block heels or elegant flats, along with some delicate jewelry.
- Layering: In cooler weather, layer a cardigan, a denim jacket, or a tailored blazer over your top.
- Crop Tops: Paper bag trousers are perfect with crop tops as they highlight the flattering high waist and gathered detail without showing too much skin.
- Footwear: From espadrilles and loafers to ankle boots and stilettos, almost any shoe style can complement these trousers, depending on the occasion.
Care Instructions for Longevity
To ensure your handmade paper bag trousers remain a cherished part of your wardrobe for years to come, proper care is essential. Always refer to your fabric’s specific care instructions, but here are some general guidelines:
- Washing: Most linen or cotton fabrics can be machine washed on a gentle cycle with cold water. Avoid harsh detergents.
- Drying: Tumble dry on low heat or, ideally, hang to air dry to prevent shrinkage and preserve the fabric’s integrity. Remove promptly to minimize wrinkles.
- Ironing: Iron on a medium-to-high setting while the fabric is still slightly damp for the best results, especially with linen. Use a pressing cloth if your fabric is delicate or dark-colored.
- Storage: Hang your trousers to prevent creasing and maintain their shape.
Your Handmade Fashion Journey Begins Here
Congratulations! You’ve successfully navigated the rewarding process of sewing your very own pair of paper bag trousers. From the initial fabric selection to the final hem, you’ve invested creativity and effort into a garment that is not only stylish and comfortable but also uniquely yours. This project is a testament to the joy and satisfaction that comes with creating something beautiful with your own hands.
Embracing DIY fashion is more than just saving money; it’s about developing new skills, expressing your individuality, and making conscious choices for a more sustainable lifestyle. We hope this detailed tutorial empowers you to continue exploring the wonderful world of sewing and embark on many more creative projects.
A heartfelt thank you once again to Tuğba İşler from YouTube for her original content and inspiring vision. Her dedication to sharing sewing knowledge is invaluable to the crafting community. Now, go show off your fantastic new paper bag trousers and inspire others!
Don’t forget to share your creations and tag us with your amazing DIY fashion pieces!