
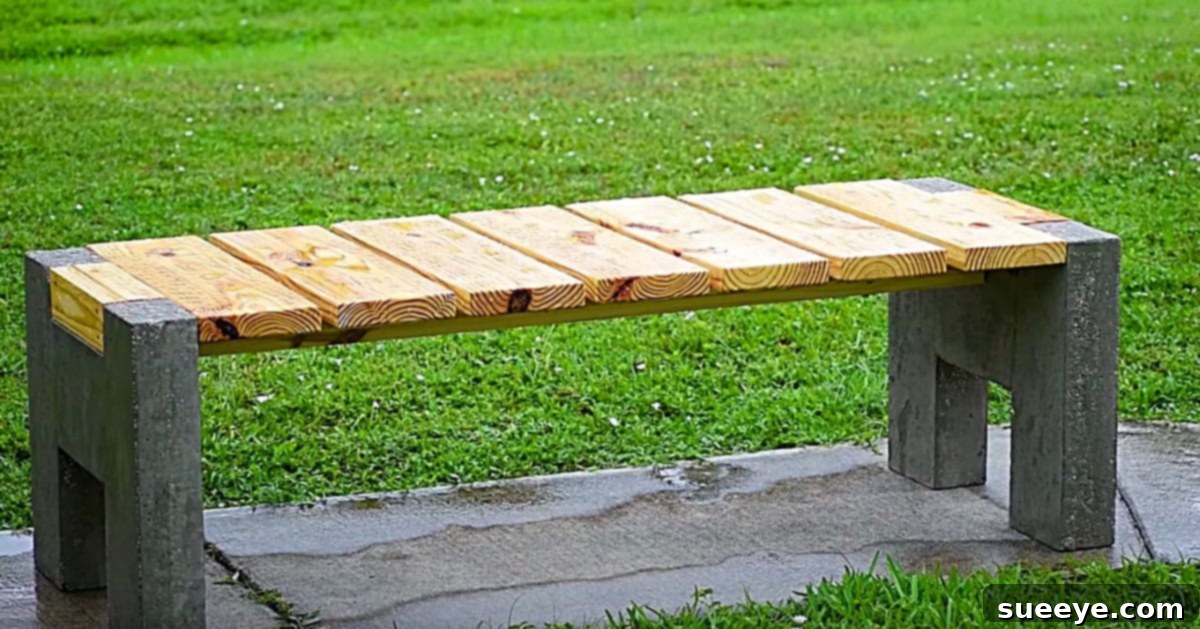
DIY Modern Concrete and Wood Outdoor Bench: Craft Your Own Stylish Garden Seating
Transform your outdoor living space with a touch of modern elegance by building your very own concrete and wood outdoor bench. This DIY project is not only incredibly rewarding but also results in a durable, stylish, and highly functional piece of furniture that will enhance any garden, patio, or backyard oasis. Imagine a serene spot where you can relax with a book, enjoy a morning coffee, or gather with loved ones – all on a bench you built with your own hands.
The beauty of this concrete and wood combination lies in its striking contrast: the raw, industrial appeal of concrete paired with the warm, natural texture of wood. This blend creates a contemporary aesthetic that complements a wide range of outdoor decor styles, from minimalist to rustic. Plus, crafting it yourself allows for complete customization, ensuring your bench perfectly fits your space and personal taste.
My inspiration for this project came from a friend who’s a true DIY enthusiast, once building an entire backyard office from reclaimed pallets! When I stumbled upon a YouTube tutorial for this striking Modern Concrete and Wood Outdoor Bench, I knew it was the perfect addition to his evolving garden. He was keen to add some quick, stylish seating, especially with his nieces and nephews visiting soon, eager to learn about gardening. This bench project became the ideal blend of practical outdoor furniture and a fun, engaging activity. With his knack for construction and my eagerness to help, we decided to tackle this project together. I took charge of gathering the necessary refreshments and craft stains, while he prepared all the essential tools, ensuring we had everything laid out for an efficient build.
Embarking on a DIY project like this isn’t just about saving money; it’s about the satisfaction of creation, the joy of learning new skills, and the pride of showcasing a unique piece in your home. This guide will walk you through every step, ensuring even novice builders can achieve professional-looking results. Let’s get started on building a beautiful, enduring piece of outdoor furniture that you and your family will cherish for years to come.
Why Build a Concrete and Wood Outdoor Bench?
There are numerous compelling reasons to choose this DIY project for your outdoor space:
- Durability and Longevity: Concrete is renowned for its strength and resistance to weather elements, making it an excellent choice for outdoor furniture. Paired with properly treated wood, this bench will withstand harsh conditions and serve you for many years.
- Modern Aesthetic: The combination of raw concrete and natural wood creates a sleek, contemporary look that is highly sought after in modern landscape design.
- Cost-Effectiveness: Building your own bench can be significantly more affordable than purchasing a similar high-quality piece from a retail store. Utilizing salvaged or reclaimed wood can further reduce costs.
- Customization: You have complete control over the dimensions, finishes, and wood types, allowing you to tailor the bench to perfectly suit your specific outdoor area and personal style preferences.
- Sense of Achievement: There’s immense satisfaction in creating something beautiful and functional with your own hands. It’s a project that builds both skills and confidence.
- Low Maintenance: Once sealed and treated, both concrete and wood require minimal maintenance, making them ideal for busy homeowners.
Essential Tools for Your Bench Project
Having the right tools is crucial for any successful DIY endeavor. For this modern concrete and wood outdoor bench, precision and power are key. Here’s a detailed list of the tools you’ll need, along with why each is important:
- Power Drill: Indispensable for pre-drilling pilot holes and driving screws, especially when assembling the wood slats to the concrete bases. Ensure it has enough torque for hardwood if you choose to use it.
- Circular Saw: Essential for making straight, accurate cuts through both the melamine for your molds and the wooden boards for your bench seat. A good quality blade will ensure clean edges.
- Wood Drill Bits: A variety of sizes will be useful for creating pilot holes and potentially countersinking screw heads for a flush finish.
- Measuring Tape: Accuracy is paramount in woodworking and concrete projects. A reliable measuring tape is needed for all cuts and dimensions.
- Speed Square: This tool is critical for marking perfectly square lines on your wood and melamine, ensuring that your cuts are straight and your molds are perfectly aligned.
- Pencil or Marker: For marking cut lines and drilling points clearly on all your materials.
- Sandpaper (various grits): From coarse to fine, sandpaper will be used to smooth the edges of your wood slats, preparing them for staining or sealing, and potentially for smoothing any rough spots on the concrete.
- Safety Glasses: Non-negotiable! Always wear safety glasses to protect your eyes from flying debris, sawdust, and concrete splashes.
- Work Gloves: Protect your hands from splinters, chemicals, and the abrasive nature of concrete.
- Dust Mask/Respirator: Especially when cutting wood or mixing dry cement, a dust mask will protect your lungs from fine particles.
- Bucket and Trowel: For mixing and applying concrete. A sturdy mixing bucket is essential.
- Level: To ensure your concrete molds are perfectly level before pouring, and to check the final bench for stability.
- Clamps: Useful for holding pieces of melamine firmly together when assembling molds, or for securing wood during drilling.
Materials List for Your Modern Outdoor Bench
The core components of this bench are surprisingly few, yet each plays a vital role in its strength and aesthetics. Here’s what you’ll need, along with some selection tips:
- 4 Exterior Grade (2″ x 8″ x 8′) Boards: These will form the seat of your bench. Opt for exterior-grade wood like cedar, redwood, or pressure-treated pine for superior weather resistance. Look for straight boards free of excessive knots or warps.
- Long Wood Screws (Exterior Grade): Choose screws specifically designed for outdoor use (e.g., galvanized, stainless steel, or coated exterior screws) to prevent rust and ensure lasting integrity. Length should be appropriate for securing your 2″ thick wood slats.
- 3 Bags of Cement (Concrete Mix): For the concrete side braces. Ensure you purchase a ready-mix concrete suitable for structural applications, which typically includes cement, sand, and gravel. Just add water!
- 3/4 Sheet of Melamine: This smooth, laminate-coated particle board is perfect for concrete molds because concrete won’t stick to it, allowing for easy demolding and a smooth finish on your concrete pieces.
- Concrete Sealer (optional but highly recommended): A good quality sealer will protect your concrete from moisture, stains, and UV damage, extending its lifespan and keeping it looking fresh.
- Polyurethane (or other exterior wood finish): Essential for protecting your wooden seat slats from moisture, UV rays, and general wear and tear. Choose a marine-grade or exterior-grade polyurethane for maximum durability.
- Construction Adhesive/Caulk: For sealing the seams of your melamine molds to prevent concrete leakage and achieve crisp edges.
Step-by-Step Instructions to Build Your Bench
Step 1: Design and Prepare Your Work Area
Before making any cuts, finalize the dimensions of your bench. The instructions are based on a standard bench size, but you can adjust length and height as needed. Clear a flat, level work area, preferably outdoors or in a well-ventilated garage. Lay down a tarp or plastic sheeting to protect your ground from concrete spills and sawdust.
Step 2: Construct the Melamine Molds for Concrete Side Braces
The concrete bases are the foundation of your bench, and their shape is crucial. You’ll be creating two ‘H’-shaped molds from melamine.
Using your circular saw and speed square, accurately cut the melamine sheet into the necessary pieces to form your ‘H’ shape. For each H-brace, you’ll need pieces for the top, bottom, and two vertical supports, plus side pieces to form the walls of the mold. The exact dimensions will depend on your desired bench height and depth for the concrete ends. For a sturdy bench, aim for concrete bases that are at least 18-20 inches high and 8-10 inches deep. Assemble these pieces with screws, ensuring all corners are perfectly square and joints are tight. Apply a bead of construction adhesive or silicone caulk along all internal seams of the mold. This prevents concrete from leaking out and ensures clean, sharp edges on your finished concrete pieces. Allow the caulk to dry completely before proceeding.
Step 3: Mix and Pour the Concrete into the Molds
With your molds ready, it’s time for the concrete. Follow the manufacturer’s instructions for mixing your concrete bags. Typically, this involves adding water gradually to the dry mix in a large bucket or wheelbarrow, stirring thoroughly until you achieve a consistent, workable consistency—like thick oatmeal. Avoid making it too watery, as this weakens the concrete.
Carefully pour the mixed concrete into your ‘H’-shaped melamine molds, filling them completely. As you pour, gently tap the sides of the molds with a rubber mallet or your hand. This helps to release any trapped air bubbles, ensuring a denser, stronger concrete piece with fewer voids. Use a trowel to smooth the top surface of the concrete, making it as flat and level as possible. Cover the molds with plastic sheeting to aid in curing and prevent rapid moisture loss. Allow the concrete to cure for at least 48-72 hours, or as recommended by the concrete manufacturer, before attempting to demold. Full strength is achieved in about 28 days.
Step 4: Demolding and Initial Finishing of Concrete Bases
Once the concrete has sufficiently cured and hardened, it’s time for the exciting part: demolding! Carefully remove the screws holding the melamine mold together. Gently pry off the melamine pieces, taking care not to chip or damage the edges of your newly formed concrete ‘H’ braces. The melamine’s smooth surface should allow the concrete to release relatively easily, leaving you with smooth, sharp-edged concrete components. Inspect your concrete pieces for any imperfections. Minor rough spots can be lightly sanded with a concrete grinding disc or sandpaper suitable for masonry.
After demolding, it’s highly recommended to apply a concrete sealer. This step, while optional, significantly prolongs the life and aesthetic appeal of your concrete. The sealer will protect against moisture penetration, staining (from spills, leaves, etc.), and efflorescence (white powdery deposits). Follow the product instructions for application, typically involving cleaning the surface and applying one or more coats with a sprayer, roller, or brush. Allow the sealer to dry and cure as specified.
Step 5: Prepare the Wood for the Bench Seat
Now, turn your attention to the wooden seat slats. Using your measuring tape and circular saw, cut your four 2″ x 8″ x 8′ exterior-grade boards to the desired length of your bench seat. A typical bench length might be around 60-72 inches, but adjust to fit your specific space. Once cut, thoroughly sand all surfaces and edges of the wood slats, starting with a coarser grit (e.g., 80-100 grit) to remove any rough spots or milling marks, then progressing to a finer grit (e.g., 150-220 grit) for a smooth, splinter-free finish. This not only makes the bench more comfortable but also prepares the wood for better stain absorption.
Apply your chosen wood stain or sealer (polyurethane) to all sides of the wood slats. Multiple thin coats are usually better than one thick coat, allowing proper drying time between applications. This protective layer is vital for shielding the wood from rain, sun, and everyday wear, ensuring your bench remains beautiful for years. Ensure the wood is completely dry and cured before assembly.
Step 6: Assemble the Modern Concrete and Wood Outdoor Bench
This is where your bench takes its final form. Carefully position your two concrete ‘H’ braces parallel to each other at the desired width for your bench. Ensure they are level and stable. Place your prepared wood slats across the top openings of the concrete ‘H’s. You will need to determine the optimal spacing between the slats for comfort and aesthetics. Use spacers (small blocks of wood) to ensure even gaps between each board.
Using your power drill, pre-drill pilot holes through the wood slats and into the top sections of the concrete bases. This step is critical to prevent the wood from splitting and to ensure the screws go in smoothly. Then, drive your long exterior-grade wood screws through the pilot holes to securely fasten each wood slat to the concrete. For extra stability, consider using concrete anchors or epoxy if you desire an even more permanent bond, though direct screwing with appropriate screws into hardened concrete is often sufficient for this design.
Maintenance and Care for Your Outdoor Bench
To keep your modern concrete and wood bench looking its best and lasting for decades, a little routine maintenance goes a long way:
- Regular Cleaning: Wipe down the concrete and wood surfaces periodically with a damp cloth to remove dirt, dust, and debris. For tougher stains, use a mild soap solution.
- Reapply Sealers: Depending on your climate and exposure, you may need to reapply the concrete sealer every 2-3 years, and the wood polyurethane/finish every 1-2 years. Look for signs of wear like fading, water absorption, or rough patches.
- Winter Protection: In areas with harsh winters, consider covering your bench with a waterproof cover or moving it to a sheltered location to protect it from extreme freeze-thaw cycles and heavy snow.
Personalizing Your Bench: Design Ideas
While the basic design is stunning, don’t hesitate to infuse your own personality:
- Color and Finish: Experiment with different wood stains – from light natural tones to dark ebony. For the concrete, you can add integral color dyes to the mix before pouring, or stain it afterward for a unique look.
- Textural Elements: Consider roughing up the concrete surface slightly with a brush while wet for a textured finish, or polishing it for a high-gloss, smooth feel.
- Size Variations: Build a longer bench for extensive seating, or a smaller, single-person stool for a cozy nook. You could even create a set of benches and a matching concrete table!
- Integrated Features: With more advanced concrete work, you might even consider integrating planters or small side tables into the concrete bases.
Conclusion: Enjoy Your Handcrafted Outdoor Masterpiece
Building this DIY Modern Concrete and Wood Outdoor Bench is a project that yields immense satisfaction and a beautiful, enduring addition to your outdoor space. From the initial cuts of melamine to the final screw, each step brings you closer to creating a custom piece of furniture that is both robust and aesthetically pleasing. My friend’s nieces and nephews absolutely loved the new seating for their gardening adventures, proving that functional beauty can also bring joy and create lasting memories.
So gather your tools, select your materials, and embark on this rewarding journey. You’ll not only gain a stunning piece of outdoor furniture but also the valuable experience of crafting something truly unique. Embrace the process, take pride in your work, and enjoy countless moments on your very own handcrafted modern concrete and wood outdoor bench!