
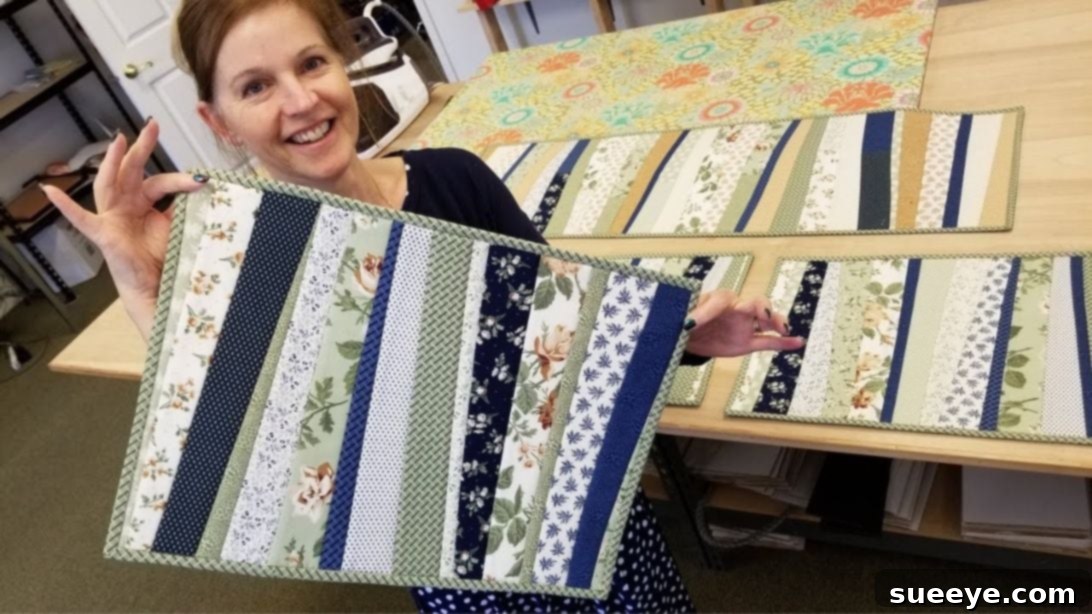
Welcome to the wonderful world of quilting, where creativity meets practicality! If you’ve ever dreamed of creating beautiful, personalized home decor without the steep learning curve, you’re in the right place. Today, we’re diving into an incredibly simple yet highly rewarding project: crafting a Quilt-As-You-Go placemat using convenient jelly roll fabric strips. This innovative technique, beautifully demonstrated by Jordan Fabrics on YouTube, is a game-changer for both novice and experienced sewists alike. Say goodbye to complex piecing and bulky layers; with this method, you’ll be quilting and assembling simultaneously, transforming fabric strips into stunning, durable placemats in no time.
The beauty of the Quilt-As-You-Go method lies in its elegant simplicity and efficiency. Instead of quilting your top, batting, and backing in separate stages, you attach your fabric strips directly to the batting and backing as you sew. This not only streamlines the process but also creates a wonderfully textured, abstract design that adds a touch of handmade charm to any dining table. What’s more, this project is incredibly forgiving and encourages creative freedom. You can easily adapt the strip placement, play with various color combinations, and even use your fabric cutouts to craft matching accessories like coasters or table runners, ensuring that not a single precious scrap goes to waste. Get ready to embark on a fun, satisfying sewing adventure that will enhance your home with unique, handcrafted placemats!
Why Choose the Quilt-As-You-Go Method?
The Quilt-As-You-Go (QAYG) technique has become a favorite among quilters for several compelling reasons. Firstly, it significantly simplifies the quilting process. Traditional quilting often involves basting three layers (quilt top, batting, and backing) together before quilting, which can be cumbersome, especially for larger projects. QAYG eliminates this step by allowing you to attach your quilt top pieces directly to the batting and backing as you go, reducing bulk and making it easier to manage under your sewing machine. This method is particularly beneficial for smaller projects like placemats, table runners, or even quilt blocks, where precision in handling multiple layers can be challenging.
Secondly, QAYG offers incredible flexibility and promotes creative exploration. There’s no need to meticulously plan an entire quilt top beforehand. You can decide on the layout of your fabric strips as you sew, experimenting with angles, colors, and patterns on the fly. This organic approach often leads to unique and surprising designs. It’s also an excellent technique for using up smaller fabric scraps or pre-cut jelly roll strips, making it a sustainable choice for your crafting endeavors. The finished product has a lovely dimensional quality, with the quilting lines naturally integrated into the piecing. Plus, it’s a fantastic entry point for beginners, as it builds confidence with basic sewing skills while producing impressive results.
Essential Materials for Your Quilted Placemat
Before diving into the sewing process, gathering all your materials is crucial for a smooth and enjoyable crafting experience. Here’s a detailed look at what you’ll need to create your beautiful Quilt-As-You-Go placemat:
- 2½-inch Fabric Strips (Jelly Roll): These pre-cut fabric strips are the star of our project! Jelly rolls typically contain 40 strips, each 2½ inches wide and 42 inches long. They are perfect for this project because they eliminate the need for tedious cutting, allowing you to jump straight into the fun part. You can choose a jelly roll with a coordinating theme, a vibrant mix of colors, or select individual strips from your stash to create a personalized look. The exact number of strips needed will depend on your desired placemat size and how you lay them out. Aim for at least 8-10 strips per placemat.
- 15 x 20 inches of Backing Fabric: This fabric will form the bottom layer of your placemat and should be a sturdy, appealing fabric since it will be visible. Cotton is often preferred for its durability and ease of sewing. Choose a color or print that complements your fabric strips without distracting from the main design. The dimensions ensure ample room for trimming later.
- Batting Fabric: Batting is the soft, fluffy middle layer of your placemat, providing insulation, structure, and that characteristic quilted texture. Cotton batting is a popular choice for its breathability and natural feel, but you can also use polyester for a puffier look or a blend for durability. Ensure your batting piece is slightly larger than your backing fabric, roughly 16 x 21 inches, to accommodate any shifting during the quilting process.
- Ruler (Quilting Ruler Recommended): A clear acrylic quilting ruler with precise measurements is invaluable for accurate cutting and trimming. A ruler at least 6 x 24 inches is ideal for longer cuts.
- Scissors or Rotary Cutter and a Cutting Mat: While scissors work, a rotary cutter combined with a self-healing cutting mat will make cutting fabric strips and trimming the placemat much faster and more accurate. Ensure your rotary cutter blade is sharp for clean cuts.
- Marking Pen, Pencil, or Chalk: You’ll need a tool to temporarily mark your fabric for straight lines or specific points. Fabric-specific pens that disappear with heat or water, or simple tailor’s chalk, are excellent choices.
- Needle and Thread: High-quality polyester or cotton thread that matches or blends with your fabric colors is best. You’ll need thread for both your sewing machine and potentially for hand-sewing the binding if you choose that finish.
- Iron, for Pressing: An iron is arguably one of the most important tools in quilting. Frequent and careful pressing (not ironing!) is essential for crisp seams and a flat, professional finish.
- Sewing Machine: Any basic sewing machine capable of a straight stitch will work perfectly for this project. Ensure your machine is in good working order, with a fresh needle and properly wound bobbins.
Step-by-Step Directions to Create Your Quilted Placemat
Step 1: Preparation and Creating the Base Layer
The foundation of a beautiful quilted placemat begins with careful preparation. Start by taking your collection of 2½-inch fabric strips. Even if they came in a jelly roll, it’s always a good idea to give them a thorough press with a hot iron. This removes any creases, ensures they lie perfectly flat, and prepares them for precise sewing. Once pressed, measure and trim the length of each strip so that it is slightly longer than 15 inches – aim for around 16-17 inches. This extra length provides a comfortable margin for error and allows for cleaner trimming later. Set these prepared strips aside.
Next, we’ll assemble the base layers of your placemat. Lay your 15 x 20-inch backing fabric on your work surface with its right side (the side you want to be visible) facing upwards. Carefully center your batting fabric on top of the backing. The batting should be slightly larger than the backing, so don’t worry if it extends beyond the edges; this excess will be trimmed. To secure these two layers together before you start adding the strips, sew them together very close to the edges of the backing fabric. A simple straight stitch, about ⅛ to ¼ inch from the edge of the backing fabric, will suffice. This step is crucial for preventing the layers from shifting as you work. Once sewn, flip the combined backing and batting over so the batting is now facing up. You should see the wrong side of your backing fabric. You’re now ready to add your first fabric strip and begin the “Quilt-As-You-Go” magic!
Position your first fabric strip onto the batting, ensuring one long edge of the strip aligns perfectly with one of the raw edges of the batting/backing combo. This creates a clean starting point. Pin it in place if needed. Using a ¼-inch seam allowance, sew this strip down through all three layers (fabric strip, batting, and backing). Now, take a second fabric strip. Place it on top of the first strip, right sides together, so that its raw edge slightly overlaps the raw edge of the first strip you just sewed down. Sew them together with a ¼-inch seam allowance. This stitch will go through the two fabric strips and the underlying batting and backing. After sewing, carefully open the top fabric strip, pressing the seam flat with your fingers (or a hot iron if you prefer) to create a smooth, flat surface. This finger pressing helps to create crisp seams and reduces bulk, which is vital for a professional finish. This technique of adding one strip, then the next, and pressing as you go is the essence of the Quilt-As-You-Go method.
Step 2: Building the Patchwork, Trimming, and Binding
Continue the process of adding fabric strips, right sides together, sewing with a ¼-inch seam allowance, opening the strip, and finger creasing. Work your way across the entire batting until it is completely covered. One of the joys of this project is the freedom of design; your strips don’t have to be perfectly straight or parallel. You can lay them out however you desire – diagonally, in a random pattern, or even vary their widths by cutting some strips in half lengthwise before attaching them. This adds wonderful visual interest and personality to your placemat. As you add each strip, ensure your stitches are neat and consistent, securing all layers together. Once the batting is fully covered, take your placemat to the iron and give the entire patchwork a good, firm press from the front. Then, flip it over to the back and press again. This ensures all seams are flat, the fabric lies smoothly, and the placemat takes on a crisp, finished appearance.
With your patchwork complete and pressed, it’s time to trim it to the final desired size. Using your quilting ruler and rotary cutter, carefully trim the patchwork to approximately 13½ by 18½ inches. This precise trimming squares up your placemat and removes any uneven edges, making it ready for the binding. The binding is what gives your placemat a neat, professional edge and adds a decorative frame to your design. To prepare your binding, take another 2½-inch fabric strip (or multiple strips sewn together to reach the required length – typically around 70-75 inches for a placemat this size). Fold this strip in half lengthwise, wrong sides together, and press firmly to create a crisp fold.
Now, attach the binding. Starting on one side of your placemat, align the raw edges of your folded binding strip with the raw edges of your patchwork. Sew the binding straight down, using a precise ¼-inch seam allowance. As you approach the first corner (about ¼ inch from the edge), stop, backstitch, and cut your thread. To create a neat mitered corner, pivot your patchwork. Fold the binding strip straight up and outward at a 45-degree angle, forming a little triangle. Then, fold the binding strip back down, aligning its raw edge with the next side of the placemat, ensuring the folded edge from the previous step creates a clean, square corner. Hold the corner firmly in place and continue stitching straight down that side with a ¼-inch seam allowance. Repeat this cornering process for all four sides. Once you’ve sewn the binding to all sides, you’ll have a beautifully framed placemat. To finish, flip the binding fabric over to the back side of the placemat. You can either hand-sew this folded edge down with an invisible stitch for a traditional finish, or machine stitch it from the front (often called “stitch in the ditch” or edge stitching) for a faster, more robust finish. Ensure your stitches catch the binding fabric on the back securely. Repeat the process until all sides of the placemat are beautifully bound, completing your handmade creation.
*All these images are credited to Jordan Fabrics via YouTube. Give her channel a visit and subscribe for more amazing sewing tutorials!
Tips for Success in Your Quilt-As-You-Go Journey
To ensure your Quilt-As-You-Go placemat project is a resounding success and a joy to create, consider these helpful tips:
- Pre-wash Your Fabrics: While jelly rolls are often marketed as ready-to-use, pre-washing all your fabrics (strips, backing, and binding) can prevent potential shrinkage and color bleeding, especially if you plan to wash your placemats frequently.
- Use a Walking Foot: If your sewing machine has a walking foot attachment, it can be incredibly beneficial for this project. A walking foot helps feed multiple layers of fabric evenly through the machine, reducing puckering and shifting, which is common when working with batting.
- Consistent Seam Allowances: A precise ¼-inch seam allowance is crucial for quilting. Invest in a ¼-inch presser foot for your machine or use masking tape as a guide on your machine bed to maintain accuracy. Consistency ensures your placemat lies flat and square.
- Press, Don’t Iron: When pressing seams, lift and place the iron rather than sliding it. Sliding the iron can stretch and distort your fabric, leading to wavy seams. Pressing sets the stitches and flattens the fabric for a professional look.
- Sharp Tools Are Safe Tools: Always use a sharp rotary cutter blade. A dull blade requires more pressure, which can lead to slips and uneven cuts, increasing the risk of injury. Replace blades regularly.
- Embrace Imperfection: Especially for beginners, remember that handmade items carry a unique charm. Don’t strive for absolute perfection on your first attempt. Each stitch is a learning opportunity, and your placemat will be beautiful because you made it!
Creative Variations and Project Ideas
Once you’ve mastered the basic Quilt-As-You-Go placemat, you’ll discover a world of creative possibilities. This versatile technique can be adapted for numerous projects and design variations:
- Diagonal Strips: Instead of sewing your strips horizontally or vertically, try laying them out at a 45-degree angle. This creates a dynamic, modern look that adds extra visual flair.
- Herringbone Pattern: With careful planning, you can arrange your strips to create a striking herringbone pattern. This might involve cutting some strips at an angle to achieve the desired effect.
- Varying Strip Widths: Don’t be afraid to cut some of your 2½-inch strips into narrower or wider pieces. A mix of strip widths can add interesting texture and dimension to your patchwork.
- Matching Table Set: Extend your creativity beyond placemats! Use the same technique to create a coordinating table runner, mug rugs, or coasters for a complete and cohesive dining set. This is also an excellent way to use up those smaller leftover fabric scraps.
- Decorative Stitches: Once your placemat is complete, consider adding some decorative machine stitching along the seam lines or in the centers of your fabric strips to enhance the quilted look.
- Gift Ideas: Handcrafted placemats make thoughtful and personalized gifts for weddings, housewarmings, birthdays, or holidays. Customize them with the recipient’s favorite colors or themes.
Care and Maintenance for Your Handmade Placemats
To ensure your beautiful Quilt-As-You-Go placemats remain vibrant and last for years, proper care is essential. Generally, machine washing in cold water on a gentle cycle is recommended for cotton quilted items. Use a mild detergent and avoid harsh chemicals or bleach, which can fade colors. Tumble dry on low heat or, for best results, air dry by laying them flat to prevent stretching and maintain their shape. A light press with an iron after drying can refresh their crisp appearance. With a little love and care, your handmade placemats will continue to brighten your dining table for many meals to come.
Conclusion: Your New Favorite Quilted Placemat
Congratulations! You’ve successfully navigated the steps to create a stunning Quilt-As-You-Go placemat using colorful jelly roll fabric strips. This project is a testament to how simple techniques can yield incredibly beautiful and functional results. You’ve not only crafted a unique piece of home decor but also honed your sewing skills, learned the efficient Quilt-As-You-Go method, and contributed to a more sustainable crafting practice by utilizing pre-cuts and minimizing waste. The abstract, textured look of these placemats will undoubtedly add a personal touch and warmth to your dining experience, making every meal feel a little more special.
We hope this guide, inspired by the fantastic tutorial from Jordan Fabrics, has empowered you to embrace the joy of quilting. Whether you choose to make a single placemat, a matching set for your home, or heartfelt gifts for loved ones, each stitch tells a story of creativity and care. So, grab your sewing machine, unleash your inner artist, and start transforming those fabric strips into timeless treasures. Happy quilting!