
Ultimate Banana Pudding Cheesecake Squares: A Heavenly Dessert Recipe
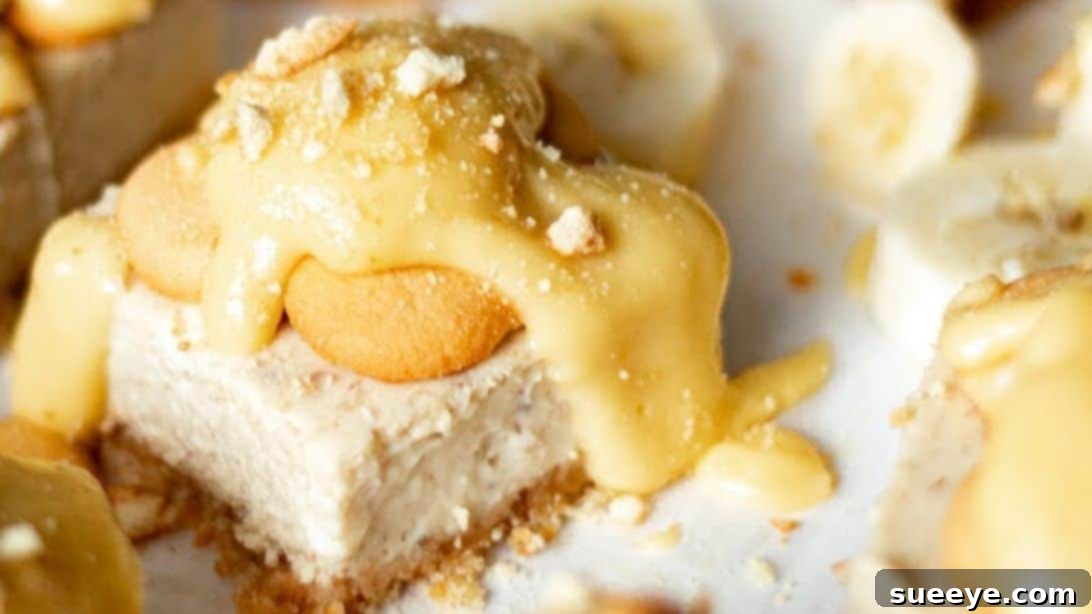
Prepare to be enchanted by these extraordinary Banana Pudding Cheesecake Squares, a masterpiece by the talented Chenée Today. This recipe transcends the ordinary, blending the beloved comfort of classic banana pudding with the rich, creamy indulgence of cheesecake. It’s more than just a dessert; it’s a symphony of flavors and textures designed to captivate your palate and become an instant favorite for any gathering or a special treat for yourself.
Each bite of these squares delivers an irresistible experience, starting with the satisfying crunch of a perfectly baked vanilla wafer crust. This delightful foundation provides a charming contrast to the smooth, velvety banana-infused cheesecake filling, creating a harmonious balance that is truly unforgettable. The grand finale is a luscious, silky vanilla custard, generously spooned over the top, which marries all the elements into a single, cohesive, and utterly delicious dessert. If you’re searching for a show-stopping homemade dessert that’s both familiar and uniquely exquisite, your quest ends here. Dive into the detailed instructions below and prepare to create a truly heavenly sweet treat.
Ingredients for Your Divine Creation
Crafting these sensational banana pudding cheesecake squares requires a thoughtful selection of ingredients, ensuring each layer contributes to the ultimate flavor profile and texture. Pay close attention to the details, as quality ingredients and proper preparation are key to success.
For the Irresistible Vanilla Wafer Crust:
- 1 ½ cups vanilla wafer crumbs: These form the crunchy, sweet base. You can crush them finely in a food processor or by hand using a rolling pin and a ziploc bag.
- 4 tablespoons salted butter, melted: The butter binds the crumbs together, providing a rich flavor and a firm crust. Melting it ensures even distribution.
- 3 tablespoons granulated sugar: Adds an extra touch of sweetness and helps the crust caramelize slightly during baking.
For the Creamy Banana Cheesecake Filling:
- 1 ½ medium overripe bananas, puréed: Overripe bananas are crucial here. Their intensified sweetness and robust banana flavor will permeate the cheesecake, creating an authentic taste.
- 16 oz cream cheese, room temperature: Essential for a smooth, lump-free cheesecake. Allow it to soften on the counter for at least an hour before use.
- ½ cup heavy cream, room temperature: Adds richness and a light, airy texture to the cheesecake filling.
- 2 large eggs, room temperature: Act as a binding agent, providing structure and richness. Room temperature eggs blend more evenly.
- ½ cup granulated sugar: Sweetens the filling, balancing the tang of the cream cheese and enhancing the banana flavor.
- 1 tablespoon pure vanilla extract: A cornerstone of many desserts, vanilla extract enhances all other flavors in the cheesecake.
- 1 tablespoon cornstarch: Helps stabilize the cheesecake, preventing cracks and ensuring a smooth, firm texture.
For the Silky Custard Topping and Garnishes:
- 1 can (12 oz) evaporated milk: The base for a rich and creamy custard, offering a depth of flavor distinct from regular milk.
- 3 large egg yolks: Provide incredible richness, color, and thickening power for the custard.
- ½ cup granulated sugar: Sweetens the custard to perfection.
- 2 teaspoons pure vanilla extract: Infuses the custard with a warm, aromatic vanilla essence.
- 4 tablespoons salted butter: Adds lusciousness and a smooth finish to the custard, melting in at the end for extra richness.
- 1 tablespoon cornstarch: The primary thickening agent for the custard, ensuring a velvety smooth consistency without being too thick.
- Mini vanilla wafers (optional): Perfect for decorative crunch and an echo of the crust flavor.
- Bananas (barely ripe, sliced) – optional: Slightly firm bananas hold their shape better for garnishing and offer a fresh contrast.
- Vanilla wafer crumbs – optional: A final sprinkle adds a professional touch and extra texture.
Crafting Your Banana Pudding Cheesecake Squares: Step-by-Step Guide
Follow these detailed instructions carefully to ensure your banana pudding cheesecake squares turn out perfectly every time. Each step is designed to build layers of flavor and texture, culminating in an exquisite dessert.
Step 1: Preparing the Foundation – The Vanilla Wafer Crust
Begin by preheating your oven to 350 degrees Fahrenheit (175°C). In a large mixing bowl, combine the 1 ½ cups of finely crushed vanilla wafer crumbs with 3 tablespoons of granulated sugar. Stir these dry ingredients together thoroughly with a spoon or whisk until they are uniformly mixed. Next, pour in the 4 tablespoons of melted salted butter. Continue to mix until all the crumbs are evenly moistened and resemble wet sand. This ensures that your crust will be firm and hold together beautifully.
Step 2: Forming and Baking the Crust
Line a 9″ x 9″ baking pan with parchment paper, leaving an overhang on two sides to create “handles” for easy removal later. Transfer the buttered crumbs into the prepared pan. Using the bottom of a flat glass or a measuring cup, firmly press the crumb mixture evenly across the bottom of the pan. The key here is to pack it down very tightly to create a solid, stable crust. Place the pan in your preheated oven at 350 degrees Fahrenheit (175°C) and bake for 10 minutes. This short bake time helps to set the crust, making it crispier and more resistant to sogginess once the filling is added. Once baked, remove from the oven and set aside to cool slightly while you prepare the filling.
Step 3: Preparing the Velvety Banana Cheesecake Filling
Reduce your oven temperature to 325 degrees Fahrenheit (160°C). In a large bowl, place the puréed overripe bananas. Add ½ cup of granulated sugar and the 16 oz of room temperature cream cheese. Using an electric mixer on medium-low speed, beat the mixture until it becomes smooth and thickened, ensuring there are no lumps of cream cheese. Scrape down the sides of the bowl as needed. Next, add the 2 large room temperature eggs and 1 tablespoon of pure vanilla extract. Continue to whisk until just combined; avoid overmixing as this can incorporate too much air, leading to cracks in the cheesecake. Finally, add the 1 tablespoon of cornstarch and ½ cup of room temperature heavy cream. Beat on low speed until the mixture is completely smooth and uniform, a testament to its creamy perfection.
Step 4: Baking and Chilling Your Cheesecake
Carefully pour the prepared banana cheesecake mixture into the cooled, pre-baked crust. Use a spatula to gently spread the filling evenly across the pan, ensuring a level surface. Place the pan inside your preheated oven at 325 degrees Fahrenheit (160°C) and bake for approximately 35 minutes. The cheesecake is done when the edges are set, but the very center still has a slight jiggle when gently shaken. This indicates it is cooked through but not overbaked, which helps prevent cracking. Once baked, turn off the oven and leave the cheesecake inside with the door slightly ajar for about 30 minutes. This slow cooling process helps prevent sudden temperature changes that can cause cracks. After this, remove the cheesecake from the oven and let it cool completely on a wire rack at room temperature. Once cooled, cover it loosely and chill in the refrigerator for a minimum of 4 hours, or ideally overnight. Chilling is crucial for the cheesecake to firm up and set properly, making it easier to slice and enhancing its dense, creamy texture.
Step 5: Beginning the Smooth Vanilla Custard
While your cheesecake chills, prepare the rich vanilla custard topping. In a medium-sized pot, combine the 12 oz can of evaporated milk with 4 tablespoons of salted butter. Heat this mixture over medium heat, stirring continuously, until it just reaches the point of simmering (just under boiling). You’ll see small bubbles forming around the edges. Keep stirring to prevent the milk from scorching at the bottom of the pot. Once simmering, remove it from the heat temporarily.
Step 6: Tempering Eggs and Thickening the Custard
In a separate large bowl, whisk together the 3 egg yolks, ½ cup of granulated sugar, and 1 tablespoon of cornstarch until the mixture is pale yellow and smooth. This step is critical for preventing scrambled eggs in your custard: gradually temper the egg mixture by slowly pouring about half of the hot milk mixture into the egg yolk mixture while whisking vigorously. This slowly raises the temperature of the eggs without cooking them instantly. Once tempered, gradually pour the entire tempered egg mixture back into the pot with the remaining hot milk over medium-low heat. Continue to stir constantly with a whisk or a rubber spatula, scraping the bottom and sides of the pot, until the custard thickens to your desired consistency – typically it should coat the back of a spoon. This usually takes about 5-8 minutes. Once thickened, remove from heat and stir in the 2 teaspoons of pure vanilla extract and any remaining salted butter until fully incorporated and melted. Transfer the custard to a separate bowl, cover the surface directly with plastic wrap (to prevent a skin from forming), and let it cool completely to room temperature, then chill in the refrigerator until ready to use.
Step 7: The Grand Finale – Assembling and Serving
Once the cheesecake is thoroughly chilled and set, and the custard is cold, it’s time for assembly. Using the parchment paper overhangs, carefully lift the cheesecake from the pan and transfer it to a cutting board. Use a sharp, clean knife (wiping it clean between each cut) to slice the cheesecake into uniform squares. Spoon a generous amount of the chilled vanilla custard over the top of each cheesecake square. For an exquisite presentation and additional texture, garnish with mini vanilla wafers, fresh slices of barely ripe banana (to prevent browning quickly), and a sprinkle of extra vanilla wafer crumbs. Arrange them artfully on a serving platter. Serve immediately and watch as these delightful Banana Pudding Cheesecake Squares disappear! Enjoy the fruits of your labor and savor every decadent bite.
Why You’ll Love This Banana Pudding Cheesecake Squares Recipe
This recipe isn’t just another dessert; it’s a culinary experience designed to impress and delight. You’ll fall in love with these banana pudding cheesecake squares for several compelling reasons. Firstly, they offer the perfect fusion of two beloved classics: the nostalgic comfort of banana pudding and the sophisticated indulgence of creamy cheesecake. This creates a unique flavor profile that is both familiar and exciting. Secondly, the contrasting textures are simply divine – from the crisp, buttery vanilla wafer crust to the smooth, rich banana-infused cheesecake filling, and finally, the silky, luscious custard topping. Every forkful is a textural adventure. It’s a fantastic make-ahead dessert, as it requires significant chilling time, making it ideal for entertaining. Plus, despite its gourmet appeal, the steps are clear and manageable, empowering even novice bakers to achieve professional-level results. Prepare for endless compliments and a new favorite recipe!
Expert Tips for Cheesecake Perfection
Achieving the perfect cheesecake can be a breeze with a few expert tips:
- Room Temperature Ingredients: Always ensure your cream cheese, eggs, and heavy cream are at room temperature. This is crucial for a smooth, lump-free batter, as cold ingredients can result in a lumpy consistency and make overmixing more likely.
- Don’t Overmix the Filling: Mix the cheesecake filling just until the ingredients are combined and smooth. Overmixing incorporates too much air, which can cause the cheesecake to puff up in the oven and then crack as it cools.
- Patience with Chilling: The chilling time is non-negotiable. It allows the cheesecake to fully set, develop its dense, creamy texture, and become firm enough to slice cleanly. Rushing this step will result in a soft, potentially runny cheesecake.
- Prevent Cracking: The slow cooling process (leaving the cheesecake in the turned-off oven with the door ajar) significantly helps prevent cracks by allowing it to adjust to temperature changes gradually.
- Clean Slices: For perfectly neat squares, use a long, sharp knife dipped in hot water and wiped clean between each cut. This creates clean edges and prevents the cheesecake from sticking to the blade.
- Banana Selection: For the filling, use very ripe (spotted) bananas for maximum sweetness and flavor. For the topping, use slightly underripe bananas so they hold their shape better and don’t brown as quickly.
Delicious Variations and Customizations
While the classic banana pudding cheesecake squares are phenomenal, feel free to experiment with these creative variations:
- Crust Alternatives: Instead of vanilla wafers, try a graham cracker crust, shortbread cookie crumbs, or even chocolate wafer crumbs for a different flavor dynamic.
- Spiced Filling: Add a pinch of cinnamon or nutmeg to the cheesecake filling for a subtle warmth that complements the banana beautifully.
- Caramel Drizzle: A drizzle of homemade or store-bought caramel sauce over the top of the custard adds an extra layer of sweetness and sophistication.
- Chocolate Lover’s Twist: Sprinkle mini chocolate chips or shaved dark chocolate over the custard. Chocolate and banana are a classic pairing!
- Nutty Crunch: Toasted chopped pecans or walnuts can be added to the crust mixture or sprinkled on top for an added layer of texture and flavor.
- Tropical Flair: A hint of coconut extract in the custard or toasted coconut flakes as a garnish can transport this dessert to a tropical paradise.
Serving Suggestions for the Perfect Dessert Experience
These banana pudding cheesecake squares are a dessert in themselves, rich and satisfying. However, you can elevate the serving experience with a few simple additions. They pair wonderfully with a freshly brewed cup of coffee or a comforting mug of hot tea. For a lighter touch, a scoop of vanilla bean ice cream or a dollop of freshly whipped cream can be served alongside, although the custard topping provides ample creaminess. These squares are perfect for potlucks, family gatherings, holiday meals, or simply as a luxurious weekend treat. Arrange them elegantly on a platter to showcase their beautiful layers, and watch them become the star of your dessert table.