
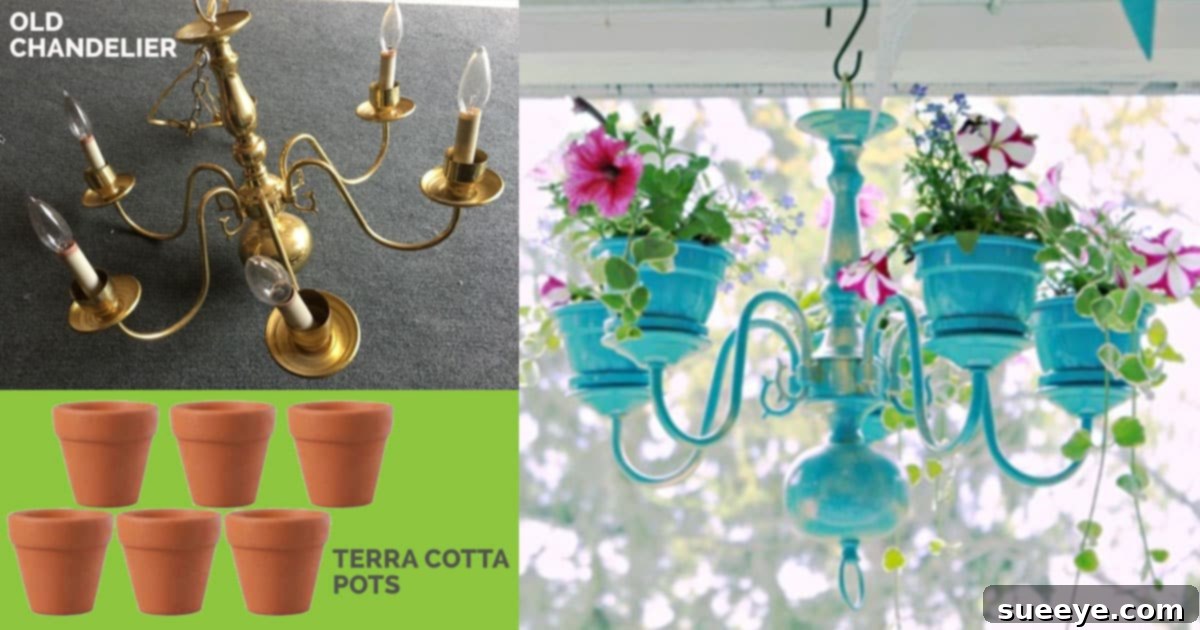
Transform Your Patio: Create a Breathtaking DIY Chandelier Planter
Are you searching for that perfect, unique touch to elevate your outdoor living space? Imagine a vibrant cascade of your favorite flowers gracefully descending from an antique chandelier, adding a magical glow to your patio or garden. This isn’t just a dream; it’s a wonderfully achievable DIY project that promises to transform your outdoor experience! As spring unfolds and summer parties beckon, there’s no better time to embark on a creative journey that culminates in a stunning, colorful, and utterly charming chandelier planter.
This ingenious idea has captivated countless enthusiasts, becoming an instant focal point wherever it’s displayed. It’s an incredibly rewarding craft that not only brightens your surroundings but also brings a smile to your face every time you see it flourishing with life. From the thrill of finding the perfect vintage chandelier to the joy of watching your plants thrive, this project is a true labor of love that yields magnificent results.
Why a Chandelier Planter is Your Next Must-Have Outdoor Project
Beyond its undeniable aesthetic appeal, a DIY chandelier planter offers a plethora of benefits, making it a standout choice for anyone looking to enhance their home’s exterior:
- Unmatched Elegance and Whimsy: It introduces a sophisticated yet playful element that traditional planters simply can’t match. The intricate design of an old chandelier, combined with natural greenery, creates a captivating piece of art.
- Eco-Friendly Upcycling: Give new life to an item destined for the landfill. This project champions sustainability by repurposing an old chandelier, turning forgotten beauty into a vibrant display.
- Budget-Friendly Decor: High-impact decor doesn’t have to come with a hefty price tag. With a bit of thrifting and creativity, you can craft a spectacular outdoor feature for a fraction of the cost of store-bought alternatives. Many enthusiasts find their chandeliers for just a few dollars, or even for free!
- Customizable to Your Style: From rustic charm to modern chic, the design possibilities are endless. Paint it to match your existing decor, or choose a bold, contrasting color to make a statement.
- Simple and Quick to Create: Despite its elaborate appearance, this project is surprisingly straightforward. Many report completing the hands-on work in as little as an hour, proving that incredible transformations don’t require extensive time commitments.
Finding Your Perfect Chandelier: The Thrill of the Hunt
The first and often most exciting step is discovering the ideal chandelier for your project. This is where the adventure truly begins! Don’t worry if it’s not working as a light fixture; in fact, non-functional ones are often ideal because they’re cheaper and easier to modify.
Where to Scout for Your Treasure:
- Thrift Stores and Charity Shops: These are goldmines for unique, vintage finds at unbeatable prices.
- Garage Sales and Flea Markets: Often brimming with forgotten treasures, these spots offer a fantastic opportunity to haggle and secure a bargain.
- Online Marketplaces: Websites like Facebook Marketplace, Craigslist, or local buy-and-sell groups frequently feature old chandeliers that owners are eager to part with.
- Architectural Salvage Yards: For truly antique or specialized pieces, these yards can yield incredible finds.
- Friends and Family: Sometimes, the perfect piece is hidden in an attic or basement, waiting for a new purpose. Don’t hesitate to ask around!
What to Look For:
Consider the size and shape that best fits your intended space. Look for chandeliers with multiple arms, as these will hold your plant pots. Metal chandeliers are generally robust and ideal for outdoor use, but plastic or resin ones can also work with proper preparation. Don’t be deterred by dirt, dust, or an outdated finish; these are all easily remedied. Focus on structural integrity – ensuring all arms are secure and can bear the weight of small potted plants.
Gathering Your Materials: What You’ll Need
Once you’ve secured your chandelier, assembling the rest of your supplies is simple. Here’s a comprehensive list to get you started on your DIY journey:
- An Old Chandelier: Your star piece!
- Small Plant Pots: Choose pots that fit snugly onto the chandelier arms. Terracotta offers a classic look, while plastic pots are lightweight and often more affordable. Ceramic pots can add a touch of elegance but might be heavier.
- Potting Soil: High-quality soil is essential for healthy plant growth.
- Your Favorite Plants or Flowers: Select varieties suited for your climate and the amount of sunlight your planter will receive. (More on this below!)
- Spray Paint (Primer, Color, Sealer): Primer ensures the paint adheres well, your chosen color provides the aesthetic, and a clear sealer protects against weather elements.
- Strong Adhesive or Epoxy: Crucial for securely attaching the pots to the chandelier arms. Look for weather-resistant options.
- Heavy-Duty Chain and Hook: For hanging your finished masterpiece securely.
- Optional Tools:
- Wire cutters and pliers (to remove old wiring if necessary).
- Sandpaper or a wire brush (for cleaning and prepping surfaces).
- Drop cloth or old newspapers (to protect your work area).
- Protective gloves and a mask (for spray painting).
Step-by-Step Guide: Crafting Your Chandelier Planter
Now for the fun part – bringing your vision to life! This project is beginner-friendly and incredibly rewarding.
- Prepare Your Chandelier:
- Clean: Thoroughly clean the chandelier to remove any dirt, dust, or grime. A damp cloth with mild soap usually does the trick.
- Disassemble (if needed): Carefully remove any electrical components, bulbs, or unnecessary decorative elements that don’t fit your planter vision. Use wire cutters and pliers for this step.
- Sand (optional): If the chandelier has peeling paint or rust, lightly sand the surface to ensure a smooth base for painting.
- Prime and Paint:
- Prime: In a well-ventilated area, apply a thin, even coat of spray primer. This helps the paint adhere better and provides a uniform base. Allow it to dry completely as per product instructions.
- Color: Apply your chosen spray paint color in several light, even coats. Avoid heavy coats, which can lead to drips. Let each coat dry fully before applying the next. Consider vibrant colors like pink, turquoise, or a classic white to complement your outdoor decor.
- Seal: Once the color is dry, apply a clear outdoor-grade sealer. This protects your paint job from the elements, ensuring your planter stays beautiful for seasons to come.
- Attach the Pots:
- Once the chandelier is fully dry and cured, position your small pots onto the arms.
- Using a strong, weather-resistant adhesive or epoxy, secure each pot firmly to an arm. You might need to hold them in place for a few minutes until the glue sets. Some DIYers also use wire to provide extra stability, wrapping it discreetly around the pot and arm.
- Allow the adhesive to cure fully according to the manufacturer’s instructions, which might take several hours or even overnight. This is a crucial step to ensure the pots remain secure once filled with soil and plants.
- Plant Your Flowers:
- Fill each pot with quality potting soil.
- Carefully plant your chosen flowers or plants. Consider trailing varieties that will beautifully spill over the sides, enhancing the chandelier effect.
- Give them an initial watering.
- Hang Your Masterpiece:
- Choose a sturdy location on your patio, porch, or garden pergola.
- Ensure the hanging hook and chain are strong enough to support the full weight of the chandelier, pots, soil, and watered plants.
- Hang your finished chandelier planter and step back to admire your incredible creation!
Choosing the Right Plants for Your Chandelier Planter
The success of your chandelier planter lies not just in its structure, but also in the vibrant life it holds. Selecting the right plants is key to creating a stunning and thriving display.
Consider These Options:
- Trailing Annuals: Petunias, calibrachoa (million bells), lobelia, ivy, and sweet potato vine are excellent choices. They spill gracefully over the edges, enhancing the chandelier’s cascading effect.
- Compact Flowering Plants: Impatiens, begonia, and pansies offer bursts of color without overwhelming the structure.
- Herbs: For a practical and aromatic touch, plant small herbs like thyme, oregano, or mint. Just be mindful that some herbs, like mint, are vigorous growers and might need their own pot.
- Succulents and Cacti: If you prefer low-maintenance options or live in a dry climate, small succulents or cacti can create a unique, modern look.
Important Considerations:
Think about the amount of sunlight your chosen hanging spot receives. Select plants that thrive in those conditions (full sun, partial shade, or full shade). Also, consider the mature size and weight of the plants to ensure they don’t become too heavy for the chandelier arms.
Personalize Your Chandelier Planter: Beyond the Basics
This DIY project is an open invitation for personalization. Make it truly yours with these creative touches:
- Color Schemes: Match your patio cushions, create a bold contrast, or go for an elegant monochromatic look with white or black paint and vibrant flowers.
- Embellishments: Reattach existing crystals (if they’re suitable for outdoors) or add new beads, solar-powered fairy lights, or decorative ribbons for extra sparkle and charm.
- Themed Decor: Achieve a shabby chic look with distressed paint, or a bohemian vibe with macrame hangers for the pots.
Care and Maintenance for Long-Lasting Beauty
Once your chandelier planter is hanging proudly, a little care will ensure it remains a stunning feature all season long:
- Watering: Hanging planters tend to dry out faster than ground beds. Check the soil moisture daily, especially during hot weather, and water as needed.
- Fertilizing: Feed your plants with a balanced liquid fertilizer every two to four weeks to encourage continuous blooming.
- Pruning: Pinch back leggy growth and deadhead spent blooms to encourage bushier growth and more flowers.
- Winterizing: If you live in a region with harsh winters, consider bringing your planter indoors or protecting it to prolong its life. Emptying the pots and storing the chandelier frame can also work.
- Structural Check: Periodically inspect the chandelier and pot attachments to ensure everything remains secure.
Showcasing Your Creation and Inspiring Others
There’s immense satisfaction in creating something beautiful with your own hands. This chandelier planter is more than just a decoration; it’s a conversation starter. Like many, I’ve seen friends and family “go crazy” over this idea, always noticing it first thing when they visit. It truly becomes one of the most commented-on additions to any home, testament to its unique charm.
It also makes an incredibly thoughtful and personal gift, especially for those who seem to “have everything.” Instead of a generic present, offer a handmade piece that adds beauty and life to their outdoor space. Whether it’s for a birthday, Mother’s Day, or a housewarming, a custom chandelier planter is a gift that keeps on giving.
Ready to Create Your Own?
Embrace the joy of DIY and add a splash of color and creativity to your outdoor living area with this enchanting chandelier planter. It’s a project that combines sustainability, affordability, and sheer beauty into one irresistible package. You’ll smile every time you see your favorite flowers or plants overflowing from your unique creation.
For a detailed visual guide and fantastic step-by-step photos, we highly recommend checking out the original tutorial that inspired this project. A big thank you to DIY Show Off for their fabulous chandelier planter tutorial, which provides invaluable tips on everything from spray painting techniques to glue recommendations and crucial drying times. Be sure to explore their blog for even more creative ideas and inspiration!