
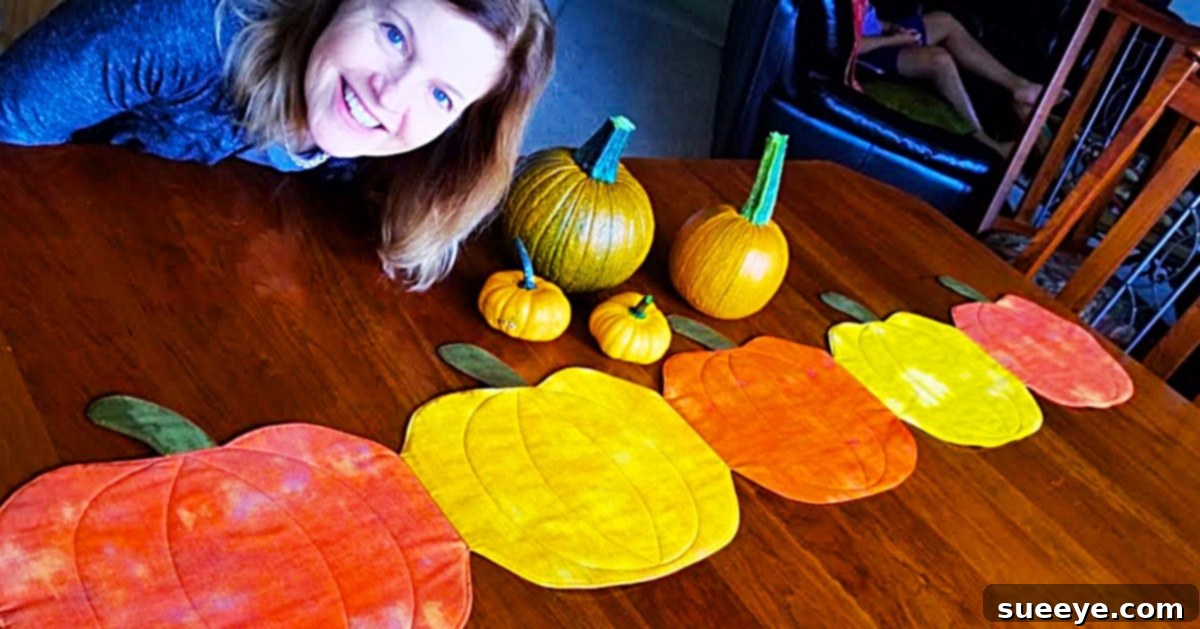
As the leaves begin to turn and the crisp autumn air fills our homes, there’s no better way to embrace the season than with cozy, handcrafted decor. If you’re searching for a unique and charming addition to your Fall festivities, look no further than a beautifully quilted pumpkin table runner. This exquisite piece not only serves as a stunning centerpiece but also infuses your space with the warmth and spirit of autumn. When I first discovered the brilliant video tutorial by Jordan Fabrics on YouTube, I was immediately captivated. Their approach to creating this delightful pumpkin table runner is truly ingenious, as it deviates from traditional oblong designs, instead featuring individual pumpkin shapes that come together to form a cohesive and eye-catching display. It’s an easy quilting project that yields professional-looking results, making it perfect for both seasoned quilters and enthusiastic beginners alike. Prepare to transform your dining area or console table into a charming Fall wonderland with this essential autumn craft project.
Crafting the Perfect Quilted Pumpkin Table Runner for Fall
The allure of a handmade table runner goes beyond mere decoration; it’s about infusing your home with personality and warmth. This particular DIY pumpkin table runner project from Jordan Fabrics stands out for several compelling reasons. Unlike conventional table runners that are often rectangular, this design ingeniously incorporates individual pumpkin shapes, creating a dynamic and organic flow that mimics real pumpkins scattered across your table. This unique aesthetic ensures your Fall decor will be memorable and conversation-starting. Imagine a festive gathering, with this vibrant runner serving as the focal point, perfectly complementing your seasonal spread.
Why This Quilted Pumpkin Table Runner Stands Out
- Authentic Design: Each element is shaped like a real pumpkin, offering a more natural and artistic look compared to printed fabrics.
- Versatile Decor: While perfect for Thanksgiving, it’s also ideal for Halloween, harvest festivals, or simply to add a touch of autumn charm throughout the season.
- Engaging Project: The process is broken down into manageable steps, making it an accessible and enjoyable sewing experience.
- Personalized Touch: With a vast array of Fall-themed fabrics available, you can customize your runner to perfectly match your existing home decor.
- Durable and Reusable: A quilted runner is designed to last for many seasons, becoming a cherished part of your annual Fall traditions.
Essential Materials for Your Fall Quilting Project
Before diving into the creative process, gathering all your supplies is key to a smooth and enjoyable experience. This sewing pumpkin project requires a few standard quilting tools, most of which you might already have in your craft stash. Opting for high-quality fabrics in rich autumn hues will elevate the final look of your quilted pumpkin table runner.
- Fabric (in Fall colors): You’ll need several coordinating fabrics for your pumpkins (oranges, yellows, creams, reds, greens, browns), plus backing fabric and a small amount for the pumpkin stems. Consider a mix of solids, small prints, and textures to add depth.
- A Sewing Machine: A reliable machine with a straight stitch capability is fundamental for quilting.
- Thread: All-purpose polyester or cotton thread that matches your dominant fabric colors for piecing, and a contrasting or matching thread for topstitching, if desired.
- A Pair of Scissors: Sharp fabric scissors are essential for precise cuts and trimming.
- A Rotary Cutter: This tool, paired with a cutting mat, makes cutting fabric quickly and accurately a breeze, especially for straight edges.
- A Cutting Mat: Protects your work surface and provides a grid for accurate measuring and cutting with your rotary cutter.
- A Fabric Pen (or chalk): For marking patterns, sewing lines, and placement guides on your fabric without leaving permanent marks.
- Pins (or fabric clips): To hold fabric layers securely in place during cutting and sewing, ensuring alignment.
- An Iron: Indispensable for pressing seams flat and giving your finished project a crisp, professional appearance.
- An Ironing Board: Provides a stable, heat-resistant surface for efficient pressing.
- Pumpkin Pattern Template: While not explicitly listed, the video tutorial will provide or guide you to create the specific pumpkin shapes. This is crucial!
Step-by-Step Guide: How to Sew Your Quilted Pumpkin Table Runner
Creating this charming quilted pumpkin table runner is a rewarding process, broken down into simple, manageable steps. The detailed instructions in the Jordan Fabrics tutorial make it incredibly approachable. Here’s an expanded guide to walk you through each phase of this delightful autumn craft.
Step 1: Preparing Your Fabric and Pattern Pieces
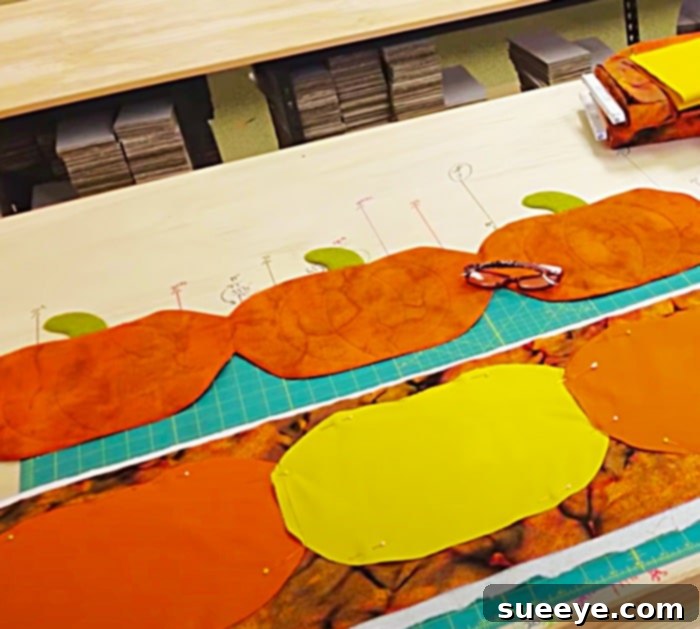
The journey begins with careful preparation. First, make sure all your fabrics are pre-washed and pressed. This prevents future shrinking and ensures your finished runner maintains its shape. Access the pumpkin pattern provided in the Jordan Fabrics video tutorial. Print and cut out the templates accurately. Lay your chosen pumpkin fabrics right sides up and place your templates on top. Using your fabric pen, carefully trace the pumpkin shapes onto the wrong side of your fabric. You’ll need to cut out multiple pumpkin shapes for the front and matching shapes for the back of each individual pumpkin unit. Remember to include a small rectangle or stem pattern for the top of each pumpkin. Precision in this step will lead to a more polished final product. Take your time to align the grain of the fabric, if applicable, to ensure your pumpkins lay flat.
Step 2: Constructing the Individual Pumpkin Shapes
Once all your pumpkin front and back pieces are cut, it’s time to start sewing! Take one pumpkin front piece and one pumpkin backing piece. Place them right sides together, carefully aligning all edges. Using your fabric pins, secure the layers around the entire perimeter of the pumpkin shape, leaving a small opening (about 2-3 inches) along one relatively straight edge at the bottom or side. This opening will be used later for turning the pumpkin right side out. Using your sewing machine, stitch around the pumpkin shape with a consistent seam allowance (typically a quarter-inch, but follow the tutorial’s recommendation). Make sure to backstitch at the beginning and end of your seam, especially at the opening, to reinforce it.
Step 3: Trimming, Turning, and Shaping
After sewing, the next crucial step is preparing your pumpkin for turning. Carefully trim the seam allowance around the entire curve of the pumpkin. For smoother curves, snip small notches into the seam allowance, being careful not to cut through your stitch line. This reduces bulk and allows the fabric to lay flat once turned. Next, gently turn each pumpkin shape right side out through the opening you left. Use a point turner or a blunt pencil to carefully push out all the curves and edges, giving your pumpkin a well-defined shape. Once turned, give each pumpkin a good press with your iron. Press the seams flat and neatly fold under the raw edges of the opening, pressing them flush with the sewn seam. This creates a clean edge that will be easy to topstitch later.
Step 4: Adding Decorative Topstitching and Details
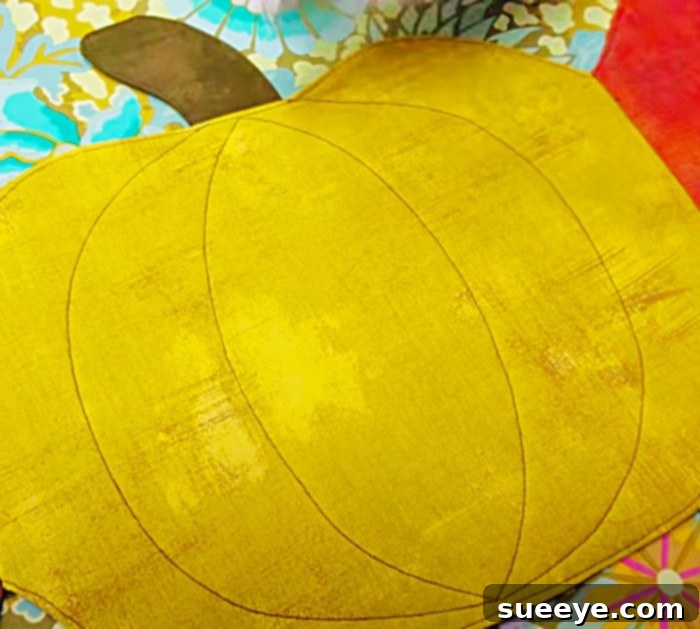
This is where the pumpkins truly come to life! With your sewing machine, perform a line of topstitching very close to the edge of each pumpkin, all the way around. This not only closes the opening seamlessly but also gives a crisp, finished look to the edges. Now, for the signature pumpkin detailing: Use your fabric pen to mark faint lines from the top center to the bottom center of each pumpkin, mimicking the natural ridges of a real pumpkin. These lines will guide your decorative topstitching. Using a contrasting or slightly darker thread, stitch along these marked lines. You can make them straight, slightly curved, or even slightly wavy to add character. This detailing provides texture and dimension, making each pumpkin unit realistic and charming. Don’t forget to attach the small stem pieces you prepared earlier to the top of each pumpkin, either by stitching them in place or using fabric glue if preferred for initial positioning.
Step 5: Assembling Your Table Runner
With all your individual quilted pumpkins complete, it’s time to assemble them into a cohesive seasonal table runner. Arrange your finished pumpkins in a pleasing sequence on your table or design wall. The Jordan Fabrics tutorial will likely guide you on the optimal arrangement and how to join them. You might sew them directly together along their edges where they touch, or use a thin strip of connecting fabric for a more defined separation. Alternatively, they might be layered onto a larger backing piece. If you’re joining them by sewing, make sure to use a small, secure stitch, potentially hand-stitching for invisible joins. Once the pumpkin units are connected and form the desired runner length, you will need to add a backing fabric to the entire runner and finish the edges. This could involve quilting the layers together (if the design permits) and then binding the outer edges with a coordinating fabric strip to give it a clean, durable finish. Press your completed runner one last time to ensure it’s perfectly flat and ready for display.
Pro Tips for a Flawless Quilted Pumpkin Table Runner
- Fabric Selection: Don’t be afraid to mix and match different patterns and textures within a similar color palette to create visual interest. Variegated threads can also add a subtle richness to your topstitching.
- Precision is Key: Especially when cutting and sewing curves, take your time. Small inaccuracies can become more apparent on smaller pieces.
- Pressing Matters: Pressing after each major sewing step is critical. It flattens seams, helps shapes hold, and makes the next steps much easier. A well-pressed project always looks more professional.
- Needle Choice: Use a sharp needle suitable for your fabric type. A dull needle can snag fabric and lead to uneven stitches.
- Practice Topstitching: If you’re new to topstitching, practice on fabric scraps first to get a feel for the stitch length and how close you want your stitch to be to the edge.
- Take Breaks: Quilting can be meticulous. Step away and come back with fresh eyes if you feel frustrated or tired.
Customizing Your Fall Table Runner
One of the joys of a DIY quilting project is the ability to personalize it. While the pumpkin theme is central, you can put your unique spin on this table runner. Consider adding small fabric leaves in between the pumpkins for extra autumnal flair. Embroidery details, such as small vines or initial monograms on a specific pumpkin, can make it even more special. You could also experiment with different sizes of pumpkins to create varying dimensions or use a wider range of colors, perhaps including some unexpected blues or purples for a modern twist on Fall decor. This project is also fantastic for using up fabric scraps from other projects, making it an eco-friendly craft. Imagine making a mini version as a coaster set or a wall hanging!
Caring for Your Handmade Pumpkin Decor
To ensure your beautiful quilted pumpkin table runner lasts for many autumns to come, proper care is essential. Generally, quilted items should be washed gently. Machine wash on a delicate cycle with cold water and a mild detergent. Avoid harsh chemicals or bleach, as these can fade your fabrics. Tumble dry on low or, even better, lay flat to air dry to help maintain its shape. A quick iron on a medium setting can smooth out any wrinkles. When storing your runner at the end of the season, fold it neatly and place it in a breathable container or bag to protect it from dust and pests. Avoid storing in direct sunlight to prevent fading.
Embrace the spirit of autumn by creating this stunning quilted pumpkin table runner. With the clear guidance from Jordan Fabrics, this project promises to be a delightful and fulfilling experience. It’s more than just a decoration; it’s a labor of love that will bring warmth, charm, and a personalized touch to your Fall home decor for years to come. Gather your fabrics, fire up your sewing machine, and get ready to craft a seasonal masterpiece that perfectly captures the cozy essence of autumn.