
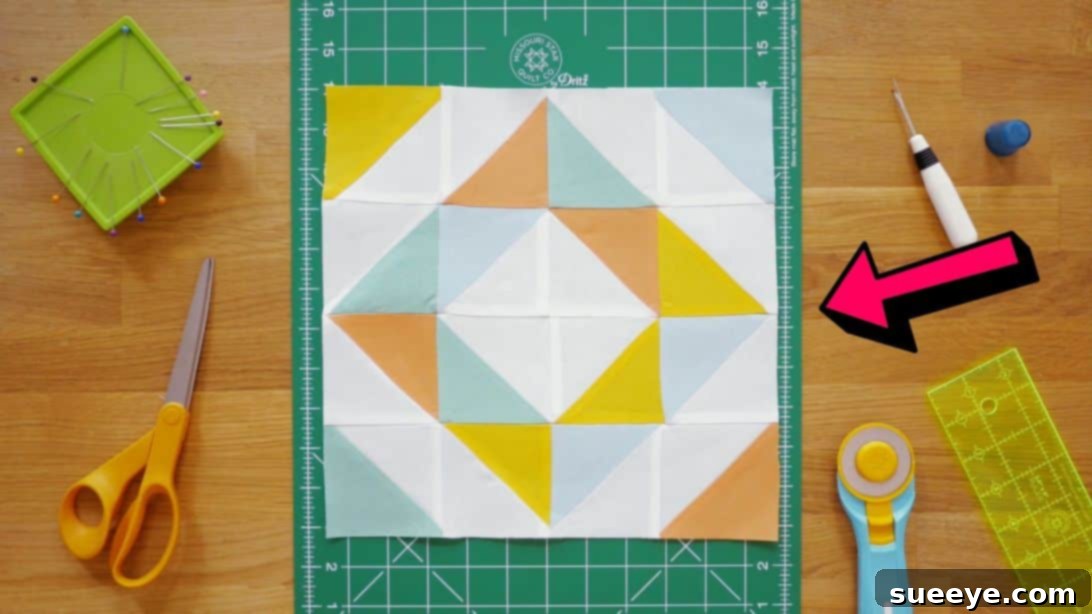
Welcome to the captivating world of quilting! If you’re a beginner eager to explore this rewarding craft and enhance your skills, you’ve landed in the perfect spot. Quilting, while visually stunning, can sometimes appear daunting, especially when confronted with complex patterns involving numerous intricate steps. However, every expert quilter started with fundamental techniques, and focusing on basic patterns is the most effective way to build confidence and proficiency.
Before diving into elaborate designs, it’s crucial to master foundational quilt blocks. These essential building blocks not only teach you precision and technique but also provide a solid base for more advanced projects. Some of the most accessible and popular beginner quilt blocks include the timeless four-patch quilt block, the versatile nine-patch quilt block, the ubiquitous half-square triangles (HSTs), and the charming snowball quilt block. All these designs are celebrated for their straightforward nature, making them ideal for new quilters and ensuring a fulfilling, frustration-free learning experience.
RELATED: Explore More Basic Beginner-Friendly Quilt Blocks
This comprehensive tutorial will guide you through creating a stunning, beginner-friendly Four Seasons Quilt, courtesy of the expert quilters at Missouri Star. This particular project is an exceptional learning opportunity because the entire quilt block is constructed using half-square triangles – an indispensable skill for any quilter. You’ll not only learn the fundamentals of HSTs but also discover an efficient method to produce four HSTs at a time, significantly speeding up your quilting process. For those looking to accelerate even further, consider exploring the magic 8 method, which allows you to create eight pieces simultaneously.
Mastering half-square triangles (HSTs) is a cornerstone of quilting. These simple yet powerful units are formed by sewing two fabric squares together and then cutting them diagonally to create two triangles, which are then sewn back together to form a square. Their versatility allows for an endless array of design possibilities, from creating dynamic geometric patterns like chevrons and pinwheels to forming intricate pictorial elements. The Four Seasons Quilt is designed to immerse you in HST creation, providing ample practice to refine your cutting, sewing, and pressing techniques – all critical skills for precise quilt making.
Mastering the Easy Four Seasons Quilt: A Step-by-Step Journey
To embark on your Four Seasons Quilt adventure, gather the following essential materials. Precision in preparation will pave the way for a smooth and enjoyable quilting experience.
Materials You Will Need:
- Fabric Packs:
- One pack of 5″ print squares (often referred to as charm packs). Choose prints that evoke the changing seasons, or a palette that simply appeals to your aesthetic.
- One pack of 5″ background squares. A solid white, cream, or light gray provides a striking contrast to your print fabrics, allowing the HST designs to pop.
- Essential Quilting Tools:
- Sewing Machine: A reliable machine with a consistent 1/4″ seam allowance is vital.
- Rotary Cutter: A sharp 45mm or 60mm rotary cutter for precise fabric cuts.
- Self-Healing Cutting Mat: Protect your work surface and prolong the life of your rotary blade.
- Quilting Rulers: A 6.5″ square ruler and a longer ruler (e.g., 6″x24″) are incredibly useful for accurate trimming and cutting.
- Good Quality Thread: 100% cotton thread is recommended for quilting, ideally in a neutral color that blends with your fabrics.
- Iron and Ironing Board/Pressing Mat: Essential for pressing seams flat and accurate.
- Pins or Fabric Clips: To hold fabric pieces together securely before sewing.
- Seam Ripper: Every quilter needs one! Don’t be afraid to use it for accuracy.
- Fabric Scissors: For cutting thread and small fabric adjustments.
- Batting: The middle layer of your quilt, providing warmth and texture. Cotton, wool, or blends are popular choices.
- Backing Fabric: A single piece of fabric or pieced fabric for the back of your quilt.
- Binding Fabric: Strips of fabric used to finish the edges of your quilt.
Before you begin, it’s often a good practice to pre-wash your fabrics, especially if you’re using different types or colors that might bleed. This also preshrinks the fabric, preventing future distortion. Once washed and dried, press all fabrics smoothly to remove any wrinkles, ensuring your cuts and seams are as accurate as possible.
How to Make the Four Seasons Quilt: Step-by-Step Instructions
Step 1: Preparing Your Fabric Squares for HSTs
Begin by selecting one 5″ print square and one 5″ background square. Take a moment to ensure both squares are perfectly flat and neatly aligned. Place them right sides together, ensuring all edges match up precisely. The key to successful half-square triangles (HSTs) is a consistent seam allowance, so set your sewing machine to a 1/4″ seam. Carefully sew around all four sides of the paired squares. You’ll be creating a continuous stitch line that forms a perfect square frame just inside the outer edges of your fabric pieces. Take your time, guide the fabric steadily, and secure your stitches at the beginning and end.
Step 2: Transforming Squares into Four Half-Square Triangles
Once you’ve sewn around all four sides, it’s time for the magic of transformation. Place your sewn square on your cutting mat. Using a sharp rotary cutter and a reliable quilting ruler, carefully cut the square diagonally from corner to corner in both directions. You will make two cuts that intersect in the center, forming an “X” shape across your square. This precise cutting will yield four perfectly formed, unsewn half-square triangles. After cutting, gently open each HST unit. At this stage, pressing is crucial. First, “set the seam” by briefly pressing your iron down on the sewn seam before opening the fabric. Then, carefully press each HST unit open, ensuring the seam allowance is either pressed to one side (usually the darker fabric side to prevent shadowing) or pressed open for a flatter result. Pressing open can lead to less bulk at seam intersections later, but pressing to one side is generally easier for beginners. Aim for flat, crisp units.
Step 3: Repetition and Trimming for Accuracy
Now that you’ve successfully created your first batch of four HSTs, repeat steps 1 and 2 for all your remaining 5″ print and background squares. This process, often called “batching” or “chain piecing,” allows for efficient production. For truly professional results, after pressing, you’ll want to trim your HSTs to a consistent size. For this project, you will likely trim them down to 4.5 inches square. Place your quilting ruler with the 45-degree line aligned perfectly with the seam line of your HST. Trim two sides, rotate the HST, realign, and trim the remaining two sides. This meticulous trimming ensures all your HSTs are uniform in size, which is absolutely vital for a quilt top that lies flat and has perfectly matched points.
Step 4: Arranging and Assembling Your Four Seasons Quilt Blocks
With a pile of precisely trimmed HSTs, the creative fun truly begins! For the Four Seasons Quilt, the pattern often involves arranging four HSTs to form a larger square block. Observe the pattern in the photo below: you’ll notice how the light and dark triangles are strategically placed to create a specific design, often a pinwheel or a dynamic star-like effect. Experiment with different orientations until you achieve the desired aesthetic for your individual block. Once satisfied with the arrangement of your four HSTs for one block, you will sew them together in rows. Typically, you’ll sew two HSTs together to form a top row, and another two to form a bottom row. When sewing, remember to use your consistent 1/4″ seam allowance. After sewing each row, press the seams open or towards opposite directions to help them “nest” when you join the rows. Finally, sew the two rows together to complete your first Four Seasons quilt block. Repeat this arrangement and assembly process with the remaining HSTs until you have created all the blocks required for your quilt top.
Beyond the Block: Assembling Your Quilt Top
Once you’ve created all your individual Four Seasons quilt blocks, the next exciting phase is joining them together to form the complete quilt top. Arrange your finished blocks on a design wall or on the floor to visualize the overall pattern and make any final adjustments to their placement. Once you are happy with the layout, begin sewing your blocks into rows. Again, maintain that consistent 1/4″ seam allowance, and press seams between blocks carefully, alternating direction from row to row to help them nest. Once all rows are complete, sew the rows together to form the full quilt top. This careful attention to detail throughout the piecing process will ensure your quilt top lies flat and looks professional.
Quilting and Finishing Your Masterpiece
With your quilt top complete, the next steps involve preparing your quilt sandwich and the actual quilting process.
- Make the Quilt Sandwich: Lay out your backing fabric (right side down), then a layer of batting, and finally your quilt top (right side up). Smooth out any wrinkles.
- Basting: Secure these three layers together. You can use safety pins, spray basting adhesive, or hand basting stitches. This step is crucial to prevent shifting during quilting.
- Quilting: This is where you stitch through all three layers. For beginners, simple straight lines, meandering patterns, or stitch-in-the-ditch (quilting along the seam lines) are excellent choices. You can use your domestic sewing machine or opt for hand quilting for a more traditional feel.
- Binding: Once quilted, trim the edges of your quilt square. Then, attach pre-cut strips of binding fabric around the perimeter of the quilt. This not only gives a neat, finished edge but also protects the raw edges of your quilt.
Beginner-Friendly Four Seasons Quilt: Tips for Success
Quilting is a journey of learning and discovery. Here are some invaluable tips to ensure your Four Seasons Quilt project is a resounding success:
- Precision is Paramount: The 1/4″ seam allowance is the golden rule in quilting. Consistently maintaining this allowance is key to blocks fitting together perfectly. Invest in a 1/4″ foot for your sewing machine if you don’t already have one.
- Pressing vs. Ironing: In quilting, we “press,” we don’t “iron.” Ironing involves sliding the iron, which can distort fabric on the bias. Pressing involves lifting and placing the iron down, holding it, and then lifting it again, ensuring seams lie flat without stretching.
- Trim Those HSTs: Don’t skip the trimming step! It makes a world of difference in the final accuracy of your blocks and quilt top. A good square-up ruler is a quilter’s best friend.
- Quality Tools Matter: While you don’t need the most expensive equipment, good quality fabric, sharp rotary blades, and accurate rulers will significantly improve your experience and the outcome of your projects.
- Embrace Imperfection: No quilt is perfect, especially your first few. Don’t let minor flaws deter you. Each stitch is a part of your unique creative journey.
- Practice Makes Progress: The more you quilt, the more natural the techniques will become. Start with smaller projects to build confidence before tackling larger quilts.
- Join a Community: Connect with other quilters online or in person. Sharing tips, asking questions, and showcasing your work can be incredibly motivating and inspiring.
- Watch Tutorials: Visual learning is powerful. Watch videos, like those from Missouri Star, multiple times to grasp techniques before attempting them.
Customizing Your Four Seasons Quilt
While this tutorial provides a foundation, the beauty of quilting lies in its endless customization possibilities.
- Fabric Choices: Go beyond seasonal prints! Choose fabrics to match a nursery theme, a specific room decor, or simply a collection of colors you adore. Variegated prints, solids, or tone-on-tone fabrics can create entirely different visual effects.
- Size Variations: Adjust the number of blocks to create anything from a small wall hanging or baby quilt to a lap quilt, throw, or even a full bed-sized quilt. Simply calculate how many 4.5″ finished blocks you need for your desired dimensions.
- HST Block Arrangements: Once you’ve mastered the basic Four Seasons block arrangement shown, experiment! You can rotate HSTs to form different pinwheels, chevrons, or even star patterns within each larger block.
- Combine with Other Blocks: As you gain confidence, consider incorporating other basic blocks like four-patches or nine-patches into your quilt alongside your HSTs for added complexity and interest.
Your Quilting Journey Begins Here!
Congratulations on taking the first steps into the wonderful world of quilting with the Four Seasons Quilt! By focusing on the fundamental technique of creating half-square triangles, you’ve not only produced a beautiful and functional piece of art but also gained invaluable skills that will serve as the cornerstone for all your future quilting endeavors. Remember, quilting is a marathon, not a sprint. Enjoy the process, celebrate each stitch, and don’t be afraid to experiment and personalize your creations.
We encourage you to share your finished Four Seasons Quilt with fellow enthusiasts and inspire others on their own quilting journeys. As you continue to explore, you’ll find that each quilt tells a story, and yours is just beginning. Happy quilting!