
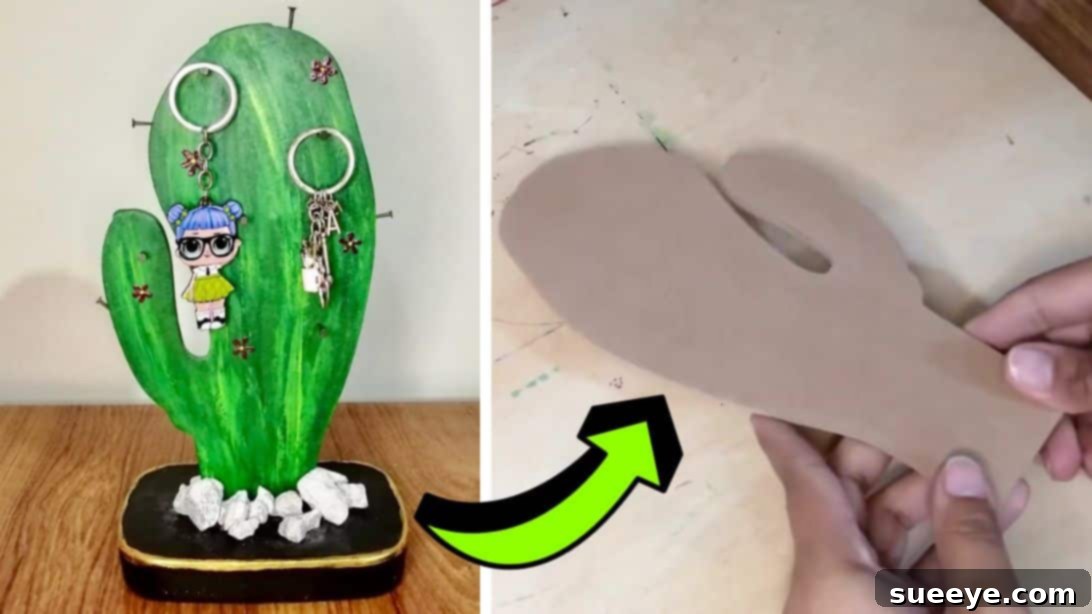
DIY Cactus Keychain Holder: Organize Your Keys with a Touch of Desert Charm
Are you searching for a creative and functional way to keep your keys organized? Look no further! This delightful DIY cactus keychain holder offers the perfect blend of practical utility and charming home decor. It’s a surprisingly simple weekend project that brings a unique, handcrafted touch to your entryway or desk. Imagine a vibrant green cactus, complete with delicate pink blooms, standing proudly as it holds all your essential keys. This project is not only satisfying to create but also makes an incredibly thoughtful and personalized gift for friends and family. Get ready to transform a simple piece of wood into a functional work of art!
This tutorial, inspired by the fantastic work of Daily Art on YouTube, guides you through each step, ensuring a smooth and enjoyable crafting experience. You’ll learn how to paint, assemble, and add those intricate details that make this cactus truly stand out. Whether you’re a seasoned DIY enthusiast or just starting your crafting journey, this project is designed to be accessible and rewarding.
RELATED: How to Make a DIY Elephant Macrame Keychain – For more key organization inspiration!
Beyond its primary function as a key holder, this adorable wooden craft piece doubles as a fantastic decorative accent. Its whimsical design can brighten up any space, from a minimalist office to a cozy living room. The beauty of DIY lies in customization: you can adjust the size of your keychain holder to fit your needs, or even experiment with different shapes if a cactus isn’t quite your style. Think about a majestic tree, a playful animal, or an abstract geometric design – the possibilities are endless once you master the basic techniques outlined here.
Why Craft a DIY Cactus Keychain Holder?
In a world increasingly filled with mass-produced items, handmade crafts offer a unique sense of warmth and personality. Creating your own cactus keychain holder goes beyond just making a functional item; it’s about infusing your space with your own creativity and effort. Here are a few compelling reasons to dive into this project:
- Unique Home Decor: This isn’t just another generic key rack. Its vibrant colors and whimsical cactus shape make it a conversation starter and a standout piece in any room.
- Practical Organization: Say goodbye to misplaced keys! Having a designated, stylish spot for your keys reduces morning stress and keeps your essentials within easy reach.
- Personalized Gift Idea: Handmade gifts carry immense sentimental value. A custom-painted cactus key holder is a thoughtful present for housewarmings, birthdays, or just because. You can tailor the colors and details to suit the recipient’s taste.
- Beginner-Friendly Project: Despite its professional look, this craft is surprisingly simple, requiring basic materials and techniques. It’s an excellent project for honing your painting and assembly skills.
- Stress-Relieving Activity: Engaging in creative activities like DIY crafting can be incredibly therapeutic. The process of painting, blending, and assembling offers a wonderful escape from daily routines and a chance to focus on something beautiful.
- Customization Potential: The core design can be adapted in countless ways. Change the colors, add glitter, use different shapes for the cutout, or even vary the base material. Your imagination is the only limit!
Essential Supplies Needed for Your DIY Cactus Keychain Holder
Gathering your materials is the first exciting step in any DIY project. For this charming cactus key holder, you’ll find that most items are readily available at your local craft store or even around your home. Investing in quality supplies will not only make the crafting process more enjoyable but also ensure a durable and beautiful finished product.
- Cactus-shaped MDF Cutout (6mm thickness): MDF (Medium-density fibreboard) is an excellent choice for crafting due to its smooth surface, affordability, and ease of painting. The 6mm thickness provides good rigidity without being too heavy or difficult to work with. If a pre-cut cactus isn’t available, you can draw and cut your own shape from an MDF sheet, or opt for plywood, which offers a similar experience.
- Acrylic Paint: You’ll need green (various shades for depth), yellow, pink, black, and white. Acrylic paints are perfect for this project because they are fast-drying, water-soluble for easy cleanup, and offer vibrant, opaque colors that adhere well to wood. Consider having a light green and a darker green to create depth and texture on your cactus.
- White Cement: This will form the sturdy base for your cactus. White cement dries to a clean, light color that can be easily painted. Ensure you use cement specifically for crafting or small projects, and always follow safety instructions regarding mixing and handling.
- Plastic Wrap: Essential for protecting your cactus cutout from direct contact with the wet cement, ensuring it can be easily removed once the base has cured.
- Hammer and Small Nails: These will be used to create the hooks for your keys. Choose small finishing nails or brads with a flat head for a neat appearance. Ensure they are long enough to securely embed into the MDF cutout without poking through the other side.
- Keys and Keychains: Have your actual keys and keychains handy for testing the placement and functionality of your new holder.
- Paintbrush Set: A variety of sizes will be beneficial: a larger flat brush for base coats, a smaller detail brush for flowers and streaks, and a fine-tipped brush for outlines.
- Plastic Container: A small, disposable plastic container (like a yogurt cup or a takeout container) will serve as a mold for your cement base. Make sure it’s wide enough to provide stability for your cactus.
- Sandpaper (fine-grit): Crucial for smoothing the edges of your cement base once it’s dry, giving it a professional and polished finish.
- Stirring Stick: For mixing the cement. An old spoon or craft stick works well.
- Masking Tape or Painter’s Tape: To hold the plastic wrap in place and secure the cactus during the cement drying process.
- Water: For mixing cement and cleaning brushes.
- Old Newspaper or Drop Cloth: To protect your work surface from paint and cement spills.
Step-by-Step Guide: How to Craft Your DIY Cactus Keychain Holder
Let’s dive into the creative process! Follow these detailed instructions carefully, taking your time with each step, especially the drying phases. Patience is key to achieving a professional and durable finish for your handmade key holder.
Step 1: Bringing Your Cactus to Life with Color
Begin by giving your MDF cactus cutout its signature green hue. Apply an even base coat of green acrylic paint to both sides of the cactus. Ensure complete coverage and allow this first coat to dry thoroughly. Drying times for acrylics are usually quick, but vary based on paint thickness and humidity. Once dry, it’s time to add character and depth. Using a lighter shade of green, and then a touch of yellow, apply streaks all over the cactus. These streaks mimic the natural ridges and variations found on real cacti. Don’t worry about perfection; organic imperfections add to the charm!
Now, for a unique texturing technique: grab a small piece of cardboard or a firm plastic card. While the streaky paint is still wet, gently smear the freshly painted details downwards, as shown in the video tutorial. This action blends the colors subtly, creating a natural, weathered, and dimensional look. Continue adding streaks and smearing until you achieve a visually appealing texture that resembles a real cactus. This artistic freedom allows you to personalize your creation.
Step 2: Adding Floral Accents and Preparing the Base
Once you’re satisfied with the textured green on both sides of your cactus, allow the paint to dry completely. This step is crucial to prevent smudging when you handle the piece. Next, using a fine-tipped brush and pink acrylic paint, carefully paint a few small, charming flowers strategically placed across your cactus. You can make simple five-petal blooms or tiny buds. Let these delicate flowers dry fully before proceeding. These floral touches add a pop of color and a touch of sweetness to your rugged cactus.
While your cactus is drying, prepare the base. In a separate plastic container, mix your white cement with water according to the manufacturer’s instructions. Consistency is key here; aim for a thick, paste-like mixture similar to pancake batter – not too runny, not too stiff. Wear gloves if handling cement directly. Before placing the cactus, wrap the bottom part of its “trunk” with plastic wrap. Secure the plastic wrap tightly with masking tape. This protective layer is vital as it prevents the cement from bonding directly to the wood, allowing for easy removal later. Carefully place the plastic-wrapped bottom of the cactus into the center of the wet cement mixture in your plastic container. Use additional tape if needed to hold the cactus upright and perfectly centered within the cement while it sets.
Step 3: Curing the Base and Refining its Finish
With the cactus securely taped in its position within the cement, set the entire assembly aside in a safe, undisturbed location. The cement needs ample time to cure and become completely solid. This process can take anywhere from 24 to 48 hours, depending on the type of cement and environmental humidity. Resist the urge to touch or move it prematurely, as this could compromise the structural integrity of the base. Once the cement is thoroughly dry and solid, carefully remove the cactus from its new base. Gently peel off all the plastic wrap from the bottom of the cactus, ensuring no residue remains.
Next, carefully unmold the cement base from its plastic container. If it’s a bit stubborn, you might need to carefully cut away the plastic container. Now you have a rough cement base. To achieve a smooth, professional finish, wet the base slightly and use fine-grit sandpaper to sand down all the edges and surfaces. This step removes any sharp points, imperfections, and gives the base a refined look. Once you’re happy with the smoothness, rinse off any cement dust and let the base dry completely. Finally, paint the entire base with black acrylic paint. Black provides a striking contrast to the vibrant green cactus and its pink flowers, creating a sophisticated and grounded aesthetic.
Step 4: The Final Touches: Hooks, Assembly, and Embellishments
Allow the black paint on the base to dry fully. To add an elegant touch, take a fine-tipped brush and some gold acrylic paint, then carefully paint a thin gold outline along the top edges of the black base. This subtle metallic detail elevates the entire piece. Let the gold paint dry completely. Now it’s time to add the key hooks. Using your hammer, carefully drive a few small nails into the cactus cutout. Plan the placement of your nails strategically to ensure even spacing and enough room for your keys. You can place them along the “arms” of the cactus or symmetrically on the main body. Ensure the nails are securely embedded, leaving enough of the nail head exposed to comfortably hang a keychain.
Once the nails are in place, re-insert the cactus back into its now-finished base. It should fit snugly if the plastic wrap did its job correctly. If you wish to add an extra layer of visual appeal, consider placing some decorative pebbles or small polished stones around the bottom of the cactus, on top of the black base. These natural elements enhance the desert theme and add a delightful textural contrast. Finally, with your beautifully crafted cactus keychain holder complete, gather your keys and keychains and hang them proudly on their new home. You’re done! Step back and admire your functional piece of art.
Tips for Customizing Your 3D Cactus Keychain Holder
The beauty of DIY is the freedom to personalize! While the cactus design is charming, don’t hesitate to put your own spin on this project. Here are some ideas to inspire your creativity:
- Vary the Shape: Instead of a cactus, consider an animal silhouette (like a bird or elephant), a tree, a cloud, or even a house shape. Any sturdy wooden cutout can be adapted.
- Color Palettes: Experiment with different color schemes. A monochromatic cactus (various shades of green only), a rainbow cactus, or even a pastel version could be stunning. The base can also be painted in a contrasting color like white, gray, or metallic silver.
- Textural Elements: Besides streaking, you could use a sponge for a dappled paint effect, or even apply fine sand mixed with glue to create a more realistic desert texture on the base.
- Embellishments: Add small rhinestones or beads to the flowers, or use glitter paint for extra sparkle. Tiny artificial succulents glued to the base could also enhance the natural theme.
- Different Hooks: Instead of nails, you could use small screw-in cup hooks for a more finished look, or even decorative knobs if your cutout is thick enough.
- Base Alternatives: If cement seems too daunting, consider using a solid block of wood, a heavy stone, or even a sturdy piece of clay that you can mold and bake. Just ensure it provides sufficient stability.
Remember, this 3D cactus keychain holder is more than just a functional item; it’s a reflection of your personal style and a testament to your crafting skills. It’s an easy wooden craft project idea that yields both practical results and a beautiful piece of handmade decor. Enjoy the process of creating something truly unique and useful!
*All images are credited to Daily Art via YouTube. We encourage you to visit their channel and subscribe for more inspiring DIY projects and art tutorials!
Beyond the Cactus: Expanding Your DIY Crafting Horizons
Mastering this DIY cactus keychain holder opens up a world of possibilities for future crafting endeavors. The techniques learned here—painting on MDF, working with cement for bases, and adding small details—are transferable to countless other projects. Imagine creating personalized bookends, unique phone stands, or even small decorative sculptures for your home. Each project you complete builds confidence and expands your creative toolkit.
Whether you’re looking to declutter your space, add a touch of handmade charm to your decor, or find the perfect personalized gift, this 3D cactus keychain holder is an excellent starting point. It embodies the joy of crafting and the satisfaction of bringing a vision to life with your own hands. So, gather your supplies, unleash your inner artist, and embark on this rewarding DIY adventure. Your keys (and your home) will thank you for it!