
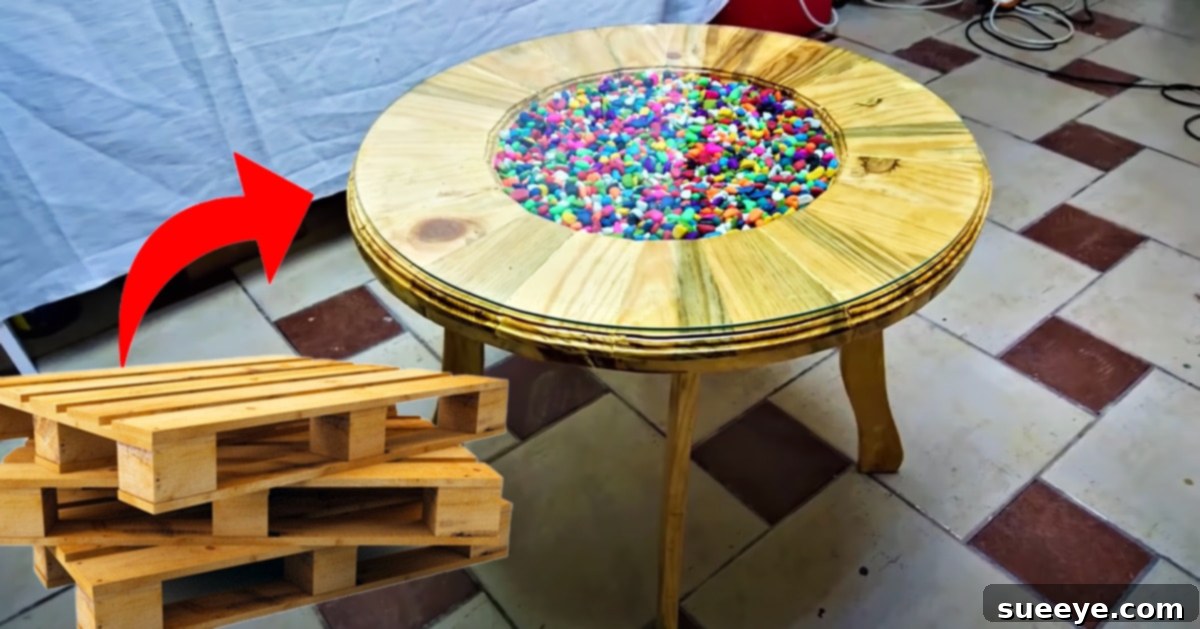
DIY Pallet Coffee Table: Transform Reclaimed Wood into Stylish Furniture
Embark on a rewarding journey of creativity and sustainability by building your very own coffee table from reclaimed pallet boards. This comprehensive guide, inspired by the ingenious Wise Crafts tutorial, will walk you through the process of turning discarded wood into a stunning and functional piece of furniture. Upcycling old pallets is not only an eco-friendly practice but also an excellent way to save money and add a unique, rustic charm to your living space, patio, or garage. Imagine the satisfaction of crafting a custom coffee table that reflects your personal style, all while contributing to a greener planet.
The Wise Crafts video offers a straightforward, follow-along visual guide, perfect for those who prefer to learn by watching. While the creator doesn’t narrate, detailed instructions are provided in the video’s description, ensuring you have all the necessary information at your fingertips. Although the tutorial showcases professional machinery, don’t be discouraged! We’ll explore alternative tools and methods that can help you achieve similar impressive results with more accessible equipment. Get ready to dive into the world of pallet woodworking and create a conversation-starting centerpiece that combines practicality with distinctive design.
Why Choose Pallet Upcycling for Your Next Project?
Upcycling wooden pallets into furniture has gained immense popularity for a multitude of compelling reasons, making it an ideal choice for your next DIY venture, especially a coffee table. Beyond the sheer joy of creating something with your own hands, pallet projects offer significant benefits:
- Environmental Sustainability: By repurposing old pallets, you actively contribute to reducing landfill waste and minimizing the demand for new timber. This eco-conscious approach supports sustainable living and lessens your carbon footprint.
- Cost-Effectiveness: Pallets are often available for free or at a very low cost from local businesses, industrial parks, or construction sites. This dramatically reduces the material expenses for your project, making high-quality, custom furniture surprisingly affordable.
- Unique Aesthetic Appeal: Pallet wood naturally possesses a distinctive character, with variations in grain, texture, and subtle imperfections that tell a story. This weathered charm can be embraced to create rustic, industrial, or even modern farmhouse-style furniture that stands out from mass-produced items.
- Durability and Strength: Designed for heavy-duty shipping, pallet wood (often pine, oak, or fir) is robust and durable. When properly prepared and finished, it can withstand daily use, ensuring your coffee table will last for years to come.
- Personalized Design: Unlike store-bought furniture, a DIY pallet coffee table allows for endless customization. From the dimensions and leg design to the finish and decorative elements, you have complete control to tailor the piece to perfectly match your home decor and functional needs.
- Skill Development: Undertaking a pallet project is an excellent way to learn or hone basic woodworking skills, from dismantling and sanding to cutting and assembly. It’s a rewarding process that builds confidence and opens doors to future DIY endeavors.
The transformation of rough, discarded wood into a beautiful and functional coffee table is truly amazing. This project exemplifies how creativity and resourcefulness can lead to both stylish home decor and a more sustainable lifestyle.
Essential Tools and Materials for Your Pallet Coffee Table
Before you begin, gathering the right tools and materials is crucial for a smooth and successful project. While the Wise Crafts tutorial features advanced woodworking machinery, many tasks can be accomplished with more common, hand-held tools. Here’s a detailed breakdown of what you’ll need, along with some practical alternatives:
Core Materials:
- Old Pallet Boards: The star of your project. Source heat-treated (HT stamped) pallets, not chemically treated (MB stamped). Inspect them for cleanliness, mold, and damage. You’ll need several boards, depending on the desired size of your table.
- Wood Glue: High-quality wood glue is essential for strong, lasting joints. “Embedded glue” likely refers to a strong construction adhesive or specialty wood glue designed for structural integrity.
- Cellulosic Varnish or Other Wood Finish: This protects the wood and enhances its appearance. Alternatives include polyurethane, lacquer, shellac, tung oil, linseed oil, or even paint for a solid color finish.
- Fine Sandpaper (various grits): Essential for achieving a smooth, splinter-free finish. Start with coarser grits (e.g., 80-100) for initial shaping and progress to finer grits (e.g., 180-220) for a silky smooth feel.
- Colorful Rocks/Pebbles: For decorative inlay under the glass top. Consider river rocks, sea glass, or even mosaic tiles for a different look.
- Round Glass Top: This will be the functional surface of your coffee table. Ensure it’s tempered safety glass for durability and safety. The diameter will depend on your table’s design.
- Sawdust: Useful for mixing with wood glue to create a homemade wood filler for gaps or imperfections.
Key Tools (with Alternatives):
- Pry Bar & Hammer: Absolutely essential for safely disassembling pallets.
- Measuring Tape & Pencil/Label: For accurate measurements and markings.
- Safety Gear: Always wear safety glasses, work gloves, and a dust mask, especially when cutting or sanding.
- Spiral Machine (Jointer/Planer): Used to flatten and square the edges and faces of rough lumber.
- Alternative: A hand plane can achieve similar results with more effort. For smaller projects, a belt sander or even careful sanding can suffice, though it’s harder to get perfectly flat surfaces. Alternatively, seek out pre-milled reclaimed wood if available.
- Thickness Machine (Planer): Reduces the thickness of boards to a consistent dimension.
- Alternative: Again, a hand plane requires skill and time. For many DIY projects, simply selecting boards of similar thickness or sanding down minor variations might be acceptable.
- Vibrating Sander (Orbital/Random Orbital Sander): Crucial for smoothing wood surfaces.
- Alternative: A belt sander for faster material removal (use with caution), or simply more elbow grease with a sanding block and sandpaper.
- Wood Milling Machine (Router/CNC Machine): Used for shaping, carving, and creating profiles (like the coffee table legs in the video).
- Alternative: A jigsaw or band saw can cut out shapes. A hand router or even basic chisels and rasps can achieve simpler profiles and decorative edges. For straight cuts, a circular saw or miter saw is invaluable.
- Clamps: Essential for holding glued pieces together while they dry, ensuring strong bonds.
- Drill & Screws (Optional but Recommended): For reinforcing joints or assembling structural elements before gluing.
Having the right tools, whether high-tech machines or simple hand tools, will make the process more efficient and enjoyable. Prioritizing safety by wearing appropriate gear is non-negotiable.
Step-by-Step Directions: Crafting Your Pallet Coffee Table
This section elaborates on the instructions from the Wise Crafts video, providing a detailed, step-by-step guide to help you build your pallet coffee table. Remember to watch the full video tutorial for visual guidance.
Step 1: Disassemble and Prepare the Pallet Boards
The first crucial step is to carefully break down your pallets into individual boards. This requires patience to avoid damaging the wood. Use a pry bar and hammer to gently separate the deck boards from the stringers. Try to pry near the nails to minimize splitting. Once disassembled, remove all nails, staples, and any other metal fasteners using a claw hammer or pliers. Inspect each board for rot, cracks, or excessive damage, setting aside only the best pieces for your project. Clean the boards thoroughly with a stiff brush and soapy water, then allow them to dry completely.
Step 2: Smooth and Dimension the Wood
Achieving a smooth, consistent surface is vital for a professional-looking finish and safe handling. This is where machines like the spiral machine (jointer/planer) and thickness machine (planer) come into play in the tutorial. These tools flatten the faces, square the edges, and bring all boards to a uniform thickness. If you don’t have these machines, dedicate significant time to sanding. Start with coarse-grit sandpaper (80-100 grit) to remove rough spots and level surfaces, then gradually move to medium (120-150 grit) and fine (180-220 grit) sandpaper with your vibrating sander (orbital sander) until the wood is smooth to the touch. This process removes splinters and prepares the wood for finishing.
Step 3: Design and Cut the Table Legs and Frame Components
Before cutting, carefully plan the dimensions and design of your coffee table legs and any internal support structures. Use your measuring tape and pencil to mark out the shapes on your prepared boards. The Wise Crafts video uses a wood milling machine to carve out elegantly shaped legs. If you’re using alternative tools, a jigsaw or band saw can cut the general profile of the legs. For simpler designs, straight cuts using a circular saw or miter saw will suffice. Cut all necessary pieces for the legs and any other frame elements that will support the tabletop and hold the glass in place. Ensure all cuts are precise for a stable assembly.
Step 4: Assemble the Base and Frame
With all pieces cut and sanded, it’s time for assembly. Apply a generous but even layer of wood glue to the joining surfaces of your coffee table legs and frame components. Carefully align and press the pieces together. Use clamps to hold them firmly in place while the glue dries. This is a critical step for structural integrity, so ensure adequate clamping pressure and allow sufficient drying time according to the glue manufacturer’s instructions. You can also reinforce joints with screws, pre-drilling pilot holes to prevent splitting the wood. Build a sturdy frame that will securely hold both the decorative rocks and the glass top.
Step 5: Finishing and Decorative Touches
Once the glue has fully cured, give the entire assembled structure a final sanding with fine-grit sandpaper to remove any dried glue squeeze-out and ensure a perfectly smooth surface. Now it’s time to apply your chosen finish, such as cellulosic varnish. Apply multiple thin coats, sanding lightly with very fine sandpaper (e.g., 220-320 grit) between coats for optimal smoothness and adhesion. Follow the product’s instructions for drying times. Once the finish is dry, arrange your colorful rocks or other decorative elements within the designated area on the table frame. Some DIYers choose to secure the rocks with a thin layer of epoxy resin for a permanent, smooth surface, while others prefer to leave them loose under the glass for easy rearrangement. Finally, carefully place the round glass top onto the finished frame, ensuring it sits securely and evenly.
Customization and Personalization Ideas
The beauty of DIY furniture lies in its potential for personalization. While the Wise Crafts tutorial provides an excellent foundation, feel free to adapt the design to perfectly suit your taste and needs:
- Finish Variations: Instead of a clear varnish, consider staining the wood to enhance its natural grain with different tones (e.g., dark walnut, weathered grey). For a more modern or vibrant look, paint the table a solid color that complements your room’s palette. You could also try a distressed finish for an antique feel.
- Alternative Inlays: If colorful rocks aren’t your style, explore other materials for the inlay under the glass. Options include polished sea glass, small pebbles, cork, mosaic tiles, bottle caps, or even a collection of vintage photographs or maps. You could also embed LED strip lights for a captivating glow.
- Leg Designs: Experiment with different leg styles. Tapered legs offer a mid-century modern vibe, while chunky, straight legs provide a more robust, rustic look. You could even add small casters to the bottom for easy mobility.
- Adding Storage: Integrate shelves beneath the tabletop for magazines, books, or remote controls. With a slightly larger design, you could even incorporate small drawers for discreet storage.
- Tabletop Alternatives: While glass offers a sleek look and highlights the inlay, you could opt for a solid wooden top, an epoxy resin river table effect, or even a metal sheet for an industrial aesthetic.
- Size and Shape: Adjust the dimensions to create a larger statement coffee table, a smaller side table, or even a unique console table for an entryway.
Placement and Aesthetic Considerations
The finished pallet coffee table, particularly with its rustic charm and unique rock inlay, offers versatile placement options and distinctive aesthetic contributions to various settings:
- Living Room: If placed in the living room, a solid paint color can significantly transform its appearance, allowing it to blend seamlessly with more conventional decor. A crisp white, charcoal grey, or even a bold accent color can elevate the raw pallet wood into a sophisticated piece. The colorful rocks will add an unexpected pop of texture and intrigue under the glass, making it a true conversation starter.
- Outdoor Patio or Deck: The natural resilience of pallet wood, especially when properly sealed, makes it an excellent choice for outdoor furniture. On a patio or deck, its rustic character will feel perfectly at home, complementing garden aesthetics and providing a sturdy surface for drinks and snacks. The “bonfire pit” resemblance noted in the original article hints at this outdoor suitability, evoking cozy evenings.
- Garage or Workshop: For a more utilitarian setting, the coffee table serves as a robust and practical surface. Its inherent durability is ideal for a space where function often trump formality.
- Game Room or Man Cave: The rugged, handcrafted feel of a pallet coffee table can add character to a casual entertainment space. The colorful rocks can even be chosen to match team colors or a specific theme.
Ultimately, the key is to envision how your customized pallet coffee table will fit into its intended environment. Its handmade quality ensures it will never be just another piece of furniture, but a unique expression of craft and sustainable living.
Maintaining Your Pallet Coffee Table
To ensure your beautiful DIY pallet coffee table remains a cherished piece for years, proper maintenance is key. Here’s how to keep it looking its best:
- Regular Cleaning: Dust the wooden surfaces regularly with a soft cloth. For spills, wipe immediately with a damp cloth and then dry thoroughly. Avoid abrasive cleaners or harsh chemicals, as these can damage the wood finish.
- Protect the Finish: Coasters are your best friend! Always use them under drinks to prevent water rings and condensation damage. Trivets should be used under hot dishes to protect the surface from heat marks.
- Care for the Glass Top: Clean the glass top with a standard glass cleaner and a microfiber cloth for a streak-free shine. Be gentle when removing and replacing the glass, especially if the rocks underneath are loose.
- Indoor vs. Outdoor: If your table is primarily for outdoor use, ensure the wood finish is specifically designed for exterior conditions, offering UV protection and moisture resistance. You may need to reapply the finish periodically to maintain its protective qualities. For indoor tables, avoid prolonged exposure to direct sunlight or extreme temperature changes, which can cause fading or warping.
- Tighten Fasteners: Periodically check any screws or bolts (if used) and tighten them as needed to maintain stability.
Conclusion: Your Next Rewarding DIY Project
Transforming old pallet boards into a functional and stylish coffee table is more than just a woodworking project; it’s an act of creativity, sustainability, and personal expression. The Wise Crafts tutorial provides a fantastic starting point, demonstrating how readily available materials can be reimagined into something truly remarkable. Whether you’re a seasoned woodworker with access to professional tools or a beginner armed with basic hand tools and a desire to learn, this project is achievable and incredibly rewarding.
From carefully disassembling pallets and meticulously sanding each board to thoughtfully assembling the frame and adding unique decorative touches like colorful rocks under a sleek glass top, every step contributes to a piece that is uniquely yours. Not only will you save money and reduce waste, but you’ll also gain immense satisfaction from crafting a beautiful, durable, and personalized coffee table that serves as a focal point in your home, patio, or garage. So, gather your supplies, embrace the DIY spirit, and embark on this inspiring journey to create a stylish, inexpensive, and truly one-of-a-kind piece of furniture.