
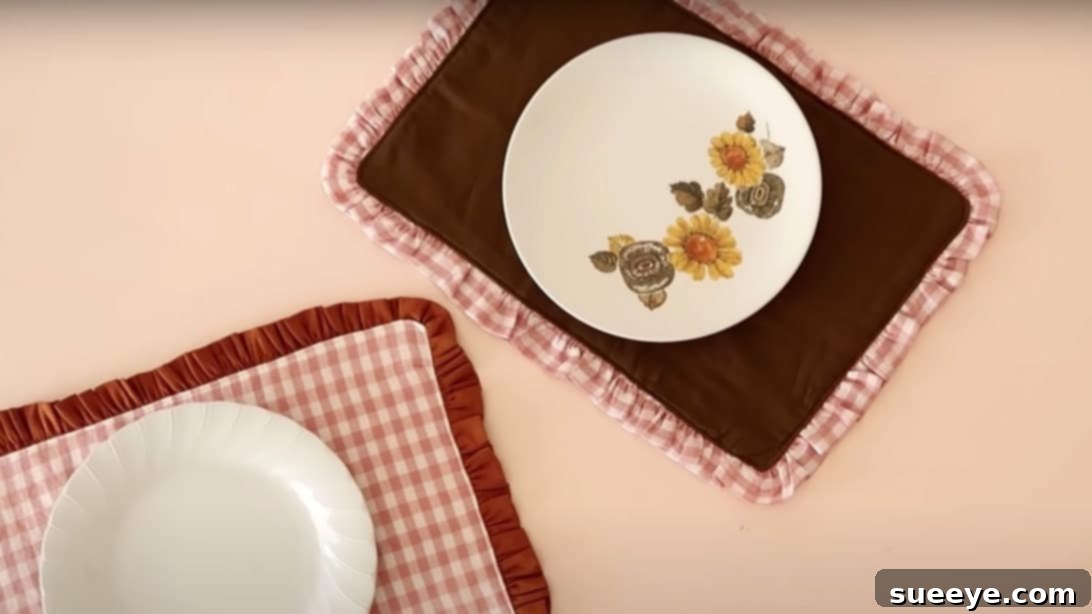
There’s an undeniable warmth and appreciation that comes with receiving a gift crafted with thought and care. While store-bought presents have their place, the very best gifts are often those made by hand, reflecting the time, effort, and affection of the giver. Imagine the delight of your loved ones unwrapping a present that speaks directly to their heart – something beautiful, personal, and incredibly practical. This easy DIY ruffled placemat sewing project, inspired by the talented Rosery Apparel, offers the perfect opportunity to create such a treasure, whether for cherished friends and family or as a lovely treat for your own home.
Placemats might seem like a simple item, but they serve as a wonderful canvas for creativity and can instantly elevate any dining experience. From protecting your table to adding a splash of color and personality, a well-made placemat is both functional and aesthetically pleasing. This particular design, featuring elegant ruffles, adds a charming touch that transforms a mundane necessity into a delightful piece of home decor. What’s more, this project is accessible for sewers of all skill levels, making it an ideal choice for beginners looking to hone their craft or experienced enthusiasts seeking a quick and satisfying make.
Beyond this delightful placemat tutorial, we highly recommend exploring the other brilliant sewing projects shared by Rosery Apparel on their video channel. Her tutorials are renowned for their clarity, ease of execution, and the unique beauty of the finished items. You’ll find a wealth of inspiration for creating more handmade wonders that are both stylish and practical, making them perfect additions to your home or thoughtful gifts for any occasion.
Why Choose a DIY Ruffled Placemat Project?
- Personalization: Select fabrics that perfectly match the recipient’s taste or your home’s decor, making each placemat truly unique.
- Cost-Effective Gifting: Sewing your own placemats can be significantly more economical than purchasing high-quality, designer versions, especially when making multiple gifts.
- Sustainable Choice: Utilize fabric scraps or choose eco-friendly materials to create a reusable item that reduces waste, aligning with a more sustainable lifestyle.
- Skill Development: This project is fantastic for beginners, offering practice in fundamental sewing techniques like cutting, straight stitching, gathering, and finishing seams.
- Unique Home Decor: Add a bespoke touch to your dining area, kitchen, or even a picnic spread with placemats that stand out from mass-produced alternatives.
- Versatile Gift: A set of handmade placemats makes an excellent gift for housewarmings, weddings, birthdays, holidays, or just because.
Materials You’ll Need for Your Charming Ruffled Placemats:
Gathering your materials is the first exciting step in any sewing adventure. For this project, you’ll need a few essential items readily available at any fabric or craft store. Choosing the right fabrics is key to both the look and durability of your placemats, so take your time to select materials that inspire you and are suitable for frequent washing.
- Main Fabric: Opt for a durable, washable fabric like quilting cotton, linen, or a cotton-linen blend. You’ll need enough to cut three pieces for each placemat. Consider pre-washing and ironing your fabric to prevent shrinkage after your project is complete.
- Contrasting/Ruffled Fabric: This fabric will form the charming ruffle around the edges. A lighter-weight cotton, voile, or even a sheer fabric can create a beautiful contrast and drape. Ensure it coordinates well with your main fabric.
- Batting Material: A thin layer of batting (like cotton or poly-blend) provides structure, heat resistance, and a bit of cushioning to your placemat. Choose a lightweight batting for a flexible finish.
- Fabric Scissors: Sharp, high-quality fabric scissors are crucial for clean, precise cuts. Avoid using these scissors for paper or other materials to keep them sharp.
- Ruler (or Quilting Ruler): A clear acrylic quilting ruler is highly recommended for accurate measuring and cutting of rectangular pieces.
- Fabric Pencil/Chalk: For marking your cutting lines on the fabric. A disappearing ink pen or tailor’s chalk also works well.
- Seam Ripper: Every sewer’s best friend! Essential for fixing mistakes and achieving a polished finish.
- Sewing Machine: A basic sewing machine with a straight stitch and zigzag stitch capability is all you need.
- Matching Thread: High-quality polyester all-purpose thread that matches your main fabric.
- Iron and Ironing Board: Pressing at each stage is vital for professional-looking results.
- Pins or Fabric Clips: To hold fabric layers in place while sewing.
Step-by-Step Directions to Sew Your Ruffled Placemat:
Follow these detailed instructions carefully to ensure your placemat turns out beautifully. Precision in cutting and pressing at each stage are the secrets to a professional finish.
Step 1: Prepare Your Fabric Pieces for the Placemat Body
Begin by cutting the foundational pieces for your placemat. For a standard-sized placemat, measure and cut one piece of batting material to 17 ¾ inches by 12 inches. This will be the inner core of your placemat, providing structure and insulation. Next, from your main fabric, cut three identical pieces, each precisely 17 ¾ inches by 12 inches. Accuracy here is paramount, so use your ruler and fabric marker to draw clear lines before cutting with sharp fabric scissors. Having three main fabric pieces allows for a neat finish on both the front and back, with an extra layer to secure the ruffle.
Step 2: Crafting the Ruffle – Creating Elegance with Fabric
The ruffle is what gives this placemat its signature charm. For the ruffle, you will need a long strip of your chosen contrasting fabric. Cut a rectangle measuring 3 inches in width by a generous 3 ½ yards (which is equivalent to 126 inches) in length. This substantial length ensures a full and luxurious ruffle. If your fabric isn’t long enough to cut a single piece, don’t worry! Simply cut several shorter 3-inch wide strips and stitch them together end-to-end (right sides together, using a ¼-inch seam allowance) until you achieve the total required length of 126 inches. Press these seams open neatly.
Once you have your long ruffle strip, bring the two short ends of the strip together, right sides facing, and stitch them with a ¼-inch seam to form a loop. Press this seam open. Now, fold the entire ruffle loop in half lengthwise, with the wrong sides together, and press firmly. This creates a neat, double-layered ruffle edge. To finish the raw edges of the folded ruffle, you have a couple of options: use an overlocker (serger) for a very clean, professional finish, or use your sewing machine with a zigzag stitch along the raw edge to prevent fraying. This step ensures durability and a polished look for your ruffle.
Step 3: Gathering the Ruffle to Fit Your Placemat
Now, it’s time to create the signature gather of the ruffle. Set your sewing machine to its longest stitch length and sew two parallel rows of gathering stitches along the entire raw, unfinished edge of your folded ruffle loop. Make sure not to backstitch at the beginning or end of these rows. Leave long thread tails. Gently pull on the two top threads from one end of the ruffle loop. As you pull, the fabric will start to gather. Distribute the gathers evenly along the entire length of the ruffle until it approximately matches the total perimeter of your main placemat fabric pieces (roughly 17.75 + 12 + 17.75 + 12 = 59.5 inches). Once gathered to the correct length, tie off the threads to secure the gathers. Carefully press the gathered ruffle with an iron to set the folds and make it easier to work with. This step is crucial for a beautifully proportioned ruffle.
Step 4: Assembling the Placemat Layers – The “Sandwich” Technique
This stage brings all your carefully prepared components together. Lay one of your main fabric pieces right side up on your work surface. On top of this, center your batting material. Now, carefully place your gathered ruffle along the outside edges of the main fabric and batting, ensuring that the raw, gathered edge of the ruffle aligns with the raw edges of the main fabric and batting. It’s important that the ruffled edge (the finished, folded part) is facing *inwards* towards the center of the placemat. This orientation ensures the ruffle will point outwards once the placemat is turned right side out. Use plenty of pins to secure the ruffle in place, especially around the corners.
Finally, take your second main fabric piece and place it on top of the entire assembly, right side down. This effectively “sandwiches” the ruffle between the two main fabric pieces, with the batting underneath. Align all raw edges perfectly. Pin all layers together securely, starting from the middle of each side and working your way outwards to ensure everything stays put. Take your time with this pinning process to prevent shifting.
Step 5: Sewing and Finishing Your Placemat
With all layers meticulously pinned, you’re ready to sew. Using a standard seam allowance (a ½-inch seam allowance is a good choice for durability), stitch all layers together around the perimeter of the rectangle. As you sew, remember to leave a small opening, approximately 4-5 inches long, unstitched along one of the longer sides of the placemat. This opening will be used to turn your placemat right side out. Reinforce the stitches at the beginning and end of your sewing, and at both ends of the opening, with a backstitch.
Once stitched, carefully trim off any excess fabric from the seam allowance, particularly at the corners. To reduce bulk and ensure crisp corners, clip the corners diagonally close to the stitching line (being careful not to cut the stitches). Now, gently turn the entire placemat right side out through the opening you left. Use a point turner or a blunt object (like a chopstick) to carefully push out the corners, making them as sharp and neat as possible.
Press the entire placemat thoroughly with an iron, paying special attention to the seams and ensuring the ruffle lies flat. Fold the raw edges of the opening inwards, aligning them with the sewn seam, and press them neatly. To close the opening and give your placemat a professional finish, you have two options: you can hand-stitch the opening closed using an invisible ladder stitch, or you can topstitch very close to the edge all the way around the entire placemat. Topstitching not only closes the opening but also provides a crisp, finished edge and helps to secure the batting and inner layers, preventing them from shifting during washing.
Step 6: The Final Touch – Refining Your Ruffle
For the absolute final touch, inspect your finished placemat. If any of the gathering stitches (the long, temporary stitches you used to gather the ruffle) are visible or peek out from beneath the topstitching, carefully use your seam ripper to remove them. This ensures a clean, professional finish, highlighting the beautiful ruffle without any distracting threads. Give your placemat one last press, and admire your handcrafted creation!
Tips for Success and Longevity:
- Pre-Wash Fabrics: Always pre-wash and dry your fabrics before cutting and sewing. This prevents shrinkage and color bleeding after your placemat is complete.
- Use a Walking Foot: If you find your fabric layers shifting, especially with the batting and ruffle, a walking foot attachment on your sewing machine can be incredibly helpful for even feeding.
- Test Stitches: Before sewing on your project, test your stitch length and tension on a scrap piece of fabric to ensure everything is set correctly.
- Press, Press, Press: Ironing at each stage of the project is non-negotiable for professional-looking results. It helps seams lie flat and gives your project a crisp finish.
- Pin Generously: Don’t be shy with pins, especially when assembling multiple layers. They are your best friend for keeping everything aligned.
Variations and Customization Ideas:
Once you’ve mastered the basic ruffled placemat, the possibilities for customization are endless:
- Different Shapes: Experiment with round, oval, or even hexagonal placemats. Just adjust your main fabric and batting cutting dimensions and the length of your ruffle accordingly.
- Quilting Stitches: Add decorative quilting stitches across the main body of the placemat for extra texture and to further secure the batting.
- Fabric Choices: Use laminated cotton for a wipeable, spill-resistant placemat, or incorporate heavier home decor fabrics for a more luxurious feel.
- Embellishments: Consider adding embroidery, appliques, or even a small fabric label with a personalized message before assembling the layers.
- Matching Sets: Extend your sewing to create matching napkin sets, table runners, or even coordinating coasters for a complete dining ensemble.
Care Instructions for Your Handmade Placemats:
To keep your beautiful ruffled placemats looking their best, machine wash them in cold water on a gentle cycle with like colors. Tumble dry on low or air dry to prevent excessive shrinkage and maintain the integrity of the fabrics and stitches. A warm iron can be used if needed to smooth out any wrinkles.
Sewing Projects as DIY Gift Ideas
Handmade sewing projects truly stand out as gifts because they carry a piece of the maker’s heart and effort. A DIY ruffled placemat is more than just a table accessory; it’s a testament to your thoughtfulness and skill. Imagine the joy of gifting a set of these charming placemats, perfectly tailored to a friend’s kitchen aesthetic or a loved one’s favorite colors. Each time they set their table, they’ll be reminded of your unique present and the love that went into its creation.
Beyond placemats, the world of sewing offers a myriad of possibilities for heartfelt, handcrafted gifts. From simple tote bags and pouches to intricate garments and decorative cushions, every stitch tells a story. Embracing DIY sewing projects allows you to create items that are not only beautiful and functional but also deeply personal and sustainable. So, unleash your creativity, choose your favorite fabrics, and embark on this rewarding journey of making with your own hands. Happy sewing, and may your handmade gifts bring immense joy and cherished memories!