
Painting is a transformative process, breathing new life into rooms, furniture, and exteriors. However, even the most enthusiastic DIYer can find certain aspects, like meticulous preparation and the inevitable clean-up, to be quite tedious and time-consuming. Imagine if you could cut down on the effort, reduce the mess, and achieve professional-looking results with significantly less hassle. What if there were clever shortcuts that could genuinely change the way you approach your next painting project? Good news! We’ve discovered four groundbreaking paint tricks, generously shared by the innovative minds at Simple Ideas, that are designed to make your painting journey smoother, faster, and more enjoyable. Say goodbye to endless rinsing and frustrating clean-up sessions. These ingenious methods promise to revolutionize your workflow, ensuring you spend less time on grunt work and more time enjoying your beautifully painted spaces.
From rapid roller cleaning to clever tools for tricky surfaces, these tips are not just about saving time; they’re about working smarter, minimizing waste, and extending the life of your valuable painting tools. Get ready to upgrade your DIY arsenal and paint like a pro, even if you’re just starting out. Let’s dive into these game-changing techniques that will make painting less of a chore and more of a pleasure.
1. Supercharge Your Roller Cleaning with a Power Drill
The Common Frustration: Inefficient Roller Cleaning
After a satisfying day of painting, the last thing anyone wants to do is spend another hour wrestling with a paint-soaked roller brush. Traditional cleaning methods often involve endless rinsing, soaking, and squeezing, which can be messy, wasteful of water, and surprisingly ineffective. Paint tends to cling tenaciously to the roller nap, especially closer to the core, making it difficult to achieve a truly clean finish. Leftover paint can harden, rendering your expensive roller covers stiff, matted, and unusable for future projects, forcing you to constantly buy new ones. This not only adds to your project costs but also contributes to unnecessary waste. The goal is to get your rollers pristine quickly, without damaging the fibers or making a huge mess.
The Ingenious Solution: Harnessing the Power of a Drill
This trick transforms the mundane task of roller cleaning into a quick and efficient process using a tool you likely already own: a power drill. The secret lies in using centrifugal force to rapidly extract paint from the roller fibers. To implement this genius hack, you’ll need a clean bucket, some water (and a little mild soap for water-based paints), and your trusty power drill. Begin by scraping off as much excess paint as possible from the roller into your paint tray. Next, securely attach the roller handle to your drill. It’s crucial that the roller is firmly seated to prevent it from flying off during operation. Prepare your bucket with just enough water to fully submerge the roller head when dipped. Carefully lower the roller into the water, ensuring it’s completely immersed. With a firm grip on the drill, activate it at a moderate speed. Watch as the drill’s rotation rapidly spins the paint out of the roller and into the water. You’ll observe the water quickly turning cloudy with paint residue.
Benefits and Best Practices
The benefits of this method are manifold. First and foremost, it’s incredibly fast, drastically cutting down cleaning time from minutes to mere seconds. Secondly, it offers a far more thorough clean than manual rinsing, dislodging paint particles from deep within the roller nap, ensuring your rollers are truly clean and ready for their next use. This extends the lifespan of your roller covers, saving you money in the long run. It’s particularly effective for water-based latex paints. For oil-based paints, you would follow the same principle but use an appropriate paint thinner or mineral spirits in the bucket first, followed by a water rinse. Always remember to wear appropriate safety goggles to protect your eyes from potential splashes, and perform this operation in an area where paint splatter won’t cause an issue, preferably outdoors or over a utility sink. After the initial spin in water, you can give it a final spin in an empty bucket to dry the roller cover almost completely, preventing mold and mildew and preparing it for storage.
2. Double Up for Efficiency: Joining Two Roller Brushes
The Challenge of Narrow and Multi-Sided Surfaces
Painting objects with multiple narrow sides, such as metal railings, wooden balusters, fence posts, pipes, or intricate moldings, can be one of the most tedious and time-consuming tasks in any painting project. Using a single roller brush requires constantly repositioning the item or yourself, carefully navigating around corners, and making multiple passes to ensure complete and even coverage on all visible sides. This often leads to inconsistent paint thickness, drips, missed spots, and considerable frustration. Brushes can be too slow, and a single roller simply isn’t designed for simultaneous two-sided application, turning a seemingly simple task into a labor-intensive ordeal.
The Smart Solution: Creating a Dual Roller System
This clever trick tackles the problem head-on by transforming two standard roller brushes into a highly efficient dual-sided painting tool. The core idea is to join two roller covers, allowing you to paint two opposing surfaces simultaneously with a single pass. This can be achieved in a couple of ways, depending on your DIY comfort level. The simplest method involves securing two small roller frames (or even just the roller covers) onto a single, custom-bent wire handle or a specially designed frame. You might take a metal rod from one roller frame, bend it to create a U-shape, and then attach two roller covers, ensuring they are parallel and spaced appropriately to fit over the item you’re painting. The goal is to create a tool that cradles the object, applying paint to both sides at once.
Unlocking Superior Speed and Coverage
The immediate advantage of this dual-roller system is a dramatic reduction in painting time. Instead of making two passes for two sides, you achieve full coverage in one fluid motion. This is particularly beneficial for projects like painting picket fences, chair spindles, or any structure with numerous narrow, symmetrical elements. Beyond speed, the dual roller helps ensure more uniform paint application on opposing sides, minimizing drips and streaks that often occur when one side dries slightly before the other is painted. This results in a cleaner, more professional finish with less effort. It’s a game-changer for repetitive tasks, reducing fatigue and improving overall project efficiency. Ensure the rollers are securely attached and maintain consistent pressure for optimal results. Experiment with different nap types to suit the surface material and paint type you are using, always prioritizing smooth, even coats.
3. DIY Roller Cleaner: The Plastic Bottle Innovation
Addressing the Messy Reality of Roller Cleaning
Even with the drill trick, the initial rinsing of a heavily paint-laden roller can still be a messy affair, often resulting in paint splatters across your workspace, hands, and clothing. The traditional method of cleaning a roller under a running faucet often leads to significant paint washing down the drain, which isn’t environmentally ideal, and it can still be difficult to flush out all the paint from the roller’s interior. Furthermore, repeatedly pressing and squeezing the roller can damage its core or fibers, shortening its useful life. There’s a need for a contained, efficient, and less messy way to thoroughly clean roller brushes without damaging them or making a huge mess.
The Smart Design: A Custom Bottle Cleaning Tool
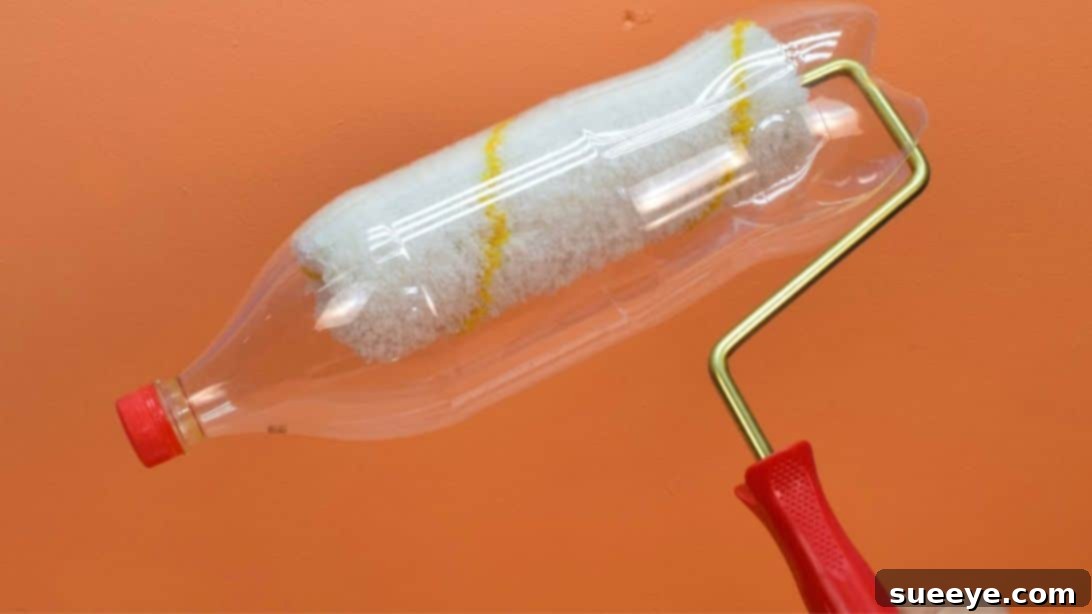
This ingenious trick utilizes an ordinary plastic bottle to create a specialized, mess-free roller cleaning device. The design is simple yet highly effective. Start with a sturdy plastic bottle (a 2-liter soda bottle works well). Carefully remove the curved bottom section of the bottle using a sharp utility blade – always exercise extreme caution and wear protective gloves. Next, drill a small hole precisely in the center of the bottle’s flat, cut-off bottom. This hole will be for water drainage. A few inches above the bottom, cut a small, horizontal slit on one side of the bottle, large enough to slide the roller handle through. From this slit, extend a straight cut down to the newly formed bottom edge of the bottle. This opening will allow you to easily insert and remove the roller brush. Once the roller is inside, secure it, ensuring the cut bottom of the bottle rests on the end of the roller frame. Mark the exact ends of the roller brush on the plastic bottle, then connect these marks with a straight cut line along the bottle’s length. This final cut line is where you’ll insert a pressure water hose. The bottle now acts as a sealed chamber, allowing you to direct a powerful stream of water directly through the roller, flushing paint out without any external splatter.
Efficiency, Cleanliness, and Tool Preservation
The primary benefit of this DIY bottle cleaner is its unparalleled ability to clean roller brushes without splattering paint everywhere. The bottle acts as a contained wash chamber, directing all the paint-infused water out through the bottom hole. This not only keeps your cleaning area tidy but also concentrates the paint sludge for easier disposal, making it more environmentally responsible. The direct water pressure method ensures a thorough clean, flushing paint from the deepest fibers of the roller cover, extending its life and maintaining its performance for future projects. It’s also incredibly water-efficient compared to letting a faucet run continuously. This homemade tool is perfect for cleaning rollers on-site, especially for smaller projects or touch-ups where a full bucket and drill setup might be overkill. It demonstrates how simple, everyday items can be repurposed into highly effective painting accessories, promoting resourcefulness and reducing the need for specialized cleaning gadgets.
4. Maximize Coverage: The Welded Wide-Area Paint Roller
The Labor of Large-Scale Painting
Tackling expansive surfaces like large walls, ceilings, or exterior siding with a standard 9-inch roller can be a daunting and time-consuming task. Each pass covers a relatively small area, requiring numerous repetitions to achieve full coverage. This leads to increased painting time, potential for lap marks where paint layers overlap unevenly, and significant physical strain, especially when painting overhead. The continuous back-and-forth motion with a narrow roller can quickly lead to fatigue, making large-scale projects feel like an endless chore. Professional painters often use wider rollers, but these can be expensive or not readily available to the average DIYer.
The Pro-Level DIY: Constructing a Wide-Area Roller
This advanced trick allows you to create a custom, extra-wide paint roller that dramatically increases your coverage per pass, effectively transforming large painting projects. The principle involves combining the frames of multiple standard roller brushes to create one much wider frame. This technique usually requires some basic metalworking skills, specifically welding. Begin by carefully cutting the straight metal rods (the axle part) from a couple of roller frames. These rods will form the basis of your new, extended frame. Next, strategically weld these cut rods together, creating a single, elongated frame that can accommodate two or more roller covers side-by-side. Once the welding is complete and sturdy, the handle portion of one of the original frames can be straightened and welded onto your newly extended frame, ensuring ergonomic use. After the frame has cooled and is structurally sound, you can then attach your chosen roller covers. The result is a robust, custom-built roller designed for maximum efficiency on vast surfaces.
Unleashing Unprecedented Painting Speed and Quality
The most significant advantage of a welded wide-area paint roller is the colossal increase in painting speed. You can cover substantially more surface area with each stroke, drastically reducing the overall time required for large projects. This efficiency is invaluable for painting entire rooms, basements, commercial spaces, or large exterior surfaces. Beyond speed, a wider roller helps achieve more uniform coverage and minimizes lap marks, which are streaks caused by applying new paint over semi-dry paint. With fewer passes, the paint layers remain wet longer, blending seamlessly for a smoother, more professional-looking finish. While this trick requires more specialized tools and skills (like welding), the investment in time and effort pays off exponentially on large-scale painting endeavors. For those without welding capabilities, commercial extra-wide roller frames are available, but this DIY method offers a custom, cost-effective alternative for the experienced handyman. Always ensure your paint tray is wide enough to accommodate your new super-roller for proper paint loading.
4 Paint Tricks That Will Change The Way You Paint
Painting doesn’t have to be a daunting task filled with endless hours of cleaning and frustrating inefficiencies. By embracing these four innovative tricks from Simple Ideas, you can transform your approach to any painting project, big or small. From leveraging the power of a drill for lightning-fast roller cleaning to ingeniously crafting tools that tackle tricky surfaces and vast expanses, these methods empower you to work smarter, not harder.
These hacks promise not only to save you valuable time and effort but also to help you achieve cleaner, more professional results, all while extending the life of your painting equipment. Whether you’re a seasoned DIY enthusiast or just embarking on your first home improvement venture, incorporating these simple yet powerful techniques will undoubtedly enhance your painting experience. So, grab your brushes, rollers, and perhaps a drill or a plastic bottle, and get ready to paint with unprecedented efficiency and confidence. Happy painting!