
Transform Your Home: 3 Enchanting DIY Rustic Decor Ideas Using Dry Branches
Embrace the charm of rustic farmhouse style and infuse your living space with warmth and natural beauty. Crafting your own home decor doesn’t have to be complicated or expensive; in fact, some of the most beautiful pieces can be made from readily available materials like dry branches. These simple, sustainable elements offer endless possibilities for creativity, allowing you to personalize your home with unique touches that reflect your style.
This guide will walk you through three delightful DIY rustic decoration projects, perfect for adding that organic, handcrafted feel to any room. Whether you’re looking to create a cozy nook for your plants, a whimsical display for a shelf, or a magical accent for your wall, these ideas are designed to inspire and delight. All you need is a little imagination, some basic tools, and a willingness to explore the potential of nature’s bounty. We’re drawing inspiration from the talented creators at Handmade! on YouTube, whose video provides a fantastic visual guide to get you started on your crafting journey. Let’s dive in and create some charming decor pieces for your home!
1. Craft a Charming Farmhouse Plant Box
Elevate your indoor greenery with a rustic plant box that beautifully combines natural elements with practical design. This DIY project is not only easy to construct but also adds a touch of countryside elegance to your plant display. It’s an ideal way to upcycle plastic containers and give your plants a more organic, earthy home.
Materials You’ll Need:
- A sturdy plastic box (ensure it’s clean and free of cracks, as it will hold your plant and soil)
- A collection of dry branches (aim for relatively straight branches of uniform thickness for a cleaner look)
- A reliable glue gun with plenty of glue sticks (for strong and instant adhesion)
- Natural cord, yarn, or jute twine (for decorative wraps and added stability)
- A saw or sharp pruning shears (for cutting branches to precise lengths)
- Measuring tape or ruler
Step-by-Step Instructions:
- Prepare the Base Frame: Begin by selecting four branches that are relatively straight. Measure the length of the longest sides of your plastic box. Using your saw or pruning shears, carefully cut two branches to this exact length. These will form the long sides of your plant box frame. Next, measure the shorter sides of your plastic box and cut two more branches to that dimension.
- Assemble the Bottom Rectangle: Arrange these four cut branches to form a rectangle, matching the perimeter of your plastic box. Apply a generous amount of hot glue to the ends of the branches where they meet, firmly pressing them together to form a strong rectangular frame. Ensure the corners are square for the best aesthetic.
- Create the Top Frame: Repeat the process from Step 1 and 2 to create an identical rectangular frame. This will form the top structure of your plant box. Having two identical frames ensures symmetry and a balanced look for your finished piece.
- Determine Vertical Support Lengths: Now, measure the exact height of your plastic box. It’s crucial to account for the thickness of the branches you used for the top and bottom frames. Subtract the combined thickness of one top branch and one bottom branch from your total plastic box height to determine the precise length needed for your vertical support branches. Cut four pieces of dry branches to this calculated length. These will connect your top and bottom frames.
- Construct the “Cage” Structure: Carefully position one of your rectangular frames flat. Apply hot glue to each corner and attach one of the four vertical support branches upright into each corner. Once all four vertical supports are in place and stable, apply glue to the top ends of these supports and gently place the second rectangular frame on top, aligning its corners with the vertical branches. Hold firmly until the glue sets, creating a robust, cage-like structure.
- Reinforce and Decorate with Twine: For both aesthetic appeal and enhanced stability, wrap jute twine or your chosen cord tightly around each of the eight intersections where branches meet (the four corners of the top frame and the four corners of the bottom frame). Secure the ends of the twine with a small dab of hot glue. This step adds a charming rustic detail while making the structure more durable.
- Final Placement: Once your branch frame is completely assembled and sturdy, carefully place your plastic box (containing your potted plant) inside the dry branch structure. The branches should snugly encompass the plastic box, creating a beautiful, naturalistic planter that instantly upgrades your plant display.
This farmhouse plant box isn’t just a functional item; it’s a statement piece. It brings an element of the outdoors in, perfect for window sills, side tables, or even as a centerpiece. Experiment with different types of branches, from smooth and uniform to gnarled and textured, to achieve varied aesthetic effects.
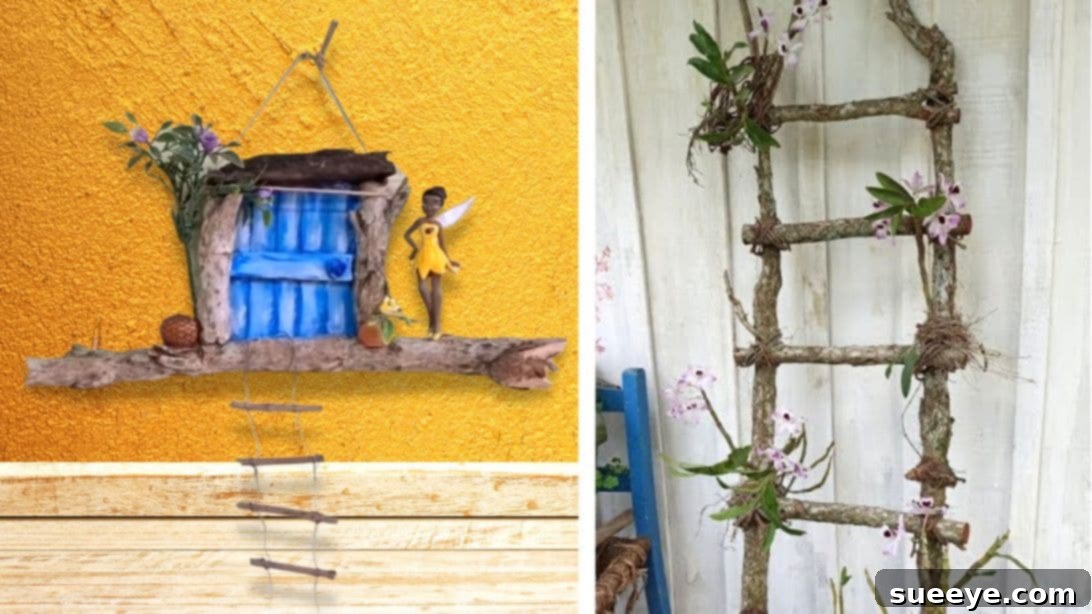
2. Craft an Enchanting Rustic Stair Decoration
Infuse a touch of whimsical natural beauty into your home with a unique decorative stair piece. This project doesn’t involve actual load-bearing stairs, but rather the creation of a miniature, artistic stair structure made entirely from branches, perfect for displaying small plants, figures, or other decorative items. It’s an imaginative way to bring a sense of vertical interest and rustic charm to any corner.
Materials You’ll Need:
- Several large, sturdy dry branches (these will form the main frame and steps of your decorative stair)
- A quantity of softer, more flexible dry branches or thin twigs (for decorative wrapping and accents)
- A hand saw or a sturdy utility knife (for cutting and shaping the larger branches)
- A hammer and small finishing nails (to secure the stair treads to the frame)
- A strong wood glue (optional, for extra reinforcement)
- Artificial orchids or other small fake plants, moss, or decorative elements (for embellishment)
- Safety gloves and eye protection (essential when working with tools)
Step-by-Step Instructions:
- Select and Prepare Main Branches: Choose two long, relatively straight and sturdy dry branches that will serve as the side supports (the “stringers”) of your decorative stair. These should be strong enough to hold the steps. Clean them thoroughly, removing any loose bark or debris.
- Cut the Stair Steps: From your collection of large dry branches, cut several shorter pieces to act as the stair treads. The number and length of these pieces will depend on how many steps you want and the desired width of your decorative stair. Aim for consistent lengths for a uniform look.
- Assemble the Stair Structure: Lay your two long side support branches parallel on a flat surface, spaced apart by the length of your step pieces. Carefully position your cut step pieces across the side supports at desired intervals, mimicking the rise and run of a small stair. For each step, use small finishing nails and a hammer to securely fasten the step branch to the side support branches. You may want to pre-drill pilot holes for the nails to prevent splitting the branches, especially if they are brittle. For added strength, you can apply a dab of wood glue before nailing.
- Reinforce and Decorate Corners: Once the main stair structure is stable, take your softer, more flexible dry branches or thin twigs. Begin to artistically wrap these around the points where the step branches meet the side support branches. This not only adds a beautiful, organic texture and rustic feel but also helps to further conceal any nails and reinforce the joints. Secure the ends of these wrapping branches with small dabs of wood glue or by tucking them tightly.
- Embellish with Greenery: Now comes the fun part – decorating! Carefully place your artificial orchids, small fake plants, or patches of decorative moss onto the steps and around the base of your rustic stair. You can secure them with small drops of hot glue if needed. Consider adding miniature figurines, tiny lanterns, or fairy lights to enhance its magical appeal.
- Display Your Creation: Your rustic stair decoration is now complete! It makes a stunning centerpiece on a mantelpiece, a charming accent on a bookshelf, or a unique display in an entryway corner. Its natural aesthetic complements a wide range of decor styles, from farmhouse to bohemian.
This rustic stair decoration is more than just a craft; it’s a conversation starter. It invites curiosity and adds an element of handcrafted elegance to your interior design. Experiment with different types of branches for varied textures and colors, ensuring your piece is truly one-of-a-kind.
3. Design a Whimsical Fairy House Wall Decor
Bring a touch of enchantment and childlike wonder to your walls with a delightful fairy house decoration crafted from natural materials. This intricate project allows for immense creativity, transforming humble branches and cardboard into a charming miniature dwelling that sparks imagination and adds a unique focal point to any room.
Materials You’ll Need:
- Sturdy cardboard (e.g., from an old box, for the base and structure)
- A ruler and a pen or pencil (for precise measurements and marking)
- Flexible crafting wire (thin gauge, for structural elements like the stairs)
- A variety of thin and thick dry branches (for walls, roof accents, and stairs – collect different sizes for visual interest)
- Scrap wood pieces (for the roof, adding texture and dimension)
- Strong wood glue or hot glue gun (essential for assembly)
- Acrylic paints in your desired colors (for the door and other details)
- Small decorative stones or pebbles (for doorknobs and pathway details)
- Tiny fake plants, moss, or dried flowers (for landscaping and garden elements)
- A small fairy doll or miniature figurine (the star of your fairy house!)
- Sharp craft knife or box cutter (for cutting cardboard)
Step-by-Step Instructions:
- Create the Cardboard Base: Begin by cutting a square piece of cardboard, approximately 4×4 inches, which will serve as the foundation for your fairy house. This size can be adjusted based on how large you want your final piece to be.
- Design the Wall Structure: On your cardboard square, draw six evenly spaced vertical lines. These lines will help guide the placement of your “walls.” Next, cut a small rectangular piece of cardboard and glue it perpendicularly in the middle of your drawn lines. This piece acts as a central support and divider.
- Build the Branch Framework: Select two pieces of thick dry branches that are the same length as your cardboard square. Glue these branches vertically on either side of the central rectangular cardboard piece, aligning them with two of your drawn lines. These form the main side walls of your fairy house.
- Construct the Roof: Take a small piece of scrap wood – this could be a flat piece or even a small, thin branch cut lengthwise – and glue it across the top of your two vertical branches and the central cardboard, creating a sturdy roof. You can add more thin branches or moss to the roof later for a thatched effect.
- Craft the Whimsical Stairs: This step adds a magical touch. Take a long, thin but sturdy branch. Wrap the ends of two pieces of flexible wire around this long branch, securing them tightly. Using thin branches or twigs, create a series of miniature steps, attaching them to the wire in an ascending fashion. Once your stairs are complete, glue the entire stair structure to the bottom edge of your cardboard base, extending downwards as if leading up to the fairy’s door.
- Add the Door Details: For the fairy door, choose a flat area on your cardboard structure. You can either cut out a door shape from cardboard or use a flat piece of thin branch. Glue a small stone or pebble in the center of the door to serve as the doorknob. This adds a charming, rustic detail.
- Paint and Personalize: Now, it’s time to bring your fairy house to life with color! Paint the door in your desired shade – perhaps a vibrant green, a deep blue, or a classic natural wood tone. You can also paint other details on the cardboard or branches to add further artistic flair.
- Decorate the Landscape: Surround your fairy house with a miniature landscape. Glue small fake plants, patches of moss, or tiny dried flowers around the base, on the stairs, and even on the roof. Create a whimsical garden scene that complements the house.
- Place Your Fairy: Finally, position your fairy doll or miniature figurine near the door, on the steps, or peeking from behind a plant. This completes the magical scene and invites viewers into the enchanting world you’ve created.
This fairy house wall decor is not just a decoration; it’s a piece of art that tells a story. It’s a fantastic project for adults and children alike, fostering creativity and adding a touch of magic to a bedroom, playroom, or even a cozy living area. Customize it with different colors, textures, and miniature details to make it uniquely yours.
Embrace the Beauty of Sustainable DIY Decor
These three projects demonstrate how easily you can transform simple, natural materials like dry branches into stunning home decorations. Beyond their aesthetic appeal, choosing to craft with dry branches offers several significant benefits:
- Sustainability: By using fallen branches, you’re upcycling natural waste and reducing the demand for new manufactured decor items, making your home decor eco-friendlier.
- Cost-Effectiveness: Dry branches are often free and abundant, making these DIY projects incredibly budget-friendly.
- Uniqueness: Each branch is distinct, ensuring that every piece of decor you create is truly one-of-a-kind, adding personality and character that mass-produced items simply can’t replicate.
- Connection to Nature: Bringing natural elements into your home can create a calming and harmonious environment, fostering a deeper connection to the outdoors.
- Personal Satisfaction: There’s immense joy and pride in creating something beautiful with your own hands, knowing it adds a personal touch to your living space.
Tips for Sourcing and Preparing Your Branches:
- Responsible Foraging: Always collect fallen branches from the ground. Avoid cutting living branches from trees, as this can harm the tree. If you’re collecting from public land, check local regulations.
- Cleaning: Before use, clean your branches thoroughly. Brush off any loose dirt, moss, or insects. For a deeper clean, you can wipe them down with a damp cloth and a mild soap solution, then allow them to air dry completely.
- Drying: Ensure branches are fully dry before crafting to prevent mold or cracking. If you collect fresh branches, let them dry in a well-ventilated area for several weeks.
- Safety First: When using tools like saws, hammers, or glue guns, always prioritize safety. Wear protective gloves and eyewear, and ensure you’re working in a well-lit, stable environment.
We hope these DIY rustic decoration ideas have ignited your creative spark. From the practical charm of a farmhouse plant box to the whimsical allure of a fairy house, these projects invite you to explore the beauty of natural materials and the satisfaction of handmade decor. So, gather your branches, unleash your creativity, and start transforming your home into a cozy, unique, and truly personal sanctuary. Happy crafting!