
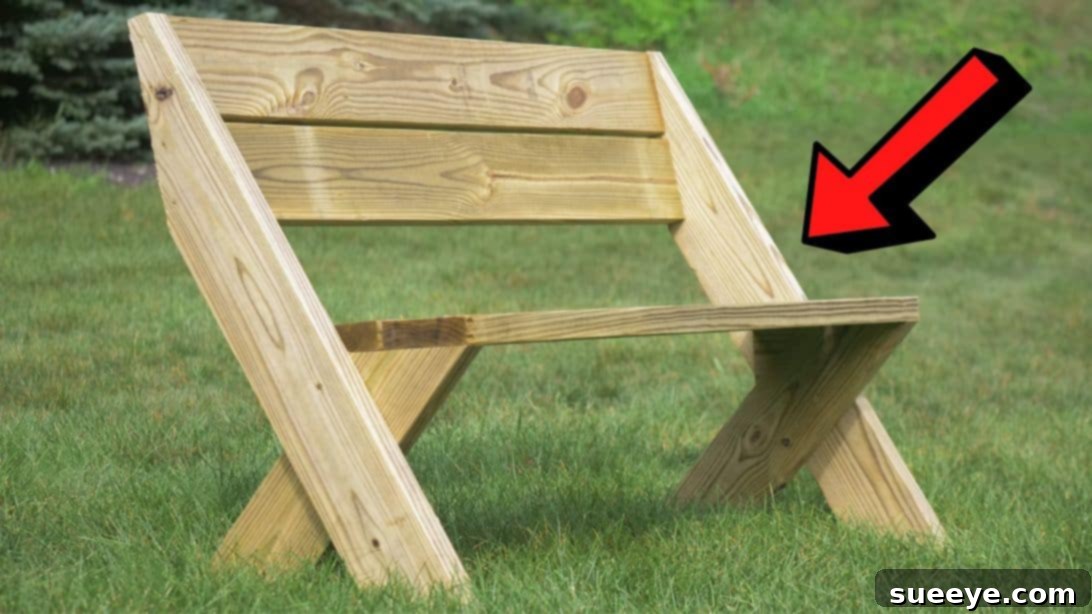
Build a Robust 2×6 Outdoor Bench in 30 Minutes: A Beginner-Friendly DIY Guide
Transforming ordinary lumber into functional and beautiful outdoor furniture is a deeply satisfying endeavor, and this project offers an incredibly accessible entry point. If you have a few 2×6 pieces of pressure-treated lumber gathering dust in your garage or workshop, then you’re just a few simple steps away from crafting a durable and stylish outdoor bench. This exceptional DIY project, inspired by the innovative design from Rogue Engineer on YouTube, demonstrates how to construct a remarkably sturdy and comfortable bench in a surprisingly short amount of time – potentially as little as 30 minutes for experienced builders, though beginners should allow a little extra time to ensure precision and safety.
What makes this bench truly stand out isn’t just its rapid construction but also its impressive strength and inviting aesthetic. It’s designed to withstand the elements while providing a comfortable spot to relax in your garden, patio, or backyard. One of the greatest advantages of this particular project is its simplicity. The instructions are straightforward and easy to follow, making it an ideal choice even if you’re new to woodworking. You won’t need an elaborate workshop or a vast collection of specialized tools; just a few basic items are sufficient to bring this project to life. Dive into the details below, and consider watching the accompanying video tutorial for visual guidance, ensuring a smooth and successful build from start to finish. Get ready to enjoy the pride of creating a beautiful and practical piece of outdoor furniture with your own hands!
Why Choose This DIY 2×6 Outdoor Bench Project?
In an era of mass-produced furniture, the appeal of a handmade item is stronger than ever. This DIY 2×6 outdoor bench project offers a multitude of benefits that extend beyond simply acquiring a new piece of seating:
- Cost-Effective: Utilizing standard 2×6 lumber, which is often readily available and affordable, significantly reduces the overall cost compared to purchasing a pre-built bench of similar quality and durability.
- Durability and Strength: Constructed from sturdy 2×6 lumber, especially pressure-treated, this bench is designed to be incredibly robust. It can easily withstand daily use and the rigors of outdoor weather conditions, providing years of reliable service.
- Quick Assembly: The “30-minute” promise is a testament to the efficient design. While individual times may vary, the project is structured for rapid assembly, making it perfect for those who want a quick win or have limited time.
- Beginner-Friendly: The simplicity of the cuts and assembly steps makes this an excellent project for novice woodworkers. It’s a fantastic way to gain confidence with basic tools and techniques without feeling overwhelmed.
- Customizable: While the core design is simple, it offers ample opportunity for personalization. You can easily adjust the length to fit your space, choose specific finishes, or even add embellishments to match your outdoor decor.
- Satisfaction of Creation: There’s immense pride in sitting on a piece of furniture you built yourself. This project delivers that satisfaction, giving you a tangible result of your efforts.
Essential Tools You’ll Need
One of the beauties of this project is its minimal tool requirement. You likely already own many of these items, or they are easily accessible at any hardware store:
- Drill or Screwdriver: Essential for driving screws and securing components. A cordless drill will make the process much faster and easier.
- Miter Saw (Optional but Recommended): While technically optional, a miter saw offers unparalleled precision for making accurate cross-cuts and especially for the angled cuts required for the bench back and legs. It significantly speeds up the cutting process and ensures professional-looking joints.
- Circular Saw: A versatile and powerful tool suitable for making straight cuts. If you don’t have a miter saw, a circular saw with a speed square or a straight edge guide can achieve the necessary cuts, though it might require a bit more careful setup.
- Speed Square: An invaluable tool for marking straight lines and accurate angles (like 45-degree cuts). It helps ensure your cuts are precise and your assembly is square.
- Tape Measure: Absolutely crucial for accurate measurements. Remember the woodworking adage: “Measure twice, cut once.”
- Pencil: For marking cut lines and pilot holes.
- Safety Glasses: Non-negotiable! Always protect your eyes when operating power tools or handling wood.
- Hearing Protection: Recommended when using saws for extended periods.
Materials List for Your Outdoor Bench
The core of this project relies on readily available lumber. Here’s what you’ll need to gather:
- 4 pieces of 2x6x8 Pressure-Treated Lumber: Pressure-treated lumber is highly recommended for outdoor projects as it’s chemically treated to resist rot, decay, and insect infestation, ensuring your bench lasts for many years. If you plan to paint or seal the bench immediately after construction, you can opt for untreated lumber, but be sure to apply a high-quality exterior finish for protection.
- 2 pieces of 2½-inch or 3-inch Exterior Wood Screws (ACQ Rated): It’s critical to use exterior-grade screws, especially those rated for ACQ (Alkaline Copper Quaternary) lumber. ACQ-treated wood can be corrosive to standard fasteners, so these specialized screws prevent premature corrosion and ensure a strong, lasting connection.
- Detailed Plan: While this guide provides an overview, a precise cutting and assembly plan is invaluable. Click here to access the detailed plan from Rogue Engineer, which will provide exact measurements, angles, and a visual breakdown of each component. This plan is your blueprint for success.
Step-by-Step Directions: Building Your 2×6 Outdoor Bench
With your tools and materials ready, it’s time to bring your outdoor bench to life. Always refer to the detailed plan from Rogue Engineer for specific measurements and diagrams as you follow these steps:
Step 1: Preparation and Accurate Cutting
The foundation of a sturdy bench lies in precise cuts. Before you begin cutting, take the time to organize your workspace, ensuring it’s clear and safe. Don a pair of safety glasses and any other personal protective equipment.
- Read the Plan: Thoroughly review the Rogue Engineer plan. Familiarize yourself with all the component names, dimensions, and necessary angles.
- Measure and Mark: Using your tape measure and pencil, carefully mark all the cutting lines on your 2×6 lumber. Double-check every measurement before making a mark. This project will involve various pieces for the legs, seat supports, seat slats, and backrest components.
- Execute Cuts:
- Straight Cuts: Use your circular saw or miter saw to cut the lumber to the exact lengths specified in the plan. These will typically be for the main seat slats and cross supports.
- Angled Cuts: The bench design often incorporates angled cuts, particularly for the back legs and potentially for the backrest support to ensure a comfortable recline. A miter saw excels at these. If using a circular saw, carefully set your speed square to the correct angle and use it as a guide.
- Taper for Back Legs: The plan specifies cutting a taper at the top of the back of the leg. This detail is crucial for the aesthetic and structural integrity, often creating a cleaner line where the backrest meets the leg. Follow the plan’s diagram for this specific cut.
- Smooth Edges: After cutting, quickly inspect all cut edges. A light sanding can remove any splinters or rough spots, making the subsequent assembly easier and safer.
Step 2: Assembling the Leg Structures
The legs are the backbone of your bench’s stability. You’ll typically construct two mirror-image leg assemblies.
- Layout Components: Arrange the pre-cut leg pieces on a flat surface according to the plan. This typically involves connecting a vertical leg piece with a horizontal support piece and potentially a diagonal brace.
- Pre-Drill Pilot Holes: To prevent the wood from splitting, especially when working close to edges, always pre-drill pilot holes for your screws. Use a drill bit that is slightly smaller than the shank of your exterior wood screws.
- Secure with Screws: Using your drill, drive the 2½-inch or 3-inch ACQ-rated exterior screws through the pilot holes to firmly join the leg components. Ensure all connections are tight and square. Repeat this process for the second leg assembly, making sure it mirrors the first.
Step 3: Attaching the Main Supports and Seat
With the leg assemblies built, you’ll connect them with the main cross supports and begin forming the seating surface.
- Connect Leg Assemblies: Position the two leg assemblies upright and parallel to each other. Attach the main front and back seat support beams between them, ensuring they are flush and square. These beams dictate the overall length of your bench. Again, pre-drill and secure with screws.
- Install Seat Slats: Starting from either the front or back, begin laying down the pre-cut seat slats. Evenly space them according to the plan’s recommendations. Proper spacing allows for water drainage and prevents wood expansion issues. Secure each slat to the underlying supports with two screws per connection point (e.g., two screws into the front support, two into the back support for each slat).
Step 4: Installing the Backrest
The backrest provides comfort and completes the bench’s design.
- Position Backrest Supports: The angled pieces you cut for the back legs or dedicated backrest supports will now come into play. Attach these to the rear of the bench, ensuring they are securely fastened and provide the correct angle for the backrest slats.
- Attach Backrest Slats: Lay the pre-cut backrest slats horizontally across the backrest supports. Maintain consistent spacing, similar to the seat slats. Secure each slat with exterior screws, ensuring they are firmly attached and provide a comfortable back angle.
And just like that, with careful measurement, cutting, and assembly, your outdoor bench is complete!
Finishing Touches and Longevity for Your Outdoor Bench
While your bench is structurally complete, applying a finish is crucial for its longevity and aesthetic appeal, especially if you used untreated lumber or want to enhance the look of pressure-treated wood.
- Sanding: Even with careful cutting, wood can have rough spots. A quick sanding (using 80-120 grit sandpaper initially, then moving to 150-220 grit for a smoother finish) will improve comfort and prepare the surface for finishing. Pay special attention to edges and areas where skin will come into contact.
- Cleaning: Before applying any finish, wipe down the entire bench to remove sawdust, dirt, and any manufacturing residues. A damp cloth followed by a dry one usually suffices.
- Staining: If you desire to change the wood’s color or enhance its natural grain, an exterior wood stain is an excellent choice. Choose a stain that offers UV protection to prevent fading in the sun.
- Painting: For a more vibrant or custom look, exterior paint designed for wood can be applied. Ensure you use an outdoor primer first for best adhesion and durability, especially on pressure-treated wood.
- Sealing/Weatherproofing: Even pressure-treated lumber benefits from a good quality exterior wood sealer or clear coat. This adds an extra layer of protection against moisture, UV rays, and general wear and tear, prolonging the life of your bench and keeping it looking fresh. Apply according to manufacturer directions.
Maintenance Tips:
- Regular Cleaning: Periodically clean your bench with mild soap and water to remove dirt, pollen, and mildew.
- Re-apply Finish: Depending on your local climate and the type of finish used, you may need to re-apply stain or sealer every 1-3 years to maintain protection.
- Seasonal Storage (Optional): If possible, storing your bench in a sheltered area during harsh winter months can significantly extend its lifespan.
Customization Ideas
This basic 2×6 bench design is a fantastic canvas for your creativity:
- Length Adjustment: Easily modify the length of the seat and backrest slats to create a longer communal bench or a shorter, more intimate one.
- Armrests: Integrate simple armrests by adding vertical 2×6 pieces at the ends, extending from the seat.
- Cushions: Add outdoor cushions for enhanced comfort and a pop of color that complements your existing patio decor.
- Decorative Elements: Experiment with different paint colors, stenciled patterns, or even carve a personalized design into the backrest.
Conclusion: Enjoy Your Handcrafted Outdoor Oasis
You’ve just completed a rewarding DIY project that yields a practical, durable, and attractive piece of outdoor furniture. This 2×6 outdoor bench, a testament to clever design by Rogue Engineer, proves that quality woodworking doesn’t have to be complicated or time-consuming. Whether you built it in 30 minutes or took a more leisurely pace, the satisfaction of creating something functional with your own hands is truly unparalleled.
This project is perfect for enhancing your garden, patio, or front porch, providing a welcoming spot for relaxation or social gatherings. Now, all that’s left is to find the perfect spot, perhaps add a cozy cushion, and enjoy the fruits of your labor. Don’t hesitate to share your finished project with friends and family, and inspire them to embark on their own DIY adventures. Happy building!
*Thanks to Rogue Engineer via YouTube for the inspiring project and all images used here. If you enjoyed this DIY idea, we highly recommend visiting his channel and subscribing for more innovative and achievable woodworking tutorials!