
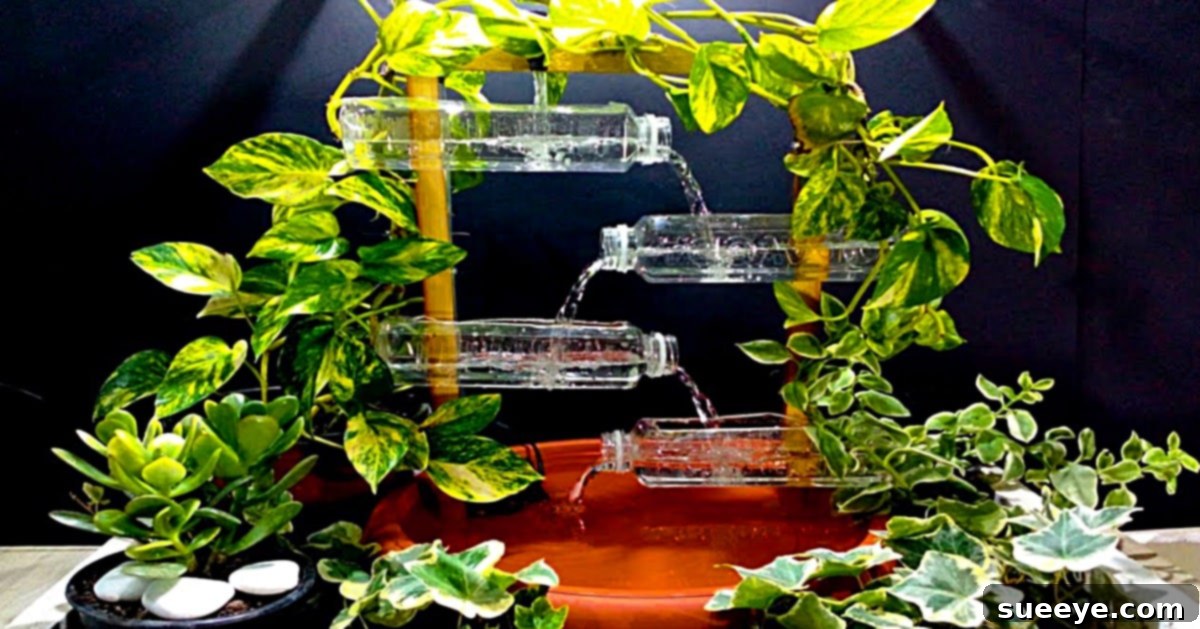
Transform Your Space: A DIY Terra Cotta Plastic Bottle Water Fountain Guide
There’s something uniquely captivating about the gentle trickle of a water fountain. The soothing sounds and visual appeal can transform any outdoor space, turning a simple porch or garden into a tranquil oasis. Recently, I had the pleasure of visiting an old friend whose home boasted one of the most remarkable fountains I’d ever seen. Nestled on her porch, it exuded a charm that immediately drew me in. When I inquired about its origins, expecting a tale of exotic imports or custom craftsmanship, her answer completely floored me: “I made it myself!”
My jaw dropped. A fountain maker? She burst into laughter, quickly clarifying that she was far from a professional. Instead, she pulled out her phone and revealed the secret: a simple, brilliant YouTube video detailing how to construct this very fountain using readily available, recycled materials. The idea was so ingenious and accessible that I couldn’t wait to rush home and start my own project. The moment my car hit the driveway, I was already gathering materials, sifting through old storage in my garage. To my delight, everything needed for this incredible plastic bottle water fountain project was straightforward and easily found.
This DIY terra cotta plastic bottle fountain isn’t just an attractive addition; it’s a testament to creativity and sustainability. It transforms discarded plastic into a beautiful, functional art piece, offering a calming ambiance without breaking the bank. If you’re looking for an eco-friendly, rewarding craft that brings peace and beauty to your home, you’ve come to the right place. Let’s dive into how you can create your very own recycled water feature.
Why Create a DIY Plastic Bottle Fountain?
Beyond the simple joy of crafting, building your own water fountain from recycled plastic bottles offers a multitude of benefits:
- Eco-Friendly & Sustainable: This project is a fantastic example of upcycling. Instead of contributing to landfill waste, you’re giving plastic bottles a new, beautiful purpose. It’s a small step towards a more sustainable lifestyle.
- Cost-Effective: Compared to purchasing a pre-made fountain, which can be quite expensive, a DIY version using recycled materials dramatically cuts down costs. Most items can be found around your home or purchased affordably.
- Therapeutic & Relaxing: The gentle sound of trickling water is scientifically proven to reduce stress and promote relaxation. Having a fountain nearby can create a serene atmosphere perfect for unwinding after a long day.
- Customizable Design: While we provide a specific design, the beauty of DIY is the ability to personalize it. You can choose different bottle types, colors, and decorative elements to match your unique style and existing decor.
- Sense of Accomplishment: There’s immense satisfaction in creating something beautiful and functional with your own hands. This project is accessible even for beginners, providing a rewarding crafting experience.
- Enhances Outdoor Appeal: A water feature instantly elevates the aesthetic of any patio, balcony, or garden. It adds a focal point and an element of natural beauty.
Materials You’ll Need for Your Upcycled Water Feature
The beauty of this project lies in its simplicity and the accessibility of its materials. Most items are likely already in your home or easily found at a local craft or hardware store. Here’s what you’ll need to gather:
- 4 Square-Shaped Water Bottles: Brands like Fiji water bottles are ideal due to their sturdy, square shape, which makes stacking and gluing much easier. Their consistent size ensures a stable structure.
- 1 Terracotta Plant Tray: This will serve as the reservoir for your fountain, collecting the water and housing the pump. A standard size, about 10-12 inches in diameter, usually works well, but choose one that accommodates your bottle structure.
- 2 Pieces of Wood (small blocks or dowels): These pieces will be used to create support or spacing within your fountain structure, ensuring proper water flow and stability. Dimensions will depend on your specific design, but typically small blocks around 1″x1″x2″ or similar are sufficient.
- A Hot Glue Gun: An essential tool for creating strong, waterproof seals between your plastic components.
- Plenty of Glue Sticks: You’ll need more than you think to ensure all connections are secure and watertight.
- 1 Small Submersible Water Pump: This is the heart of your fountain, circulating the water. Look for a pump designed for small indoor/outdoor fountains, typically with a flow rate of 40-80 GPH (gallons per hour) and a lift height appropriate for your fountain’s height (usually 1-2 feet). It should come with a small tube or an adapter to connect one.
- Small Tubing (flexible, clear plastic): To connect the pump to the top of your fountain, allowing water to flow upwards. The diameter should match your pump’s outlet.
- Plants & Decorations (for aesthetic appeal): Small, water-friendly plants, decorative pebbles, glass beads, or shells can be used to beautify your fountain and hide the pump and tubing.
Tools You’ll Also Need:
- Utility knife or strong scissors (for cutting plastic bottles)
- Marker (for marking cutting lines)
- Ruler (for precise measurements)
Detailed Steps to Construct Your Beautiful Recycled Water Fountain
Creating this fountain is a rewarding process that comes together surprisingly quickly. Follow these detailed steps to build your own relaxing water feature.
Step 1: Prepare Your Water Bottles
Begin by thoroughly cleaning all four square-shaped water bottles. Remove labels and any residue. Decide on the height of your fountain. For a multi-tiered effect, you will need to cut the tops off some bottles. The exact cut will depend on your desired design – for example, you might cut the top off two bottles entirely to create open reservoirs, and cut holes in the caps of others to allow tubing to pass through. Using a marker and ruler, carefully mark your cutting lines. A utility knife or strong pair of scissors will work best for cutting the plastic cleanly.
Step 2: Assemble the Bottle Structure
This is where your creativity comes into play. The general idea is to stack and connect the bottles to form a tiered structure where water can cascade down. Use your hot glue gun to securely attach the bottles together. Ensure all connections are strong and, most importantly, watertight. If you’re creating multiple tiers, use the small pieces of wood as spacers or supports between layers to create openings for water flow or to stabilize the structure. For instance, you might glue two bottles side-by-side as a base, then a third on top, slightly recessed, and the fourth at the very top, acting as the primary water outlet. Remember to leave space for the pump’s tubing to run up through the structure.
Step 3: Prepare the Terracotta Tray and Install the Pump
Place your terracotta plant tray in its final desired location. This tray will act as the fountain’s base and water reservoir. Position your small submersible water pump inside the tray. Connect the flexible tubing to the pump’s outlet. Carefully thread the tubing up through your assembled plastic bottle structure, ensuring it reaches the very top where the water will emerge. Secure the pump to the bottom of the tray with a dab of hot glue if needed, or weigh it down with some pebbles to prevent it from floating or shifting.
Step 4: Connect and Test the Water Flow
Once the tubing is securely in place and reaches the highest point of your bottle structure, fill the terracotta tray with water. Make sure the water level is high enough to completely submerge the pump. Plug in your water pump. Observe the water flow. It should pump water up through the tubing and cascade down your plastic bottle tiers, collecting back in the terracotta tray. Check for any leaks in your bottle structure. If you find any, unplug the pump, drain the water, and re-seal the leaky areas with more hot glue. Adjust the tubing position as needed to achieve your desired water flow and sound.
Step 5: Decorate Your Fountain
Now for the fun part – making your fountain beautiful! Use your decorative plants, pebbles, river stones, or other elements to conceal the pump, tubing, and any visible glue seams. Arrange them aesthetically around the base and within the tiers of your plastic bottle fountain. Small succulents, moss, or water-loving plants can add a natural touch. The goal is to make the fountain look like a seamless, natural piece of garden decor, hiding its recycled origins unless you choose to reveal them.
Tips for a Perfect DIY Fountain
- Waterproof is Key: Ensure every single seam and connection made with hot glue is completely sealed. Test thoroughly before committing to decorations.
- Pump Power: Don’t underestimate the importance of the right pump. Too weak, and your water won’t flow properly; too strong, and it might splash too much. Read pump specifications carefully, focusing on ‘lift height’ and ‘flow rate’.
- Level Surface: Place your fountain on a perfectly level surface to ensure even water distribution and prevent spills.
- Electrical Safety: Always use an outdoor-rated extension cord if your fountain is outside and plug it into a GFCI (Ground Fault Circuit Interrupter) outlet for safety. Keep all electrical connections dry.
- Experiment with Flow: You might need to adjust the tubing or even add small holes to your plastic bottle structure to achieve the perfect cascade and sound.
Maintaining Your Upcycled Water Fountain
Like any water feature, your DIY fountain will require a little regular attention to keep it running smoothly and looking its best:
- Regular Water Top-Up: Water will evaporate, especially on warm days. Check the water level daily and top it up to ensure the pump remains fully submerged and doesn’t run dry, which can damage it.
- Cleaning: Over time, algae and debris can accumulate. Once a month, or as needed, unplug the pump, drain the water, and clean the terracotta tray and bottles with a brush and mild soap. Rinse thoroughly before refilling.
- Pump Maintenance: Periodically clean your pump’s intake screen to remove any debris (leaves, dirt, pet hair) that could clog it and reduce efficiency.
- Winterizing (if applicable): If you live in an area with freezing temperatures, it’s best to bring your fountain indoors for the winter or at least remove the pump to prevent freezing damage.
Personalize Your Fountain: Unleash Your Creativity
The beauty of a DIY project is the freedom to make it uniquely yours. Here are some ideas to customize your plastic bottle fountain:
- Paint It: Spray paint your plastic bottles before assembly with a primer, then a desired color (e.g., bronze, stone effect, or vibrant hues) for a completely different look.
- Lighting: Add small, submersible LED lights to the base or within the tiers for a magical nighttime glow.
- Different Bottles: Experiment with various bottle shapes and sizes for a unique design, though square ones are easiest for stacking.
- Natural Elements: Incorporate more natural elements like driftwood, larger stones, or even small bird figurines.
- Multiple Fountains: Once you master one, consider creating a series of smaller fountains for a grander display.
The satisfaction of watching this relaxing fountain, producing its lovely trickling sound, is truly unmatched. Thanks to the trusty hot glue gun and a little ingenuity, this project was an absolute breeze to complete. It’s more than just a fountain; it’s a personal statement, a piece of sustainable art, and a source of everyday tranquility. So, gather your materials, follow these steps, and prepare to enjoy the enchanting beauty and soothing sounds of your very own DIY recycled plastic bottle water fountain. Your outdoor space, and your stress levels, will thank you!