
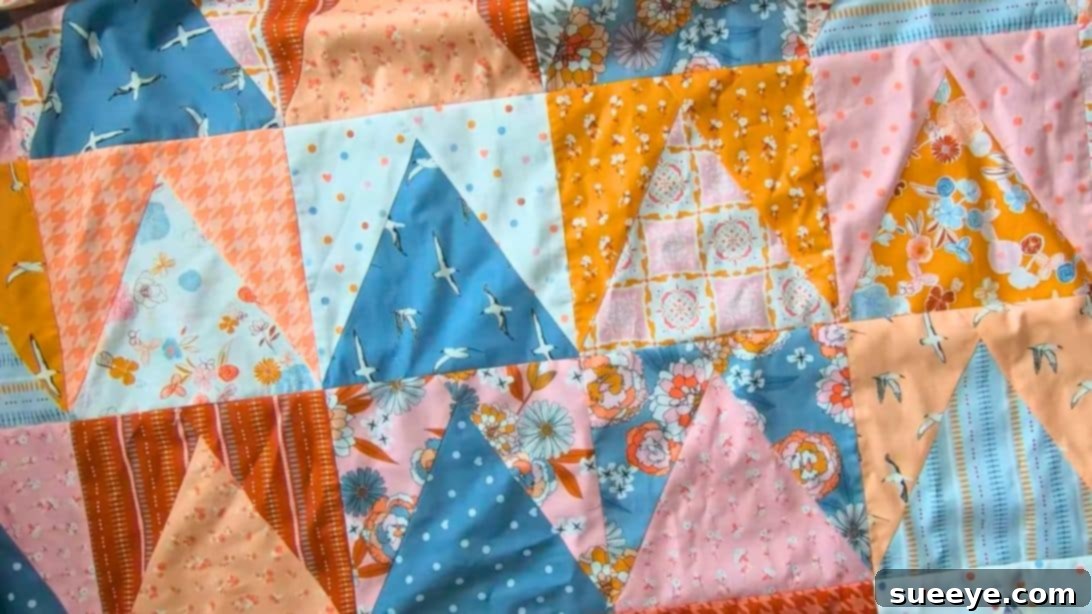
Bohemian Peak Layer Cake Quilt Pattern: A Zero-Waste Guide for Beginners
Are you searching for a captivating quilting project that’s both simple to execute and environmentally conscious? Look no further than the exquisite Bohemian Peak Quilt Pattern, brilliantly designed by Moonkin Stitchery. This remarkable design stands out not only for its stunning visual appeal but also for its ingenious approach to fabric utilization, requiring just a single layer cake with virtually zero waste. Perfect for quilters of all skill levels, especially beginners, this pattern simplifies complex-looking designs into a series of straightforward cuts and seams. Forget complicated steps and an overwhelming amount of scraps – this pattern focuses on efficiency and beauty. Dive into this comprehensive guide to create your very own Bohemian Peak Quilt, a project that promises quick satisfaction and a beautiful finished piece. We’ll walk you through each step, ensuring you gain confidence and skill along the way, transforming a single fabric bundle into a treasured heirloom.
Why Choose the Bohemian Peak Quilt Pattern?
The Bohemian Peak Quilt offers a unique blend of accessibility and artistic flair, making it a favorite among the quilting community. Here are some compelling reasons to make this your next project:
- Beginner-Friendly: This pattern is a dream come true for novice quilters. It avoids intricate curves or complex block assembly, focusing instead on precise straight cuts and simple seams. This allows beginners to build foundational skills, such as consistent seam allowances and accurate cutting, without feeling overwhelmed.
- Zero-Waste Design: One of the most attractive features of this pattern is its commitment to sustainability. By cleverly utilizing every piece from your initial layer cake cuts, you minimize fabric waste significantly. This not only saves material but also makes the project more economical and environmentally friendly.
- Quick to Assemble: Thanks to its straightforward cutting and piecing methods, you’ll be amazed at how quickly your quilt top comes together. It’s an ideal project for a weekend sew or when you need a gift in a hurry.
- Stunning Visuals: The unique arrangement of 60-degree triangles creates a dynamic “peak” or “mountain range” effect across the quilt surface. This geometric design adds a sophisticated and modern touch that can complement a variety of decor styles, from contemporary to classic bohemian.
- Showcases Fabric Collections: Layer cakes are often curated fabric collections designed to work harmoniously together. This pattern is excellent for highlighting those beautiful prints and colors, allowing each fabric to shine within the cohesive design.
Essential Materials You’ll Need
Preparation is key to a successful quilting project. Gather all your materials before you begin, ensuring you have the right tools for precision and ease. A well-stocked sewing area will make the process much more enjoyable and efficient.
- One Pack of Layer Cake (or 10″ Squares): This is the foundation of your quilt. A standard layer cake typically contains 42 pre-cut 10×10 inch squares of coordinating fabrics from a specific collection. If you don’t have a pre-cut layer cake, you can easily cut your own 10-inch squares from various coordinating fabrics purchased by the yard. Aim for a good mix of prints and solids to add depth to your design.
- Quilting Ruler (preferably with a 60-degree line): A clear acrylic quilting ruler is absolutely indispensable for accurate measurements and cuts. While you can mark angles with any ruler, one specifically marked with a 60-degree line will significantly simplify the cutting steps, ensuring precision and reducing potential errors.
- Rotary Cutter: A sharp rotary cutter is crucial for making clean, efficient cuts through fabric layers. Ensure your blade is fresh to prevent fabric snagging or imprecise edges. This tool makes quick work of cutting multiple pieces accurately.
- Self-Healing Cutting Mat: Protect your work surface and your rotary blade by using a self-healing cutting mat. Choose a size that accommodates your layer cake squares comfortably.
- Sewing Machine: A reliable sewing machine capable of a consistent straight stitch is all you need. Familiarize yourself with your machine’s quarter-inch seam allowance foot, if available, as this will be vital for accurate piecing.
- Coordinating Thread: Select a high-quality cotton thread that matches or subtly blends with the dominant colors of your chosen fabrics. A neutral gray or cream is often a safe choice if you have many different fabric colors.
- Iron and Ironing Board: Essential for pressing seams accurately after each sewing step. Proper pressing is critical for flat blocks and a smooth, professional-looking finished quilt top.
- Quilting Pins or Fabric Clips: Use these to securely hold fabric pieces together before sewing. They help maintain alignment and prevent shifting.
- Optional: Quilt Batting and Backing Fabric: Once your quilt top is complete, you’ll need these to sandwich your quilt. The size and quantity will depend on the desired final dimensions of your finished quilt.
Step-by-Step Instructions for Your Bohemian Peak Quilt
Follow these detailed steps carefully to transform your layer cake into a stunning Bohemian Peak Quilt. Each stage, from initial cuts to final assembly, emphasizes precision and thoughtful execution to ensure a beautiful and satisfying outcome.
Step 1: The Initial 60-Degree Cut on Each Square
Begin by selecting one of your 10-inch layer cake squares. Lay it perfectly flat and smooth on your cutting mat. Take your quilting ruler and, for this initial cut, you will align its 60-degree line with the bottom right corner edge of your fabric square. This precise alignment is paramount for establishing the distinct angles that define your quilt blocks. Carefully position the ruler so that the 60-degree angle indicator on the ruler is flush with the corner, and the ruler’s edge extends diagonally across the fabric. Once satisfied with the alignment, use your sharp rotary cutter to make a clean, continuous cut along the edge of your ruler. This first cut will create a significant angled edge on your square, setting the foundation for the unique peak design that will emerge.
Step 2: Completing the 60-Degree Triangle Cuts for Three Pieces
After successfully making your first cut, keep the same ruler in hand. Now, you will rotate the fabric piece and/or the ruler. Align the 60-degree line on your ruler with the freshly cut edge of your fabric. Carefully slide the ruler down until its cutting edge reaches the bottom left corner of the remaining fabric. This creates an opposing diagonal cut. When you make this second cut with your rotary cutter, your original 10-inch square will be transformed into three distinct pieces: a prominent 60-degree triangle (the “peak”) and two smaller, mirrored trapezoid-like shapes. The ingenious aspect of this zero-waste pattern is that all three of these pieces will be utilized to form a single quilt block. Repeat this exact two-step cutting process for every single layer cake square you have. Consistency and accuracy in these cuts will directly impact the precision of your assembled quilt blocks.
Step 3: Thoughtful Fabric Selection and Piecing Strategy for Each Block
Once all your layer cake squares have been precisely cut into three pieces each (one large 60-degree triangle and two smaller trapezoid shapes), it’s time for the creative step of assembling your individual quilt blocks. The distinct “peak” design relies heavily on your fabric placement strategy. For each block, you will use one large 60-degree triangle as your central element – this will form the prominent “peak.” For the two trapezoid pieces that will flank this central triangle, choose fabrics that offer a pleasing contrast or complement to your central piece. Ideally, the two side pieces should be a different print or color from the central triangle, but they should also coordinate well with each other to maintain visual harmony. Lay the three chosen pieces out side-by-side on your work surface to visualize the complete block before sewing. Experiment with different fabric combinations from your cut pieces until you achieve the desired aesthetic for your quilt. This step is where your quilt’s personality truly begins to emerge.
Step 4: Sewing the Quilt Block Together with Precision
With your fabric pieces carefully selected and arranged, it’s time to bring them together at your sewing machine. Start by taking your central 60-degree triangle and one of the smaller trapezoid pieces designated for its left side. Align the raw edges of these two pieces perfectly. Using a consistent quarter-inch seam allowance (this is absolutely crucial for accurate piecing and a flat quilt), sew these two pieces together. After sewing, carefully press the seam open; this technique helps to evenly distribute bulk, ensuring your block lies as flat as possible. Next, take the remaining trapezoid piece intended for the right side of your block. Align its raw edge with the corresponding edge of your partially assembled block. Pay close attention to the bottom right corner of the central triangle: it should line up precisely with the bottom corner of the right-side piece. The top portion of the right-side piece will intentionally extend slightly past the top of the central triangle, usually by about a quarter inch. This is part of the design and will be trimmed later. Sew this second seam using the same consistent quarter-inch allowance. Once sewn, press this seam open as well. Congratulations, you’ve successfully completed a dynamic Bohemian Peak quilt block!
Step 5: Trimming Blocks to Uniform 9-Inch Squares
After assembling and pressing each quilt block, the next critical step is to trim them all to a uniform size of 9-inch squares. This process, known as “squaring up,” is essential for ensuring all your blocks are the exact same dimension, which in turn leads to a flat, even, and professional-looking quilt top when they are joined. Lay your assembled block flat on your cutting mat. Position your quilting ruler strategically: ensure that the main seam line (where the central triangle meets the side pieces) runs directly under a precise guide line on your ruler. Crucially, both the right and left bottom corners of your central triangle should align perfectly with seam lines on your ruler. Additionally, the top point of your central triangle (the “peak”) should align precisely with the four-and-a-half-inch mark on your ruler, which is exactly half of 9 inches, ensuring the peak is perfectly centered. Carefully trim all four sides of the block to create a perfect 9-inch square. Any small excess fabric that creates the “zero waste” aspect will be removed here. Repeat this precise trimming process for every single block you have made, maintaining utmost accuracy for a cohesive quilt.
Step 6: Laying Out Your Quilt Top and Final Assembly
With all your 9-inch Bohemian Peak blocks precisely squared up, the exciting design phase begins: laying out your quilt top! Spread all your finished blocks on a design wall, a clean floor, or a large table where you can view them from a distance. The most common and striking arrangement for this pattern involves orienting all the central triangles (the “peaks”) to point upwards, creating a cohesive mountain-range effect across your entire quilt. However, this is your opportunity for creative expression – don’t hesitate to experiment! You could create alternating patterns, rotate some blocks to form different visual motifs like zigzags or waves, or arrange them to highlight specific fabric combinations. Once you are completely satisfied with your chosen layout, it’s a great idea to take a picture of it for reference before moving the blocks. Now, begin assembling your quilt top by sewing the blocks together into rows. Using a consistent quarter-inch seam allowance, sew each block to its neighbor within a row. As you sew, press the seams between blocks, and for best results, alternate the direction of the seam allowance for each row (e.g., press seams in row one to the right, seams in row two to the left). This “nesting” of seams will help reduce bulk and make it significantly easier to match points accurately when joining the rows. Finally, sew your completed rows together to bring your stunning Bohemian Peak Quilt top to life.
Tips for Success with Your Bohemian Peak Quilt
To ensure your Bohemian Peak Quilt project is as rewarding and beautiful as possible, keep these expert tips in mind:
- Precision is Paramount: In quilting, particularly with geometric patterns, accuracy in cutting and a consistent quarter-inch seam allowance are the absolute most important factors for a successful outcome. Take your time with each cut and seam; rushing can lead to misaligned blocks.
- Pressing Matters: Always press your seams after each sewing step. Pressing open, as suggested in this pattern, helps to distribute bulk evenly and keeps your blocks flat. Flat blocks are easier to square up and will result in a much flatter, more professional-looking quilt top.
- Chain Piecing: To significantly speed up the process of sewing multiple identical units, consider using chain piecing. This technique involves feeding multiple units through your sewing machine consecutively without cutting the thread in between. You then clip the threads apart later. It saves both time and thread.
- Audition Your Fabrics: Before you commit to sewing, take the time to lay out your cut pieces or even whole layer cake squares to see how different prints and colors interact. This “auditioning” step helps you fine-tune your design and ensures your final quilt top is harmonious and visually appealing.
- Sharp Tools are Your Friends: Always use a sharp rotary blade and good quality, thin quilting pins. A dull blade can fray fabric edges and lead to inaccurate cuts, while bent or thick pins can distort your seams and create puckers.
- Watch the Video Tutorial: If you are a visual learner, we highly recommend watching Moonkin Stitchery’s original tutorial video. Seeing the steps demonstrated visually can clarify any uncertainties and provide valuable insights into techniques.
Beyond the Pattern: Variations and Customization
While the Bohemian Peak Quilt Pattern is inherently beautiful in its original form, there’s always ample room to inject your personal style and creativity. Here are some ideas to customize and expand upon this fantastic design:
- Fabric Play: Don’t limit yourself to traditional layer cakes. Experiment with solid colors alongside busy prints for a bolder contrast, or try a monochromatic palette (various shades of one color) for a sophisticated and modern look. For a truly eclectic “bohemian” vibe, incorporate scraps from different collections, ensuring a cohesive color story.
- Quilt Size: The number of layer cakes you use will directly determine the final size of your quilt. Plan accordingly if you’re aiming for a baby quilt, a cozy throw, a twin-sized quilt, or even a majestic bed-sized masterpiece. You can also adjust the initial square size, though this would require recalculating trimming.
- Adding Borders: To increase the overall size of your quilt or to frame the stunning peak design, consider adding one or multiple borders around your assembled quilt top. Borders offer another opportunity to introduce coordinating or contrasting fabrics, adding an extra decorative element.
- Quilting Design: Once your quilt top, batting, and backing are basted together, the quilting itself offers another layer of design. Choose a quilting pattern that complements the peaks – simple straight lines that echo the angles, a meandering stipple for texture, or even custom free-motion quilting to add intricate details.
- Binding Choices: The binding is the final touch that finishes and protects the edges of your quilt. This is a perfect opportunity to introduce another coordinating fabric from your layer cake, a solid color that highlights a particular shade, or even a bold contrasting color for a pop of excitement.
- Alternate Layouts: While “peaks up” is standard, consider rotating blocks to create intriguing secondary patterns, such as diamonds, stars, or even a sense of movement across the quilt surface.
Conclusion: Embrace Your Inner Quilter with the Bohemian Peak Quilt
The Bohemian Peak Layer Cake Quilt Pattern by Moonkin Stitchery is a remarkable testament to how simple techniques, when executed with care, can yield incredibly striking and sophisticated results. Its ingenious zero-waste philosophy, combined with its beginner-friendly steps, makes it an ideal project for anyone looking to create a beautiful, handcrafted quilt without undue complexity or a daunting pile of leftover fabric scraps. From the initial precise cuts that define the unique angles to the thoughtful selection of fabrics and the final assembly of your stunning quilt top, each step is designed for clarity, success, and enjoyment.
We hope this expanded guide has provided you with all the confidence, detailed instructions, and creative inspiration needed to embark on your very own Bohemian Peak quilting adventure. Gather your chosen layer cake, sharpen your rotary cutter, and prepare to be amazed by the beauty and satisfaction of what you can create with your own hands. Happy quilting, and enjoy the process of bringing this gorgeous pattern to life!