
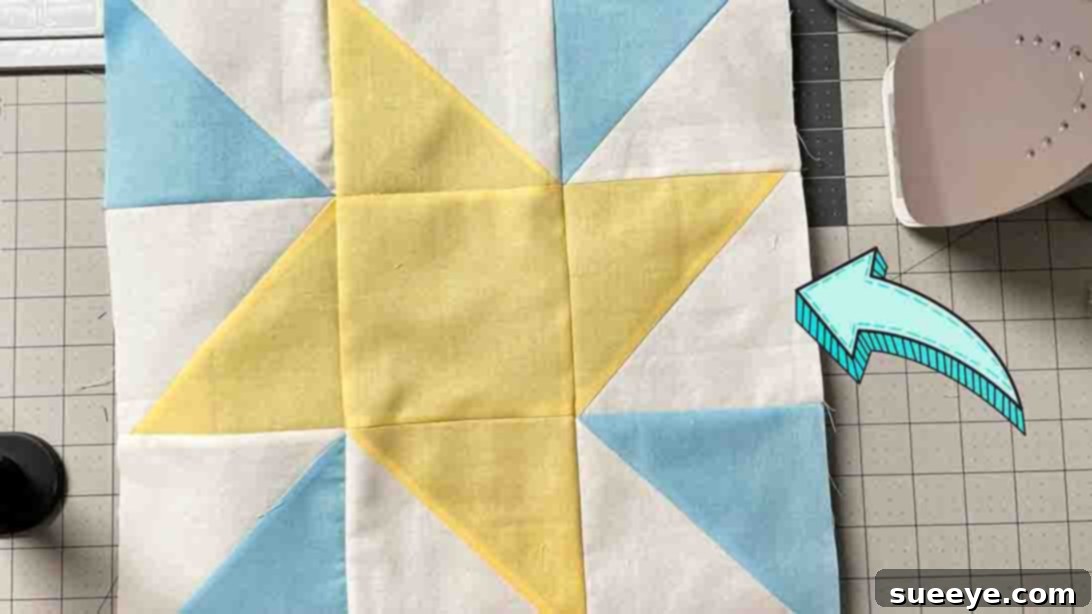
Master the Eccentric Star Quilt Block: A Beginner-Friendly Tutorial
Embark on your next creative journey with the captivating Eccentric Star Quilt Block! If you’re new to the wonderful world of quilting or simply seeking a fresh, engaging project, this pattern is an absolute must-try. Despite its intricate and visually appealing design, this star quilt block is remarkably beginner-friendly. There’s no need for complicated cuts or advanced techniques; it primarily relies on the versatile half-square triangle (HST), making it an excellent opportunity to hone fundamental quilting skills while producing a stunning result. This specific design, championed by Cut and Create on YouTube, is a favorite for many quilters due to its unique aesthetic and straightforward construction.
The beauty of the Eccentric Star lies in its adaptability. It looks magnificent whether crafted from a carefully curated collection of coordinating fabrics or a vibrant array of scraps from your stash. This makes it not only an economical choice but also an exciting way to breathe new life into leftover fabric pieces. Imagine the possibilities: a bold, modern quilt, a charming throw, or even decorative pillows, all showcasing your personalized Eccentric Star blocks. Dive into this detailed guide and watch the accompanying video tutorial to master each step, transforming simple fabric squares into a radiant star.
Quilting offers a unique blend of artistry and precision, and the Eccentric Star block perfectly embodies this balance. It teaches you the importance of accurate cutting and precise seam allowances, skills that are foundational to all quilting projects. By focusing on these basics, you’ll gain confidence and build a strong skillset for tackling even more complex patterns in the future. So, gather your materials, set up your sewing machine, and prepare to create something truly special.
Essential Materials for Your Eccentric Star Quilt Block
Before diving into the fun of cutting and sewing, ensure you have all your materials ready. High-quality quilting cotton is always recommended for the best results, as it’s easy to work with and holds its shape well. Pressing your fabrics before cutting is a crucial step to ensure accuracy and prevent distortions. Remember, precision in your initial cuts will lead to a perfectly pieced block.
Fabric Requirements:
- Fabric A (Bright Yellow for the Star Points):
- 2 – 5 1/2″ x 5 1/2″ squares
- 1 – 5″ x 5″ square (for the block center)
- Fabric B (Complementary Blue for Outer Points):
- 2 – 5 1/2″ x 5 1/2″ squares
- Fabric C (Crisp White for Background/Contrast):
- 4 – 5 1/2″ x 5 1/2″ squares
General Quilting Tools You’ll Need:
- Rotary cutter, self-healing mat, and acrylic ruler for precise cutting.
- Sewing machine with a 1/4-inch piecing foot.
- Good quality thread (cotton or polyester, matching your fabric colors).
- Fabric scissors.
- Iron and ironing board for pressing seams.
- Pins or fabric clips to hold pieces together.
- Fabric marker or pencil for drawing lines.
Step-by-Step Directions to Craft Your Eccentric Star Quilt Block
Creating the Eccentric Star Quilt Block is a systematic process that builds upon simple techniques. Take your time with each step, paying close attention to measurements and pressing. The key to a beautiful quilt block lies in consistent seam allowances and careful handling of your fabric.
Step 1: Mastering Half-Square Triangles (HSTs)
The foundation of many classic quilt blocks, including our Eccentric Star, lies in perfectly constructed Half-Square Triangles (HSTs). This technique involves combining two fabric squares to create two smaller triangle units, which then form the points of your star. Begin by cutting all your fabric requirements as listed above. It’s a good practice to label your fabric pieces (A, B, C) to avoid confusion, especially when you start making multiple blocks.
To create your HSTs, take the two 5 1/2″ x 5 1/2″ blue squares (Fabric B) and pair each with one of the white 5 1/2″ x 5 1/2″ squares (Fabric C). Place one blue square right sides together with one white square. Using your fabric marker or pencil, draw a diagonal line from one corner to the opposite corner on the back of the lighter fabric (usually the white). This line will serve as your cutting guide.
Next, using your sewing machine, sew a precise 1/4″ seam allowance on either side of the drawn diagonal line. Accuracy here is paramount for perfectly sized HSTs. Once both seams are sewn, take your rotary cutter and cut directly along the drawn line. You will now have two raw HST units. Carefully press these open. Many quilters prefer to press seams towards the darker fabric to minimize shadow, but you can also press them open for a flatter finish, especially if you anticipate nesting seams later.
Repeat this entire process with the yellow 5 1/2″ x 5 1/2″ squares (Fabric A) and the remaining two white 5 1/2″ x 5 1/2″ squares (Fabric C). You will end up with a total of four blue/white HSTs and four yellow/white HSTs. After pressing, it’s crucial to trim any “dog ears” – the small triangular bits of fabric that extend beyond the seam allowance – to ensure crisp points. You may also want to square up your HSTs to a specific size (e.g., 5″ x 5″ or 4.5″ x 4.5″, depending on your desired final block size and seam allowances), though for this pattern, simply trimming dog ears is often sufficient if your 1/4″ seams were accurate.
Step 2: Assembling Your Eccentric Star Block
With your perfectly crafted HSTs ready, it’s time to bring your star to life! This step involves laying out all your pieces in the correct configuration, much like solving a puzzle, and then sewing them together row by row. Visualize your block as a traditional nine-patch grid, with the central yellow square surrounded by HSTs.
Start by placing the sole 5″ x 5″ yellow square (from Fabric A) precisely in the center of your workspace. This square forms the core of your eccentric star. Next, arrange the yellow half-square triangles (the ones made from Fabric A and Fabric C) on each of the four sides of the central yellow square. Ensure that the yellow fabric portion of the HSTs is facing inward, pointing towards the central yellow square. This creates a vibrant yellow cross shape around the center.
Now, take your blue half-square triangles (made from Fabric B and Fabric C). These will form the outer points and corners of your star. Place one blue HST in each of the four corners of your layout. Orient them so that the blue fabric of the HST touches the white fabric portion of the adjacent yellow HST. This specific placement is what gives the Eccentric Star its unique, dynamic appearance, creating a visually compelling contrast and movement within the block.
Once you are satisfied with your layout – double-check against the provided images or the video tutorial – it’s time to sew the pieces together. Work row by row, from left to right. Begin by sewing the three pieces of the top row together, then the three pieces of the middle row, and finally the three pieces of the bottom row. Use a consistent 1/4″ seam allowance for all seams. After sewing each row, press the seams. For the top and bottom rows, you might press seams outward. For the middle row, press seams inward. This technique, known as “nesting seams,” helps reduce bulk where seams meet, resulting in a flatter, more professional finish.
Finally, sew the three rows together. Pin carefully at each seam intersection to ensure your points match up perfectly. Sew the top row to the middle row, then the bottom row to the combined unit. Press your finished block. You’ll be amazed at how quickly your fabric squares transform into a beautiful Eccentric Star! You can now make as many blocks as you need to achieve your desired quilt size, experimenting with different color combinations and fabric choices for each new star.
Tips for Success and Creative Variations
Achieving perfect quilt blocks is a matter of practice and attention to detail. Here are some extra tips to help you along the way:
- Accurate Cutting is Key: Always use a sharp rotary cutter and ensure your fabric is flat on the mat. Even a slight wobble can throw off your measurements.
- Consistent Seam Allowance: The 1/4″ seam allowance is standard in quilting. Practice on scraps to ensure your machine is calibrated correctly.
- Pressing Matters: Don’t underestimate the power of a good press! Pressing after each seam helps your blocks lie flat and makes assembly easier. A hot, dry iron is usually best for cotton.
- Nesting Seams: When joining rows or blocks, press seams in opposite directions to allow them to “nest” together. This helps create precise intersections and reduces bulk.
- Chain Piecing: If you’re making multiple blocks, consider chain piecing your HSTs or rows. This technique involves sewing pieces continuously without cutting threads between units, saving time and thread.
- Color Play: Experiment with different fabric choices! Use bright solids for a modern look, or mix patterns for a scrappy, bohemian feel. Consider the contrast between your fabrics to make the star points pop.
- Project Ideas: Once you’ve mastered the Eccentric Star Quilt Block, consider these projects:
- Full Quilt: Sew multiple blocks together, adding sashing or borders if desired.
- Table Runner: A few blocks arranged in a row can make a stunning centerpiece.
- Cushion Cover: One or two blocks can form the front of a beautiful throw pillow.
- Tote Bag: Incorporate a block into the design of a handmade tote.
Embrace Your Quilting Journey with the Eccentric Star
The Eccentric Star Quilt Block is more than just a pattern; it’s an opportunity to grow your quilting skills, express your creativity, and produce something truly beautiful. Its unique design, combined with its beginner-friendly nature, makes it a perfect choice for anyone looking to add a touch of handmade charm to their home or create a heartfelt gift.
We encourage you to experiment with different fabric combinations, making each Eccentric Star uniquely yours. Share your creations with fellow quilters, and don’t hesitate to revisit the Cut and Create YouTube tutorial whenever you need a visual refresher. Happy quilting, and enjoy the rewarding process of bringing your fabric stars to life!