
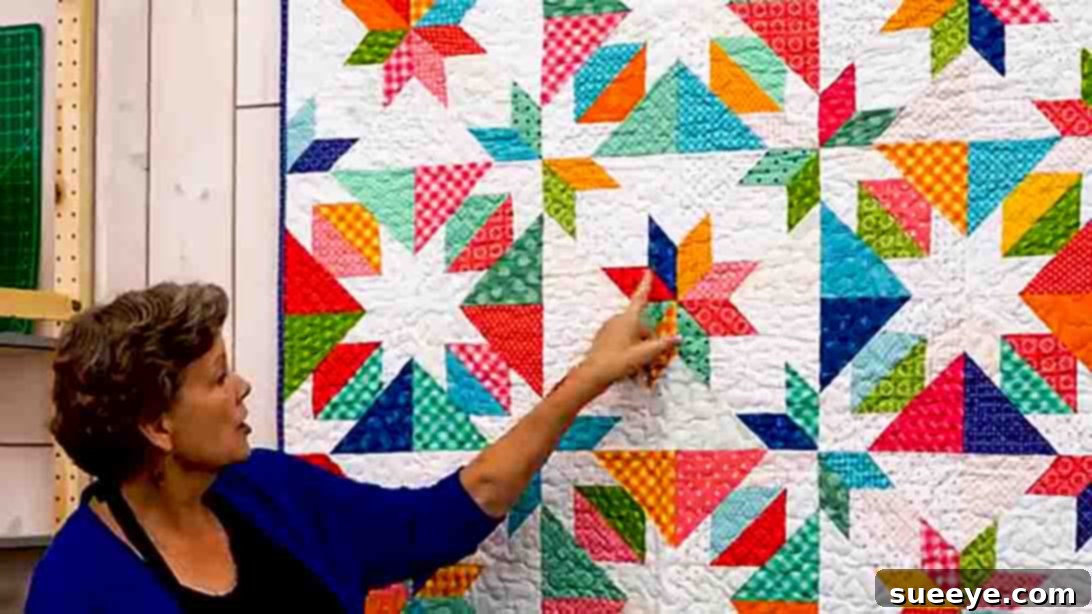
Master the Confetti Star Quilt: A Beginner-Friendly DIY Tutorial
Are you searching for your next captivating quilting adventure? Look no further! Challenge your skills and unleash your creativity with the mesmerizing Confetti Star Quilt, inspired by the renowned experts at Missouri Star Quilt Company. Despite its intricate appearance, this stunning design is surprisingly achievable, even for those new to the art of quilting. The steps are thoughtfully broken down, making it an ideal project for beginners eager to expand their repertoire.
Many quilters are often intimidated by complex-looking patterns, but the Confetti Star Quilt is a fantastic opportunity to build confidence. Its unique construction teaches fundamental techniques in a fun and rewarding way. You’ll be amazed at how quickly you can piece together these beautiful blocks, transforming simple fabric squares into a radiant star design. This tutorial will guide you through each stage, from precise fabric cutting to the final block assembly, ensuring a smooth and enjoyable crafting experience.
RELATED: Jenny Doan All Star Quilt Block Tutorial
Ready to embark on this exciting quilting journey? Gather your essential quilting tools and prepare to bring this magnificent Confetti Star Quilt to life today! Whether you prefer visual learning or detailed written instructions, we’ve got you covered. You can follow along with the original video tutorial provided by Missouri Star or continue reading our comprehensive, step-by-step guide below. Let’s transform beautiful fabrics into a cherished heirloom!
Essential Fabric Requirements for Your Confetti Star Quilt
Before diving into the exciting world of cutting and sewing, it’s crucial to have all your materials ready. The Confetti Star Quilt is designed to make excellent use of pre-cut fabrics, specifically 10-inch squares, often known as “layer cakes,” which streamline the process significantly. Choosing your fabrics is one of the most enjoyable parts of any quilt project, so take your time to select colors and patterns that truly inspire you and will make your finished quilt pop with personality.
- Print Squares: 1 pack or (24) 10-inch print squares. These will form the “darker” or patterned elements of your stars, adding depth and visual interest. Consider a variety of coordinating prints, or a single collection for a cohesive look.
- Background Squares: 1 pack or (24) 10-inch background squares. These squares typically consist of solid or tone-on-tone fabrics that will make your star points stand out. A lighter, contrasting color often works best to highlight the “confetti” effect.
- Binding Fabric: 1/2 yard binding fabric. This fabric will frame your quilt, providing a neat and durable edge. Choose a color that complements your quilt top and adds a final touch of polish.
- Backing Fabric: 2 7/8 – 3 1/4 yards backing fabric. The backing provides the “other side” of your quilt. You can opt for a soft flannel, a coordinating print, or even piece together larger scraps for a unique backing. The exact yardage may vary slightly depending on your fabric width and how you choose to orient your backing pieces.
Remember, thorough preparation is key to a smooth quilting process. Ensure your fabrics are pre-washed if desired, especially if you’re mixing different fiber contents, to prevent any potential shrinkage or color bleeding after the quilt is finished.
Detailed Directions: Crafting Your Confetti Star Quilt
Now that your materials are ready, let’s begin the exciting process of bringing your Confetti Star Quilt to life. Precision in cutting and careful attention to seam allowances are your best friends throughout this tutorial. Take your time, enjoy each step, and watch as your beautiful star blocks emerge!
Step 1: Precision Cutting for Star Shapes
The foundation of your Confetti Star Quilt lies in accurate cutting. This step transforms your simple 10-inch squares into the building blocks of your stars. For optimal accuracy and ease, we recommend using a rotating cutting mat and a sharp rotary cutter.
- Begin by selecting one 10-inch colored (print) square and one 10-inch background square. Stack them precisely, ensuring all edges are perfectly aligned. The rotating mat will allow you to make multiple cuts without repositioning your fabric, saving time and ensuring accuracy.
- Position your 2 1/2-inch x 15-inch quilting ruler diagonally across the stacked squares. Make your first cut from one corner to the opposite corner, dividing the stack into two large triangles.
- Without moving the fabric stack, rotate your cutting mat 90 degrees. Now, position your ruler for a second diagonal cut, perpendicular to your first cut, creating an “X” shape across the original square. You will now have four identical larger triangles.
- Carefully remove two of these large triangles. Set them aside into a designated pile – these will be used as the outer points of your stars.
- Take one of the remaining two large triangles. Lay your ruler along one of its cut edges, approximately 2 1/2 inches from the point, and make a straight cut. This will create a smaller triangle and a diamond shape. Repeat this process on the other side of the same large triangle, resulting in two smaller triangles and one diamond from this section.
- Perform the same cutting technique on the last large triangle you have. By the end of this sub-step, you will have created additional small triangles and diamonds from your initial two large triangles.
- Organize all these newly cut pieces into separate piles: large triangles, smaller triangles, and diamond shapes. This organization is crucial for smooth assembly.
- Repeat all the above cutting steps for the lighter (background) squares. It’s vital to maintain consistency in your cuts across all squares to ensure your blocks fit together perfectly.
These precise cuts are what give the Confetti Star Quilt its distinctive fragmented, sparkling appearance. Remember to always use a fresh blade in your rotary cutter for clean, crisp edges, and cut away from your body for safety.
Step 2: Assembling the Dark Star Blocks
With all your pieces meticulously cut and organized, it’s time to bring your first Confetti Star blocks to life! This step focuses on creating the “darker” star blocks, where the print fabrics take center stage. Maintaining a consistent 1/4-inch seam allowance throughout this process is paramount for accurate block construction.
- For each dark block, you will need two large dark (print) triangles, two dark (print) diamonds, and four light (background) diamonds. Carefully arrange these pieces on your design wall or a flat surface according to the visual guide provided in the image above. Envision the star pattern taking shape: a central row of three pieces (two light diamonds flanking one dark diamond) and two large dark triangles positioned on either side to form the star points.
- Begin by sewing the pieces of the middle row together. Take one light diamond, sew it to one side of the dark diamond, then attach the second light diamond to the other side. Press your seams open or to one side to reduce bulk, depending on your preference. Pressing well after each seam ensures your block lays flat and square.
- Next, attach the outer large dark triangles to the middle row you just created. Align the raw edges carefully, pin if necessary, and sew with your consistent 1/4-inch seam allowance. Ensure the points of your triangles align with the edges of your middle row to create sharp star points. Press these seams as well.
- Once the block is fully assembled, it’s crucial to “square it up.” Using an 8 1/2-inch square ruler, trim any excess fabric to ensure your block measures exactly 8 1/2 inches by 8 1/2 inches. Squaring up at this stage is vital for creating a quilt top where all blocks fit together perfectly without distortion.
- Repeat this entire assembly process to create a total of four identical dark Confetti Star blocks. Consistency in cutting, sewing, and squaring up will ensure a cohesive and professional-looking quilt.
Step 3: Creating Light Star Blocks and Assembling the Quilt Top
Now that you’ve mastered the dark star blocks, you’ll apply the same principles to create their lighter counterparts, and then bring all your blocks together to form the stunning quilt top.
- To make the light Confetti Star blocks, repeat all the cutting and assembly steps outlined in Step 1 and Step 2, but reverse the fabric placement. Where you previously used dark (print) fabrics, now use light (background) fabrics, and vice versa. For each light block, you will use two large light triangles, two light diamonds, and four dark diamonds. This reversal creates a beautiful contrast and the “confetti” effect when the blocks are alternated.
- You will need to create four of these light Confetti Star blocks, mirroring the four dark blocks you’ve already made. Ensure these light blocks are also squared up to precisely 8 1/2 inches.
- With your eight star blocks (four dark, four light) complete, you are ready to assemble the quilt top. For a standard layout, you will need a total of twelve blocks. This implies you’ll need to create two more dark blocks and two more light blocks using the same method, bringing your total to six dark and six light blocks.
- Lay out your twelve finished 8 1/2-inch blocks on a design wall or a large flat surface. Arrange them in a grid pattern: three blocks across and four blocks down. Experiment with alternating dark and light blocks to create a visually appealing pattern that highlights the unique star design. Often, an alternating checkerboard pattern of dark and light blocks works wonderfully.
- Once you are satisfied with your layout, begin sewing the blocks together into rows. Stitch the three blocks in the first row together, then the three blocks in the second row, and so on, until you have four completed rows. Remember to use a consistent 1/4-inch seam allowance and press your seams after each join to maintain flatness. For easier alignment when joining rows, consider pressing seams in opposite directions for alternating rows.
- Finally, sew these four rows together, carefully aligning the seams where the blocks meet to create a seamless intersection of your star points. Press the final seams of your quilt top, and you will have a beautiful, completed Confetti Star Quilt top!
Your quilt top is now complete, showcasing a dazzling array of “confetti” stars! This is a major milestone in your quilting journey. From here, the next steps involve basting your quilt layers (top, batting, and backing), machine or hand quilting to secure the layers, and finally, adding the binding to create a finished, durable edge. Each of these steps contributes to the longevity and beauty of your handmade creation.
The Confetti Star Quilt is more than just a project; it’s an opportunity to hone your skills, experiment with color, and create something truly unique. Whether draped over a sofa, gracing a bed, or given as a heartfelt gift, this quilt is sure to be admired for its intricate design and the love poured into every stitch. Happy quilting!
Confetti Star Quilt Tutorial: Your Journey to a Stunning Quilt