
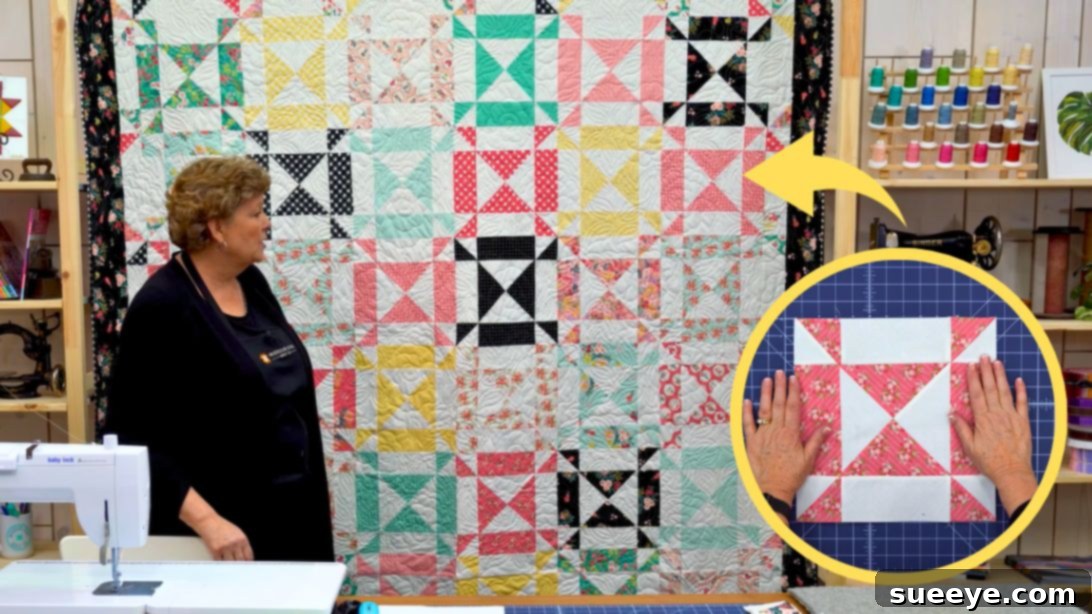
Master the Turn Style Quilt: An Easy and Stunning Project for All Skill Levels
Are you searching for that perfect quilting project that combines speed, simplicity, and a truly captivating design? Look no further than the delightful Turn Style Quilt! This popular pattern, expertly demonstrated by quilting legend Jenny Doan of Missouri Star Quilt Company, is a fantastic choice for quilters of all experience levels, especially those just starting their journey. Using convenient 10-inch precut fabric squares, often known as layer cakes, you can transform a stack of beautiful fabrics into a stunning quilt top in a single weekend. Get ready to dive into a fun and rewarding sewing adventure that yields an eye-catching design with a playful pinwheel effect.
Why Choose the Turn Style Quilt for Your Next Project?
The Turn Style Quilt offers a unique blend of efficiency and visual appeal that makes it a favorite among the quilting community. Its primary charm lies in its use of precuts, which significantly reduces the time spent on cutting fabric – often the most tedious part of any quilting project. Layer cakes provide a ready-made assortment of coordinating fabrics, allowing you to jump straight into the fun of piecing. This project is not only quick to complete but also produces a dynamic design that looks far more intricate than the actual construction process suggests. The clever manipulation of simple hourglass blocks creates a mesmerizing movement across the quilt top, forming charming pinwheel motifs where blocks meet. It’s an ideal project for those who want a rewarding finished product without committing to weeks of meticulous work.
Beyond its speed, the Turn Style Quilt is an excellent learning opportunity for beginners. It introduces fundamental quilting techniques such as accurate seam allowances, pressing, and squaring up blocks, all within a manageable framework. Experienced quilters will appreciate its versatility and the endless possibilities for fabric combinations. Whether you opt for a vibrant mix of prints or a more subdued palette, this pattern beautifully showcases your chosen fabrics, making it a perfect gift or a cherished addition to your home décor.
Essential Materials for Your Turn Style Quilt
Before you begin sewing, gather all your supplies to ensure a smooth and enjoyable quilting process. The beauty of this pattern is its reliance on precuts, simplifying your fabric selection significantly. Here’s a detailed list of what you’ll need to create your own stunning Turn Style Quilt:
- One pack of 10″ print squares: Often called “layer cakes,” these precut squares will form the colorful, patterned elements of your quilt blocks. Choose a pack with a variety of prints that complement each other.
- One pack of 10″ background squares: These squares will provide contrast and allow your print fabrics to truly shine. A solid white, cream, or light grey is often used, but feel free to experiment with a subtle print for added texture.
- 1/2 yard of background fabric: This extra background fabric is crucial for creating additional units or for any minor miscuts, ensuring you have enough to complete your project.
- 1 1/2 yards of outer border fabric: Select a fabric that beautifully frames your quilt top and ties all the colors together. Consider a contrasting solid or a coordinating print from your layer cake collection.
- 3/4 yards of binding fabric: The binding provides a clean, professional finish to your quilt edges. Choose a durable fabric that matches or subtly contrasts with your quilt’s overall aesthetic.
- 7 3/4 yards of backing fabric: This will form the underside of your quilt. You can piece together a wide back fabric or several coordinating fabrics to create a custom backing design.
- Basic quilting supplies: Don’t forget your sewing machine, thread, rotary cutter, cutting mat, quilting ruler, fabric scissors, pins or clips, and an iron.
Thoughtful fabric selection is key to the visual impact of your quilt. Try to choose a clear contrast between your print and background squares to make the “turn style” effect pop. The clearer the distinction, the more dramatic your final design will be.
Step-by-Step Guide: Crafting Your Turn Style Quilt
This tutorial will guide you through each stage of creating your Turn Style Quilt, from initial cuts to the final assembly of your quilt top. Precision in cutting and sewing is important for achieving sharp points and a professional finish, so take your time with each step. Let’s begin building these dynamic blocks!
Step 1: Crafting Your Quarter Square Triangles (QSTs)
Begin by taking one 10-inch print square and one 10-inch background square. Place them together, right sides facing each other, ensuring all edges align perfectly. Stitch a seam down two opposite sides of the stacked squares, using an accurate 1/4-inch seam allowance. For instance, sew along the left and right sides, leaving the top and bottom open. Once these two seams are sewn, lay your ruler diagonally from corner to corner and make a precise cut. Then, rotate your fabric 90 degrees and cut diagonally again through the other two corners. This process will yield four quarter square triangles (QSTs) from each pair of 10-inch squares. Carefully press each QST open, ensuring the seam allowance is consistently pressed towards the darker fabric. This technique helps reduce bulk and allows for easier nesting of seams in subsequent steps.
Step 2: Assembling the Hourglass Block Foundation
Now, take two of the freshly pressed QSTs you created in Step 1. Arrange them so that when sewn together, they form a larger square, creating an hourglass block. Lay one QST on top of the other, right sides together, carefully aligning the seams. It’s crucial here to “nest” your seams – this means pushing the seam allowance of one QST in one direction and the seam allowance of the other QST in the opposite direction. This nesting helps the seams lock together perfectly, resulting in crisp points where the fabrics meet. Sew these two QSTs together with a 1/4-inch seam allowance. Once sewn, press the block open. Repeat this process for all your QST sets. After pressing, your hourglass blocks will likely be slightly larger than needed. Use your rotary cutter and a square ruler to trim each hourglass block down to a precise 13-inch square. This trimming step is vital for ensuring all your blocks are uniform in size, which will make the final assembly of your quilt top much easier and more accurate.
Step 3: Precision Cutting for the Turn Style Effect
This step is where the “turn style” magic truly begins. Take one of your 13-inch hourglass blocks. Using your rotary cutter and ruler, carefully cut a 3-inch strip from each of its four sides. To do this accurately, first align your ruler 3 inches in from one edge and cut. Rotate the block 90 degrees and repeat. Continue this process for all four sides. After these cuts, you will be left with a smaller central hourglass square and four surrounding strips/corners. These pieces will then be reassembled to create the distinctive spinning effect of the Turn Style Quilt. This deconstruction of the initial hourglass block is a clever technique that transforms a simple design into something visually dynamic and complex-looking.
Step 4: Constructing the Dynamic Turn Style Block
Now that your 13-inch hourglass block has been cut into a central square and four strips, it’s time to reassemble it to achieve the ‘turn style’ effect. This involves rotating the cut sections to create new color juxtapositions. First, take the central hourglass square and orient it as desired. Then, arrange the four surrounding strips/corners. The key is to turn these outer pieces so that the colors “match up” in a specific way: where white meets a color, and a color meets white, effectively creating a swirling illusion. Visualize the final pinwheel effect. Carefully position the corner squares – white next to color and color next to white – ensuring they are correctly oriented before sewing. Sew these rearranged pieces together in rows first, using a precise 1/4-inch seam allowance. Once your rows are complete, sew the rows together to form the new, redesigned block. After each seam, press the seams flat to maintain block integrity and ensure a smooth, finished appearance. This reassembly process is the heart of the Turn Style design, creating intricate visual pathways.
Step 5: Assembling Your Quilt Top and Adding Borders
With all your individual Turn Style blocks constructed, it’s time for the exciting phase of laying out your quilt top. When arranging the blocks, the unique visual effect is achieved by rotating each block after placing the previous one. A common pitfall is placing two identical colors directly next to each other, which will disrupt the pattern flow. If you find two of the same colors touching at a seam, simply rotate one of the blocks until the colors alternate correctly. As your blocks come together, you’ll notice that the corners of four adjacent blocks will naturally form a beautiful pinwheel design, which is a hallmark of this pattern. For a standard throw-size quilt, you will aim for a layout of 6 blocks across and 6 blocks down, totaling 36 blocks. Once you’ve achieved your desired layout, sew your blocks together in rows, and then sew the rows together to complete the main quilt top. For the outer border, the tutorial suggests using 3-inch half-square triangles (HSTs). These HSTs can be made from leftover fabric or cut from your border fabric yardage. Attach these HSTs to create a decorative frame around your assembled quilt center, adding the final touch to your striking Turn Style Quilt top.
Tips for Quilting Success
Achieving a professional-looking quilt, especially for intricate patterns like the Turn Style, relies on a few fundamental techniques. Firstly, **accurate cutting** is paramount. Use a sharp rotary blade and a non-slip ruler to ensure all your squares and strips are cut precisely to size. Even a slight discrepancy can throw off your entire block. Secondly, master the **1/4-inch seam allowance**. Consistency here will ensure your blocks fit together perfectly. Consider using a 1/4-inch quilting foot for your sewing machine, which provides a built-in guide. Thirdly, **pressing matters**. Always press seams towards the darker fabric (as in your QSTs) or press them open to reduce bulk. Avoid ironing back and forth, as this can stretch your fabric. Instead, use an up-and-down motion. Lastly, **stay organized**. Keep your cut pieces in labeled bins or stacks, and lay out your blocks on a design wall or floor before sewing to visualize the pattern and prevent errors.
Customizing Your Turn Style Quilt
While the standard Turn Style Quilt is beautiful, don’t hesitate to infuse your personal style into the project. **Fabric selection** offers the most significant opportunity for customization. Experiment with high-contrast solids and prints for a modern look, or choose a monochromatic scheme with varying textures for subtle elegance. You can also adjust the **quilt size** by simply making more or fewer blocks. If you want a larger bed quilt, just scale up the number of blocks accordingly. Consider introducing **different border designs**; instead of HSTs, perhaps a solid wide border, a pieced strip border, or even a flange for an extra pop of color. For the quilting itself, explore various **quilting stitches**. Simple straight lines or a grid pattern can enhance the geometric design, while free-motion quilting can add softness and organic movement. Don’t be afraid to make it uniquely yours!
Final Touches: Binding and Backing
Once your Turn Style Quilt top is assembled and beautifully pieced, the next crucial steps involve preparing it for its journey to becoming a finished, cozy quilt. This includes layering, quilting, and binding. First, you’ll need to create your quilt sandwich: lay your backing fabric right side down, then your batting layer, and finally your completed quilt top right side up. Ensure all layers are smooth and free of wrinkles. Baste these layers together using pins, basting spray, or thread basting to prevent shifting during quilting. Next comes the quilting phase, where you stitch through all three layers to secure them and add texture. This can be done on a domestic sewing machine, a longarm machine, or even by hand for a traditional touch. Finally, the binding provides a durable and attractive edge to your quilt. Using your 3/4 yard of binding fabric, cut strips, sew them together end-to-end, and attach them to the raw edges of your quilt. This not only protects the edges but also frames your beautiful Turn Style design, bringing your quilting masterpiece to a professional and enduring finish.
Join the Quilting Community with Missouri Star Quilt Co.
The Turn Style Quilt, as presented by the engaging Jenny Doan of Missouri Star Quilt Company, is more than just a pattern; it’s an invitation to join a vibrant community of crafters. Her clear instructions and encouraging demeanor make complex techniques accessible to everyone. If you found these instructions helpful, we highly recommend watching the original video tutorial to see each step in action. Visual learners will benefit immensely from Jenny’s hands-on demonstration, bringing this written guide to life. Embrace the joy of quilting, experiment with colors, and take pride in creating something beautiful with your own hands. Happy sewing, and may your Turn Style Quilt be a testament to your creativity!