
Decadent & Easy: Master the Rich Chocolate Silk Pie (Preppy Kitchen Inspired)
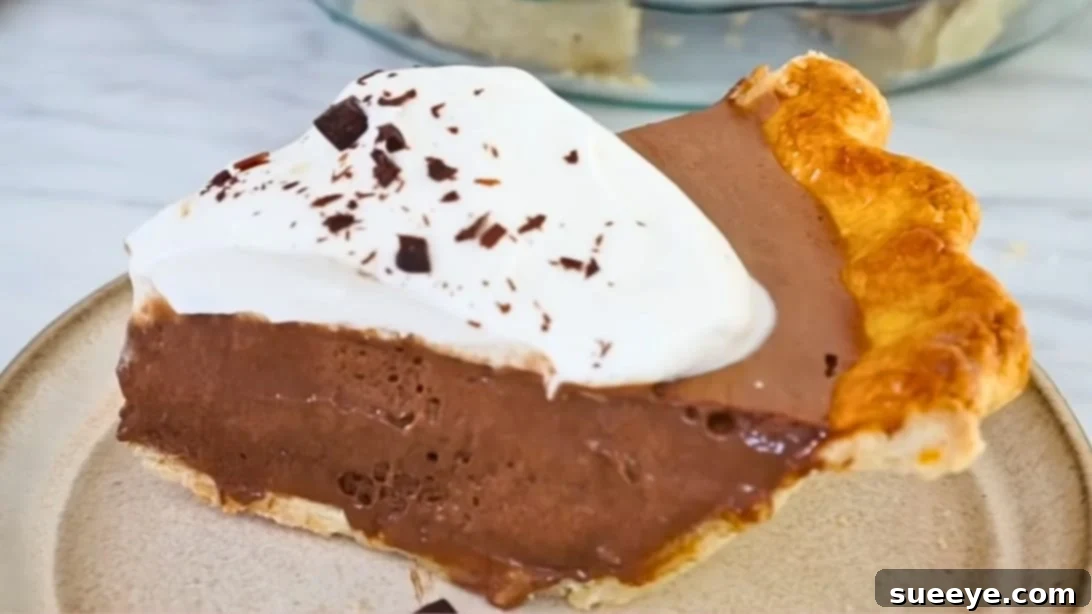
Prepare to experience dessert perfection with this incredibly rich chocolate silk pie recipe! If you’ve been searching for a show-stopping dessert that’s surprisingly simple to make, your quest ends here. This pie boasts an unbelievably smooth, intensely chocolatey filling nestled within a perfectly flaky crust – truly everything you could ever desire in a classic dessert. Inspired by the culinary expertise of Preppy Kitchen, this recipe guides you through creating a decadent treat that will impress everyone. Be sure to crown each slice with a generous dollop of freshly whipped cream and delicate chocolate shavings for the ultimate indulgence. Let’s dive into making this absolutely irresistible chocolate masterpiece!
Why This Chocolate Silk Pie Will Become Your Go-To Dessert
There’s a reason chocolate silk pie holds a special place in the hearts of dessert lovers, and this recipe elevates it to new heights. Its magic lies in the contrast of textures and the depth of flavor. Imagine a filling so lusciously smooth it melts in your mouth, bursting with rich cocoa notes, perfectly balanced by a crisp, buttery pie crust. Unlike many pies that can feel heavy, this chocolate silk pie maintains a delightful lightness, making it incredibly addictive. It’s the ideal dessert for any occasion, from casual family dinners to elegant holiday gatherings, always leaving a lasting impression. Beyond its incredible taste, this recipe is designed to be approachable, ensuring a successful bake even for those new to pie making. Get ready to fall in love with its unparalleled simplicity and sensational flavor!
Ingredients for the Ultimate Chocolate Silk Pie
Crafting this exquisite chocolate silk pie requires a handful of common pantry staples, transformed into pure dessert magic. Each ingredient plays a crucial role in achieving that signature silky texture and profound chocolate flavor. We’ll start with a reliable pie crust, then delve into the creamy, dreamy filling components. Precision in measurement is key for baking, so make sure to gather everything before you begin.
- 1 pie crust (9-inch): You can use a store-bought frozen crust for convenience or opt for your favorite homemade recipe for an extra touch of artisanal quality. Either way, a pre-baked crust is essential for preventing a soggy bottom.
- 1 1/2 cups of granulated sugar: Provides the perfect level of sweetness, complementing the bitterness of the cocoa powder and enhancing the overall flavor profile of the filling.
- 1/2 cup of unsweetened cocoa powder: The star of the show, delivering that deep, rich chocolate flavor. Use a good quality cocoa powder for the best results. Dutch-processed cocoa will give a darker color and milder chocolate flavor.
- 2 cups of milk: Forms the liquid base for our silky custard. Whole milk is recommended for richness, but 2% milk can also be used.
- 4 large egg yolks: These are critical for thickening the custard and providing its luxurious, silky texture. They also add a beautiful richness and subtle eggy flavor that balances the chocolate.
- 3 tablespoons of all-purpose flour: Acts as a thickening agent, ensuring the filling sets up beautifully without being too runny. It works in conjunction with the egg yolks to create a stable custard.
- 1/2 teaspoon of salt: A pinch of salt is vital in baking; it enhances all the other flavors, particularly the chocolate, and balances the sweetness. Don’t skip it!
- 1/4 cup of unsalted butter: Added at the end, the butter contributes to the pie’s smooth mouthfeel, adds richness, and gives the filling a lovely sheen.
- 1 teaspoon of vanilla extract: A classic flavor enhancer, vanilla complements chocolate beautifully and adds warmth and depth to the overall taste of the pie.
- Whipped cream for serving: An absolute must-have topping! Freshly whipped cream provides a light, airy contrast to the rich filling.
- Optional: Chocolate shavings or curls for garnish: Elevates the presentation and adds an extra layer of chocolatey goodness.
Step-by-Step Instructions for a Perfect Chocolate Silk Pie
Follow these detailed instructions carefully to achieve a chocolate silk pie that’s not only visually stunning but also exquisitely delicious. We’ll guide you through each phase, from preparing the crust to perfecting the luscious filling and chilling it to perfection.
Step 1: Prepare Your Oven for Blind Baking
Begin by preheating your oven to 400°F (200°C). This high temperature is crucial for the initial blind baking of the pie crust, ensuring it cooks through quickly and evenly before we add the filling. A properly preheated oven is key to achieving that desirable golden-brown and flaky texture.
Step 2: Blind Bake the Pie Crust to Golden Perfection
Carefully place your 9-inch pie crust into a pie pan. Gently press it against the bottom and sides, then crimp the edges as desired to create a decorative finish. To prevent the crust from puffing up and shrinking during baking (known as blind baking), line it with parchment paper and fill it with pie weights, dried beans, or even rice. These weights will hold the crust in place. Transfer the weighted crust to your preheated oven and bake for 20 minutes. After this initial bake, carefully remove the parchment paper and pie weights. Return the crust to the oven and continue baking for another 10 to 15 minutes, or until the crust is beautifully golden brown and appears dry. This second bake ensures a fully cooked and crisp base for your pie, preventing a soggy bottom once the moist filling is added. Allow the crust to cool completely on a wire rack before proceeding.
Step 3: Begin the Chocolate Custard Base
In a medium-sized saucepan, combine the granulated sugar and unsweetened cocoa powder. Whisk these dry ingredients together thoroughly until there are no lumps and the cocoa is evenly distributed. This step is crucial for preventing a clumpy filling. Gradually, and while continuously whisking, pour in 1 1/2 cups of milk. Continue to whisk until the mixture is smooth and well-combined. Place the saucepan over medium-high heat and bring the mixture to a gentle simmer, stirring frequently to prevent scorching on the bottom. Once it begins to simmer, reduce the heat to medium-low. This controlled heating will allow the sugar to dissolve and the cocoa flavor to bloom.
Step 4: Temper the Egg Yolks for a Smooth Filling
While the milk mixture is heating, prepare your egg yolk mixture. In a large, heat-proof mixing bowl, add the remaining 1/2 cup of milk, the four large egg yolks, all-purpose flour, and salt. Whisk these ingredients vigorously until they are completely combined and smooth, with no visible flour lumps. This creates a rich base that will thicken our custard. Once the hot chocolate milk mixture has reached a simmer, carefully and slowly begin to drizzle about half of the hot milk mixture into the egg yolk mixture, whisking constantly and vigorously. This process, known as tempering, gradually raises the temperature of the egg yolks, preventing them from scrambling when fully combined with the hot liquid. After tempering, transfer the entire warm egg mixture back into the saucepan with the remaining hot milk mixture.
Step 5: Cook the Filling to a Silky Consistency
Return the saucepan to medium-low heat. Cook the mixture for approximately 5 minutes, stirring constantly with a whisk or rubber spatula. It’s important to stir continuously to ensure even cooking and prevent the bottom from sticking or burning. The filling will gradually thicken and begin to bubble gently, indicating it’s reaching the desired consistency. Once thickened and bubbling, immediately remove the saucepan from the heat. Stir in the 1/4 cup of unsalted butter and the 1 teaspoon of vanilla extract. Continue mixing until the butter is completely melted and fully incorporated, and the filling is smooth and glossy. The butter adds a luxurious sheen and further richness to the pie.
Step 6: Assemble and Chill Your Decadent Pie
Carefully pour the warm, silky chocolate filling into the pre-baked and cooled pie shell. Use a spatula to spread it evenly. Allow the pie to cool slightly at room temperature, then transfer it to the refrigerator. Chill the pie uncovered for at least 4 hours, or ideally overnight. Chilling is a crucial step that allows the filling to fully set and firm up, ensuring clean, beautiful slices. Once thoroughly chilled, your magnificent chocolate silk pie is ready to be served. Garnish each slice with freshly whipped cream and a sprinkle of chocolate shavings or curls, if preferred. Enjoy this truly unforgettable dessert!
Expert Tips for the Perfect Chocolate Silk Pie Every Time
Achieving a flawless chocolate silk pie is easier than you think with a few insider tips. These pointers will help you navigate common baking challenges and ensure your pie is a resounding success.
- Quality Ingredients Matter: Since chocolate is the star, invest in good quality unsweetened cocoa powder and real vanilla extract. The difference in flavor will be noticeable.
- Don’t Skimp on Blind Baking: A thoroughly blind-baked crust is essential. It prevents a soggy bottom, which is a common pitfall for custard-based pies. Bake until truly golden and dry.
- Whisk, Whisk, Whisk: Constant whisking during the initial mixing of dry ingredients and milk, and especially during tempering and cooking the custard, is key. This prevents lumps and ensures a smooth, silky texture.
- Temper Slowly: When adding hot milk to the egg yolks, do it slowly, a ladleful at a time, while whisking vigorously. This gradual heating prevents the eggs from scrambling. Patience here will yield a perfectly smooth filling.
- Cook to the Right Thickness: The filling should be noticeably thickened and gently bubbling when removed from the heat. It shouldn’t be excessively thick, as it will continue to set as it cools. If it’s too thin, it won’t set properly.
- Cool Completely Before Chilling: While the recipe suggests refrigerating uncovered, letting the pie cool for about 30-60 minutes at room temperature first can prevent condensation from forming on the surface in the fridge, which can affect the top layer.
- Chill Thoroughly: Do not rush the chilling process! Four hours is the minimum, but overnight is truly best. This allows the filling to fully set, making for clean, beautiful slices.
- Avoid Over-Stirring After Butter: Once the butter and vanilla are added, stir just until incorporated. Over-stirring can incorporate too much air, which isn’t ideal for a dense, silky texture.
Creative Variations and Customizations for Your Chocolate Silk Pie
While this classic chocolate silk pie is perfect on its own, there are many ways to customize it to your taste or for different occasions. Get creative and make it your own!
- Crust Alternatives: Instead of a traditional pastry crust, consider a chocolate cookie crumb crust (like Oreos or Graham crackers mixed with butter) for an extra layer of chocolate. A pretzel crust can also add a delightful sweet and salty crunch.
- Flavor Boosters:
- Espresso/Coffee: Add 1-2 teaspoons of instant espresso powder to the cocoa mixture for a mocha-chocolate kick. Coffee naturally enhances chocolate flavor.
- Orange Zest: A teaspoon of finely grated orange zest (added with the vanilla) can provide a beautiful citrus note that pairs wonderfully with chocolate.
- Mint: A few drops of peppermint extract (start with 1/4 teaspoon) can transform it into a refreshing mint chocolate pie.
- Spicy Kick: A pinch of cayenne pepper or chili powder can add a subtle, intriguing heat to the chocolate.
- Topping Innovations:
- Salted Caramel Drizzle: A swirl of homemade or store-bought salted caramel sauce adds a rich, gooey layer and balances the sweetness.
- Toasted Nuts: Sprinkle toasted pecans, walnuts, or almonds on top for added crunch and nutty flavor.
- Raspberry Coulis: A tart raspberry sauce can cut through the richness of the chocolate beautifully.
- Shaved White Chocolate: For a contrasting visual and flavor, use white chocolate shavings instead of dark.
- Coconut Flakes: Toasted coconut flakes add a tropical twist and texture.
- Mini Pies or Tarts: For individual servings, bake the pie filling in smaller tart shells or mini pie crusts. Adjust baking times accordingly if the crust needs to be fully baked with the filling.
Serving and Storage Suggestions
Once your chocolate silk pie is perfectly chilled and set, it’s ready to be the star of your dessert table. Proper serving and storage will ensure every bite is as delicious as the first.
Serving:
Before serving, allow the pie to sit at room temperature for about 10-15 minutes; this slightly softens the filling, enhancing its smooth texture and rich flavor. Use a sharp knife to cut clean slices, wiping the blade between cuts for a pristine presentation. As mentioned, a generous dollop of freshly whipped cream is almost mandatory, and a sprinkle of chocolate shavings or cocoa powder adds an elegant finish. For a truly decadent experience, consider pairing it with a small scoop of vanilla bean ice cream or a drizzle of espresso sauce.
Storage:
Leftover chocolate silk pie should be stored in the refrigerator. To prevent it from absorbing refrigerator odors and drying out, cover it loosely with plastic wrap or aluminum foil. It will remain fresh and delicious for 3-4 days in the refrigerator. While technically you can freeze custard pies, the texture of the filling might change slightly upon thawing (it can become a bit grainy). If you do freeze, wrap it tightly in plastic wrap and then foil, and consume within 1-2 months. Thaw overnight in the refrigerator before serving.
Frequently Asked Questions (FAQ) About Chocolate Silk Pie
Here are some common questions you might have when making this delightful chocolate silk pie:
Q: Can I use store-bought pie crust?
A: Absolutely! A good quality store-bought pie crust works perfectly and significantly cuts down on prep time. Just make sure to blind bake it as instructed.
Q: My filling isn’t thickening. What went wrong?
A: This usually happens if the mixture wasn’t cooked long enough or at a high enough temperature. Ensure you’re stirring constantly over medium-low heat until it thickens and gently bubbles for the full 5 minutes. Also, make sure your egg yolks are fresh and properly tempered.
Q: Why do I need to temper the egg yolks?
A: Tempering gradually warms the egg yolks before adding them to the hot mixture. This prevents them from cooking too quickly and scrambling, ensuring a perfectly smooth and cohesive custard.
Q: Can I make this pie ahead of time?
A: Yes, this pie is an excellent make-ahead dessert! In fact, it needs at least 4 hours to chill and set, and it’s even better when made the day before you plan to serve it. This allows the flavors to meld and the filling to achieve its ideal texture.
Q: How can I prevent my pie crust from shrinking during blind baking?
A: Ensure your pie dough is well-chilled before baking. After placing it in the pan, chill it again for at least 30 minutes. Also, use pie weights or dried beans/rice to fill the parchment-lined crust, which helps hold its shape.
Q: My pie has a watery layer on top after chilling. What caused this?
A: This can happen if the pie was covered with plastic wrap while still warm, trapping condensation. Always chill the pie uncovered for at least the first hour or two to allow any steam to escape, then cover loosely if storing for longer.
Conclusion: Your New Favorite Chocolate Dessert Awaits!
There’s an undeniable joy in creating something truly spectacular from simple ingredients, and this rich chocolate silk pie delivers just that. With its velvety smooth texture, deep chocolate flavor, and perfectly crisp crust, it’s a dessert that speaks of comfort, elegance, and pure indulgence. Whether you’re a seasoned baker or just starting your culinary journey, this recipe, inspired by the renowned Preppy Kitchen, offers a straightforward path to an extraordinary treat. So go ahead, gather your ingredients, follow these steps, and prepare to delight your taste buds and impress your guests with a chocolate silk pie that will undoubtedly become a cherished favorite. Happy baking!