
Mastering the Half Elastic Waistband: An Easy Sewing Tutorial for Pants, Skirts & Shorts
Are you ready to elevate your sewing game with a project that combines comfort, style, and simplicity? The half-elastic waistband is a fantastic feature for pants, skirts, and shorts, offering a flat, tailored look in the front and a comfortable, adjustable fit in the back. Perfect for garments that need a little give without sacrificing a polished appearance, this technique is a favorite among sewists of all skill levels. If you’ve been searching for an approachable way to master this versatile design, you’ve come to the right place. This comprehensive guide, inspired by the clear and concise instructions from Thuy Sewing on YouTube, will walk you through every step of creating a beautiful and functional half-elastic waistband. Thuy Sewing is renowned for making complex techniques accessible, and this tutorial is no exception. Even if you’re a complete beginner, you’ll find the process straightforward and rewarding. Say goodbye to complicated closures and hello to effortlessly comfortable attire. Get ready to transform your sewing projects and enjoy the satisfaction of crafting garments that look great and feel even better!
Understanding the Half Elastic Waistband
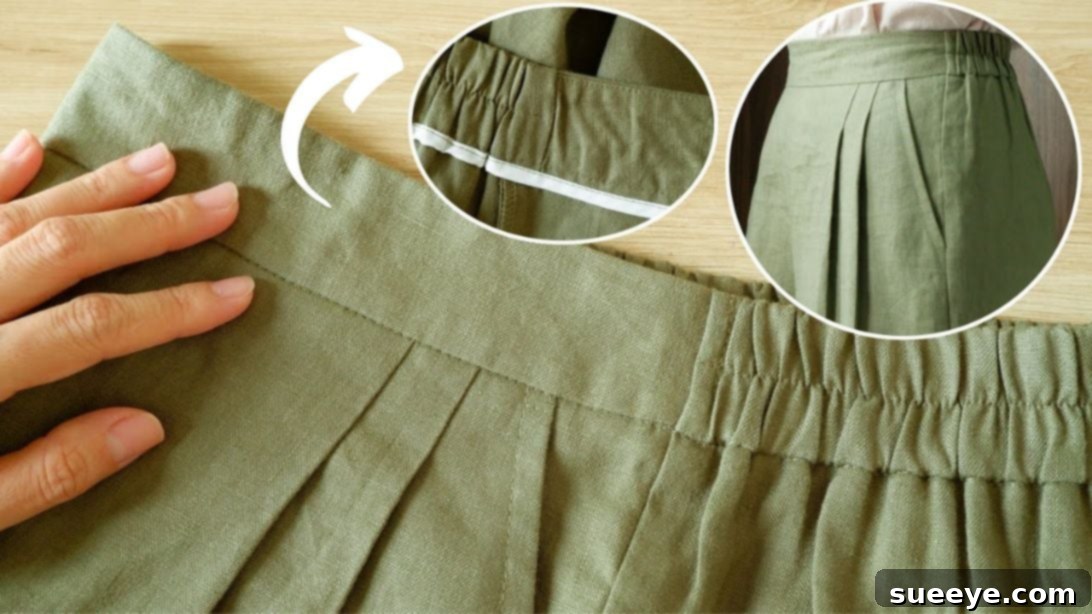
The half elastic waistband is a clever design that provides the best of both worlds: the sleek, structured look of a flat waistband at the front, and the comfortable, forgiving stretch of elastic at the back. This design is particularly popular for everyday wear, children’s clothing, and garments where ease of movement and adjustable sizing are desired. Unlike a full elastic waistband, which can sometimes appear bulky or less formal, the half-elastic version maintains a clean aesthetic, making it suitable for a wider range of styles, from casual shorts to more tailored skirts. It’s an excellent choice for fabrics that don’t have much stretch themselves but are being used for garments that require a flexible fit around the waist. Understanding this balance is key to appreciating why this technique is so widely utilized in apparel design, offering both comfort and a polished finish.
Materials for Your Half Elastic Waistband Project:
Before diving into the hands-on process, ensure you have all the necessary tools and materials at hand. Gathering everything beforehand will help streamline your workflow and prevent interruptions, making your sewing experience much more enjoyable and efficient.
- Garment Base: Your pre-cut pants, shorts, or skirt body pieces, ready for waistband attachment.
- Matching Fabric: A piece of fabric, ideally matching your main garment fabric in type and color, for constructing the waistband itself. Ensure you have enough for both the front and back waistband sections.
- Fusible Web: A heat-activated adhesive material that adds structure and stability to fabric, crucial for creating a crisp, flat front waistband.
- Needle and Thread: A sharp sewing machine needle appropriate for your fabric type and high-quality polyester thread that matches your fabric for seamless stitches.
- Fabric Pins: Essential for holding fabric layers together securely before and during sewing, ensuring precision and preventing shifting.
- Marking Pen/Chalk: For accurately transferring measurements and pattern lines onto your fabric.
- Ruler or Measuring Tape: For precise measurements of fabric pieces and elastic.
- Fabric Scissors: Sharp scissors specifically for fabric, ensuring clean, accurate cuts.
- Sewing Machine: A functional sewing machine with basic straight stitch and zigzag capabilities.
- Elastic: A strip of elastic, approximately 2-3 cm (0.7-1.1 inches) thick, which will be inserted into the back portion of the waistband to create the gathered effect. While the original tutorial notes a 4 cm (1.5 inches) *relaxed length*, the key is that it will be significantly stretched across the back waistband. For most adult garments, start with an elastic piece about 15-25 cm (6-10 inches) long, adjusting based on your desired gather and waist measurement. This allows for ample stretching to create a snug, gathered fit.
Step-by-Step Guide: Crafting Your Perfect Half Elastic Waistband
Step 1: Preparing Your Waistband Components and Front Assembly
The journey to a perfect half-elastic waistband begins with meticulous preparation of your fabric pieces. Precision in this initial stage is key to achieving a professional finish, ensuring everything aligns perfectly in later steps.
First, take accurate measurements of both the front and back sections of your garment’s waistline. These measurements will serve as the foundation for your waistband pieces, so accuracy here is paramount. Next, prepare a section of your matching fabric by pressing a piece of fusible web onto its wrong side. This step is crucial for giving the front waistband piece stability and a crisp finish, preventing it from stretching or puckering during wear. Once stabilized, measure and cut a rectangle from this fused fabric. This piece will form the front portion of your waistband. Its length should precisely match the exact measurement of your garment’s front waistline, and its width should be 6 cm (approximately 2.3 inches). This width provides ample allowance for folding and creating a sturdy, comfortable waistband.
Now, let’s shape the front waistband for an ergonomic fit. Take the 6 cm wide fused fabric strip. Fold it in half lengthwise, ensuring the right sides are facing each other and the raw edges align perfectly. From this folded edge, measure and add a 1 cm (approximately 0.39 inch) seam allowance to both the raw top edge and the side edge. Additionally, add a 1 cm seam allowance on one edge of the lower measurement. This might sound intricate, but it’s about shaping the waistband to flow smoothly around the body. Connect these marks with a gentle curve, tapering down towards the main waistband line. This curve is essential for creating a flattering, ergonomic fit around the wearer’s waist, ensuring the waistband doesn’t dig in or gape, especially when worn. Carefully cut along these curved lines. This initial cut piece forms one half of your front waistband. To create a mirror image for the other side of the front waistband, simply place this folded cutout piece on top of your leftover fabric, trace its exact shape, and cut. You should now have two symmetrical pieces for the front waistband.
Next, prepare the bias tape. Cut a strip of bias tape with a width of 3.5 cm (approximately 1.37 inches). The length of this bias tape should be sufficient to wrap around the raw edges where the front and back waistband pieces will eventually join. A good rule of thumb is to make it the total combined length of both the front and back waistlines, allowing for a bit extra. Fold the ends of the bias tape towards the center, press them flat, then fold the entire strip in half lengthwise and press again. This pre-pressing prepares the bias tape for a clean, easy application later, providing a neat and durable finish to the raw seams, enhancing the garment’s interior.
Finally, assemble the front garment pieces. With their right sides facing each other, align and sew the front pieces of your garment together at the center front seam. Once sewn, open the seam allowance flat and topstitch along both sides of the center seam. Topstitching not only flattens the seam for a crisp, clean look but also adds durability and a professional finish to your garment’s front, preventing the seam allowance from flipping. This completes the foundational work for the front of your garment, ready to integrate with the newly crafted waistband elements.
Step 2: Constructing the Waistband, Inserting Elastic, and Finishing Touches
With the front waistband components prepared, it’s time to integrate them with your garment and incorporate the elastic for that signature comfortable back fit. This step involves careful alignment and precise sewing to ensure a smooth, professional result that will stand the test of time and wear.
Begin by taking your prepared front waistband piece. Fold it in half lengthwise to find its exact midpoint. Align this midpoint with the center front midpoint of your garment’s body (pants, shorts, or skirt), ensuring right sides are together. Securely pin the waistband in place along the entire front waistline. Next, cut another piece of your matching fabric. This piece will form the back section of your waistband. Its length should accurately match the back measurement of your garment, and its width should also be approximately 6 cm (2.3 inches), consistent with the front waistband pieces. Place this back waistband piece on top of the garment’s back waistline, right sides together, aligning the raw edges. Pin it securely along the top edge of the back and continuing along the front waistband section. Carefully sew along this pinned top edge, attaching the entire waistband unit to the garment body. Use a consistent seam allowance for a clean finish.
After sewing, turn your garment inside out. Press the newly attached waistband seam open and flat. This pressing step is vital for creating a crisp, professional look and will make the next steps much easier by preparing the fabric. If necessary, gently trim any excess fabric from the sides of the waistband to ensure it perfectly matches the garment’s side seams. Now, align the side seams of the waistband with the side seams of your garment. Sew these side seams together, ensuring they match perfectly for a seamless transition, and give them a good press to set the stitches. This creates a continuous, unbroken waistband around the entire garment.
To finish the raw edges of the side seams and provide a neat interior, sew the previously prepared bias tape around the raw edges of these seams. This method encases the raw edges, preventing fraying and adding a touch of professionalism to the inside of your garment. Now comes the exciting part: inserting the elastic. Take your elastic strip, which should be approximately 2-3 cm (0.7-1.1 inches) thick. As discussed earlier, while the original guide mentions a 4 cm (1.5 inches) *length*, it’s crucial to understand this refers to the *relaxed* length before significant stretching. For a typical adult garment, you might start with an elastic piece that is about 15-25 cm (6-10 inches) long, depending on your desired gather and actual waist measurement, but the key is that it will be significantly stretched to fit the back waistband. Place this elastic at the lower part of the extended back waistband fabric, making sure it’s positioned correctly within what will become the elastic casing. Pin one end of the elastic securely to one of the side seams. Then, holding the other end, pull and stretch the elastic so that it reaches the other side seam, pinning it in place while maintaining an even, consistent stretch across the entire back. This creates the signature gathered effect of the half-elastic waistband.
With the elastic stretched and pinned, carefully fold the raw edges of the back waistband fabric down and over the elastic. Ensure the elastic is fully encased within this fold, creating a smooth channel or casing. Pin this fold securely in place, making sure the fabric is smooth and evenly distributed around the stretched elastic. Then, sew this folded edge in place, effectively securing the elastic inside its casing. As you sew, continue to pull and stretch the back part of the waistband and the elastic simultaneously, ensuring that the fabric remains smooth and that the elastic is sewn in a stretched state. This technique prevents the fabric from bunching up as you sew and ensures an even gather once the elastic is released. Finally, topstitch the middle of the back waistband lengthwise. This not only further secures the elastic within its casing but also prevents it from twisting inside the channel during wear, providing a much more comfortable and durable finish. Give your newly sewn waistband a final press to set the stitches and ensure a pristine, professional look. Your comfortable and stylish half-elastic waistband is now complete, ready to be adorned!
Tips for a Flawless Half Elastic Waistband
Achieving a professional-looking half elastic waistband is well within reach, especially with a few helpful tips to guide you through the process. These insights can make a significant difference in the final outcome of your project, elevating it from handmade to exquisitely crafted.
- Choose Your Fabric Wisely: While the tutorial works with various fabrics, medium-weight woven fabrics like cotton twill, linen, gabardine, or even some lighter denims are ideal. They offer enough stability for the flat front waistband and drape well for the gathered back. Avoid overly stretchy fabrics for the waistband itself, as they might not hold the structured shape of the front effectively.
- Pressing is Your Best Friend: Don’t underestimate the power of thorough pressing after each sewing step. Pressing seams open or to one side helps to flatten the fabric, define edges, and ensures your waistband looks crisp, smooth, and professionally finished. A well-pressed garment always stands out, giving a tailored appearance.
- Accurate Measurements Are Paramount: Take the time to measure your garment’s waistline and your waistband fabric pieces precisely. Even small discrepancies can lead to an ill-fitting or skewed waistband. Double-check all measurements before cutting to save time and fabric in the long run. Use a clear ruler and a fabric marking tool for precision.
- Test Your Elastic: Before committing to your final elastic length, do a quick test. Pin one end of your chosen elastic to one back side seam, pull it across the back to the other side seam, and see how much gather it creates. Adjust the length until you achieve your desired comfort and aesthetic. Remember that different elastic types have varying stretch and recovery properties, so testing is crucial.
- Use Plenty of Pins: Especially when attaching the waistband and inserting the elastic, generous use of fabric pins will prevent shifting and ensure everything stays perfectly aligned. This is crucial for achieving even gathers and straight seam lines, particularly when working with curved or stretched sections.
- Slow and Steady Wins the Race: When sewing, particularly when dealing with curves or the stretched elastic, slow down your machine. This allows for greater control and precision, helping you to avoid mistakes and ensure smooth, consistent stitching. Take your time, especially during the crucial elastic insertion step.
Troubleshooting Common Issues with Half Elastic Waistbands
Even with careful planning and execution, sometimes minor challenges can arise. Here’s how to identify and address some common issues you might encounter while sewing a half elastic waistband, helping you to achieve a perfect result every time:
- Waistband Not Lying Flat: This often happens if the fusible web wasn’t applied evenly, if the fabric was stretched during construction, or if the seam allowances weren’t pressed open properly. Go back and press the waistband thoroughly, ensuring all seams are flat. If the issue is severe, you might need to unpick and re-sew the section, paying extra attention to precise seam allowances, applying the fusible web smoothly, and pressing meticulously.
- Elastic Twisting Inside the Casing: The final topstitching along the middle of the back waistband is specifically designed to prevent this common problem. If your elastic is still twisting, it might be due to insufficient topstitching (e.g., too few lines or stitches that are too far apart) or a casing that’s too wide, allowing the elastic to move freely. If possible, add another line of topstitching to secure it further or carefully unpick and re-sew the casing with a tighter fit around the elastic.
- Uneven Gathering: This typically occurs if the elastic wasn’t stretched evenly when pinned and sewn across the back waistband. To fix this, carefully unpick the stitching around the elastic in the affected area, re-stretch the elastic more uniformly across the back panel, and re-sew. Using more pins and stretching slowly and consistently while sewing can help prevent this issue initially.
- Bulky Side Seams: If your side seams feel too thick or uncomfortable, it might be because the fabric is heavy or the seam allowances are too wide. To reduce bulk, trim down the seam allowances slightly (without getting too close to the stitching) or grade them (trim one side of the allowance shorter than the other) before pressing them open.
- Waistband Too Tight or Too Loose: This points to an issue with initial measurements or elastic length. For a waistband that’s too tight, you might need to insert a longer piece of elastic, or if the fabric is too small, you may need to recut. For a waistband that’s too loose, a shorter piece of elastic is usually the solution, ensuring it gathers the fabric sufficiently. Always test elastic length before final sewing.
Conclusion: Embrace the Comfort and Style of Your DIY Half Elastic Waistband
Congratulations! You’ve successfully navigated the steps to create a comfortable, stylish, and perfectly fitted half-elastic waistband. This technique is a fantastic addition to any sewist’s repertoire, offering a blend of tailoring and ease that makes garments a joy to wear. From casual shorts to elegant skirts, the versatility of the half-elastic waistband ensures your creations will not only look professionally finished but also provide unparalleled comfort for everyday wear.
The satisfaction of wearing something you’ve crafted with your own hands, especially a piece that fits so wonderfully, is truly rewarding. We extend our deepest gratitude to Thuy Sewing for her inspiring and accessible tutorials. Her clear instructions empower countless individuals to tackle new sewing challenges and expand their skills with confidence. We encourage you to explore her YouTube channel for more fantastic sewing projects and invaluable tips. Keep practicing, keep creating, and continue to enjoy the wonderful and fulfilling world of sewing!
*All image credit belongs to Thuy Sewing via YouTube. Follow and subscribe to her channel for more amazing tutorials!