
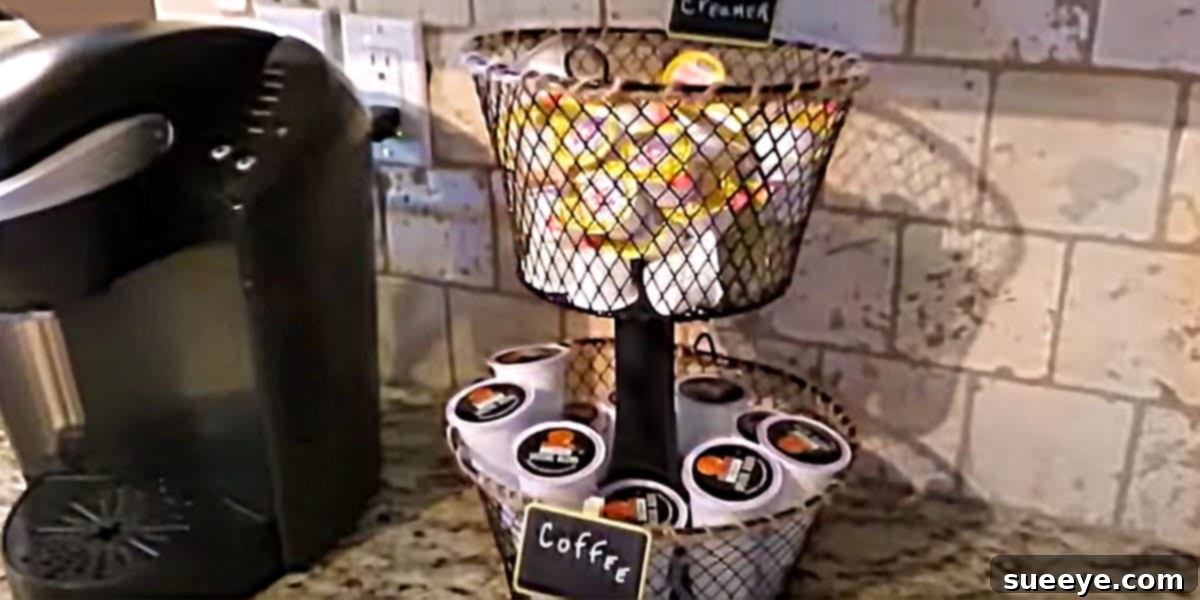
Transform Your Kitchen: DIY Farmhouse Coffee & Creamer Station with Dollar Tree Finds
Is your kitchen counter a battleground of misplaced coffee pods and scattered creamer bottles? Many of us can relate to the daily struggle of a cluttered coffee corner. The morning rush often leaves little time for meticulous organization, leading to a pile-up of essentials that make our kitchens feel less inviting and more chaotic. Imagine starting your day with a perfectly organized, aesthetically pleasing coffee station that not only keeps everything tidy but also adds a touch of charming farmhouse style to your home. We’re here to show you how to achieve exactly that, creating a functional and beautiful K-cup organizer and creamer holder using incredibly affordable items, primarily from the Dollar Tree!
This clever DIY project is designed to banish counter clutter for good. If you’ve been searching for a practical solution to store your K-cups and those convenient little flavored creamers without breaking the bank, look no further. We’ll guide you through crafting a personalized coffee station that perfectly complements a farmhouse-themed kitchen, proving that stylish organization doesn’t require a hefty investment. Say goodbye to rummaging through cabinets for your favorite coffee pod and hello to a streamlined, delightful morning routine.
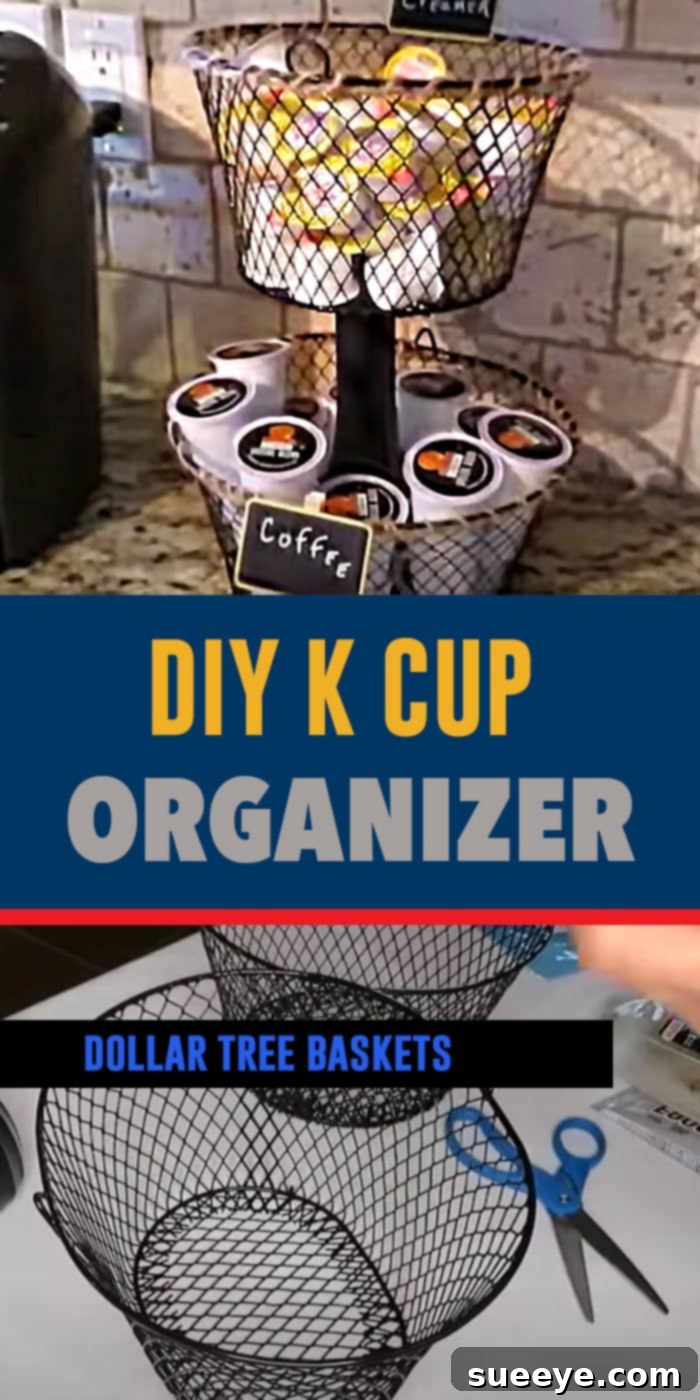
The Frustration of Disorganized Coffee Supplies
For Keurig owners, the convenience of K-cups is undeniable, but their storage can often be a vexing issue. Keeping them in their original bulky boxes often means stashing them away in a cabinet, making them difficult to access, especially when you’re half-awake and craving that first cup of coffee. The constant reaching and shuffling can quickly become a frustrating daily ritual. Similarly, those delightful individual flavored creamers, while a perfect addition to your brew, tend to occupy precious counter real estate, contributing to an overall sense of disarray.
A disorganized coffee area doesn’t just look messy; it can genuinely impact your morning mood. The search for a specific flavor or a clean spoon can add unnecessary stress to what should be a peaceful start to the day. This DIY farmhouse coffee station addresses these exact pain points, bringing everything you need for your daily brew into one dedicated, easily accessible, and beautifully presented spot. It’s about more than just storage; it’s about enhancing your entire coffee experience and reclaiming your valuable kitchen space.
Embracing the Charm of Farmhouse Decor
Farmhouse style has captivated decorators and homeowners alike with its rustic charm, warmth, and emphasis on comfort and practicality. It evokes a sense of simpler times, community, and handcrafted beauty. Incorporating farmhouse elements into your kitchen, especially through a functional piece like a coffee station, can instantly elevate the room’s aesthetic. This project taps into that beloved style, allowing you to create a piece that feels both vintage and contemporary, blending seamlessly with existing farmhouse decor or becoming a charming focal point in a more modern setting.
The beauty of this DIY coffee station lies in its ability to marry budget-friendliness with high-end style. By utilizing inexpensive items from the Dollar Tree, we can transform ordinary objects into a cohesive and stylish organizer that reflects the quintessential farmhouse look – think rustic textures, muted colors, and practical design. This approach not only saves money but also provides the immense satisfaction of creating something beautiful and useful with your own hands, truly embodying the spirit of DIY home decor and personalizing your living space.
Materials You’ll Need: Budget-Friendly & Beautiful
One of the most appealing aspects of this project is its affordability. You don’t need to spend a fortune to achieve a high-quality, charming farmhouse look. Most of the core components can be found at your local Dollar Tree, making this an incredibly budget-friendly endeavor. Here’s a detailed list of what you’ll need to gather:
From the Dollar Tree: Essential Crafting Foundations
- 1 Round Wire Basket: This will likely serve as the base or perhaps an upper tier, ideal for holding K-cups or mugs. Its open wire design is perfect for the farmhouse aesthetic, offering both visibility and breathability.
- 1 Oval Wire Basket: The oval shape offers versatility, perhaps for holding creamers, sugar packets, or even as a lower tier to hold the round basket. The contrasting shapes add visual interest and functional separation to your station.
- Jute Twine: An absolute staple for farmhouse and rustic crafts. Jute twine will be used to add texture, decorative wraps, and a natural, earthy touch to the wire baskets, softening their metallic appearance.
- Clear Glass Vase: A simple, clear glass vase (or even a sturdy glass jar) is perfect for holding stirring spoons, sugar packets, tea bags, or even a small decorative faux plant. Its transparency keeps the look light and airy.
Additional Items: Enhancing Style and Durability
While the Dollar Tree provides the foundation, a few extra items will elevate the aesthetic and ensure the durability of your farmhouse coffee station. These can be sourced from general craft stores, Walmart, or Dollar General, offering great value for their impact.
- Rust-Oleum 2X Ultra Cover Spray Paint – Satin Canyon Black: (Purchased at Walmart or a hardware store). This specific paint is a game-changer. “Satin Canyon Black” provides a sophisticated, matte black finish that instantly transforms the Dollar Tree wire baskets into a higher-end looking piece. The “2X Ultra Cover” ensures excellent coverage with fewer coats, saving time and effort. This step is crucial for achieving that authentic farmhouse industrial look, giving your basic baskets a modern, yet rustic appeal.
- Mini Chalkboard Clip: (Purchased at Dollar General Bistro or craft store). A small chalkboard clip adds a personalized and utterly charming touch. You can label your station “Coffee,” “Creamers,” or write a delightful morning quote. It’s a small detail with a big impact on the farmhouse vibe and allows for easy customization.
- Chalk Marker: (Purchased at Walmart or craft store). Essential for writing clearly and neatly on your mini chalkboard clip. A white or light-colored chalk marker will stand out beautifully against the black surface, ensuring your labels are legible and stylish.
- Glue Gun and Hot Glue Sticks: Indispensable for quick, temporary (or sometimes permanent, depending on the bond) adhesion during assembly, especially for attaching jute twine or securing components while a stronger glue sets. Hot glue is a crafter’s best friend for immediate hold.
- E-6000 Glue: This is your heavy-duty, permanent adhesive. E-6000 is known for its strong bond on various materials (metal, glass, fabric), making it ideal for securely joining the wire baskets together and ensuring your coffee station is robust, stable, and long-lasting. It provides structural integrity to your design.
Step-by-Step Guide to Crafting Your Coffee Station
Now that you’ve gathered all your supplies, it’s time to bring your vision to life! This project is surprisingly straightforward, even for beginner crafters. Follow these detailed steps to create your own beautiful and functional farmhouse coffee and creamer organizer, designed to cut back on frustration and enhance your morning routine.
Step 1: Preparation and Painting Your Wire Baskets
Transforming your basic Dollar Tree baskets into chic farmhouse decor starts with a solid foundation – proper cleaning and a flawless paint job.
- Clean the Baskets Thoroughly: Before anything else, thoroughly clean your wire baskets. Use warm, soapy water to remove any dust, grime, or manufacturing residues. Rinse them well under running water and allow them to air dry completely. A clean, dry surface is paramount for optimal paint adhesion and a smooth finish.
- Prepare Your Work Area: Choose a well-ventilated area for painting, preferably outdoors or in a garage with open doors. Lay down a drop cloth, old newspaper, or cardboard to protect your work surface from overspray. It’s also helpful to elevate the baskets slightly (e.g., on small blocks or an old box) to allow for easier access to all sides during painting.
- Apply Spray Paint with Precision: Shake your Rust-Oleum Satin Canyon Black spray paint can vigorously for at least one minute to ensure the pigment is well mixed. Hold the can approximately 8-12 inches away from the baskets and apply thin, even coats using a sweeping motion. Avoid applying too much paint at once to prevent drips and uneven coverage. It’s always better to apply multiple thin coats than one thick, heavy one. Rotate the baskets to cover all angles uniformly.
- Allow for Adequate Drying and Curing: Let the first coat dry for at least 30 minutes to an hour, or as per the manufacturer’s instructions, before applying a second coat. You might need 2-3 coats to achieve full, even coverage and that deep, sophisticated black finish. Once all coats are applied, allow the baskets to cure completely for at least 24 hours (or even 48 hours for maximum durability) before handling them extensively or proceeding to the next steps. This curing time is crucial for the paint to harden and become resistant to chips and scratches.
Step 2: Assembling the Structure of Your Organizer
With your beautifully painted baskets ready, it’s time to bring them together to form the core structure of your coffee station. Strategic assembly ensures both stability and functionality.
- Plan Your Layout: Before applying any glue, experiment with how you want your round and oval baskets to be arranged. Common configurations include stacking them (e.g., the oval basket on the bottom for stability, with the round basket on top for K-cups), or placing them side-by-side and connecting them for a wider station. Consider what makes the most sense for holding K-cups in one section, and creamers, sugar, or mugs in the other. Visualize the finished look and functionality.
- Secure with E-6000 Glue for Permanent Bond: Once you’ve determined your ideal arrangement, apply a generous amount of E-6000 glue to the contact points where the baskets will meet. E-6000 provides an incredibly strong and durable bond on metal, which is essential for a sturdy organizer. Press the baskets firmly together, ensuring good contact between the glued surfaces.
- Use Hot Glue for Temporary Hold (Optional but Highly Recommended): Since E-6000 takes a significant amount of time to cure (often 24-72 hours), you can use a few small dabs of hot glue on the same contact points immediately after applying the E-6000. Hot glue dries quickly and will act as a temporary clamp, holding the baskets securely in place while the stronger E-6000 forms its permanent, resilient bond.
- Allow to Cure Undisturbed: Place the assembled structure in a stable position where it won’t be moved or bumped. Allow the E-6000 glue to cure fully, ideally for 24-72 hours, without disturbing it. This extended curing time is vital for achieving maximum strength and durability, ensuring your coffee station can withstand daily use.
Step 3: Adding Rustic Charm with Jute Twine
Jute twine is the quintessential farmhouse touch. Adding it to your baskets will infuse your coffee station with natural texture and a warm, rustic aesthetic.
- Decide on Jute Placement: Once the glue has completely cured and your baskets are firmly joined, it’s time to add the beautiful jute twine. Decide where you want to add these rustic accents. Popular spots include wrapping the handles of the baskets, wrapping sections of the wire frame, or even creating small decorative bows.
- Begin Wrapping and Securing: Start by dabbing a small amount of hot glue at the beginning of the section you intend to wrap. Press the end of the jute twine firmly into the glue to secure its starting point. Carefully and tightly wrap the twine evenly around the chosen section of the basket. Ensure each loop of twine is snug against the previous one to avoid gaps.
- Maintain Security with Glue: To keep the twine secure and prevent it from unraveling over time, add another small dab of hot glue underneath the twine every few wraps. This reinforces the wrap and holds it firmly in place.
- Finish the Wrap Neatly: When you reach the desired length or end point of your wrapping, trim the twine cleanly. Secure the end with a final small dab of hot glue, tucking it in neatly to hide any raw edges. The jute twine instantly adds texture and that quintessential farmhouse look, transforming the metal baskets with its organic feel.
Step 4: Personalizing with the Chalkboard Clip and Vase
The final touches are where your coffee station truly comes to life, offering both functionality and personalized charm.
- Prepare Your Chalkboard Clip: Use your chalk marker to write a charming label or message on the mini chalkboard clip. Popular options include “Coffee,” “Creamers,” “Morning Fuel,” “Coffee Bar,” or even your family’s initial for a personalized touch. Take your time to write neatly, and allow the chalk marker ink to dry completely to prevent smudging.
- Attach the Clip with Ease: Secure the chalkboard clip to one of your wire baskets. The clip design makes this incredibly easy; simply attach it to an edge of the wire, ensuring it’s visible and adds to the overall aesthetic.
- Integrate the Clear Glass Vase: Place the clear glass vase strategically within or beside your assembled basket structure. This vase is incredibly versatile: it’s perfect for holding stirring spoons, sugar packets, individual tea bags, sweetener packets, or even a small decorative faux plant for an extra touch of greenery and freshness. Its clear design ensures it doesn’t detract from the farmhouse style but rather complements it.
- Arrange Your Supplies: Now, arrange your K-cups in one basket, your flavored creamers in another, and place any other coffee essentials (like sugar, stirrers, or mugs) artfully within the station.
Enjoy Your Beautifully Organized Coffee Corner!
With these steps completed, your custom DIY Farmhouse Coffee and Creamer Station is ready to transform your kitchen! Step back and admire your handiwork. No more hunting for K-cups or juggling creamer bottles. Everything is now neatly organized, easily accessible, and presented in a style that enhances your home decor. This project not only solves a common organizational challenge but also adds a significant dose of warmth, character, and a touch of bespoke craftsmanship to your kitchen space. Enjoy the newfound peace and efficiency this beautiful station brings to your mornings!
Benefits Beyond Organization
The advantages of creating this DIY coffee station extend far beyond simply tidying up your counter. You’ll experience a multitude of improvements to your daily routine and home aesthetic:
- Enhanced Efficiency: Mornings become smoother and more streamlined when everything you need for your coffee is in one designated, easy-to-reach spot. No more wasted time searching!
- Stress Reduction: A clutter-free, organized environment contributes to a calmer, more pleasant start to your day, reducing the small stresses that can accumulate from disarray.
- Elevated Aesthetics: The charming farmhouse design adds significant visual appeal, transforming a utilitarian area into a stylish focal point that complements your kitchen decor.
- Cost Savings: By cleverly utilizing affordable Dollar Tree items and a few other craft supplies, you achieve a sophisticated, designer-inspired look without the hefty price tag associated with pre-made organizers.
- Personal Satisfaction: There’s a unique joy and pride that comes from crafting something beautiful and functional with your own hands, knowing you’ve created a custom solution tailored to your needs.
- Space Optimization: This vertical or compact organizer maximizes your counter space, keeping it free from scattered items and making your kitchen feel more expansive and tidy.
Customization Ideas for Your Farmhouse Coffee Bar
While the Satin Canyon Black provides a classic, timeless farmhouse look, don’t hesitate to customize your station further to truly make it your own. Your DIY project is an opportunity for personal expression!
- Alternate Paint Colors: Consider an antique white, a distressed gray, a soft sage green, or even a deep navy blue for a different take on the farmhouse aesthetic that matches your personal kitchen palette.
- Decorative Embellishments: Enhance the rustic charm by adding small artificial floral sprigs (like lavender or cotton stems), a tiny rustic bow made from burlap ribbon, or even small wooden beads strung onto the jute twine for extra flair and texture.
- Different Labeling Methods: Instead of a chalkboard clip, you could use a small wooden tag with stenciled letters, a printed label glued to the basket, or even a vintage-style metal tag for a different character.
- Integrate a Mug Holder: If you have available wall space nearby, a small command hook, a rustic peg rack, or a vertical mug tree could be incorporated to complete your coffee bar setup, keeping your favorite mugs within easy reach.
- Add a Small Tray: Place the entire station on a decorative wooden tray to define the space even further and make it easy to move for cleaning.
Conclusion: A Simple Project, A Big Impact
This DIY Farmhouse Coffee & Creamer Station project is a testament to how creative thinking and a few inexpensive supplies can lead to truly remarkable and impactful results. It’s a fantastic, budget-friendly way to tackle persistent kitchen clutter, infuse your home with beloved farmhouse style, and significantly simplify your daily routine. By investing a small amount of time and effort, you’ll create a durable, attractive K-cup organizer and creamer holder that you’ll love and utilize for years to come, making your mornings a little brighter and your kitchen a lot tidier.
Say goodbye to the chaos of disorganized coffee supplies and embrace the charm of a perfectly organized coffee corner. Gather your Dollar Tree treasures, unleash your creativity, and enjoy the wonderful transformation of your kitchen into a functional and stylish farmhouse haven!