
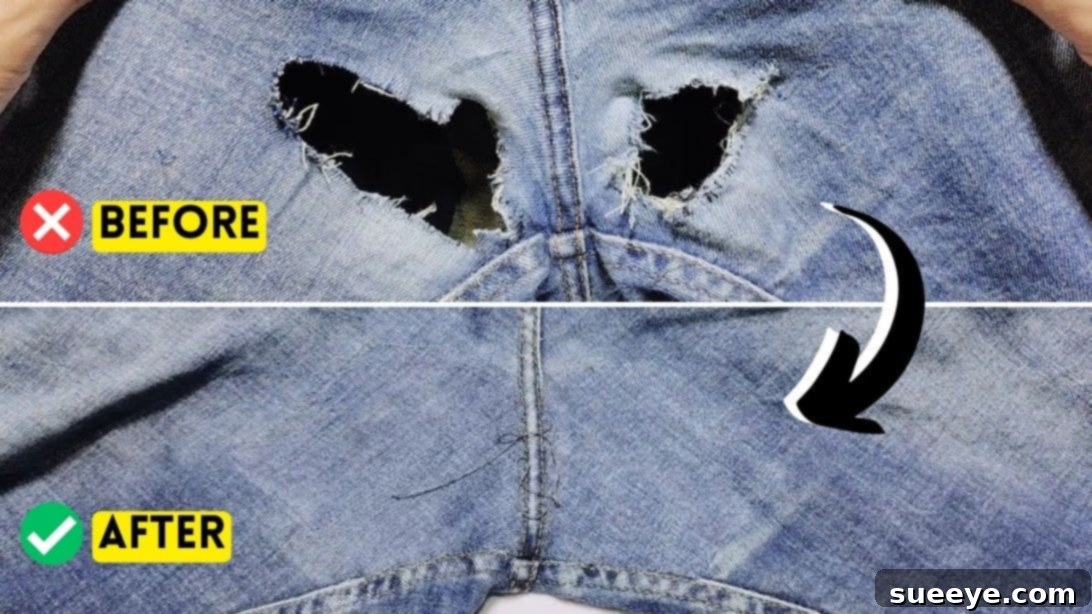
Invisible Jean Repair: A Step-by-Step Guide to Seamlessly Fixing Torn Denim
Do you have a beloved pair of jeans with a gaping hole that you thought was beyond saving? Before you relegate them to the scrap pile or, worse, the trash bin, consider the incredible power of a simple, invisible repair! Many people mistakenly believe that a significant tear means the end of a denim garment, but with the right technique, you can restore your jeans to their former glory, making the damage virtually undetectable. This detailed guide, inspired by brilliant tutorials like the one from Learning a craft on YouTube, will walk you through a super easy sewing method to mend torn jeans with only basic materials and a few minutes of your time. You’ll be amazed at how a seemingly irreparable hole can vanish, saving you money, promoting sustainability, and extending the life of your favorite denim.
Repairing your jeans isn’t just about frugality; it’s a statement of sustainability. Fast fashion contributes significantly to waste, and by choosing to mend rather than discard, you’re making an eco-conscious decision. Plus, there’s an immense satisfaction that comes from transforming something damaged into something perfectly wearable again with your own hands. This tutorial focuses on an “invisible” technique, meaning the repair blends so seamlessly with the original fabric that it’s difficult to spot, even upon close inspection. Ready to give your jeans a second life? Let’s gather our tools and get started!
Essential Materials for an Invisible Jean Repair
To achieve a professional and discreet repair, selecting the right materials is paramount. Here’s a detailed list of everything you’ll need, along with tips for choosing the best options:
- A Piece of Denim (Patch Fabric): This is perhaps the most crucial item. The patch fabric should be as close a match as possible to your jeans in terms of color, weight, and wash. Ideally, use a scrap piece from an old pair of jeans you no longer wear or even from the hem of the jeans you are repairing if you plan to shorten them. The better the match, the more invisible your repair will be.
- Fusible Webbing (Iron-on Adhesive): This magical material acts as a temporary or permanent adhesive, allowing you to bond fabrics together with heat. It’s essential for this method as it helps secure the patch in place, provides stability, and prevents fraying from the inside, contributing significantly to the “invisible” aspect of the repair. Choose a lightweight, flexible webbing designed for fabric.
- Tailor’s Chalk or Fabric Marker: Used for marking the repair area accurately. Chalk is easily removable and won’t stain your fabric.
- Sharp Scissors: A good pair of fabric scissors is vital for clean, precise cuts of both your jeans and the patch. Dull scissors can fray edges and make the job harder.
- Hand Sewing Needle: A sharp, medium-sized needle that can easily pass through denim. Ensure it’s not too thick to avoid leaving large holes in your fabric.
- Polyester Thread (Matching Color): Just like the patch denim, the thread color is critical. Choose a high-quality polyester thread that precisely matches the color of your jeans. Polyester is strong and durable, perfect for denim. If you can’t find an exact match, opt for a slightly darker shade rather than a lighter one, as darker threads tend to blend in better.
- Iron and Ironing Board: An iron is indispensable for pressing seams flat and, most importantly, for activating the fusible webbing to secure your patch. Ensure your iron has various heat settings suitable for denim.
Step-by-Step Guide to Invisible Jean Repair
Follow these detailed instructions carefully to achieve a durable and virtually invisible mend for your torn jeans. Patience and precision are key!
Step 1: Preparing the Tear and Cutting the Patch
The first step involves meticulously preparing the damaged area and creating the perfect patch. Begin by laying your jeans flat on a clean, well-lit surface, ensuring the torn area is fully exposed and flattened. Using your tailor’s chalk, carefully mark a rectangle or square around the torn part of the jeans. This marked area should encompass the entire tear and extend slightly beyond its frayed edges, providing ample room for the patch. The exact size will depend on the size of your hole; generally, aim for about an inch or two of overlap on all sides of the tear.
Next, take your chosen piece of matching denim. Lay it flat and use your scissors to cut out a patch that is slightly larger than the chalk outline you just drew on your jeans. A good rule of thumb is to cut the patch about half an inch to an inch larger than the marked area on your jeans on all sides. This extra allowance will be used for folding the edges of the patch, which is crucial for a clean and durable finish. Precision here ensures the patch will cover the entire damaged area without adding unnecessary bulk.
Now, prepare the patch for sewing. Fold in all four edges of the denim patch by about a quarter of an inch, pressing them flat with your fingers or an iron if needed. This creates a neat, finished edge that prevents fraying and ensures a smooth application. Place the prepared patch over the torn area on the *outside* of the jeans, aligning it so it completely covers the chalk outline. Using your matching polyester thread and a hand sewing needle, begin to carefully hand-sew the patch onto the jeans. Use a small, even running stitch or a whipstitch close to the folded edge of the patch. Work your way around the entire perimeter of the patch, securing it firmly to the jeans. Ensure your stitches are neat and tight, but don’t pull too hard to avoid puckering the denim. The goal here is to secure the patch temporarily and neatly, providing a base for the invisible finish.
Step 2: Securing the Patch from the Inside for an Invisible Finish
With the patch now sewn onto the outside, the next crucial steps involve working from the inside of the jeans to create the truly invisible and durable repair. Once the entire patch is securely stitched around its perimeter on the outside, it’s time to turn your jeans inside out. Carefully inspect the inside of the jeans where the patch has been sewn. You will likely see the excess fabric of the patch poking out around your initial stitching line. Using your sharp scissors, meticulously trim off this excess denim, leaving only a small seam allowance of about 1/8 to 1/4 inch from your stitching. Be careful not to cut into your previous stitches or the main denim fabric.
After trimming the excess, the seam allowance will be a continuous strip. To help this seam allowance lay flat without bulk, especially on curves, you need to create small notches. Snip into the seam allowance at regular intervals, about every quarter to half an inch, cutting almost up to your stitching line but not through it. These notches will allow the fabric to spread and lie flat when pressed open. Once notched, use your iron to carefully press these notched seam allowances open and flat against the inside of the jeans. This pressing step is critical for minimizing bulk and ensuring a smooth, undetectable repair from the outside.
Now, for the magic of fusible webbing. Cut a piece of fusible webbing that is slightly larger than the trimmed and pressed-open patch area on the *inside* of the jeans. Place this piece of fusible webbing directly on top of the patched area, ensuring it covers all the raw edges and the seam allowance you just pressed open. Using your iron set to the appropriate temperature for denim (refer to your fusible webbing’s instructions), press down firmly and evenly over the webbing. Hold the iron in place for the recommended amount of time, allowing the heat to activate the adhesive and bond the patch securely to the jeans from the inside. This step not only permanently secures the patch but also encapsulates the raw edges, preventing any future fraying and providing a smooth, durable finish that is barely noticeable from the outside.
Finally, trim off any excess fusible webbing that extends beyond the patched area to maintain a clean finish. Turn your jeans right-side out and inspect your work. You should find that the tear has disappeared, replaced by a smooth, reinforced section that blends beautifully with the original denim. The initial hand stitches on the outside, if done neatly with matching thread, will be almost indistinguishable from the texture of the denim itself.
*These amazing images are all credited to Learning a craft via YouTube. Check their other content and follow for more inspiring DIY projects!
Special Considerations: Repairing a Hole Between the Legs of the Jeans
Holes that develop between the legs or in the crotch area of jeans are a common and frustrating problem, often caused by friction and wear. While the general principles of patching remain the same, this area requires a bit more thought due to its high-stress nature and less visible location. Here’s how to adapt the invisible repair technique for this challenging spot:
- Assess the Damage: Crotch tears often start as thinning fabric before developing into full holes. If you catch it early, reinforcing the thinning area *before* a hole forms can significantly prolong the life of your jeans. If a hole has already appeared, make sure to assess the surrounding fabric for weakness. You may need to patch a larger area than just the immediate tear.
- Choose a Stronger Patch: For high-friction areas, consider using a slightly thicker or more durable denim patch. While invisibility is desired, durability in this area is paramount. A good color match is still important, but a slight difference in texture might be acceptable if it means a stronger repair.
- Larger Internal Patch: Instead of focusing solely on the outer visible repair, prioritize a generous internal patch. Cut your fusible webbing and denim patch much larger, extending well beyond the frayed edges into stable denim. This distributes the stress over a wider area, preventing new tears from forming just outside your repair.
- Reinforce with Darning (Optional but Recommended): For maximum strength in the crotch area, especially if the surrounding fabric is thin, consider adding machine darning stitches. After applying the internal patch and fusible webbing, you can use your sewing machine (with a darning foot if available) to sew parallel rows of stitches back and forth over the weakened area from the outside. Use a matching thread, and make the stitches dense and close together. This technique mimics the weave of the denim and creates a very strong, integrated repair. If you don’t have a machine, you can replicate this by hand with very small, close running stitches.
- Smoothness is Key: Because this area sees a lot of movement and friction, ensure your repair is as flat and smooth as possible. Any bumps or rough edges can cause discomfort or lead to premature wear of the repair itself. Press all seams and the fusible webbing thoroughly.
- Working in a Confined Space: Repairing the crotch area can be tricky due to the confined space. Turn the jeans inside out and try to flatten the area as much as possible. You might need to manipulate the fabric quite a bit to get your needle or machine foot into the right position.
By taking these extra steps, you can create a durable and effective repair for even the most challenging tears in your jeans, ensuring comfort and extending their lifespan significantly.
Tips for a Flawless Finish and Long-Lasting Repair
To ensure your invisible jean repair truly stands the test of time and looks professional, keep these additional tips in mind:
- Practice Makes Perfect: If you’re new to sewing or this specific technique, consider practicing on a scrap piece of denim first. This allows you to get a feel for the stitches, thread tension, and fusible webbing without risking your favorite jeans.
- Use a Thimble: Pushing a needle through thick denim can be tough on your fingers. A thimble will protect your finger and help you push the needle through with greater ease and control.
- Press, Press, Press: We can’t stress this enough. Pressing throughout the entire process – when folding edges, opening seam allowances, and applying fusible webbing – is crucial for a flat, neat, and invisible finish. It fuses layers together, sets stitches, and removes wrinkles.
- Consider a Walking Foot for Machine Sewing (if darning): If you decide to machine darn the area for extra strength, a walking foot can be incredibly helpful. It helps feed multiple layers of fabric evenly, preventing puckering and shifting.
- Don’t Rush: Take your time with each step. Rushing can lead to messy stitches, uneven patches, or improper application of the fusible webbing, all of which can compromise the repair’s invisibility and durability.
- Wash Carefully: After the repair is complete, it’s generally safe to wash your jeans as usual. However, for the first few washes, consider turning them inside out to protect the newly mended area, especially if you added darning stitches. Avoid harsh detergents or excessive heat if possible, as these can sometimes degrade adhesives over time.
- Address Small Fraying Early: Don’t wait for a small fray to become a large hole. Addressing minor wear and tear with a few discreet stitches or a small patch of fusible webbing can prevent bigger problems down the line.
Conclusion: Embrace the Art of Mending
There’s a unique satisfaction in taking a beloved item that’s been damaged and restoring it to its former glory. This invisible jean repair technique offers a practical, sustainable, and rewarding solution for anyone looking to extend the life of their denim. By carefully following these steps, choosing the right materials, and paying attention to detail, you can transform a seemingly irreparable tear into a practically invisible mend. Not only will you save money and reduce waste, but you’ll also gain a valuable skill that can be applied to many other garments. So, next time your favorite jeans suffer a tear, don’t despair – grab your needle, thread, and patch, and give them the second life they deserve!