
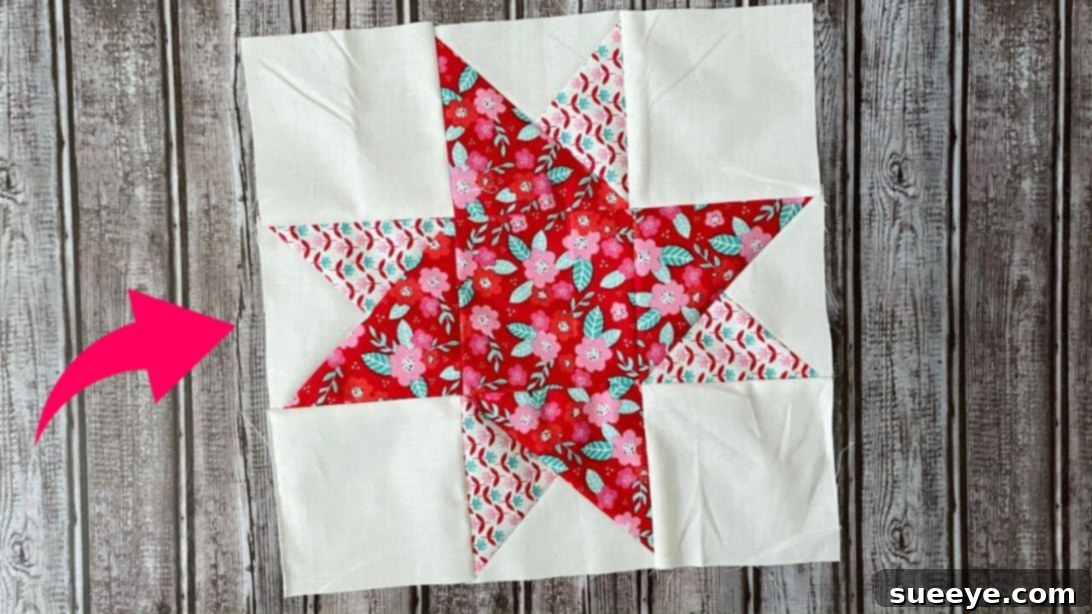
Mastering the Modified Double Friendship Star Quilt Block: A Comprehensive Guide for Quilters
For those who adore the timeless charm of star patterns in quilting, prepare to be captivated by this stunning modified double friendship star quilt block! This unique design is an absolute must-add to your quilting project list. Its captivating beauty and surprisingly straightforward construction make it a favorite among quilters of all skill levels. If you’ve enjoyed creating the classic Friendship Star Quilt Block, you’re in for an even more rewarding experience. This enhanced version takes the beloved simplicity of the original and elevates it with additional intricate points, creating a more dynamic and visually striking star that truly shines in any quilt.
Why You’ll Love Crafting This Double Friendship Star Quilt Block
The appeal of the Double Friendship Star isn’t just in its gorgeous appearance; it’s also in the satisfying process of bringing it to life. This pattern is designed to be incredibly beginner-friendly, offering clear steps that build confidence with every stitch. It’s a fantastic project for those new to quilting, providing an excellent opportunity to practice fundamental techniques such as precise cutting, accurate seam allowances, and efficient pressing. Experienced quilters will equally appreciate its versatility and the speed with which these beautiful blocks come together, making it perfect for quick projects or as a core element in larger, more complex quilt designs.
The subtle addition of extra points between the main star arms transforms a familiar motif into something fresh and exciting. This modification creates a layered depth, giving the impression of a star within a star, or a radiant glow emanating from its center. Whether you’re aiming for a cozy throw, a decorative wall hanging, or a thoughtful handmade gift, the Double Friendship Star quilt block provides a solid foundation for endless creative possibilities. It’s not just a block; it’s a statement piece that will garner admiration and be cherished for years to come.
Essential Materials for Your Double Friendship Star Quilt Block
Gathering your materials is the first exciting step in any quilting journey. For this beautiful Double Friendship Star quilt block, you’ll need a selection of fabrics that complement each other and bring your vision to life. The original tutorial by Cut and Create provides a clear breakdown, which we’ll follow to ensure a seamless crafting experience. Remember that fabric choice plays a crucial role in the final aesthetic, so select colors and patterns that resonate with your personal style or the intended recipient.
Fabric A: The Primary Print
- One (1) 6-inch printed square: This fabric will form a significant part of your star points, so choose a print that you love and that contrasts well with your background fabric.
Fabric B: The Background
- One (1) 6-inch background square: This square will be paired with Fabric A to create your initial half-square triangles.
- Four (4) 5-inch background squares: These smaller squares will frame your star, providing a clean border and helping the intricate star design stand out.
Fabric C: The Accent Print / Secondary Star Points
- Two (2) 5 1/2-inch printed squares: These larger squares will be crucial for forming the sharper, secondary points of your modified star. Opt for a print that either harmonizes or boldly contrasts with Fabric A for an impactful design.
- One (1) 5-inch printed square: This will be the center square of your quilt block, tying all the elements together. It can match Fabric A, Fabric C, or be a completely different coordinating fabric for an extra pop.
Tools You’ll Need for Quilting Success
Beyond the fabrics, having the right tools makes all the difference in achieving precision and enjoyment in your quilting projects. Here’s a list of essential tools that will help you craft a perfect Double Friendship Star quilt block:
- Sewing Machine: A reliable machine with a quarter-inch foot attachment for consistent seam allowances.
- Rotary Cutter: Sharp and efficient for accurate fabric cuts.
- Self-Healing Cutting Mat: To protect your work surface and prolong the life of your rotary blade.
- Quilting Rulers: Clear acrylic rulers (e.g., 6.5″ square, 12.5″ square) for precise measuring and squaring up.
- Fabric Scissors: Sharp scissors for small snips and thread cutting.
- Iron and Ironing Board: Essential for pressing seams flat and accurately.
- Pins or Fabric Clips: To hold fabric layers securely in place while sewing.
- Coordinating Thread: High-quality 100% cotton thread that matches or blends with your fabrics.
- Seam Ripper: For those inevitable moments when a stitch needs to be unpicked – every quilter’s friend!
Step-by-Step Guide to Crafting Your Double Friendship Star Quilt Pattern
Now, let’s dive into the exciting part: assembling your beautiful Double Friendship Star quilt block. Precision is key in quilting, especially when working with star points, so take your time with each step, paying close attention to your measurements and seam allowances. This guide builds upon the excellent instructions provided by Cut and Create, ensuring a smooth and enjoyable crafting experience.
Step 1: Preparing Your Half-Square Triangles (HSTs)
Begin by taking your 6-inch printed square (Fabric A) and your 6-inch background square (Fabric B). Place these two squares right sides together, ensuring all edges are perfectly aligned. Using a ruler and a fabric marker or pencil, draw a diagonal line from one corner to the opposite corner across the center of the top square. Then, draw a second diagonal line from the remaining two corners. You will have an “X” shape across your square. Now, carefully cut along both of these diagonal lines. This will yield four pairs of triangles, each consisting of one background fabric and one printed fabric triangle.
Step 2: Assembling the Half-Square Triangle Units
Take each pair of triangles from Step 1. Align the raw edges and sew them together along the longest edge (the hypotenuse) with a precise 1/4-inch seam allowance. As you sew, aim for consistency, ensuring that your background fabric is always on the left and the printed fabric on the right for uniformity. Once all four pairs are sewn, it’s time to set the seams. Press each seam open towards the darker (printed) fabric side. This helps to reduce bulk and creates a crisp, flat unit. After pressing, these units should form perfect squares. Carefully trim each unit to a precise 5-inch square. This squaring-up step is critical for ensuring your finished block lies flat and its points align perfectly.
Step 3: Creating the Star Points with Precision
Now, let’s add the intricate secondary points of our double star. Take your two 5 1/2-inch printed squares (Fabric C) and stack them neatly, one on top of the other. Cut both squares in half diagonally once. This will give you four large triangles. Next, take each of these large Fabric C triangles and place one on top of each of your 5-inch half-triangle units (from Step 2), right sides together. Position the Fabric C triangle so its longest edge aligns with one of the unsewn diagonal edges of your 5-inch square unit. Sew these pieces together along that edge with a consistent 1/4-inch seam allowance. After sewing, set the seams and press them open, again pressing towards the darker fabric to ensure a flat finish. Finally, and this is a crucial step for sharp points, trim each of these newly formed units down to a perfect 5-inch square. This meticulous trimming will sharpen your star points beautifully. You will now have four distinct star point units.
Step 4: Constructing the Quilt Block Layout
With your four star point units ready, it’s time to assemble the complete block. This step involves creating a traditional nine-patch layout. Lay out your pieces on a flat surface in a 3×3 grid. Take your four 5-inch background squares (Fabric B) and place them in the four corner positions of your grid. The five-inch printed square (Fabric C) will be the very center square of your block. Now, carefully arrange your four star point units (created in Step 3) in the remaining four positions, ensuring that the star points are oriented correctly to form the double star design radiating outwards. Refer to the provided image below for the precise arrangement.
Once you are satisfied with your layout, begin sewing the squares together in rows. Sew the three squares in the top row together, then the three squares in the middle row, and finally, the three squares in the bottom row. Press the seams for the top and bottom rows outwards (towards the background squares), and press the seams for the middle row inwards (towards the center printed square). This technique, known as “nesting seams,” will help your rows join perfectly in the next step. Once all three rows are sewn and pressed, carefully sew the rows together, aligning the nested seams to ensure precise points. Press the finished block flat to remove any puckering and reveal your magnificent Modified Double Friendship Star Quilt Block!
Pro Tips for a Perfect Double Friendship Star Quilt Block
Achieving a flawless quilt block is incredibly rewarding. Here are some expert tips to help you master the Double Friendship Star and elevate your quilting game:
- Accurate Cutting is Paramount: Use a sharp rotary cutter and ensure your fabric is pressed flat before cutting. Even a slight inaccuracy can throw off your points and block size.
- Consistent Seam Allowance: A perfect 1/4-inch seam allowance is the cornerstone of successful quilting. Consider using a 1/4-inch piecing foot on your sewing machine.
- Pressing Matters: Don’t underestimate the power of good pressing! Pressing seams flat and in alternating directions (“nesting”) helps blocks lie flat and points match up perfectly.
- Squaring Up Blocks: After each major step (like creating HSTs or the star points), use a square ruler to trim your units to the exact required size. This ensures all pieces fit together precisely.
- Chain Piecing: To save time and thread, sew multiple identical units one after another without lifting the presser foot or cutting the thread between them. This is especially useful for HSTs.
- Starch Your Fabric: A light mist of fabric starch before cutting can add stability to your fabric, making it easier to cut accurately and prevent stretching as you sew.
- Take Your Time: Quilting is a journey, not a race. Enjoy the process, and don’t rush. If a seam isn’t perfect, unpick it and re-sew. It’s always worth it for a beautiful result.
Customizing Your Double Friendship Star Quilt Block
One of the joys of quilting is the ability to infuse your personality into every project. The Double Friendship Star block offers immense potential for customization:
- Color Play: Experiment with different color palettes. Use bright, bold colors for a playful look, or subtle, muted tones for a more sophisticated aesthetic. Consider analogous colors for harmony or complementary colors for striking contrast.
- Fabric Selection: Beyond color, the type and print of fabric can dramatically change the block’s feel. Try florals, geometrics, solids, or batiks. A scrappy look using various coordinating prints can also be incredibly charming.
- Block Size Variation: While this tutorial focuses on a specific block size, you can easily scale the pattern up or down by adjusting your initial square measurements proportionally. Remember to adjust all subsequent cuts accordingly.
- Layout Options: Once you’ve created multiple blocks, consider various setting options. You can arrange them in a straight set, on point, or alternate them with plain or sashing blocks for a completely different effect.
Beyond the Block: What to Make Next?
Once you’ve mastered the Double Friendship Star quilt block, a world of project possibilities opens up! This versatile block can be incorporated into a wide range of quilted items:
- Full-Sized Quilt: Create a stunning heirloom quilt by making multiple blocks and sewing them together. The repeating star pattern will create a mesmerizing visual texture.
- Quilted Wall Hanging: A single block or a small collection of blocks can be framed or simply bound to create a beautiful piece of textile art for your home.
- Pillows and Cushions: Turn a single block into the front of a decorative throw pillow for your sofa or bed.
- Table Runners or Placemats: A few blocks sewn in a row make an exquisite table runner, perfect for adding a handmade touch to your dining area.
- Tote Bags or Pouches: Integrate a block into the design of a handmade bag for a unique and personal accessory.
The possibilities are truly endless, limited only by your imagination and creativity. Each project you undertake with this block will not only enhance your quilting skills but also bring a touch of handmade warmth and beauty into your life or the lives of those you gift your creations to.
Final Thoughts on Your Quilting Journey
The Modified Double Friendship Star quilt block is more than just a collection of fabric pieces sewn together; it’s a testament to the joy of creation, the beauty of pattern, and the satisfaction of mastering a new skill. Whether you’re a seasoned quilter or just embarking on your first quilting adventure, this pattern offers a delightful challenge and a rewarding outcome. Its elegant design and approachable construction make it an ideal choice for a wide array of projects, promising to add a touch of handmade charm to any space. So, gather your fabrics, fire up your sewing machine, and embark on the wonderful journey of creating your very own Double Friendship Star. Happy quilting!