
Craft a Beautiful Four Patch Lattice Quilt: Your Go-To Guide for an Easy Project
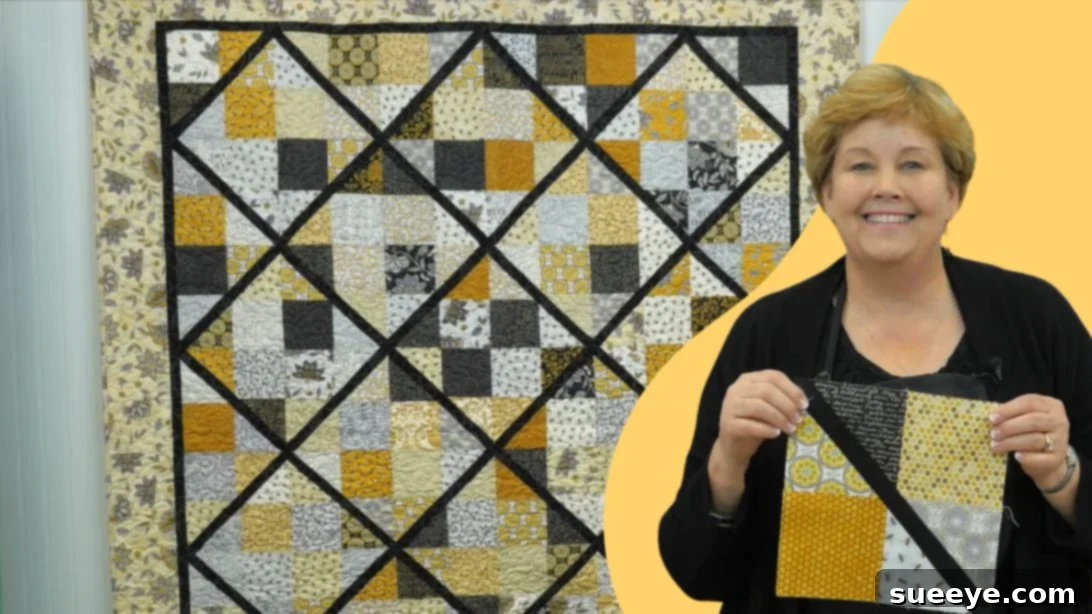
Are you searching for a rewarding yet straightforward quilting project to tackle this week? Look no further than the charming Four Patch Lattice Quilt. This ingenious pattern, popularized by the quilting experts at Missouri Star Quilt Company, transforms simple four-patch blocks into a visually stunning lattice design when assembled. Its elegant complexity belies its ease of construction, making it an ideal choice for quilters of all skill levels, from enthusiastic beginners to seasoned stitchers looking for a quick and satisfying make.
The beauty of the Four Patch Lattice Quilt lies in its repetitive yet striking pattern. Each block is incredibly simple to create, but when pieced together, they weave a captivating interplay of color and negative space, creating the illusion of intricate lattice work. This comprehensive guide will walk you through every step, from gathering your materials to assembling your quilt top, ensuring a smooth and enjoyable quilting journey. Get ready to transform your fabric stash into a cozy masterpiece that will be cherished for years to come. Whether you’re making it for yourself or as a thoughtful gift, the process is as rewarding as the finished product. Let’s dive in and start sewing!
Essential Materials for Your Four Patch Lattice Quilt
Before you begin your creative endeavor, gathering all your materials ensures a seamless and uninterrupted creative process. The Four Patch Lattice Quilt is wonderfully fabric-friendly, making excellent use of pre-cut squares. These pre-cuts save valuable time on measuring and cutting, allowing you to jump straight into the fun part of piecing. Here’s a detailed list of what you’ll need to bring your vision to life:
- Four Packs of 5″ Fabric Squares (Charm Packs): These delightful pre-cut squares are the heart of your quilt, forming the colorful four-patch units. Using charm packs is a fantastic shortcut, as they often come with a curated selection of coordinating fabrics, simplifying your color choices and ensuring a cohesive look. Aim for a generous variety of colors and patterns to add depth and visual interest to your lattice design. Consider contrasting light and dark prints to make your four-patches truly pop.
- 1 Yard of Background Fabric (Including Inner Border): This versatile fabric will create the elegant ‘lattice’ effect that defines this quilt, as well as the initial border around your quilt blocks. Opt for a solid color or a very subtle, tone-on-tone print that provides a stark contrast with your charm pack fabrics. Classic choices like white, cream, or light grey are perennial favorites, as they brilliantly highlight the colorful four-patch blocks and emphasize the intricate lattice structure. A clean, light background helps the pattern truly sing.
- 1 1/2 Yards of Outer Border Fabric: The outer border acts as a beautiful frame for your quilt, adding a professional finish and often a touch of grandeur. Choose a fabric that beautifully complements your overall color scheme but provides a distinct edge, visually separating the quilt center from its surroundings. This could be a coordinating solid, a sophisticated tone-on-tone, or a bolder print that masterfully ties all your chosen colors together, providing that ‘wow’ factor.
- 4 1/2 Yards of Backing Fabric: The backing fabric forms the ‘other side’ of your quilt and contributes significantly to its comfort, warmth, and drape. While it won’t be visible during the piecing process, selecting a fabric that you love and that feels good to the touch is important for the overall enjoyment of the finished quilt. Consider using wide-back fabrics to minimize seams, or get creative by piecing together standard width fabrics for a custom and unique quilt back.
- Basic Quilting Tools: Beyond the fabrics, ensure you have your essential quilting toolkit ready and within reach. This includes a sharp rotary cutter (with fresh blades for clean cuts), a self-healing cutting mat (to protect your surfaces), an acrylic ruler (preferably a long one for cutting strips and squaring blocks), a reliable iron and ironing board (for crisp seams), a sewing machine in good working order (recently serviced if possible), sharp sewing machine needles (appropriate for cotton fabric), high-quality cotton thread that matches your background fabric, fabric clips or pins (for holding pieces securely), and of course, a trusty seam ripper (because every quilter needs one!).
Careful selection of your fabrics is indeed paramount to the quilt’s overall aesthetic and success. Consider how your chosen colors and prints will interact, aiming for a harmonious balance between vibrant focal points and calming background elements. Don’t be afraid to experiment with different color palettes – from bright and bold modern combinations to soft and subdued vintage-inspired schemes – to create a quilt that truly reflects your personal style and vision.
Step-by-Step Instructions: Creating Your Four Patch Lattice Quilt
This tutorial meticulously breaks down the creation of the Four Patch Lattice Quilt into manageable, easy-to-follow steps, ensuring clarity and accuracy at every stage. Follow these instructions closely, taking your time with each phase, for a beautiful and professionally finished quilt top.
Step 1: Constructing Your Four-Patch Blocks
The very foundation of this captivating quilt is the classic four-patch block. To begin, select four distinct 5-inch fabric squares from your charm packs. It is crucial at this stage to choose squares with varying colors or patterns that provide a good contrast to create visual interest and ensure the lattice effect stands out prominently later. Lay them out in a 2×2 grid on your workspace or design wall, experimenting with different arrangements until you find a color combination that is visually appealing and balanced. Once you are completely satisfied with your color placement, take the two squares from the top row and place them right sides together, carefully aligning their edges. Sew them together along one side using a precise 1/4-inch seam allowance. Repeat this exact process for the two squares in the bottom row, joining them with the same accurate seam allowance.
After sewing each pair, take them to your ironing board. This is a critical step for flat and accurate blocks. Carefully press the seams in opposite directions. For example, press the seam of the top pair towards the left, and the seam of the bottom pair towards the right. This clever technique, commonly known as “nesting” seams, will help your seams interlock perfectly when you join the rows, significantly reducing bulk at the intersections and resulting in flatter, more accurate blocks. Now, place the two sewn rows right sides together, ensuring the center seams are perfectly aligned and nested. Pin them securely in place at the intersections and along the edges to prevent any shifting during sewing. Sew these two rows together with another accurate 1/4-inch seam allowance. Finally, press the entire four-patch block flat. You’ll want to press this final seam open or to one side, whichever method creates the flattest block with the least bulk. Repeat this entire process until you have created all the necessary four-patch blocks required for your quilt. Remember, precision in cutting and sewing these initial blocks will pay significant dividends in the final assembly and overall appearance of your quilt.
Step 2: Cutting Your Four-Patch Blocks Diagonally
This is the pivotal step where the magic truly begins, transforming your neat square four-patch blocks into the foundational units ready for the distinctive lattice design. Take one of your completed four-patch blocks and carefully place it on your cutting mat, ensuring it lies flat and stable. Using your acrylic ruler and a sharp rotary cutter, meticulously cut the block diagonally from one corner all the way to the opposite corner. This precise cut will yield two identical triangular units from each four-patch block. Repeat this exact process for all your four-patch blocks. Consequently, you will end up with twice as many triangular units as you originally had four-patch blocks. It is absolutely essential to make these diagonal cuts as straight and accurate as possible, as any wobble or deviation will directly affect the straightness and crispness of your lattice lines later on in the quilt assembly. Handle the bias edges of these newly cut triangles with extra care and gentleness to avoid stretching or distorting their shape, which can lead to wavy seams.
Step 3: Preparing Your Background Fabric Strips
Now it’s time to prepare the crucial strips that will form the defining, crisp lattice lines of your quilt. From your chosen background fabric, carefully cut 1 1/2-inch wide strips. The initial length of these strips will typically depend on the width of your fabric, which is generally between 42-44 inches from selvage to selvage. Once you have cut several of these consistent 1 1/2-inch wide strips, you will then cut them into individual 14-inch segments. This measurement of 14 inches is purposefully generous; it allows for easy handling during the sewing process and provides ample excess length for precise trimming later, ensuring your lattice strips are comfortably long enough to extend beyond the edges of your triangular units. Accuracy in cutting these strips is paramount for achieving consistent and straight lattice lines throughout your entire quilt. Before you start cutting, take the time to square up your fabric if it’s not perfectly even, to ensure all your strips are uniform in width and perfectly straight.
Step 4: Attaching the First Lattice Strip to a Triangle
Take one of your pre-cut 14-inch background fabric strips. Fold it precisely in half lengthwise and use your fingers to create a sharp crease down the exact center. This finger-pressed line will serve as a crucial guide for accurately centering the strip on your triangular units. Now, take one of the diagonal four-patch triangles you carefully cut in Step 2. Place the finger-pressed background strip onto the right side of the triangle, making sure to align the center crease of the strip directly over the diagonal cut seam of the triangle. Critically, ensure that the strip extends beyond both ends of the triangle by a noticeable amount. Sew the strip to one side of the triangle with a consistent 1/4-inch seam allowance, running your stitch precisely parallel to the diagonal seam of the four-patch. Once sewn, take the unit to your ironing board and carefully press the seam open or towards the background strip, ensuring it lies perfectly flat and smooth. The excess length of the strip extending beyond the triangle will be trimmed with precision in a later step.
Step 5: Attaching the Second Triangle to Complete the Lattice Unit
With the first background strip now securely sewn to one triangular four-patch half, take another of your diagonal four-patch triangles. Line up this second triangle to the remaining unsewn side of the background strip, ensuring its diagonal cut seam also aligns perfectly with the finger-pressed crease line of the strip. Place it right sides together with the background strip, taking care to match all raw edges. Secure with pins if necessary. Sew with a consistent 1/4-inch seam allowance, maintaining the straightness of your stitch. Once this second seam is sewn, carefully press the entire unit flat. For the neatest and most professional finish, flip the unit over and press the seams out from the center background strip. This specific pressing technique will help to reduce bulk at the seam intersections and create a crisp, well-defined lattice line, allowing the design to truly shine. Congratulations! You have now successfully created one complete lattice unit, consisting of two triangular four-patch halves expertly joined by a background strip.
Step 6: Trimming Your Lattice Units for Perfect Squares
Precision trimming is an absolutely vital step for ensuring that all your lattice units are not only the same size but also perfectly square. This uniformity is essential for accurate quilt assembly and a professional-looking finished product. Take your newly created lattice unit and fold it in half, aligning the outer edges as best as possible to form a larger triangle. Place it on your cutting mat. Align your quilting ruler with the raw edges of the block, making sure to keep the center lattice line perfectly straight and centered beneath your ruler. Carefully trim away any excess fabric on both sides, meticulously squaring up the block. The ultimate goal here is to create a perfectly square block with the lattice strip running diagonally and centrally through its design. If you are closely following the Missouri Star method, you will typically trim these blocks to a specific, consistent size (e.g., 6.5 inches square, although the exact finished size can vary). Repeat this precise trimming process for all your lattice units, ensuring they are all uniformly sized and perfectly square. This step might seem minor, but it is unequivocally crucial for achieving a beautifully flat, accurately pieced, and professional quilt top.
Step 7: Assembling the Quilt Top and Adding Borders
With all your individual lattice units meticulously prepared and squared, it’s time for the most exciting part: assembling your complete quilt top! For this particular quilt size as suggested, you will need a total of 42 finished blocks. Begin by arranging these blocks into 7 distinct rows, with each row containing 6 blocks. This is the absolutely crucial stage where the intricate lattice design truly emerges. As you carefully lay out your blocks on the floor, a design wall, or any large flat surface, pay close and careful attention to the orientation of each block. Rotate and arrange them thoughtfully so that the background strips connect seamlessly from one block to the next, forming continuous diagonal lines that create the beautiful and striking lattice effect across your entire quilt. Take your time with this visual step; it’s highly recommended to step back frequently to view the overall design from a distance, ensuring you’re completely happy with the placement of colors, patterns, and the flow of the lattice.
Once you are fully satisfied with your chosen layout, begin sewing the blocks together into rows. Take the first two blocks of your first row, place them right sides together, carefully aligning all raw edges, and sew with a precise 1/4-inch seam allowance. Continue adding blocks to complete the entire row in this manner. After completing the first row, press the seams of your first row in one consistent direction (e.g., all towards the left). For the next row, press them in the opposite direction (e.g., all towards the right). This clever technique will again allow for nesting seams when you join the rows later, which is instrumental in ensuring a wonderfully flat, accurate, and professional-looking quilt top. After all 7 rows are sewn and meticulously pressed, it’s time to join them together. Pin the rows right sides together, taking extra care to accurately align all the seams where the blocks meet, and more importantly, to ensure the lattice lines connect perfectly across the rows. Sew the rows together with a consistent 1/4-inch seam allowance. Press these final row seams flat, preferably open, to evenly distribute any bulk and maintain flatness. You now have your beautifully completed quilt center!
The next exciting step is to add the inner border, which provides a crisp frame. From your remaining background fabric, carefully cut 1 1/2-inch wide strips. Before cutting, accurately measure the length and width of your quilt top through the center, rather than just along the edges, to get the most accurate measurement. Cut your border strips to these exact measurements. Sew the side borders first, attaching them to the long sides of your quilt top, then add the top and bottom borders, pressing seams towards the border fabric for a clean finish. Finally, add your decorative outer border. From your chosen outer border fabric, cut 6-inch wide strips. Attach these wider strips in the same manner as the inner border, typically sewing the side borders first, then the top and bottom, again pressing seams towards the border. This final framing provides a beautiful, polished finish and helps to stabilize your entire quilt top, preparing it for the next stages of batting, backing, and quilting! Your stunning Four Patch Lattice Quilt top is now complete and ready for the next phase of its transformation into a finished heirloom.
Tips for Quilting Success
Achieving a truly beautiful quilt isn’t just about diligently following step-by-step instructions; it’s also about embracing good habits, learning effective techniques, and enjoying the creative journey. Here are some extra tips to significantly enhance your quilting experience and ensure a fantastic outcome:
- Accuracy is Your Best Friend: In the world of quilting, a precise 1/4-inch seam allowance is considered gospel. It is the cornerstone of blocks fitting together perfectly. If you don’t already have one, invest in a good 1/4-inch presser foot for your sewing machine, which often includes a guide to help you maintain consistency. Consistent seam allowances are absolutely crucial for blocks to fit together seamlessly and for your quilt top to lay flat.
- Pressing Matters Immensely: Never underestimate the transformative power of a good iron and proper pressing techniques. “Pressing” (gently applying heat and pressure, lifting and moving the iron) is different from “ironing” (gliding the iron back and forth, which can distort fabric). Pressing your seams after each sewing step helps to create flat, crisp blocks and a wonderfully smooth quilt top. Experiment with pressing seams open or to one side to find what works best for your specific pattern, fabric type, and desired outcome.
- Stay Organized and Plan Ahead: Keeping your cut pieces and assembled blocks well-organized is key to a stress-free quilting process. A design wall (even a simple flannel sheet tacked to a wall) can be an invaluable tool for laying out your blocks and visualizing your entire quilt top before you commit to sewing. This allows you to easily rearrange and finalize your design.
- Take Breaks and Enjoy the Process: Quilting should always be an enjoyable and relaxing experience! If you ever find yourself feeling frustrated, tired, or overwhelmed, don’t hesitate to step away from your project for a bit. A short break and a fresh perspective can often help you solve a tricky problem or simply return with renewed enthusiasm.
- Keep Your Tools Sharp and Maintained: Ensure your rotary cutter blade is always sharp; a dull blade can lead to inaccurate cuts and frayed edges. Similarly, use a fresh sewing machine needle for each new project (or after about 8 hours of sewing); a dull or bent needle can cause skipped stitches, pulled threads, and fabric damage.
- Watch the Experts for Visual Guidance: Online video tutorials, especially from reputable sources like Missouri Star Quilt Co. with Jenny Doan, offer fantastic visual guidance and often demonstrate techniques more clearly than written instructions alone. Don’t hesitate to watch a video if a step isn’t perfectly clear from the written instructions. Visual learners often benefit greatly from seeing the process in action.
Expand Your Creativity: Variations and Customization
While this tutorial provides a clear guide for a specific size and design of the Four Patch Lattice Quilt, the beauty of this pattern lies in its incredible versatility. It’s a fantastic springboard for your own creative explorations. Here are some inspiring ideas to customize and personalize your next project:
- Size It Up or Down: Don’t feel limited to the suggested quilt size. You can easily adjust the number of blocks and rows to create anything from a charming table runner or a cozy baby quilt to a generous twin, queen, or even a king-sized bed quilt. Simply calculate how many blocks you need based on your desired finished dimensions and the size of your trimmed lattice units.
- Unleash Color Play: Experiment boldly with different color palettes! Use a vibrant rainbow of charm packs for a cheerful, modern look, or stick to a sophisticated monochromatic scheme for subtle elegance. Consider holiday-themed fabrics for festive seasonal quilts, or delve into analogous colors for a calming effect. The background fabric itself can also be changed for dramatic effect – imagine a dark background making bright four-patches glow!
- Border Bonanza: Change the width or the number of borders to completely alter the quilt’s frame and overall impact. You could add multiple narrow borders in contrasting colors to create a ‘frame within a frame’ effect, or opt for a single, extra-wide border featuring a decorative print that ties all your quilt’s elements together. Consider pieced borders for an even more intricate look.
- Explore Block Placement: While the classic lattice effect is achieved through specific block orientation, don’t be afraid to experiment! Try playing with random block placements for a more improv feel, or aim to create a beautiful gradient of color that flows subtly or dramatically across your entire quilt top.
- Diverse Fabric Choices: Don’t limit your creativity to traditional quilting cotton. Explore the possibilities of using super-soft flannel for an extra cozy winter quilt, or delve into the rich textures and vibrant colors of batiks for a more artistic and unique flair. Always remember to consider how different fabric types will interact during the sewing, pressing, and washing stages.
Final Thoughts on Your Quilting Journey
The Four Patch Lattice Quilt is far more than just a simple pattern; it represents a wonderful opportunity to create something truly beautiful, functional, and deeply personal with your own hands. The immense satisfaction of witnessing simple fabric squares transform into a complex-looking yet entirely achievable design is an incredibly rewarding experience that resonates deeply with makers. Whether this project marks your very first foray into the world of quilting or your fiftieth completed masterpiece, this pattern offers a fantastic chance to refine your skills, enjoy the meditative process of sewing, and ultimately produce a cherished heirloom that will bring warmth and joy for many years to come. So, gather your carefully chosen fabrics, fire up your trusty sewing machine, and confidently embark on this delightful quilting adventure. We, and the entire quilting community, can’t wait to see the unique and stunning quilt you create!