
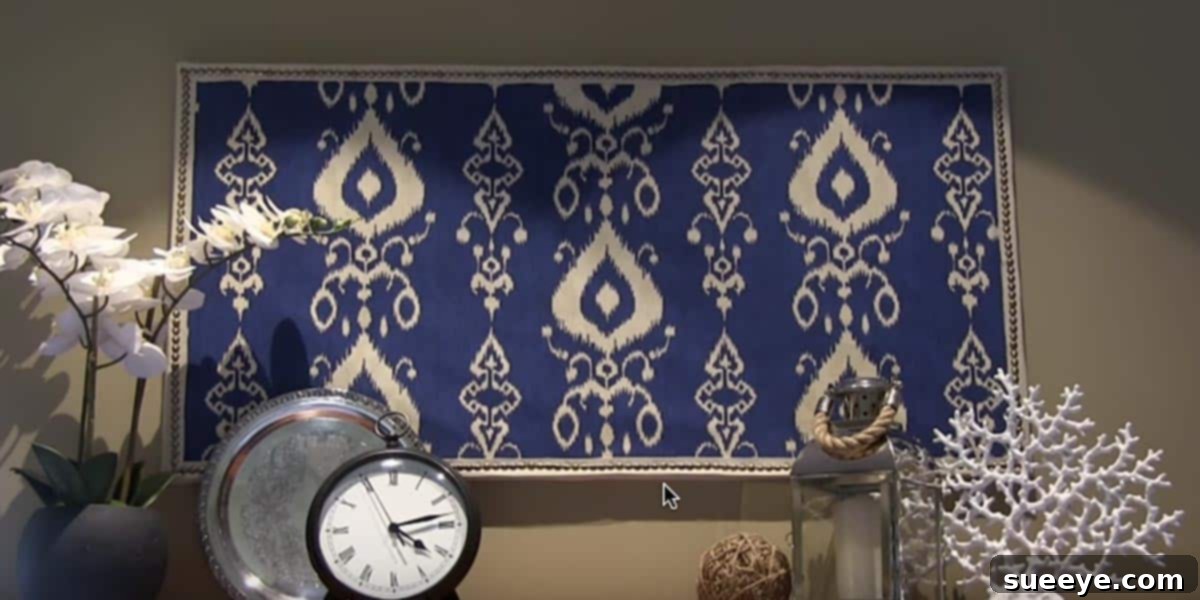
DIY Fabric Canvas Art: Transform Your Walls with Custom, Affordable Elegance
Do you look at your bare walls and envision something truly unique, yet struggle with the high price tags of store-bought art? Imagine crafting stunning, personalized wall decor that not only reflects your style but also costs a mere fraction of what you’d pay at high-end retailers. This comprehensive guide reveals how to create luxurious fabric canvas art, a project so captivating and budget-friendly, it’s often mistaken for expensive designer pieces. Whether you’re a seasoned crafter, a home stager looking for impactful solutions, or someone simply yearning to infuse character into their living space, this DIY project is your answer.
The beauty of this project lies in its remarkable versatility. You are the designer, empowered to choose any fabric that speaks to your aesthetic. While upholstery fabrics lend an especially opulent and rich finish, any fabric—from delicate cotton prints to vibrant silks—can be transformed into a work of art. This project, which can be completed for approximately $30, yields results that look far more expensive, offering unparalleled value. I’ve personally used this technique in home staging projects, needing quick, impactful art pieces that immediately elevate a room’s appeal. The results are always striking and perfectly suited for the space, often becoming a focal point.
Beyond personal home decor, these fabric canvases make exceptional gifts. Imagine creating a large, bespoke piece for a friend’s new living room, or a charming grouping of smaller canvases for a newly designed half bath. The possibilities are endless, allowing you to tailor each creation to the recipient’s taste and decor, making every gift deeply personal and memorable. It’s an opportunity to spread creativity and beauty without breaking the bank.
Why Choose DIY Fabric Canvas Art? Unveiling the Benefits
Opting for DIY fabric canvas art offers a multitude of advantages over traditional wall decor options. Here’s why this project stands out:
- Unbeatable Affordability: High-quality wall art can be prohibitively expensive. This DIY method allows you to achieve a sophisticated look for a fraction of the cost, often under $30 for a sizable piece.
- Endless Customization: Unlike limited store selections, you have complete control over the design. Choose any fabric – be it a bold geometric, a serene floral, a textured linen, or a luxurious velvet – to perfectly match your existing decor or introduce a fresh new accent.
- High-End Aesthetic: With careful selection of fabric, especially upholstery-grade materials, your finished art will exude a rich, professional, and expensive appearance that belies its humble origins.
- Therapeutic and Rewarding: The process of creating something beautiful with your own hands is incredibly satisfying. It’s a creative outlet that results in a tangible piece of art you can proudly display.
- Perfect for Home Staging: For those in the home staging industry, these pieces are invaluable. They offer quick, impactful, and cost-effective solutions to fill blank walls, add warmth, and define spaces, helping homes appeal to a wider range of buyers.
- Thoughtful Gifting: A handmade fabric canvas is a deeply personal and cherished gift for housewarmings, weddings, birthdays, or any special occasion.
Selecting Your Materials: The Foundation of Your Masterpiece
The success of your fabric canvas art project hinges on selecting the right materials. Here’s a detailed look at what you’ll need and tips for choosing each component.
Supplies:
- Canvas: Stretched canvas of your desired size. Available at craft stores in various dimensions.
- Fabric: Enough to cover your canvas with a 1.5 to 2-inch overhang on all sides.
- Tacky Glue or Staple Gun: For securing the fabric. A staple gun with 1/4 inch staples is generally preferred for a strong hold.
- Ribbon: Decorative ribbon (e.g., 1-inch wide grosgrain or satin) to cover the canvas edges.
- Decorative Nail Head Trim: Strips or individual nail heads for an elegant, upholstered finish.
- Peel and Stick Fabric Tape: Double-sided adhesive tape specifically for fabric, ideal for ribbon application.
- Fabric Scissors: Sharp scissors for clean cuts.
- Iron: To remove wrinkles from your fabric.
- Hammer: For applying decorative nail head trim.
- Measuring Tape or Ruler: For precise cuts and placements.
The Canvas: Your Blank Slate
Canvases come in various sizes, from small 5×7 inches to large 36×48 inches and beyond. Consider the space you want to fill. For a significant statement piece, a larger canvas works best. For a gallery wall or grouping, a combination of smaller and medium sizes creates visual interest. You can find affordable multi-packs at craft stores like Michael’s or Hobby Lobby, especially when they have sales.
The Fabric: Where Personality Shines
This is where your creativity truly comes alive. Upholstery fabrics are highly recommended due to their rich texture, durability, and luxurious appearance. Their thicker weave naturally gives a more expensive, custom feel. However, don’t limit yourself! Consider:
- Patterns: Geometrics, florals, abstracts, stripes – choose something that complements your room.
- Textures: Velvets, linens, cottons, silks, even embroidered fabrics.
- Colors: Bold and vibrant, or muted and monochromatic.
When selecting fabric, ensure it’s not too sheer, as the canvas might show through. Also, if your fabric has a distinct pattern repeat, you’ll want to ensure you have enough to center the pattern attractively on your canvas.
Adhesives and Fasteners: Holding it All Together
While tacky glue can work, especially for smaller pieces, a staple gun provides a much more secure and durable bond, essential for larger or frequently moved pieces. Ensure your staples are short enough (1/4 inch) not to protrude through the front of the canvas frame.
Embellishments: The Finishing Touches
The ribbon and decorative nail head trim are what truly elevate this project from a simple fabric wrap to a high-end art piece. The ribbon provides a clean, finished edge, neatly hiding the staples or glue line. The nail head trim adds that “upholstered furniture” elegance. These come in various finishes (brass, silver, antique bronze) and styles, so choose one that matches your fabric and overall decor.
Step-by-Step Guide: Crafting Your Fabric Canvas Art
Follow these detailed steps to create your beautiful fabric canvas art. Precision and attention to detail will ensure a professional-looking finish.
Step 1: Prepare Your Workspace and Fabric
Lay your chosen fabric face down on a clean, flat, and spacious work surface. Ensure it’s perfectly smooth. Next, place your canvas in the absolute center of the fabric. Using your fabric scissors, cut around the canvas, leaving an overhang of approximately 1.5 to 2 inches on all four sides. This excess fabric is crucial for wrapping and securing the material to the back of the canvas frame.
Once cut, thoroughly iron your fabric. This step is non-negotiable! Any wrinkles, creases, or folds will be magnified once the fabric is stretched over the canvas, detracting from the pristine finish you’re aiming for. Take your time to ensure the fabric is flawlessly smooth.
Step 2: Position the Fabric and Canvas for Wrapping
With your ironed fabric still face down on your clean work surface, place the canvas directly on top of it, also face down. Ensure the canvas is perfectly centered on the fabric, allowing for an even overhang around all edges. Double-check that the front (painted side) of your canvas is facing down towards the back of your fabric. This setup ensures that when you wrap and flip, the correct side of the fabric will be visible.
Step 3: Secure the Fabric to the Canvas – The Foundation
This is the most critical step for a professional finish. Begin by folding one side of the fabric over the canvas frame, pulling it taut. Start with a corner or a central point along one edge. Using your staple gun (or applying tacky glue along the frame edge), secure the fabric. The key here is consistent tension. Work your way around the entire perimeter of the canvas, pulling the fabric firmly and evenly before stapling every 4-5 inches. This prevents sagging or puckering on the front of the canvas.
When you reach the corners, imagine wrapping a gift. Fold the fabric neatly to create crisp, flat corners on the front side of the canvas. You can either create a diagonal fold or carefully pleat the excess fabric, then staple it securely to the back of the frame. Ensure no bulkiness shows through to the front. Once all sides are stapled and the fabric is taut, flip the canvas over to inspect your work. The fabric on the front should be smooth, wrinkle-free, and perfectly stretched.
Step 4: Refine the Edges with Ribbon (Optional but Recommended)
The ribbon adds a polished touch, effectively concealing any staples or imperfections along the canvas’s edge. First, iron your chosen ribbon to remove any creases. Next, apply the peel and stick fabric tape directly to the back of the ribbon. It’s often easier to apply the tape to the ribbon first, then carefully align and press the ribbon onto the edge of the canvas. Start from one corner, slowly peeling the backing off the fabric tape as you adhere the ribbon along all four edges of the canvas. Ensure the ribbon is applied straight and smoothly, wrapping neatly around the corners for a seamless look.
Step 5: Add Decorative Nail Head Trim (The Luxurious Touch)
This step truly elevates the project, giving it that high-end upholstered feel. Decorative nail head trim often comes in strips, with pre-spaced individual nail heads and a real nail every 5th or so head. Place the nail head trim directly on top of the ribbon, along the edges of the canvas. For the first few real nails, you might want to gently mark their positions with a pencil to ensure even spacing. Carefully tap the nails through the designated holes using your hammer, securing the strip in place. Take your time to ensure the trim is straight and evenly spaced around the entire canvas. The exact placement of these nails is crucial for a symmetrical and refined appearance.
Unleashing Your Creativity: Customization and Design Tips
One of the greatest joys of DIY is the freedom to customize. Here are ideas to make your fabric canvas art truly unique:
- Grouping & Gallery Walls: Create a striking gallery wall by grouping multiple canvases of varying sizes and coordinating fabrics. Mix patterns, textures, and even colors for an eclectic yet cohesive display.
- Mix and Match Fabrics: Don’t be afraid to use different fabrics on multiple canvases within a grouping. For instance, a bold patterned central piece flanked by two solid-colored textured pieces can create a powerful visual statement.
- Seasonal Decor: Easily change your wall art with the seasons! Create canvases with festive or seasonal fabrics to refresh your decor throughout the year without significant expense.
- Thematic Decor: Design canvases around a specific theme for a child’s room, a holiday, or a hobby. Think nautical fabrics for a beach-themed bathroom or rustic plaids for a cozy cabin feel.
- Alternative Trims: Instead of ribbon and nail heads, consider other embellishments like cording, fringe, decorative buttons, or even small studs for a different aesthetic.
- Monochromatic Magic: Use different textures of fabric in the same color family for a sophisticated, subtle, and incredibly chic look.
Beyond Personal Decor: Gifting and Home Staging Potential
This project extends its utility far beyond decorating your own home:
Personalized Gifts That Impress
Imagine the delight of a friend or family member receiving a custom piece of art specifically made for their new home or to match their unique style. This project allows for deep personalization:
- Housewarming Gifts: A large statement piece for a living room or bedroom.
- Wedding Gifts: Coordinated pieces that match the couple’s decor style or wedding colors.
- Baby Shower Gifts: Adorable fabric art for a nursery, perhaps featuring prints that tie into the nursery theme.
- Holiday Gifts: A thoughtful, handmade present that shows you care.
Invaluable for Home Staging
As a former home stager, I can attest to the immense value of this DIY fabric canvas art. Home staging aims to make a property appeal to the widest possible audience, often requiring stylish yet affordable decor solutions. These fabric canvases are perfect because:
- Cost-Effective Impact: They fill large blank walls that would otherwise look sparse, creating warmth and visual interest at minimal cost.
- Neutral yet Stylish: By choosing neutral-toned or subtly patterned upholstery fabrics, you can create pieces that are broadly appealing, yet still convey a sense of luxury and design.
- Quick to Produce: When you need art pieces quickly for a staging deadline, this project is efficient and yields immediate results.
- Versatile: Easily moved and reused in different staging projects, adapting to various decor styles simply by changing the fabric.
Estimated Cost Breakdown and Savings
Let’s break down the approximate costs to illustrate just how budget-friendly this project truly is, especially when compared to retail prices:
- Canvas: A medium-sized canvas (e.g., 24×36 inches) can cost anywhere from $10-$25, but often you can find them on sale or with coupons for less. Smaller canvases are even cheaper, sometimes $5-$10 for a multi-pack.
- Fabric: High-quality upholstery fabric might be $15-$30 per yard. For a 24×36 inch canvas, you might need 1-1.5 yards, totaling $15-$45. However, you can often find remnants or sale fabrics for much less, bringing the cost down to $5-$15.
- Ribbon: A roll of decorative ribbon might be $3-$7.
- Decorative Nail Head Trim: A strip or pack of individual nails can range from $5-$15.
- Adhesives/Tools: If you don’t already own a staple gun or fabric tape, these are one-time investments (staple gun $15-$30, fabric tape $5-$10).
By being savvy with sales and choosing moderately priced fabric, you can easily create a beautiful piece for around $30, as mentioned earlier. Compare this to a similar-sized, framed fabric art piece from a retailer like Pottery Barn or Wayfair, which could easily cost $150-$400 or more. The savings are substantial, allowing you to decorate multiple walls for the price of one store-bought item.
Conclusion: Your Walls Await Their Transformation
This DIY fabric canvas art project is more than just a craft; it’s an invitation to infuse your home with personality, luxury, and style on an accessible budget. It empowers you to create custom pieces that resonate with your personal taste, offer meaningful gifts, and even elevate your home staging endeavors. The process is straightforward, the materials are readily available, and the artistic possibilities are boundless.
No longer do you have to compromise on style due to budget constraints. Embrace the joy of creating something beautiful with your own hands and watch as your bare walls transform into captivating showcases of textile art. Gather your supplies, choose a fabric that inspires you, and embark on this rewarding journey to redefine your home’s aesthetic. Your unique fabric canvas masterpiece is just a few steps away!