
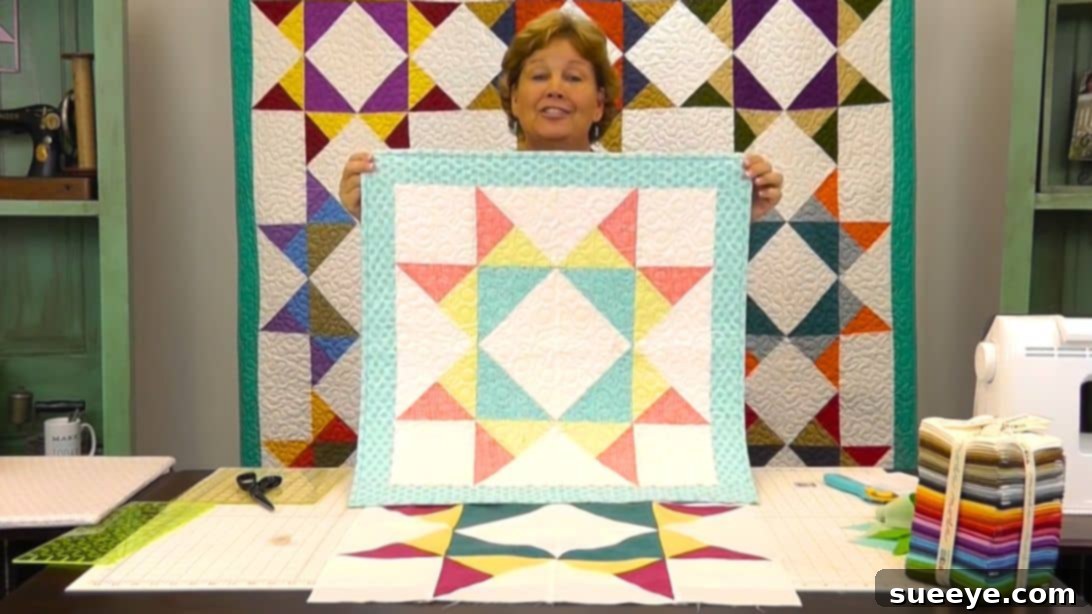
Mastering the Iconic Missouri Star Quilt Block: A Comprehensive Tutorial with Jenny Doan’s Signature Style
For countless quilters around the globe, the name Jenny Doan is synonymous with inspiration, creativity, and approachable quilting techniques. Her infectious enthusiasm and clear instruction have demystified complex patterns, making quilting accessible and enjoyable for everyone. If you’re a fan of Jenny Doan and Missouri Star Quilt Company, you’ve undoubtedly encountered their distinctive logo and the beloved Missouri Star quilt block. This classic design is not only visually stunning but also surprisingly versatile, making it a favorite among quilters of all skill levels.
Have you ever admired the intricate beauty of the Missouri Star block and wished you could create one yourself? Now is your chance! This comprehensive tutorial will guide you through every step, transforming fabric squares into a radiant quilt block that embodies the charm and elegance of traditional quilting. We’ll break down Jenny Doan’s popular method, ensuring you achieve professional-looking results with a clear, straightforward approach. Get ready to enhance your quilting skills and add this timeless pattern to your repertoire!
Why the Missouri Star Quilt Block Shines in the Quilting World
The Missouri Star quilt block is more than just a pattern; it’s a testament to enduring design and clever construction. Its striking appearance, often reminiscent of a celestial body or a blooming flower, brings a dynamic energy to any quilt. What makes this block particularly appealing is its adaptability. While it appears intricate, its construction relies on fundamental quilting units, primarily half-square triangles (HSTs), which makes it a fantastic project for both adventurous beginners and seasoned quilters looking for a satisfying sew.
Furthermore, the Missouri Star block provides an excellent canvas for exploring color theory and fabric play. By strategically selecting contrasting fabrics, you can make the star points pop, create a sense of depth, or even introduce subtle variations that change the block’s overall feel. It’s a design that looks beautiful in a single-block project, like a cushion cover, or when repeated across an entire quilt, forming a mesmerizing tapestry of stars. Following Jenny Doan’s methods, we’ll ensure your journey to creating this iconic block is both educational and deeply rewarding.
Essential Materials for Your Missouri Star Quilt Journey
Before diving into the precise cuts and stitches, gathering your materials is key to a smooth quilting process. For this stunning Missouri Star quilt block, inspired by Jenny Doan’s approachable methods, we’ll primarily be working with pre-cut fabric squares, making the cutting process much simpler and faster. Here’s what you’ll need:
- One Layer Cake (or 42 pieces of 10″ squares): A layer cake is a convenient bundle of 42 pre-cut 10-inch by 10-inch fabric squares, typically from a single fabric line. This ensures a coordinated palette, but feel free to curate your own collection of 10-inch squares for a truly unique look. These will form the colorful stars within your blocks.
- 4 Yards of White Fabric for the Background: This fabric will provide the crucial contrast that allows your colorful stars to truly shine. A good quality quilting cotton in a solid white or a very subtle tone-on-tone print is ideal, as it will highlight the intricate piecing of the star.
- 1 Yard of Border Fabric: The border fabric frames your quilt, adding a professional finish and an extra touch of design. Choose a fabric that complements your layer cake colors, whether it’s a solid that picks up a hue from the stars or a print that adds another layer of visual interest.
- Basic Quilting Supplies: Beyond the fabric, ensure you have your essential quilting toolkit ready. This includes a reliable sewing machine, high-quality thread that blends with your fabrics, a rotary cutter with a sharp blade, a self-healing cutting mat, an accurate quilting ruler, an iron and pressing mat, and plenty of pins or fabric clips for securing your pieces.
Having all your materials prepared and organized before you begin will streamline your process and allow you to focus on the joy of creation. Remember, quality materials contribute significantly to the beauty and longevity of your finished quilt.
Your Comprehensive Guide to Crafting the Missouri Star Quilt Block
Now, let’s embark on the exciting journey of piecing together the magnificent Missouri Star quilt block. Follow these detailed instructions carefully, paying close attention to your seam allowances and pressing techniques, as these are crucial for achieving crisp, accurate results.
Step 1: Preparing Your Fabric for Precision Piecing
The foundation of any beautiful quilt block lies in accurate cutting. For each individual Missouri Star block you plan to make, you will need a specific set of fabric pieces. It’s highly recommended to pre-wash and press your fabrics before cutting to prevent future shrinkage and ensure clean cuts. For one block, meticulously cut the following:
- 3 pieces of 10″ layer cake squares in contrasting colors. These will form the star points. Choose colors that will stand out against each other and your background fabric.
- 1 piece of 10″ background square. This will be used in the very center of your block.
- 4 pieces of 6 ¼” background squares. These smaller squares will frame the corners of your central star element.
- 4 pieces of 7″ squares. These are crucial for creating additional half-square triangles that form the outer star points.
Precision at this stage is paramount. Use a sharp rotary cutter and an accurate ruler to ensure all your squares are exactly the specified dimensions. Slight inaccuracies here can lead to issues with block assembly later on.
Step 2: Constructing the Central “Four-Patch” Element
The very heart of your Missouri Star block is a clever four-patch unit made from half-square triangles. This method is efficient and creates stunning results:
- Select one 10″ layer cake square and one 10″ background square. Place these two squares right sides together, aligning all edges perfectly.
- To prepare for sewing, gently trim ½” off two adjacent sides of the stacked squares. This will reduce their size slightly to 9 ½” squares. This step isn’t strictly necessary for the HSTs themselves, but it helps standardize the initial squares if your layer cake pieces aren’t exactly 10″, and it’s a common practice in some tutorials for consistency.
- With the squares still right sides together, sew all the way around the perimeter using a precise ¼” seam allowance. Maintain a consistent seam allowance to ensure your resulting units are square.
- After sewing, use your rotary cutter to cut the large square diagonally in both directions. You will make two cuts: one from corner to corner in one direction, and another from corner to corner in the opposite direction. This will yield four perfect half-square triangle units.
- Carefully open each of these four HST units. Press the seams open or towards the darker fabric (pressing open often helps reduce bulk). Pressing is vital for flat, accurate blocks.
- Arrange these four half-square triangles with the white fabric portions facing inward, forming a smaller square in the center. This arrangement creates a distinct white “center” surrounded by the colored triangles.
- Sew these four HSTs together in a traditional four-patch configuration, using a ¼” seam allowance. Nest your seams where the units meet to ensure points align beautifully. Press the completed four-patch unit open. This forms the very core of your Missouri Star.
Step 3: Creating the Iconic Half-Square Triangles (HSTs) for Star Points
The Missouri Star gets its iconic shape from a series of carefully constructed half-square triangles. This step involves making several sets of HSTs using different size squares:
- First Set of HSTs (from 10″ layer cakes): Take two of your remaining 10″ layer cake squares. Place them right sides together. Using your rotary cutter, cut this stacked pair in half horizontally and then in half vertically. This will give you four stacks of two 5″ squares.
- For each stack, sew just the sides (all four edges) of the paired 5″ squares with a ¼” seam allowance.
- Now, lay two of these sewn pairs on top of each other, making sure that the same colors are facing up. For example, if you have a red square on top of a blue square, stack another red-on-blue pair.
- Cut each stack diagonally in opposite directions. For instance, if you cut the first stack from top-left to bottom-right, cut the second stack from top-right to bottom-left. This method, often called the “eight-at-a-time” HST method (when done with larger squares), efficiently creates multiple HSTs.
- Open each resulting unit and press the seams open or towards the darker fabric. You should now have several sets of HSTs that will form various points of your star.
- Second Set of HSTs (from 7″ squares): Take your four 7″ squares of background fabric. Cut each of these squares diagonally in half once, yielding eight large white triangles.
- Now, take your remaining colored 10″ layer cake square (or use additional ones if making more blocks) and cut it into 7″ squares. Or, use the remaining colored 5″ squares from the previous step and piece them to make 7″ squares or simply use other colored scraps cut to 7″. The key is to have colored 7″ squares. Cut these colored 7″ squares diagonally in half.
- Lay one colored triangle on each of the white triangles, aligning the long edges (the bias edge). Sew them together along this long edge with a precise ¼” seam allowance.
- Press these new HSTs open, ensuring they lie perfectly flat.
- Finally, trim these HSTs down to 6 ¼” squares. This step is critical for accuracy. Use a square-up ruler to ensure each HST is perfectly square and measures exactly 6 ¼” x 6 ¼”. This precise trimming guarantees that your blocks will fit together beautifully when assembled.
Step 4: Assembling Your Missouri Star Quilt Block
With all your individual units prepared, the exciting phase of block assembly begins. This is where your careful cutting and precise piecing truly pay off. Think of your block as a 9-patch grid for easier assembly:
- Arrange all your sewn units on a design wall or a flat surface according to the classic Missouri Star pattern. This usually involves your central four-patch unit, surrounded by the various HSTs you created, and the 6 ¼” background squares in the corners. Refer to a visual guide (like the image below) to ensure correct placement. The key is to create radiating star points from the center.
- Once you are satisfied with the layout, begin sewing the units together in rows. For a standard 9-patch arrangement, you will sew three units for the top row, three for the middle row, and three for the bottom row. Sew the units within each row together first, using a ¼” seam allowance.
- When sewing units together, pay close attention to nesting your seams at the intersections. This involves pressing seams in opposite directions for adjacent units, allowing them to interlock perfectly and create crisp, aligned points. Pinning liberally at these intersections will help prevent fabric shifting.
- After sewing each row, press the seams. For the top and bottom rows, press seams in one direction (e.g., to the left). For the middle row, press seams in the opposite direction (e.g., to the right). This preparation is crucial for nesting seams when joining the rows.
- Finally, sew the three rows together, aligning the row seams precisely. Again, nesting seams will be your best friend here. Pin generously at all intersections to ensure your star points align perfectly.
- Press your completed Missouri Star quilt block open. Stand back and admire your handiwork! You now have a beautifully constructed Missouri Star, ready to be incorporated into a larger quilt project or to stand alone as a decorative piece.
Step 5: Tips for Perfecting Your Missouri Star Quilt
Achieving a stunning Missouri Star quilt block, especially one inspired by Jenny Doan’s impeccable standards, often comes down to a few key techniques and habits. Here are some pro tips to help you perfect your quilting journey:
- Precision is Paramount: While quilting is an art, precision in cutting and sewing is its foundation. Use a sharp rotary blade and an accurate ruler. Double-check your measurements before making any cuts. Even a tiny deviation can lead to points that don’t match up.
- Master the ¼” Seam Allowance: A consistent ¼” seam allowance is the cornerstone of accurate piecing. Practice this on scraps to ensure your machine is calibrated. Consider using a ¼” presser foot for your sewing machine, which often has a guide for perfect seams.
- Pressing Matters: Don’t underestimate the power of a good press. Pressing seams open can help reduce bulk, especially in areas with many seams converging. Alternatively, pressing to one side (usually the darker fabric) can facilitate nesting seams. Always press, don’t iron (which can stretch fabric).
- Trim to Perfection: After creating your HSTs or any pieced units, always square them up to the exact specified dimensions. A good square-up ruler is an invaluable tool for this. Trimming ensures that all your units are the correct size, making final assembly much smoother.
- Chain Piecing for Efficiency: To save time and thread, especially when making multiple blocks, use chain piecing. Sew units continuously without cutting the thread in between. This speeds up the process and keeps your smaller pieces organized.
- Fabric Contrast: The Missouri Star block thrives on good contrast. Ensure a clear distinction between your background fabric and the fabrics chosen for the star points. This will make the star motif pop and give your block a vibrant, dynamic look.
- Design Wall or Layout Space: Before sewing your rows and sections together, lay out all your pieces on a design wall or a large flat surface. This allows you to visualize the block, ensure correct placement, and catch any errors before they are sewn permanently.
Variations and Creative Flourishes for Your Missouri Star
Once you’ve mastered the basic Missouri Star quilt block, the possibilities for creative exploration are endless. This versatile design can be adapted in numerous ways to suit your personal style and project needs:
- Size Adjustments: Experiment with different starting square sizes to create smaller or larger Missouri Star blocks. A smaller block might be perfect for a mug rug or a mini quilt, while larger blocks can quickly assemble a full-sized quilt. Remember to adjust all subsequent cuts proportionally.
- Color Palette Exploration: Don’t limit yourself to just two contrasting colors. Introduce a third or even a fourth color into your star points for a more complex and dazzling effect. Consider using ombre fabrics, fussy-cutting prints for specific motifs, or creating a scrappy Missouri Star using various fabric scraps.
- Block Orientation: While traditionally the blocks are laid out in a grid, try rotating adjacent blocks 90 degrees to see what secondary patterns emerge in the negative space. This can add an unexpected layer of visual interest to your quilt top.
- Beyond the Quilt: The Missouri Star block isn’t just for large quilts. Use it to create stunning accent pieces like decorative pillows, tote bags, table runners, or wall hangings. A single, perfectly executed Missouri Star block can be a work of art on its own.
- Incorporating Borders: Frame your completed Missouri Star blocks with solid or pieced borders to give them breathing room and enhance their prominence. Different border widths and colors can dramatically change the overall feel of your project.
The beauty of quilting lies in its flexibility. Don’t be afraid to deviate from the instructions once you understand the core mechanics. Let the Missouri Star inspire your next unique masterpiece!
Unleash Your Inner Quilter with the Missouri Star Quilt Block
Congratulations! You’ve just navigated the rewarding journey of creating the classic Missouri Star quilt block, guided by techniques that echo the clarity and charm of Jenny Doan herself. This iconic pattern, with its striking points and timeless appeal, is a testament to the enduring beauty of traditional quilting. Whether you’re a seasoned quilter or just beginning your fabric adventure, mastering this block adds a valuable skill to your repertoire and a beautiful piece to your collection.
Each stitch you’ve made, each seam you’ve pressed, contributes to a legacy of craftsmanship and creativity. The Missouri Star block is more than just fabric and thread; it’s a symbol of dedication, patience, and the joy of bringing a design to life. We hope this detailed tutorial has empowered you to tackle this pattern with confidence and sparked even more inspiration for your future quilting projects. Keep experimenting with colors, fabrics, and layouts, and let your unique style shine through every star you create. Happy quilting!