
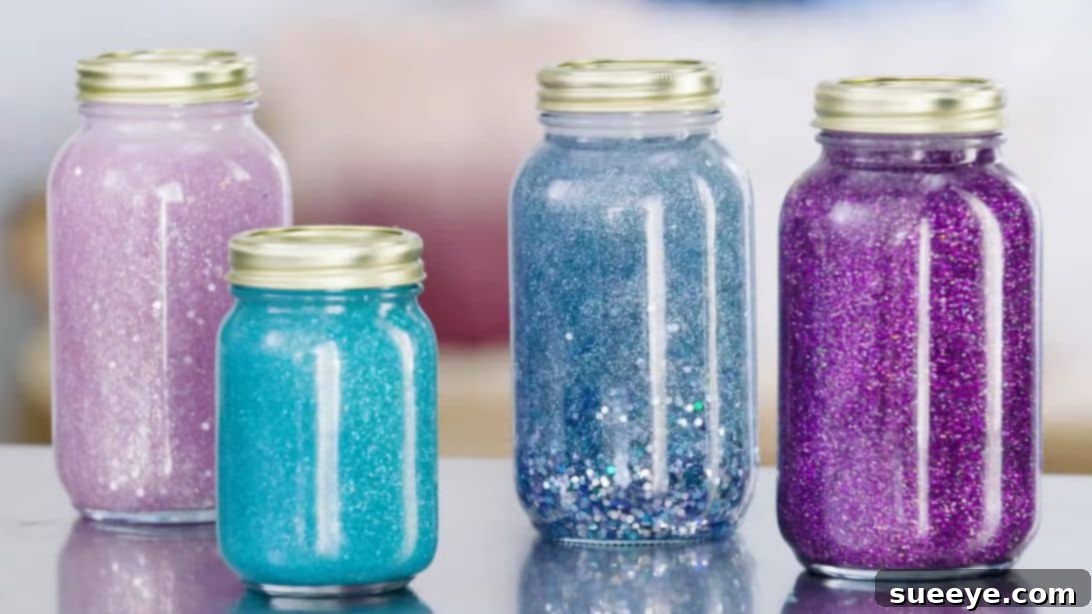
Are you searching for simple yet profoundly effective ways to manage everyday stress, alleviate anxiety, or simply find a moment of peace amidst a busy schedule? Look no further! This comprehensive guide introduces you to two wonderfully soothing DIY projects: the mesmerizing Calming Glitter Jar and the delightfully tactile Glitter Slime. These aren’t just engaging crafts; they are powerful, tangible tools designed to help relax your mind, improve focus, and bring a profound sense of tranquility into your life. Best of all, they are incredibly easy and inexpensive to create, requiring only a handful of readily available household materials. Whether you’re a crafting novice seeking a new mindfulness practice or a seasoned DIY enthusiast looking for your next rewarding project, you’ll find the step-by-step instructions below clear, concise, and incredibly rewarding. Prepare to embark on a journey of calm, creativity, and self-care. For a visual walkthrough, you can also gain inspiration and guidance from the excellent video tutorial by HGTV Handmade on YouTube. Let’s dive in and craft your calm!
Craft Your Calm: DIY Glitter Jars & Soothing Slime for Stress Relief
In our fast-paced modern world, finding moments of serenity can feel like a luxury. However, with these simple DIY projects, you can create your own personal oasis of calm right at home. Calming glitter jars, often referred to as “mindfulness jars” or “sensory bottles,” are renowned for their ability to captivate the eye and quiet the mind. As the glitter slowly descends, it mimics the slowing of thoughts, encouraging deep breaths and a meditative state. Similarly, glitter slime offers a tactile and engaging experience, providing a satisfying sensory input that can help redirect focus from anxious thoughts, reduce fidgeting, and offer a playful avenue for stress release. Both crafts are not only therapeutic but also make beautiful decorative items or thoughtful, handmade gifts for loved ones who could use a little extra peace.
The Magic Behind Calming Glitter Jars: A Visual Journey to Tranquility
The science behind why glitter jars are so effective for stress and anxiety relief is fascinatingly simple. When you shake a glitter jar, the shimmering particles swirl chaotically before gradually settling. This mesmerizing descent provides a powerful visual metaphor for our own thoughts and emotions. When our minds are racing, it’s like the turbulent glitter, but as we watch it settle, our minds are encouraged to follow suit. This process helps to engage the parasympathetic nervous system, responsible for the “rest and digest” response, effectively lowering heart rate, calming breathing, and reducing feelings of overwhelm. It’s a wonderful tool for practicing mindfulness, allowing you to anchor your attention to the present moment and observe without judgment. Children and adults alike can benefit from this simple yet profound visual aid, making it perfect for quiet time, before bed, or during moments of high stress.
Why Glitter Slime? A Tactile Approach to Relaxation and Focus
Beyond its sparkly allure, glitter slime is a fantastic sensory tool that offers immense benefits for relaxation and focus. The act of kneading, stretching, and squishing slime provides a satisfying tactile experience that can be incredibly grounding. For individuals who benefit from sensory input, or for those who tend to fidget when stressed or anxious, slime offers a healthy outlet for that energy. It can help improve concentration by giving busy hands something to do, allowing the mind to focus more effectively on other tasks or simply to relax. The vibrant colors and shimmering glitter add an extra layer of visual stimulation, making the experience even more engaging and enjoyable. Slime can be a wonderful tool for creative play, stress reduction, and even developing fine motor skills.
Materials for Your DIY Calming Creations: Gathering Your Essentials
Creating these soothing crafts doesn’t require a trip to a specialized store. Most of the items can be found around your home or at a local supermarket or craft store, keeping your project budget-friendly and accessible. Here’s what you’ll need to gather:
Glitter Jar Essentials: What You’ll Need for Your Sparkling Sanctuary
- Hot Water: Crucial for helping the glitter glue dissolve smoothly and creating that perfect, slow-settling effect. Ensure it’s hot enough to work with the glue but not boiling, especially if children are assisting.
- Glass Jar with a Lid: Any clean, clear glass jar will work beautifully. Mason jars, old jam jars, or even spice jars are excellent choices. The clearer the glass, the better you’ll see the glitter magic unfold. Ensure the lid seals tightly to prevent leaks.
- Skewer or Stirring Stick: A simple wooden skewer, a chopstick, or even a spoon will be perfect for thoroughly mixing the ingredients.
- Extra-Fine Glitter: This is key! Fine glitter creates a magical, slow descent, whereas chunky glitter tends to sink too quickly. Experiment with different colors and holographic glitters for varied effects.
- Glitter Glue: The secret ingredient for the glitter jar’s mesmerizing flow. Glitter glue is denser than regular glue and provides the viscosity needed for the glitter to suspend and fall slowly. Clear or colored glitter glue will work, but clear often allows your added glitter to shine best.
- Super Glue (or Strong Adhesive): Essential for securely sealing the jar lid. This step prevents leaks and ensures the jar is child-safe, preventing accidental ingestion of the contents.
Glitter Slime Supplies: The Ingredients for Your Tactile Delight
- Warm Water: Similar to the glitter jar, warm water helps activate the borax and dissolve the glitter glue for optimal slime consistency.
- Measuring Cup: For accurately measuring water and other ingredients, ensuring your slime has the perfect texture.
- Borax: This acts as the slime activator, reacting with the polymers in the glitter glue to create the characteristic stretchy texture. Use with caution and follow instructions carefully, especially when crafting with children.
- Plastic Spoon or Stirring Utensil: Ideal for mixing ingredients without damaging surfaces.
- Teaspoon: For precise measurement of borax.
- Glitter Glue: The foundation of your glitter slime! Any color or type of glitter glue will work, providing both the base and the shimmer for your slime.
- Mixing Bowl: A spacious bowl is needed to combine ingredients and knead your slime comfortably.
Step-by-Step Guide: Crafting Your Serenity with Ease
Now that you have all your materials, let’s get crafting! Follow these simple instructions to create your very own calming tools.
How to Make a Mesmerizing Glitter Jar: Your Portable Peace Portal
- Prepare Your Jar with Water: Begin by carefully filling your clean glass jar with hot water. Leave a few inches of space at the very top, roughly an inch or two from the rim. This space is essential for allowing the glitter and glue to move freely when shaken.
- Add the Glitter Glue: Take your bottle of glitter glue and squeeze the entire contents directly into the hot water in the jar. The hot water will help the glue dissolve and disperse more easily, preventing clumps.
- Thoroughly Mix: Using your skewer, chopstick, or stirring stick, gently but thoroughly stir the glitter glue and hot water together. Continue stirring until the glue is completely dissolved and evenly incorporated into the water, creating a uniform, slightly viscous liquid. Patience here will pay off for a clear, smooth base.
- Introduce the Fine Glitter: Now for the magic! Pour in your extra-fine glitter. The amount is up to you – some prefer a dense, shimmering cloud, while others like a more sparse, gentle fall. Start with a tablespoon or two and add more if desired. You can mix multiple colors of glitter for a rainbow effect.
- Seal the Jar Securely: Before sealing, wipe the top of the jar’s rim clean and dry with a paper towel. This ensures a strong bond. Next, dab or apply a thin bead of super glue around the very top edge of the rim. Carefully and quickly place the lid onto the jar and twist it tightly shut. Allow the super glue to dry completely according to its package instructions before handling or shaking the jar. This is crucial for preventing leaks and ensuring the jar is safe, especially if it will be used by children.
Once your glitter jar is sealed and dry, give it a good shake and watch the shimmering cascade begin. Observe how the glitter swirls, dances, and slowly settles, inviting your mind to settle with it. This simple act can be a powerful anchor during moments of anxiety, a fantastic focus tool for children, or a peaceful ritual for anyone needing a moment of quiet reflection.
How to Whip Up Soothing Glitter Slime: Your Hands-On Stress Buster
- Prepare the Glitter Glue: Squeeze the entire bottle of glitter glue into a large mixing bowl. If using multiple colors, you can combine them here for a vibrant mix.
- Create the Borax Solution: In a separate measuring cup, pour about 1 cup of warm water. Add 1 teaspoon of borax to the warm water and stir until the borax is completely dissolved. Ensure there are no visible grains of borax left, as this will affect the slime’s texture.
- Combine and Mix: Slowly pour the borax mixture into the bowl containing the glitter glue. Using your plastic spoon or stirring utensil, begin to gently stir the two liquids together. You’ll notice the mixture immediately start to thicken and form clumps.
- Knead the Slime: Once the mixture starts to come together, discard your spoon and use your hands to continue mixing and kneading the slime. This is a crucial step! The more you knead, fold, and stretch the slime, the more it will combine into a single, cohesive, non-sticky piece. It might feel sticky at first, but keep kneading – the texture will improve dramatically. If it’s still too sticky after several minutes of kneading, you can add a tiny pinch more borax solution (just a few drops at a time) and continue kneading. Be careful not to add too much, or your slime will become stiff and brittle.
- Store for Firmness: Once your glitter slime has reached the desired consistency – stretchy, pliable, and not too sticky – place it in an airtight container. Let it sit for a few minutes to an hour; this resting period allows the polymers to fully bond and the slime to firm up slightly, achieving its best texture.
Your glitter slime is now ready for endless hours of squishing, stretching, and mindful play! Remember to always store it in an airtight container when not in use to prevent it from drying out, ensuring its longevity for repeated stress-relief sessions.
Maximizing the Benefits: Tips for Using Your Calming Crafts Effectively
Having created these wonderful tools, let’s explore how to integrate them into your daily routine for maximum benefit:
- Mindful Breathing with Glitter Jars: Pair the visual experience of the glitter jar with deep breathing exercises. Shake the jar, then inhale slowly as the glitter swirls, and exhale slowly as it settles. This synchronicity can deepen relaxation.
- Focused Observation: Dedicate a few minutes to simply watching the glitter. Notice the patterns, the speed, and the way the light catches it. This focused attention can pull your mind away from distracting thoughts.
- Sensory Play with Slime: Explore the slime’s texture. How does it feel when stretched, poked, or squished? What sounds does it make? Engage all your senses in the play.
- Routine Integration: Designate specific times for using your calming crafts. This could be after work, before a stressful event, during a homework break, or as part of a bedtime routine to wind down.
- For All Ages: While excellent for children to manage big emotions, these crafts are equally beneficial for adults. Don’t underestimate the power of simple sensory engagement for adult stress relief.
Personalize Your Peace: Customization Ideas for Unique Creations
One of the joys of DIY projects is the ability to personalize them. Make your glitter jars and slime truly your own:
- Color and Glitter Variety: Don’t limit yourself to one color! Mix different shades of fine glitter in your jar or try holographic or iridescent glitters for an extra ethereal effect. For slime, experiment with food coloring for vibrant hues, or layer different colored glitters.
- Add-Ins for Glitter Jars: Consider adding small, lightweight sequins, tiny plastic beads, or even very small plastic toys (like miniature sea creatures or stars) to your glitter jar for an extra element of visual interest.
- Texture Boosters for Slime: Incorporate small foam beads, tiny plastic pearls, or even sand (in moderation) into your slime for unique tactile sensations.
- Scented Serenity: For glitter jars, a drop or two of essential oil (like lavender or chamomile) can be added to the water before sealing, providing an aromatic dimension to your calming experience. Ensure the oils are water-soluble or well-dispersed. For slime, a few drops of skin-safe essential oils or fragrance oils can make it even more enjoyable.
Safety and Storage: Keeping Your Creations Lasting and Safe
To ensure your calming crafts remain effective and safe for continued use, keep these tips in mind:
- Borax Safety: While borax is a common ingredient in slime, it should always be handled with care. Ensure proper ventilation, avoid direct contact with eyes or ingestion, and always supervise children when making or playing with borax-based slime. Wash hands thoroughly after handling. Consider borax-free slime recipes if preferred for young children.
- Securely Sealed Jars: The super glue step for glitter jars is not optional. A properly sealed jar prevents leaks and ensures the contents (which are not safe for consumption) remain contained. Periodically check the seal to ensure it hasn’t weakened over time.
- Slime Storage: Always store your glitter slime in an airtight container (a plastic food container or Ziploc bag works well) when not in use. Exposure to air will cause it to dry out and become stiff.
- Longevity of Jars: Over time, the glitter in your jar might start to clump or settle at the bottom more permanently. A gentle shake usually revives it, but if it becomes dull, you can carefully open it (if the super glue allows) and refresh the contents.
Conclusion: Embrace Your Inner Calm with DIY Crafts
Crafting a calming glitter jar or a batch of soothing glitter slime is more than just a creative pastime; it’s an investment in your mental well-being. These simple, inexpensive DIY projects offer accessible pathways to reduce stress, manage anxiety, and cultivate a sense of peace in your everyday life. By engaging your senses and providing a focal point for mindfulness, they empower you to take control of your emotional state and find tranquility whenever you need it most. So, gather your materials, follow these easy steps, and begin your journey toward a calmer, more focused you. Embrace the joy of creation and the serenity it brings. Happy crafting!
*Special thanks to HGTV Handmade via YouTube for inspiring this delightful guide and for all the wonderful images used here. If you found this project idea inspiring and helpful, we highly recommend exploring their channel for a treasure trove of other amazing DIY projects and creative tutorials. Be sure to give their channel a visit and subscribe for more fantastic content!