
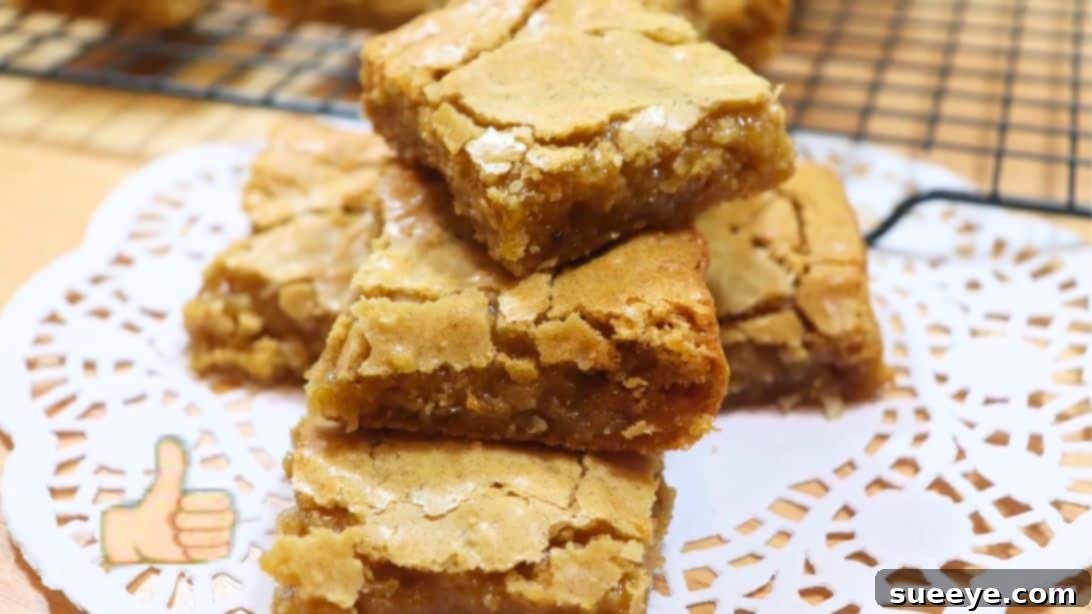
Irresistibly Chewy Coconut Bars: Your New Favorite Easy Dessert Recipe
Prepare your taste buds for an unforgettable experience with these phenomenally chewy coconut bars! As a dedicated dessert enthusiast, I’m always on the lookout for recipes that truly stand out, and this particular creation by My Ol’ Lady’s Cookin’ Show has genuinely exceeded all expectations. When searching for new coconut dessert recipes, I stumbled upon their video, and the tempting thumbnail alone convinced me to give it a try. Let me assure you, it did not disappoint – in fact, it delivered a flavor sensation that I haven’t encountered in a long time. If you have an affinity for the delicate, tropical essence of coconut, prepare to fall in love with this recipe.
These bars achieve a remarkable trifecta of taste, offering the perfect harmony of sweetness, a delightful nutty undertone from the browned butter, and a rich, buttery finish. Beyond their incredible flavor, their texture is pure perfection: wonderfully moist, exquisitely chewy, and utterly satisfying with every bite. Warning: they are notoriously addicting! I confess I lost count of how many I enjoyed when I first baked a batch at home. This isn’t just a recommendation; it’s a heartfelt plea for you to try these fantastic treats. Not only are they incredibly simple to prepare, requiring only a handful of common ingredients, but the result is a bakery-quality dessert that will impress everyone who tries it.
Why These Chewy Coconut Bars Will Become Your Go-To Dessert
What makes these chewy coconut bars so special? It’s a combination of simplicity, speed, and an extraordinary flavor profile that sets them apart. Unlike many complicated baking projects, this recipe streamlines the process without compromising on taste or texture. The magic largely lies in the technique of browning the butter, which infuses the entire dessert with a deep, toasted, nutty aroma that complements the sweet coconut beautifully. This isn’t just about mixing ingredients; it’s about creating layers of flavor that elevate a simple bar into something truly gourmet.
The Unrivaled Appeal of Browned Butter
One of the secret weapons in this recipe is the browned butter. While it might seem like a small detail, browning butter transforms it from a simple fat into a rich, nutty, aromatic foundation for your baked goods. As butter melts and gently cooks, its milk solids toast, releasing complex, caramel-like notes that deepen the flavor profile of the entire batch of bars. This extra step takes only a few minutes but contributes immensely to the unique, irresistible taste that makes these coconut bars so exceptional and memorable. It’s this subtle sophistication that takes them from good to absolutely amazing.
Essential Ingredients for Crafting the Perfect Chewy Coconut Bars
The beauty of this recipe lies in its minimalist ingredient list, yet each component plays a crucial role in achieving the desired taste and texture. High-quality ingredients are always recommended for the best results, ensuring your bars are as flavorful and perfectly textured as possible. Here’s a closer look at what you’ll need and why:
- 1/2 cup (1 stick) of Unsalted Butter: Using unsalted butter allows you to control the overall saltiness of the bars. The browning process (explained in the steps) is key here, adding a rich, nutty depth that is indispensable to this recipe’s unique flavor.
- 1 1/2 cups of Light Brown Sugar: Brown sugar is essential for both flavor and texture. Its molasses content provides a subtle caramel note and contributes significantly to the chewy, moist consistency of the bars, preventing them from drying out.
- 2 Large Eggs: Eggs act as a binder, holding all the ingredients together, and contribute to the richness and structure of the bars. Adding them one at a time ensures proper emulsification and a smooth batter.
- 1 teaspoon of Pure Vanilla Extract: A staple in most baked goods, vanilla extract enhances the overall sweetness and complexity of flavors, harmonizing beautifully with both the coconut and the browned butter.
- 1/2 teaspoon of Fine Sea Salt: Salt is crucial for balancing the sweetness and brightening all the other flavors. Don’t skip it, as it prevents the bars from tasting overly sugary.
- 1 teaspoon of Baking Powder: This leavening agent gives the bars a slight lift and contributes to their tender crumb, ensuring they aren’t too dense.
- 1 cup of All-Purpose Flour: The foundational dry ingredient, flour provides the necessary structure to hold the bars together. Measure it correctly by spooning it into the cup and leveling it off for accuracy.
- 1 1/2 cups of Sweetened or Unsweetened Coconut Flakes: The star ingredient! You can choose between sweetened flakes for a richer, sweeter bar or unsweetened for a slightly less sweet and more intense coconut flavor. Either way, ensure they are fresh for the best taste and texture.
Gathering all your ingredients before you begin, a practice known as “mise en place,” will make the baking process smooth and enjoyable. Freshness of ingredients, especially the coconut flakes, makes a noticeable difference in the final product.
Step-by-Step Guide: How to Bake Delicious Chewy Coconut Bars
Creating these delightful chewy coconut bars is a straightforward process, even for novice bakers. Follow these detailed steps to ensure a perfect batch every time. Precision in technique, especially with the butter browning, will yield the most outstanding results.
Step 1: Browning the Butter to Perfection
Begin by melting your butter. Place the 1/2 cup of unsalted butter into a light-colored saucepan over medium heat. A light-colored pan is important because it allows you to easily monitor the color changes as the butter browns. Let the butter melt completely, then continue to cook it, stirring frequently with a whisk. You’ll notice it will foam, then the foam will subside. Continue stirring until tiny brown bits begin to form at the bottom of the pan and the butter takes on an amber color and a wonderfully nutty aroma. This process typically takes about 5-7 minutes. Be careful not to burn it; remove it from the heat as soon as you achieve that beautiful golden-brown color and fragrant scent. This browned butter is the secret to the bars’ incredible depth of flavor.
Step 2: Combining Warm Butter with Sweetness and Salt
While the browned butter is still warm (but not sizzling hot), carefully pour it into a large mixing bowl. Immediately add the 1 1/2 cups of light brown sugar and 1/2 teaspoon of salt. Using a sturdy whisk or a rubber spatula, mix these ingredients together thoroughly until they are well combined and the mixture forms a thick, cohesive paste. The warmth of the butter will help to dissolve the sugar slightly, creating a wonderfully smooth base and enhancing the chewy texture of the final product. Continue mixing until there are no streaks of unmixed sugar visible.
Step 3: Incorporating Eggs for Richness and Structure
Now it’s time to add the eggs. Crack your two large eggs into a separate small bowl first to ensure no shell fragments get into your batter. Add one egg at a time to the butter and sugar mixture. After adding the first egg, mix vigorously until it is fully incorporated into the batter, creating a uniform texture. Then, add the second egg and repeat the process, mixing thoroughly until the batter appears smooth and glossy. This method ensures better emulsification, leading to a lighter and more uniform crumb in your finished bars.
Step 4: The Dry Ingredients Come Together
Incorporate the remaining wet and dry ingredients. To the mixture, add the 1 teaspoon of baking powder, the 1 teaspoon of pure vanilla extract, and finally, the 1 cup of all-purpose flour. Begin mixing with your spatula or whisk on low speed (if using an electric mixer) just until the flour is mostly incorporated. It’s crucial not to overmix at this stage once the flour is added, as overmixing can develop the gluten too much, leading to tough bars. Mix just until no streaks of dry flour remain, and the batter comes together smoothly.
Step 5: Folding in the Star Ingredient: Coconut Flakes
With the base batter ready, it’s time for the star of the show: the coconut flakes. Gently stir in the 1 1/2 cups of coconut flakes (sweetened or unsweetened, depending on your preference) into the batter. Use a folding motion with a rubber spatula to evenly distribute the coconut throughout the mixture. You want every bite to have that delightful chewy coconut texture, so ensure they are well incorporated but again, avoid overmixing. The batter will be thick and sticky, which is exactly what you want for dense, chewy bars.
Step 6: Preparing for Baking and Spreading the Mixture
Preheat your oven to 350°F (175°C). Line an 8×8 or 9×9-inch baking pan with aluminum foil or parchment paper, ensuring there’s an overhang on the sides – this will create “handles” that make it incredibly easy to lift the baked bars out of the pan later. Lightly spray the foil or parchment paper with cooking spray to prevent any sticking. Transfer the thick coconut mixture into the prepared baking pan. Using a spatula or your lightly greased hands, spread the mixture evenly across the bottom of the pan, pressing it down gently to ensure a compact and uniform layer. This helps in achieving an even bake and a consistent texture throughout the bars.
Step 7: Baking and Cooling for Optimal Texture
Place the baking pan into the preheated oven and bake for 20 to 25 minutes. Baking times can vary slightly depending on your oven, so keep an eye on them. The bars are ready when the edges are lightly golden brown and the center is set but still slightly soft to the touch. A toothpick inserted into the center should come out with moist crumbs, not wet batter. Once baked, remove the pan from the oven and let it cool completely on a wire rack within the pan. This cooling step is critical! Allowing the bars to cool fully allows them to set properly, enhancing their chewiness and preventing them from crumbling when cut. Once fully cooled, use the foil or parchment overhangs to lift the entire slab out of the pan. Transfer to a cutting board, slice into desired bar shapes, serve, and savor every delicious bite!
Tips for Achieving Bakery-Quality Coconut Bars
To ensure your chewy coconut bars are absolutely perfect every time, consider these additional tips:
- Don’t Overbake! Overbaking is the enemy of chewiness. The bars should still look slightly soft in the center when you remove them from the oven; they will continue to set as they cool.
- Cool Completely: Patience is a virtue here. Cutting the bars while they are still warm will result in a messy, crumbly outcome. Let them cool fully, ideally for at least 2-3 hours, or even chill them in the refrigerator for easier, cleaner cuts.
- Grease and Line Your Pan Well: This prevents sticking and makes removal effortless, ensuring beautiful, intact bars.
- Use Quality Ingredients: Fresh butter, good quality vanilla extract, and fresh coconut flakes will elevate the flavor significantly.
- Read Through First: Always read the entire recipe before you start to familiarize yourself with the steps and avoid any surprises.
Variations and Customizations: Make Them Your Own!
While these chewy coconut bars are fantastic as is, feel free to get creative and personalize them with a few delicious additions:
- Chocolate Chip Coconut Bars: Fold in 1/2 to 1 cup of mini chocolate chips or regular chocolate chips along with the coconut flakes for a classic flavor pairing.
- Nutty Coconut Bars: Add 1/2 cup of finely chopped pecans, walnuts, or almonds for an extra crunch and nutty flavor dimension. Toasting the nuts lightly beforehand will enhance their taste.
- Citrus Zest Infusion: For a brighter flavor, add 1-2 teaspoons of fresh lemon or lime zest to the batter along with the vanilla extract.
- Spice It Up: A pinch of cinnamon or cardamom can add a warm, exotic touch to the coconut flavor.
- Glaze Topping: Once cooled, drizzle the bars with a simple powdered sugar glaze (powdered sugar mixed with a little milk or lemon juice) for an extra layer of sweetness and visual appeal.
Storage and Serving Suggestions
Ensuring your chewy coconut bars stay fresh and delicious is key to enjoying them longer. Here’s how to store and serve them for the best experience.
How to Store Your Chewy Coconut Bars
These bars store wonderfully, making them excellent for meal prep or larger gatherings. Once completely cooled and cut, place them in an airtight container. At room temperature, they will stay fresh and perfectly chewy for up to 3-4 days. For longer storage, you can refrigerate them for up to a week. If you plan to enjoy them over an extended period, these bars also freeze beautifully. Wrap individual bars tightly in plastic wrap, then place them in a freezer-safe bag or container for up to 2-3 months. Thaw at room temperature for a quick, delightful treat.
The Best Ways to Enjoy These Treats
Chewy coconut bars are incredibly versatile. They are perfect as a standalone dessert, ideal for packing in lunchboxes, or a delightful addition to a dessert platter for parties and potlucks. Pair them with a cup of coffee or tea for an afternoon pick-me-up, or serve them alongside a scoop of vanilla bean ice cream for an elevated dessert experience. Their rich flavor and satisfying chewiness make them a hit with almost everyone.
Frequently Asked Questions About Chewy Coconut Bars
Here are some common questions you might have about making these delicious coconut bars:
Q: Can I use unsweetened coconut flakes instead of sweetened?
A: Absolutely! Using unsweetened coconut flakes will result in a less sweet bar with a more pronounced, natural coconut flavor. If you prefer a milder sweetness or want to control sugar intake, this is a great option. The texture will remain largely the same.
Q: How long do these coconut bars last?
A: When stored in an airtight container at room temperature, these chewy coconut bars will stay fresh and delicious for about 3-4 days. If refrigerated, they can last up to a week.
Q: Can I freeze chewy coconut bars?
A: Yes, they freeze wonderfully! Allow the bars to cool completely and cut them into individual servings. Wrap each bar tightly in plastic wrap, then place them in a freezer-safe container or bag. They can be frozen for up to 2-3 months. Thaw at room temperature before serving.
Q: What is the best way to cut them into clean bars?
A: The key to clean cuts is to ensure the bars are completely cooled, or even chilled in the refrigerator for about 30 minutes. Use a sharp, non-serrated knife. Wipe the knife clean with a damp cloth after each cut for the neatest edges.
Q: Why is browning butter important in this recipe?
A: Browning the butter adds a depth of flavor that cannot be achieved with just melted butter. It imparts a rich, nutty, and slightly caramel-like taste that perfectly complements the sweetness and coconut, elevating the entire dessert to a new level of deliciousness.
More Irresistible Coconut Dessert Recipes to Explore
If you’re as enamored with coconut as we are after trying these bars, you’re in luck! There’s a whole world of delightful coconut-infused treats waiting for you to discover. Dive into these other fantastic recipes that celebrate the tropical goodness of coconut:
- RELATED: Easy Chocolate Coconut Brownies – A perfect blend of rich chocolate and tropical coconut, these brownies are incredibly moist and satisfying.
- Crockpot Pineapple Coconut Spoon Cake Recipe – A wonderfully moist and flavorful cake that’s effortlessly made in your slow cooker, combining the best of pineapple and coconut.
- Easy-to-Make Milk Coconut Fudge – Indulge in this creamy, melt-in-your-mouth fudge that’s packed with sweet coconut flavor and incredibly simple to whip up.
- Coconut Balls (3-Ingredient Recipe) – For a quick and delightful treat, these simple 3-ingredient coconut balls are a dream come true, offering pure coconut bliss with minimal effort.
Final Thoughts on These Delightful Chewy Coconut Bars
These chewy coconut bars are more than just a dessert; they’re an experience. From the inviting aroma of browned butter filling your kitchen to the first bite of their moist, chewy texture and perfectly balanced flavors, they promise to be a beloved addition to your recipe repertoire. Whether you’re a seasoned baker or just starting, this recipe offers a foolproof path to a truly exceptional homemade treat. Don’t hesitate – gather your ingredients and embark on this delicious baking adventure. You’ll be glad you did!