
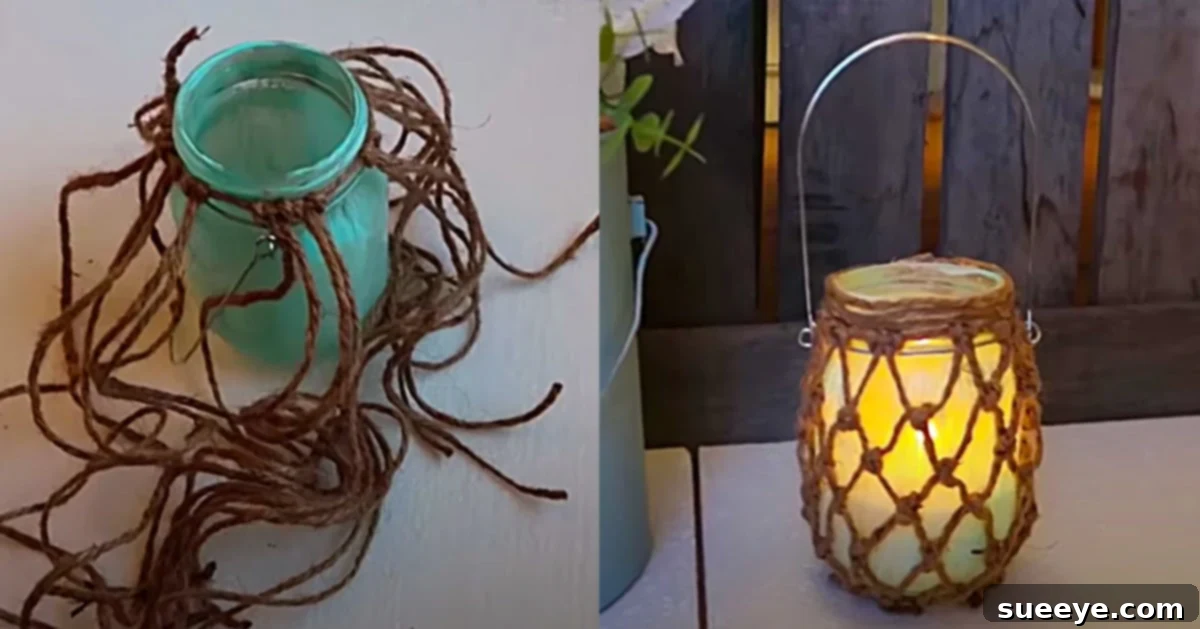
Coastal Farmhouse Charm: DIY Fishnet Mason Jar Decoration for a Summer Vibe
Transform your living space into a serene coastal retreat with this enchanting DIY fishnet mason jar project. Perfect for adding a touch of nautical elegance and a laid-back summer mood to any room, this craft is both beautiful and surprisingly simple to create. Whether you’re a seasoned crafter or just starting, the charm of a handmade coastal decoration, especially one as versatile as a mason jar, is undeniable. It’s an ideal way to infuse your home with the calming essence of the ocean, bringing those cherished beach house vibes right to your doorstep.
The inspiration for this delightful project often comes from witnessing its creation, and a fantastic starting point is this detailed YouTube video by Coffee With My Sunshine. She expertly guides viewers through each step, making the entire process seem effortless and enjoyable. This tutorial focuses on creating a distinctive coastal look for your mason jar, starting with a base coat of Delta Creamcoat, followed by Mod Podge, and finally a beautiful craft paint in a chosen nautical hue. The real magic, however, lies in the application of a stunning fishnet design using macrame techniques, elevating a simple jar into a piece of art that perfectly encapsulates the ocean’s allure. The end result is truly superb, reflecting the timeless beauty of seaside decor.
Embracing a coastal farmhouse aesthetic means blending rustic charm with the tranquil elements of the sea. Mason jars, with their inherent versatility and rustic appeal, are the perfect canvas for such an endeavor. They offer endless possibilities for customization, making them a staple in DIY home decor. This particular fishnet design not only enhances the jar’s visual appeal but also provides a textural dimension that mimics authentic fishing nets, adding character and a story to your decor. Imagine these jars adorning your patio, illuminating your living room, or adding a touch of beachy sophistication to your bathroom – the possibilities are limitless.
Beyond its aesthetic appeal, crafting this fishnet mason jar can be a wonderfully meditative activity. The rhythmic motions of macrame and the satisfaction of seeing your vision come to life offer a refreshing break from the daily grind. It’s an opportunity to create something beautiful with your own hands, adding a personal touch that store-bought decorations simply can’t replicate. So, gather your materials, set aside some creative time, and prepare to embark on a crafting journey that promises to bring the refreshing spirit of the coast into your home.
Essential Materials for Your Coastal Fishnet Mason Jar
Creating this charming coastal fishnet mason jar requires a few readily available and inexpensive materials. Most of these items can be found at your local craft store, dollar store, or even around your home. The beauty of DIY projects like this lies in their accessibility and the ability to customize them to your liking. Here’s what you’ll need to get started:
- Jute Twine: This is a crucial element for creating the authentic fishnet look. Jute twine, often found at Dollar Tree or craft stores, provides that perfect rustic, nautical texture and appearance. Its natural color is ideal, but you can also find colored jute if you wish to experiment. Ensure you have enough length, as macrame can use up more twine than anticipated.
- A Mason Jar: The star of our project! Any size mason jar will work, but a standard pint or quart-sized jar is usually best for decorative purposes. Make sure it’s clean and free of any labels or residue.
- Craft Paint: To achieve that classic coastal look, opt for craft paints in nautical hues. Think soft blues, seafoam greens, sandy beiges, or crisp whites. Acrylic craft paint works wonderfully and dries quickly.
- Mod Podge: This versatile crafting glue, sealer, and finish is essential. It will protect your painted surface and provide a smooth, durable finish, making your jar more resilient to wear and tear.
- Delta Brand Cream Coat (or similar primer/base coat): A good quality cream coat or primer will ensure that your craft paint adheres smoothly and evenly to the glass surface of the mason jar. It provides an opaque base, allowing your chosen color to truly pop and preventing streaking.
- A Hot Glue Gun and Glue Sticks: An indispensable tool for securing the twine and other elements quickly and efficiently. Always exercise caution when using a hot glue gun to prevent burns.
Optional Materials for Enhanced Customization: While the above list covers the basics, consider these additions to personalize your fishnet mason jar even further:
- Sandpaper: Fine-grit sandpaper can be used to lightly distress the painted surface for a weathered, vintage coastal look.
- Small Seashells, Sand, or Pebbles: These can be hot-glued to the jar’s base or rim for extra coastal flair, or placed inside the finished jar.
- Fairy Lights or LED Tea Lights: To turn your jar into a magical lantern. These battery-operated lights are safe to use inside the jar and cast a warm, inviting glow.
- Ribbon or Burlap Strips: For decorative bows or wraps around the neck of the jar.
Step-by-Step Guide to Crafting Your Coastal Fishnet Mason Jar
Creating your coastal fishnet mason jar is a rewarding process that combines painting and basic macrame. Follow these detailed steps to bring your beach-inspired vision to life:
Phase 1: Preparing and Painting Your Mason Jar
The foundation of your beautiful coastal decor piece starts with the proper preparation and painting of your mason jar. This phase is crucial for ensuring a long-lasting and aesthetically pleasing finish.
Step 1: Clean Your Mason Jar Thoroughly. Begin by ensuring your mason jar is sparkling clean. Wash it with soap and water to remove any dirt, dust, or sticky residues from labels. Rinse it thoroughly and allow it to dry completely. Any moisture or grime can prevent the paint from adhering properly.
Step 2: Apply a Base Coat (Delta Creamcoat or Primer). Once dry, apply a thin, even coat of Delta Creamcoat (or a similar primer designed for glass surfaces) to the exterior of your mason jar. This step is vital as it provides an opaque, uniform base for your chosen craft paint, ensuring vibrant color and better adhesion. Use a foam brush for a smooth, streak-free application. Allow this base coat to dry completely according to the product instructions, which usually takes at least 30 minutes to an hour.
Step 3: Paint with Your Chosen Nautical Color. Now, it’s time to infuse your jar with its coastal personality. Apply your chosen craft paint (e.g., a serene blue, a soft seafoam green, or a crisp white) over the dried base coat. Apply in thin, even layers. You may need two or three coats to achieve full, opaque coverage, allowing each coat to dry completely before applying the next. This layered approach prevents paint from peeling and ensures a professional finish. Patience during the drying process is key here.
Step 4: Seal the Painted Surface with Mod Podge. Once your final coat of paint is completely dry (it’s often best to let it cure for several hours or even overnight), apply a thin layer of Mod Podge over the entire painted surface. Mod Podge acts as a sealer, protecting your paint from chips and scratches, and giving it a subtle sheen. Ensure even coverage and allow it to dry until clear and non-tacky. For extra durability, you can apply a second thin coat after the first has dried.
Phase 2: Crafting the Fishnet with Jute Twine
This is where the rustic, nautical magic truly happens. The macrame fishnet will give your mason jar its signature coastal charm.
Step 5: Prepare Your Jute Twine. Begin by cutting several long strands of jute twine. The exact number and length will depend on the size of your mason jar and how dense you want your net to be. A good starting point is to cut 8-10 pieces, each roughly 3-4 times the height of your jar. You can always trim excess later. For a standard pint jar, pieces around 3 feet long should give you plenty to work with. Fold each piece in half.
Step 6: Attach the Initial Twine Structure to the Jar Rim. Take one folded piece of twine. Create a loop at the fold and place it around the neck of the jar, just below the rim. Thread the two loose ends through the loop and pull tightly to create a lark’s head knot. This securely attaches the twine to the jar. Repeat this process with all your prepared twine pieces, spacing them evenly around the entire circumference of the jar. Aim for consistent spacing to ensure an even net. Use small dots of hot glue under each knot to prevent them from slipping down the jar’s neck as you work.
Step 7: Begin the Netting (Macrame Knots). This is the core of the fishnet design. You will be working in rows, tying square knots or half-hitch knots to create the net pattern.
Row 1: Take two adjacent strands from one knot, and two adjacent strands from the knot next to it. You now have four strands. Using these four strands, tie a square knot or a simple overhand knot about 1-2 inches down from the initial row of knots at the rim. Repeat this around the entire jar, connecting adjacent groups of strands. Ensure your knots are at roughly the same height to create an even first row of “mesh.”
Row 2 and Subsequent Rows: For the second row, you’ll work with the strands from the knots you just made. Take two strands from one knot in the first row, and two strands from the adjacent knot in the first row. Tie another knot (square or overhand) about 1-2 inches below the first row of knots. Continue this pattern, always using two strands from one knot and two from the neighboring knot, to build your net downwards. This staggered knotting creates the classic diamond-shaped mesh of a fishnet. Maintain consistent spacing and tension with each knot for a uniform appearance.
Step 8: Continue Netting Down the Jar. Keep tying rows of knots until your net extends down to the bottom curve of the mason jar, or as low as you desire. The number of rows will depend on the height of your jar and the spacing of your knots. As you near the bottom, the jar may start to narrow, so adjust your knot spacing slightly to accommodate the changing circumference, keeping the net snug but not overly tight.
Phase 3: Securing and Finishing Your Fishnet Mason Jar
The final touches ensure your fishnet is secure and your mason jar is ready for display.
Step 9: Secure the Net at the Bottom with a Rope Ring. Once your net has reached the desired length, you need to gather and secure the bottom strands. Cut a new, separate piece of jute twine, long enough to wrap around the base of the jar with some overlap. This will form your “rope ring.” Gather all the loose strands from the bottom of your fishnet. Wrap the new piece of twine tightly around these gathered strands, just at the very bottom of the jar. Use generous amounts of hot glue to secure this rope ring, making sure all the individual net strands are firmly held in place and cinched around the base of the jar. This creates a neat, finished edge for your net.
Step 10: Trim and Finish the Ends. After securing the rope ring, you will have many excess strands of jute twine dangling below it. Use a sharp pair of scissors to carefully clip all these ends. You can trim them very short for a clean look, or leave a slight fringe for a more rustic aesthetic. Ensure all trimmed ends are securely held by the hot glue under the rope ring. Inspect your entire net for any loose knots or areas that need tightening. Add small dabs of hot glue where necessary to reinforce the net, especially if you plan to handle the jar frequently.
Step 11: Final Inspection and Optional Embellishments. Take a moment to admire your finished coastal fishnet mason jar! Check for any imperfections and make any final adjustments. Now is also the perfect time to add any optional embellishments you decided on, such as hot-gluing small seashells around the rim or base, or tying a decorative bow with a piece of burlap ribbon around the neck. If you plan to use it as a lantern, carefully place LED fairy lights or a battery-operated tea light inside.
This project has truly ignited a longing for the tranquil beach way of life within me, inspiring a strong desire to embrace summer with open arms and a refreshed home. I’m now brimming with ideas to create an entire beach-themed decor scheme for my patio, extending this coastal charm beyond just a single jar. Imagine stringing these fishnet jars as lanterns, filling them with sand and seashells, or using them as charming vases for wildflowers. This DIY approach not only decorates your home but also fills it with personal meaning and the joyous anticipation of sunny days and ocean breezes.
Creative Variations and Display Ideas for Your Coastal Fishnet Jar
Once you’ve mastered the basic fishnet mason jar, the possibilities for customization and display are endless. Here are some ideas to inspire your creativity and integrate your new coastal decor piece into your home:
Personalizing Your Fishnet Mason Jar
- Color Palette Experimentation: Don’t limit yourself to traditional blues and greens. Consider pastel pinks or corals for a sunset beach vibe, or even dark grays and blacks for a dramatic, stormy sea effect. You can also distress the paint for a weathered, vintage look.
- Adding Textural Elements: Instead of just jute twine, try incorporating other natural fibers like cotton cord for a softer look, or even thin strips of burlap interwoven into your net for added texture.
- Glow-Up with Lighting: Turn your jar into a magical lantern by placing a string of battery-operated fairy lights inside. These emit a warm, ethereal glow that is perfect for evenings on the patio or as a soft bedside lamp. LED tea lights also work beautifully and safely.
- Seaside Embellishments: Hot glue small seashells, pieces of sea glass, or even tiny dried starfish to the base, rim, or even directly onto the netting for an authentic beachcomber feel. A thin layer of sand at the bottom of the jar can also enhance the illusion.
- Personalized Tags: Attach a small kraft paper tag with a handwritten coastal quote, a special date, or a family name for a personalized touch.
Displaying Your Coastal Masterpiece
- Patio or Porch Lanterns: Hang several fishnet jars at varying heights from a pergola, porch ceiling, or tree branches using durable twine or hooks. They create a captivating ambiance for outdoor gatherings, especially when lit with fairy lights.
- Indoor Ambiance: Place them on shelves, mantels, or windowsills in your living room, bedroom, or bathroom. They instantly add a relaxed, beachy vibe. In the bathroom, they can hold cotton balls or small soaps.
- Centerpieces and Vases: Use a larger fishnet jar as a unique centerpiece for your dining table, perhaps filled with fresh coastal flowers, pebbles, or a collection of shells. Smaller jars can serve as charming individual vases.
- Storage Solutions: Beyond aesthetics, these jars can be functional. Use them in a craft room to hold brushes, pencils, or other supplies, bringing coastal charm to your workspace.
- Grouping for Impact: Arrange jars of different sizes or slightly varied designs in clusters to create a cohesive and impactful display. This adds visual interest and reinforces the theme.
The beauty of DIY coastal decor lies in its ability to transport you to a tranquil seaside escape, regardless of your geographical location. This fishnet mason jar project is more than just a craft; it’s an invitation to infuse your home with peace, charm, and the enduring allure of the ocean. Happy crafting, and may your home be filled with the spirit of endless summer!