
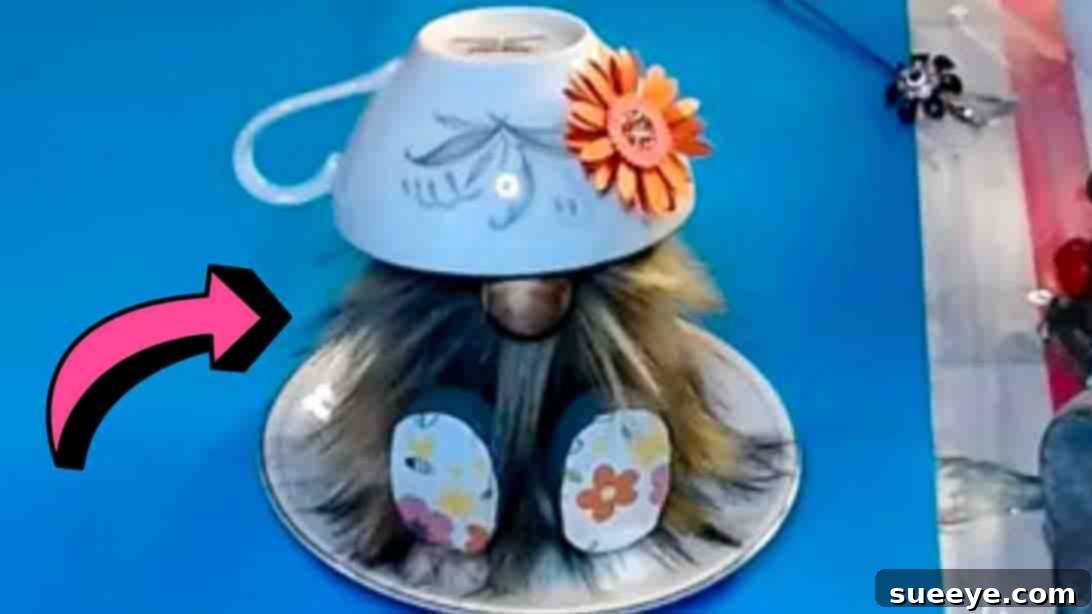
Craft Your Own Enchanting Teacup Gnome: The Ultimate DIY Guide
Are you searching for a delightful and engaging craft project to brighten your home this weekend? Look no further! This comprehensive guide will walk you through creating an absolutely charming DIY Teacup Gnome, inspired by the wonderful tutorial from Glitzy Stitches Home By Shawnie Lee on YouTube. We promise, this might just be the cutest and most satisfying gnome you’ll ever make!
What makes this project truly special is its accessibility and potential for personalization. Imagine transforming a forgotten teacup and saucer from a thrift store into a whimsical piece of home decor. This not only makes it a fantastic budget-friendly craft but also an excellent “thrift flip” project to enjoy with friends or family. Unlike some elaborate DIY gnomes that can seem daunting, this teacup variation is remarkably straightforward, making it perfect for crafters of all skill levels. Get ready to unleash your creativity and bring a touch of magic into your space with this unique homemade gnome.
Why Choose a DIY Teacup Gnome?
Gnomes have captured hearts worldwide, becoming a staple in seasonal and everyday home decor. Their whimsical charm and cozy appeal make them perfect additions to any space, especially during autumn and the festive holiday seasons. But why specifically a teacup gnome?
- Unique Aesthetic: Combining the elegance of a teacup with the rustic charm of a gnome creates a truly distinctive decorative item that stands out.
- Eco-Friendly Crafting: Repurposing thrifted teacups and saucers gives new life to old items, promoting sustainable crafting practices.
- Beginner-Friendly: The structure provided by the teacup simplifies the construction process, making it much easier than sculpting traditional gnome bodies.
- Personalization Potential: With countless teacup designs, fabric patterns, and embellishments available, each gnome can be uniquely yours.
- Perfect for Gifting: A handmade teacup gnome makes a thoughtful and personal gift for birthdays, holidays, or housewarmings.
This project is more than just a craft; it’s an opportunity to create something beautiful, practice mindfulness, and add a bespoke touch to your home decor. Let’s gather our materials and begin this exciting crafting journey!
Materials You’ll Need:
One of the best aspects of this DIY Teacup Gnome is that it utilizes simple, often inexpensive materials. Many items can be found around your home, at a local craft store, or even better, at a thrift store!
- Teacup and Saucer: This is the foundation of your gnome. Look for a sturdy teacup and a matching saucer. Thrift stores are treasure troves for unique, vintage, or elegant sets. Consider the color and pattern – will it complement your chosen fabric for the gnome’s body and beard? A wider, more stable saucer is generally easier to work with.
- A Piece of Fabric: This will form the gnome’s body and a small accent on its shoes. Felt, cotton, flannel, or even a soft fleece can work wonderfully. Think about seasonal patterns (plaids for fall, festive prints for winter) or solid colors that match your decor. You’ll need enough to wrap around your pool noodle piece, plus a small strip for the shoe accents.
- A Small Piece of Pool Noodle: This creates the core of the gnome’s body, giving it shape and structure. A standard pool noodle can be easily cut to size. Approximately 4-6 inches in length is usually sufficient, depending on your desired gnome height.
- Dollar Tree Toy Baby Shoes: These inexpensive toy shoes are perfect for creating the gnome’s feet. Their small size and simple shape make them ideal. You might find them in various colors, but remember you can always paint them to match your gnome’s aesthetic.
- A Piece of Faux Fur (Cut and Shaped as a Gnome Beard): The beard is a defining feature of any gnome. Select faux fur with a good texture and color that complements your fabric. When cutting, always cut from the back of the fur with only the tips of your scissors to avoid cutting the fur fibers themselves, which helps maintain a natural, flowing look. A triangular or rounded beard shape works best.
- Wooden Bead: This will serve as the gnome’s nose. Choose a bead that is proportionate to your gnome’s size – typically around 1 to 1.5 inches in diameter for a standard teacup gnome. You can also paint the bead if you desire a different skin tone.
- Hot Glue Gun and Glue Sticks: An essential tool for this project, hot glue provides quick and strong bonds, allowing you to assemble your gnome efficiently. Always use caution when working with hot glue.
- Scissors: Sharp craft scissors are needed for cutting fabric and the pool noodle.
- Elastics (Small Rubber Bands): These are used to cinch the top of the pool noodle body, helping to create a distinct head shape under the teacup hat.
- Faux Flowers (Optional): These are fantastic for adding a decorative touch to your gnome, often placed on the teacup “hat.” Consider small berries, miniature pinecones, ribbons, tiny buttons, or even small ornaments for seasonal themes.
Step-by-Step Directions to Create Your Teacup Gnome:
Now that you have all your materials ready, let’s dive into the fun part: assembling your adorable teacup gnome! Follow these detailed instructions for a smooth and enjoyable crafting experience.
Step 1: Constructing the Gnome’s Body and Facial Features
This initial phase focuses on forming the gnome’s core structure and attaching its most recognizable features: the nose and beard.
-
Prepare the Gnome’s Body:
Begin by cutting a piece from your pool noodle. The length will depend on how tall you want your gnome to be and the size of your teacup. A good starting point is about 4 to 6 inches. This length allows for enough body to attach features while leaving space for the teacup hat. Next, take your chosen fabric and wrap it snugly around the cut pool noodle piece. Ensure the fabric covers the entire length and circumference of the noodle. Secure the fabric in place using hot glue, running a bead of glue along the seam where the fabric overlaps and at the top and bottom edges. Trim any excess fabric to maintain a neat appearance.
Once the fabric is securely glued, gather the excess fabric at one end (this will be the top of the gnome’s body, under the teacup hat) and tie it tightly with an elastic band. This cinching creates a slight neck or head definition, making the gnome appear more structured and allowing the teacup to sit more naturally.
-
Attach the Body to the Saucer:
Now, place the fabric-wrapped pool noodle body onto the saucer. For a more dynamic and visually interesting look, position the body slightly offset towards the back of the saucer. This will allow the gnome’s beard and shoes to protrude forward, giving it character. Once you’re happy with the placement, apply a generous amount of hot glue to the bottom of the pool noodle and firmly press it onto the saucer. Hold it in place for a few moments to ensure a strong bond.
-
Add the Nose and Beard:
With the body firmly in place, it’s time to give your gnome its identity. First, attach the wooden bead (the nose). Position it approximately one-fourth of the way down from the top of the fabric-wrapped body. The exact placement can vary slightly based on your preference, but ensure it’s centered to where the face would be. Apply a dab of hot glue to the back of the bead and press it firmly onto the fabric. Hold until secure.
Immediately after, take your pre-cut faux fur beard. Apply hot glue to the top edge of the beard piece and carefully attach it just below the wooden bead nose. Ensure the fur flows downwards naturally, covering the lower part of the body and giving the gnome its classic, cozy appearance. Adjust the beard until it frames the nose perfectly and sits evenly.
Step 2: Adding the Teacup Hat, Shoes, and Final Embellishments
In this final stage, your gnome truly comes to life with its signature teacup hat, adorable shoes, and personalized decorations.
-
Attach the Teacup Hat:
Carefully place the teacup upside down on top of the gnome’s body, directly above the elastic you tied earlier. This will serve as the gnome’s hat. Experiment with the angle slightly – a straight placement is classic, while a slight tilt can add more personality. Once you’ve found the perfect position, apply a generous amount of hot glue to the rim of the teacup and firmly press it onto the fabric-wrapped top of the pool noodle body. Hold it steadily for a minute or two to ensure the glue sets and the teacup is securely attached. This is crucial for the gnome’s stability.
-
Add the Toy Baby Shoes:
Take your Dollar Tree toy baby shoes. If you wish to change their color to better match your gnome, now is the time to paint them. Allow the paint to dry completely. For added coherence and a polished look, cut small pieces of the same fabric you used for the gnome’s body and glue them to the bottom (sole) of the toy shoes. This simple detail helps to unify the gnome’s appearance. Next, apply hot glue to the back of each shoe and attach them to the front of the gnome’s body, just peeking out from underneath the beard. Position them as if the gnome’s feet are resting slightly forward on the saucer, giving it a playful stance.
-
Decorate Your Gnome:
Now for the fun, creative part! Personalize your teacup gnome with faux flowers or other embellishments. Small silk flowers, miniature berries, tiny leaves, or even a delicate ribbon tied around the teacup’s handle can add immense charm. You can glue these decorations onto the teacup hat, at the base of the hat where it meets the body, or even tucked into the beard. Consider the season: fall leaves and tiny pumpkins for autumn, small pinecones and holly for winter, or bright blossoms for spring. This step allows you to truly make the gnome your own.
And just like that, your adorable DIY Teacup Gnome is now complete! Step back and admire your handcrafted creation. It’s ready to bring warmth and whimsy to any shelf, mantel, or tabletop.
Tips for Personalization and Creative Variations
While the basic steps will guide you to a fantastic teacup gnome, don’t hesitate to infuse your own unique style. Here are some ideas to inspire further creativity:
- Seasonal Themes: Easily adapt your gnome for different seasons or holidays. Use orange and black fabrics for Halloween, red and green for Christmas, pastels for Easter, or nautical themes for summer.
- Teacup Styles: Experiment with different types of teacups. A delicate floral teacup can create a garden gnome, while a plain white one offers a minimalist aesthetic. Large mugs or even small bowls could also be used for a different scale.
- Beard Variations: Instead of faux fur, consider using yarn for a braided beard, or even strips of felt for a more whimsical look.
- Accessories: Add tiny accessories to your gnome’s hands or to the saucer base. Think miniature books, tiny knitting needles, a tiny paintbrush, a small coffee bean bag, or even a mini garden tool.
- Fabric Choices: Explore different textures for the gnome’s body fabric. Burlap gives a rustic feel, while velvet adds a touch of luxury.
- Hand-Painted Details: If you’re artistic, you could hand-paint small details onto the teacup itself before assembly, or add delicate patterns to the gnome’s body fabric.
- Scented Gnomes: For an extra sensory touch, place a small sachet of dried lavender or a few drops of essential oil on the inside of the pool noodle before sealing it.
Care and Display of Your Teacup Gnome
Once your charming teacup gnome is complete, you’ll want to display it proudly and ensure its longevity. Here are a few tips:
- Display Areas: Teacup gnomes look wonderful on bookshelves, mantelpieces, windowsills, end tables, or as a centerpiece on a coffee table. They also make excellent additions to tiered trays or vignettes.
- Indoor Use: These gnomes are primarily designed for indoor display. Exposure to harsh weather, direct sunlight for prolonged periods, or extreme temperatures can damage the materials and glue.
- Cleaning: To clean your gnome, gently dust it with a soft brush or a microfiber cloth. Avoid using harsh chemical cleaners or getting it wet, as this could damage the fabric, faux fur, or glue.
- Storage: If you’re packing your gnome away for off-season storage, place it gently in a box with some soft packing material to protect its delicate features, especially the teacup and embellishments.
Embrace the Joy of Handmade Decor!
Crafting your own DIY Teacup Gnome is more than just following instructions; it’s about bringing joy and personality into your home through handmade decor. The simplicity of this project, combined with the opportunity for creative expression, makes it a rewarding experience for anyone. Whether you’re making it for yourself, as a heartfelt gift, or as a fun activity with loved ones, this little gnome is sure to bring smiles and a cozy, whimsical vibe to any space.
A huge thank you again to Glitzy Stitches Home By Shawnie Lee for sharing this delightful DIY project. We encourage you to watch her original video tutorial for visual guidance and further inspiration!
Happy crafting, and enjoy your beautiful new Teacup Gnome!