
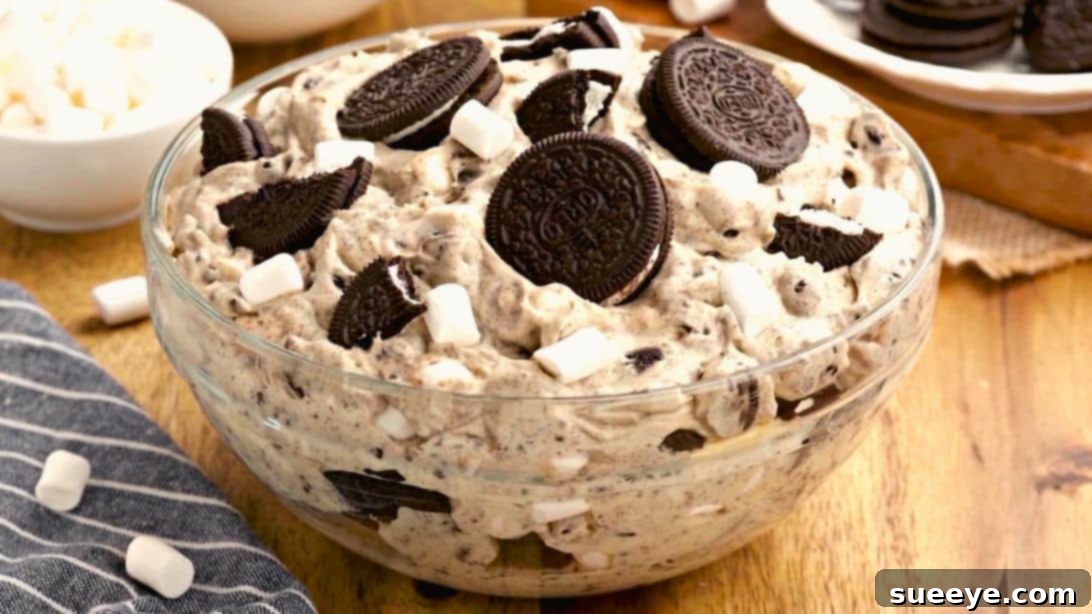
Have you ever found yourself with an insatiable craving for something sweet, creamy, and utterly delightful, but without the time or desire for extensive baking? Perhaps a luscious cheesecake comes to mind, but the thought of preheating ovens, managing water baths, and enduring lengthy cooling times just doesn’t fit your busy schedule. This was precisely my dilemma a few days ago, as I scoured the internet for that perfect dessert fix. That’s when I stumbled upon an absolute gem: an incredibly simple yet profoundly satisfying Oreo Fluff recipe by The Slow Roasted Italian on YouTube. This revelation instantly changed my dessert game!
This remarkable dessert is a no-bake wonder, prepared entirely in a single bowl, using just a handful of readily available ingredients. You’ll likely find many of them already stocked in your pantry! The result? A divinely delicious, fluffy, and incredibly indulgent treat that instantly became a family favorite in my household. If you’re looking for an effortless way to satisfy your sweet tooth with a dessert that tastes like it took hours of meticulous work, you’ve undoubtedly found your new go-to recipe. Get ready to impress yourself and everyone else with minimal effort and maximum flavor.
Irresistible No-Bake Oreo Fluff: Your Easy One-Bowl Dessert Solution
The allure of a no-bake dessert is truly undeniable. It promises deliciousness without the fuss of complex techniques, specialized equipment, or lengthy oven times, making it an ideal choice for busy weekdays, spontaneous gatherings, or simply when you need a quick, sweet escape. Our One-Bowl Loaded Oreo Fluff delivers on every front, combining the creamy richness of cheesecake with the iconic crunch and chocolatey goodness of Oreo cookies, all enveloped in a light, airy texture that melts in your mouth. This recipe isn’t just about ease; it’s a celebration of simple pleasures, transforming humble ingredients into a show-stopping dessert that will capture hearts and satisfy every sweet craving.
What makes this particular Oreo Fluff truly special is its incredible simplicity and efficiency. Forget the typical scenario of multiple mixing bowls, endless utensils, and a sink full of dishes; everything comes together beautifully in just one primary mixing bowl, significantly streamlining your preparation and cleanup process. This makes it perfect for culinary beginners, seasoned home bakers looking for a much-deserved break, or anyone who appreciates a dessert that delivers maximum flavor with minimal effort. Whether you’re planning a casual family meal, need a fantastic potluck contribution, hosting a backyard BBQ, or simply want to treat yourself to something extraordinary, this Oreo Fluff is your ultimate answer. Let’s delve into the magic that brings together these delightful components to create a universally loved dessert.
Gather Your Simple Ingredients for Oreo Fluff Perfection
One of the most appealing aspects of this no-bake Oreo Fluff is its reliance on readily accessible ingredients. You won’t need to embark on a scavenger hunt for obscure items; everything you need can be conveniently found at your local grocery store, and chances are, some of these key components are already staples in your kitchen. Opting for quality ingredients, even in simple recipes, can make a significant difference in the final taste, texture, and overall enjoyment of your dessert. Here’s a detailed list of what you’ll need to create this dreamy, indulgent treat:
- 8 ounces (226g) of Cream Cheese, softened: This forms the creamy, tangy foundation of our fluff. Ensuring your cream cheese is softened to room temperature is absolutely crucial for achieving a smooth, lump-free mixture. It allows it to blend seamlessly and effortlessly with the other ingredients, creating that desirable velvety texture that defines a perfect fluff.
- 1 tablespoon of Vanilla Extract: A timeless flavor enhancer that imparts warmth, depth, and a subtle sweetness to the dessert. It beautifully complements the sweetness of the Oreos and pudding, elevating the entire flavor profile. Never skip this essential ingredient!
- 3.4-ounce (96g) package of Instant Cheesecake Pudding Mix: This is our secret weapon for achieving that distinct cheesecake tang and a wonderfully stable, thick consistency without any baking whatsoever. It’s vital to use *instant* pudding mix, not the cook-and-serve variety, as we will be using the dry mix directly, not prepared pudding.
- 3 cups of Heavy Whipping Cream, divided: This rich cream provides the luxurious, airy base of the fluff. Divided into two distinct portions, it helps create both the creamy cheesecake mixture and the light, voluminous whipped topping that gives the dessert its characteristic “fluff” and irresistible lightness.
- 1/4 cup of Powdered Sugar (Confectioners’ Sugar): When added to the whipping cream, powdered sugar lends a subtle, delicate sweetness and, importantly, helps to stabilize the whipped cream, preventing it from deflating too quickly. It also contributes to the incredibly smooth and pleasant mouthfeel of the finished dessert.
- 2 cups of Miniature Marshmallows: These delightful little pockets of sweetness add a wonderful chewy texture contrast and an extra layer of soft indulgence to the fluff. They interact beautifully with the creamy base, creating a lovely, slightly gooey element throughout.
- 14.3-ounce (405g) package of Oreo Cookies: The undeniable star of the show! Both crushed and a few whole cookies are utilized, providing essential texture, an iconic chocolatey flavor, and significant visual appeal. While classic Oreos are fantastic, feel free to experiment with your favorite flavor variations for a unique and personalized twist.
Expert Tips for Ingredient Success:
- Softened Cream Cheese is Key: For the best results, take your cream cheese out of the refrigerator at least 30-60 minutes before you plan to begin the recipe. If you’re short on time, you can microwave it on low power for 10-15 seconds, but exercise caution not to melt it, as this can affect the final texture.
- Confirm Instant Pudding: Always double-check that you’re purchasing *instant* pudding mix. The cook-and-serve variety will not achieve the desired thickness and setting properties in this specific no-bake recipe.
- Cold Heavy Whipping Cream: To ensure optimal whipping, your heavy cream should be very cold. For an extra boost, you can even chill your mixing bowl and whisk attachment in the freezer for 10-15 minutes beforehand; this helps the cream whip up faster and hold its stiff peaks longer.
- Oreo Flavor Explorations: Don’t be afraid to get creative! Golden Oreos could offer a delightful vanilla-centric fluff, Mint Oreos for a refreshing twist, or even Peanut Butter Oreos for an added nutty depth. The possibilities are endless!
Crafting Your No-Bake Oreo Fluff: Step-by-Step Excellence
Preparing this incredible Oreo Fluff is designed to be as enjoyable and stress-free as indulging in it. With the majority of the action taking place in a single bowl, the entire process is wonderfully streamlined, allowing you to focus on creating a truly spectacular dessert rather than managing a messy kitchen. Follow these detailed steps carefully to achieve perfect, airy, and utterly delicious fluffy results every single time.
Step 1: Building the Creamy Cheesecake Base
This initial step lays the robust foundation for our delectable fluff – a rich, tangy, and incredibly smooth cheesecake-flavored base. This combination provides the essential body and core flavor of the dessert, setting the stage for the textural additions to come.
Begin by taking a generously sized mixing bowl. Into this bowl, add the softened cream cheese and the aromatic vanilla extract. Using an electric mixer (either a hand mixer or a stand mixer fitted with a whisk or paddle attachment), beat these two ingredients together thoroughly. Continue mixing until the cream cheese is completely smooth, visibly lightened, and delightfully fluffy, ensuring there are no visible lumps. This initial aeration and thorough blending are absolutely vital for achieving a silky, lump-free texture in your final fluff.
Next, with the mixer still running on low, carefully add the entire package of instant cheesecake pudding mix directly into the cream cheese mixture. Continue beating them together. At this particular stage, the mixture will begin to thicken considerably and may initially appear somewhat chunky – rest assured, this is perfectly normal and a clear indication that the pudding mix is beginning to activate and do its job. There’s no need to worry about it being perfectly smooth just yet; the subsequent additions will address and refine this consistency.
Now, it’s time to incorporate the first portion of heavy whipping cream. Slowly drizzle in 1½ cups of the heavy whipping cream, adding it just about one tablespoon at a time. While you are steadily adding the cream, ensure your mixer is consistently running on a low speed. This gradual addition, coupled with continuous mixing, is the key to achieving a truly silky-smooth consistency. It systematically helps to gradually thin out the cream cheese and pudding mixture without causing it to curdle or develop unwanted lumps. Continue beating until all of this portion of cream is thoroughly combined, and the mixture becomes smooth, uniform, and beautifully cohesive.
Finally, gently sprinkle in the powdered sugar. Continue beating for another minute or two until the sugar is completely dissolved, fully combined, and thoroughly incorporated into the mixture. This final beating step not only adds a touch more sweetness but also helps to thicken and stabilize the base even further, ensuring a perfectly stable and creamy texture. Once complete, set this bowl aside for a moment to prepare your next component.
Step 2: Whipping the Cream and Expertly Assembling the Fluff
The second stage is where the magical “fluff” factor truly comes to life, adding incredible lightness, luxurious volume, and finally incorporating the delightful Oreo cookies and miniature marshmallows that define this dessert.
In a separate, clean mixing bowl (or the same one if you’ve quickly washed it, although using two bowls is often more convenient for this step), add the remaining 1½ cups of very cold heavy cream. Using your electric mixer on high speed, beat the heavy cream vigorously until stiff peaks form. Stiff peaks are achieved when you lift the whisk, and the cream holds its shape firmly and stands upright without collapsing. Be vigilant during this process, as overbeating can quickly turn the cream into butter, which we want to avoid for our light fluff.
Now, with a delicate touch, gently fold the freshly whipped cream into the cheesecake mixture you prepared earlier. The technique here is paramount: use a large spatula and a deliberate circular motion, cutting down through the middle of the bowl and scooping up from the bottom, then gently turning the mixture over onto itself. This folding technique is absolutely crucial for maintaining the airiness and volume of the whipped cream, ensuring your fluff remains wonderfully light and airy rather than becoming dense and heavy. Continue folding gently until the whipped cream is fully incorporated, and the entire mixture is uniform in both texture and pale, creamy color, transforming into a truly ethereal cloud of deliciousness.
Next, it’s time to prepare the undisputed star ingredient: the Oreo cookies! Begin by reserving a few whole Oreo cookies; these will be used for elegantly garnishing the finished dessert later, adding a beautiful visual flourish. Take the remaining Oreo cookies and place them into a sturdy Ziploc bag. Using a rolling pin or the flat side of a meat mallet, crush the cookies into varying sizes – some finer crumbs and some larger, satisfying chunks are ideal for providing a delightful and varied textural contrast throughout the fluff. Aim for distinct pieces of Oreo goodness rather than a fine powder.
Add the miniature marshmallows and the freshly crushed Oreos to the magnificent cheesecake and whipped cream mixture. With your spatula, gently stir them together until they are evenly distributed throughout the fluff. Remember to be gentle during this step to preserve the airy texture of the mixture. Once everything is beautifully combined and integrated, carefully transfer the magnificent Oreo Fluff to your chosen serving bowl, or portion it into individual dessert cups for a more refined presentation.
To complete your masterpiece, artfully garnish the top of the fluff with the reserved whole Oreos. You can arrange them elegantly, sprinkle a few more crushed pieces on top, or even add a dash of extra mini marshmallows for enhanced visual appeal and texture. Serve immediately to savor its fresh, creamy texture, or, for an even richer experience, chill it in the refrigerator for at least an hour to allow the flavors to meld and the mixture to set even further. Either way, prepare for a chorus of compliments and satisfied smiles!
Serving and Storage Tips for Your Oreo Fluff
Once your incredible No-Bake Oreo Fluff is assembled, you’ll undoubtedly be eager to dig in! While it’s absolutely delicious immediately after preparation, allowing it to chill in the refrigerator for at least 1-2 hours can significantly enhance its texture and deepen its flavor profile. Chilling helps the pudding mixture to fully set, making the fluff firmer, more cohesive, and even more refreshingly cool. Furthermore, the flavors have a crucial chance to meld beautifully, creating a more harmonious and well-rounded taste. Always cover your serving bowl tightly with plastic wrap to prevent it from absorbing any unwanted refrigerator odors and to keep it fresh.
When it comes to serving, this Oreo Fluff is remarkably versatile and can adapt to various occasions. It makes a fantastic and eye-catching centerpiece in a large, clear trifle bowl, beautifully showcasing its inviting layers of creamy fluff, dark Oreo pieces, and soft marshmallows. Alternatively, for a more elegant presentation or for portion-controlled treats, you can spoon it into individual parfait glasses, small ramekins, or decorative dessert cups, perfect for a dinner party or a casual get-together. For an extra touch of decadence, garnish each serving with an additional sprinkle of crushed Oreos, a dollop of fresh whipped cream, a drizzle of chocolate sauce, or even a few fresh berries. A fresh mint leaf can also add a delightful pop of color and freshness.
Leftovers (should you be so lucky to have any!) can be stored in an airtight container in the refrigerator for up to 3-4 days. While the texture might soften slightly over time, especially the Oreo pieces, the dessert remains absolutely delicious and enjoyable. We generally do not recommend freezing this fluff, as the delicate texture of the cream cheese and whipped cream can change adversely upon freezing and thawing, and the marshmallows might become a bit rubbery. It’s truly best enjoyed fresh and well-chilled for optimal taste and texture.
Get Creative: Customizing Your Oreo Fluff
While the classic No-Bake Oreo Fluff recipe is a triumph of flavor and simplicity on its own, its straightforward base makes it incredibly adaptable to your personal preferences, dietary considerations, and creative whims. Don’t hesitate to experiment with these exciting ideas to make this dessert uniquely yours, reflecting your taste and imagination:
- Different Oreo Flavors: The world of Oreos is vast and exciting! Go beyond the classic; try using Golden Oreos for a delightful vanilla-centric fluff, Mint Oreos for a refreshing and cool twist, Peanut Butter Oreos for a rich, nutty depth, or even seasonal varieties like Birthday Cake Oreos for an extra dash of sprinkles and fun.
- Pudding Mix Varieties: While the cheesecake pudding is undeniably fantastic, feel free to swap it for other flavors to alter the core profile. Vanilla, white chocolate, or even chocolate pudding mix can offer exciting new dimensions. Imagine a banana cream pudding mix to create a unique “banana split” fluff, especially when combined with a few slices of fresh banana.
- Creative Add-ins: Boost the texture, flavor, and visual appeal with additional ingredients. Consider incorporating mini chocolate chips (milk, dark, or white), chopped nuts (pecans, walnuts, or almonds add a lovely crunch), or even a vibrant swirl of caramel or hot fudge sauce throughout the layers. Fresh berries like sliced strawberries, raspberries, or blueberries can introduce a wonderful tart counterpoint, balancing the sweetness.
- Flavor Extracts: Beyond vanilla, a touch of almond extract can add a sophisticated nutty note, peppermint extract (especially with mint Oreos) can provide a festive zing, or even a hint of orange zest can brighten the entire flavor profile.
- Alternative Serving Styles: Instead of a large communal bowl, layer the fluff with extra crushed Oreos in elegant individual parfait glasses for a more refined presentation. For a “cheesecake” experience, you could also press a layer of crushed Oreos mixed with melted butter into the bottom of a springform pan to create a no-bake crust effect before adding the fluff.
Why This No-Bake Oreo Fluff Is Your Next Favorite Dessert
In a culinary world often dominated by complex recipes and demanding techniques, this No-Bake Oreo Fluff shines brightly as a beacon of delicious simplicity. It masterfully balances the creamy richness of cheesecake, the comforting sweetness of miniature marshmallows, and the iconic, satisfying crunch of America’s favorite cookie. This isn’t just a dessert; it’s an experience—an effortless journey to sweet satisfaction that requires no oven, minimal cleanup, and consistently delivers maximum enjoyment and delight.
Whether you’re a seasoned home cook looking for a stress-free option or just beginning your exciting culinary adventures, this recipe offers a foolproof path to creating something truly special and memorable. It’s perfectly suited for satisfying those sudden, intense sweet cravings, an absolutely fantastic option for last-minute gatherings, impromptu potlucks, or simply a delightful treat to share with loved ones on any given day. The remarkable ease of preparation makes it accessible to everyone, and its incredible, universally appealing flavor ensures it will be requested again and again, cementing its place as a permanent fixture in your recipe repertoire.
So, the next time you find yourself yearning for a spectacular dessert without any of the usual fuss or extensive labor, remember this incredible No-Bake Oreo Fluff. Gather your simple ingredients, follow these straightforward and detailed steps, and prepare to indulge in a heavenly, creamy, and wonderfully textured dessert that will undoubtedly earn a permanent spot in your recipe collection. Give it a try – your taste buds, your family, and your guests will wholeheartedly thank you!
*These amazing images are all credited to The Slow Roasted Italian via YouTube. Be sure to check out their other fantastic content and follow for more delicious and easy-to-make recipes!